Page 7 of 505
6
Instruments and
controls
Courtesy lamps 140Interior mood lighting 153- courtesy lamp
- panoramic roof
Rear view mirror 143Reversing camera on interior mirror 254ERA-GLONASS emergency call system 158, 328 -329
12 V accessory socket 113USB port 113Deactivating the passenger front airbag 170, 176
5/6 -speed manual gearbox 203Gear efficiency indicator 204Automatic gearbox 205-209Electronic gearbox 210 -213Stop & Start 214-217Hill start assist control 202
Manual air conditioning 125-126Dual-zone air conditioning 127-130Rear heating, air conditioning 136Air recirculation 125, 130Front demist - defrost 131Rear screen demist - def rost 13 3
Parking brake 201
Opening the bonnet 271
Dashboard fuses 311-314
Touch screen (Toyota Pro Touch withnavigation system) 41- 43, 331- 418Touch screen (Toyota ProTouch) 41- 43, 419 - 472
Toyota Radio Bluetooth 44, 473 - 495Air vents 134
Setting the date and time 44
Over view
Page 9 of 505

8
Interior fittings 110-114
- cup or can holder
- mats
- sun visors
- glove box
- storage box
- upper storage box
Child seats 173 -175, 179 -182, 189ISOFIX mountings 183 -189Rear side windows 118, 291Side blinds 118
Fixed one-piece bench seat 95 -97Rear seat and bench seat 98 -100Rear seat and bench seat on rails 101-104Captain seat(s) on rails 105 -108Seat labels 10, 102, 103, 109
2-seat front bench seat 93 -94Heated bench seat 94Fold-up tablev 112
Rear heating - air conditioning 136Skyview® 120
Temporary puncture repair kit 282-284, 285 -290Spare wheel, jack, changing a wheel, tools 282-284, 291-297
Seating area fittings 115 -118- luggage retaining net- high load retaining net- load space cover- rear windows- side blindsAccessories 267-268
Rear courtesy lamp 140Changing courtesy lamp bulbs 307, 310
Rear view mirror 143Conversation mirror 143Front courtesy lamp 140Changing courtesy lamp bulbs 307, 310Front, side, curtain airbags 168 -172Passenger front airbag deactivation 170, 17612 V accessory sockets 113USB port 113
Front seats, adjustments, head restraint 87-92- manual adjustments- electric adjustments- head restraints- heated seatsSeat belts 164-166
Fixed one-piece bench seat 95 -97Rear seat and bench seat 98 -100Rear seat and bench seat on rails 101-104Captain seat(s) on rails 105 -108Seat labels 10, 102, 103, 109Sliding and folding table 121-124
Interior
- accessory socket, USB port- 230 V sockets
230 V socket 114
Tool box 282-283
Over view
Page 114 of 505

(depending on version)
USB port
F To connect a 12 V accessory (maximum power: 120 Watts), lift the cover and connect a suitable adaptor.
It allows the connection of a port")
113
12 V accessory socket(s)
(depending on version)
USB port
F To connect a 12 V accessory (maximum power: 120 Watts), lift the cover and connect a suitable adaptor.
It allows the connection of a portable device, such as a digital audio player of the iPod® type or a USB memory stick.It reads the audio files which are transmitted to your audio system and played via the vehicle's speakers.You can manage these files using the steering mounted controls or the audio system.
When a USB port is used, the portable device charges automatically.While charging, a message is displayed if the current consumption of the portable device exceeds the power rating of the port.For more information on using this equipment, refer to the Audio and telematics section.
Obser ve the maximum power rating to avoid damaging your accessory.
The connection of an electrical device not approved by Toyota, such as a USB charger, may adversely affect the operation of vehicle electrical systems, causing faults such as poor telephone reception or inter ference with displays in the screens.
3
Ease of use and comfort
Page 340 of 505
339
"Radio Media" voice commands
These commands can be issued from any screen page after pressing the voice command or telephone button on the steering wheel, as long as there is no telephone call in progress.
"Voice command"Help message
Tune to channel <...>You can pick a radio station by saying "tune to" and the station name or frequency. For example "tune to channel Talksport" or "tune to 98.5 FM". To listen to a preset radio station, say "tune to preset number". For example "tune to preset number five".
What's playingTo display the details of the current "track", "artist" and "album", you can say " What's playing"
Play song <...>
Use the command "play" to select the type of music you'd like to hear. You can pick by "song", "artist", or "album". Just say something like "play artist, Madonna", "play song, Hey Jude", or "play album, Thriller".Play ar tist <...>
Play album <...>
Media voice commands are available only for a USB connection.
.
Audio and Telematics
Page 384 of 505
383
17
20
18
21
19
1
1
16
Level 1Level 2Comments
Radio Media
Secondary page
Music files
Albums
Choose a selection mode.
Artists
Genres
Playlists
Folders
Radio Media
Secondary page
Managing photos
USB
Display photos.The system supports the following image formats: .gif, .jpg, .jpeg, .bmp, .png, .raw and .tiff with a maximum file size of 10 Mb per image.
.
Audio and Telematics
Page 389 of 505
, an operation which can take from a f")
388
Media
USB playerSelecting the source
Select "Source".
Press Radio Media to display the primary page.
The system builds playlists (in temporary memory), an operation which can take from a few seconds to several minutes at the first connection.
Insert the USB memory stick into the USB port or connect the USB device to the USB port using a suitable cable (not supplied).
Choose the source.
Bluetooth® audio streaming
Streaming allows you to listen to music from your telephone.
The Bluetooth profile must be activated. First adjust the volume on your portable device (to a high level).Then adjust the volume of your audio system.
If play does not start automatically, it may be necessary to start the audio playback from the telephone.Control is from the portable device or by using the audio system buttons.
Once connected in streaming mode, the telephone is considered to be a media source.
Reduce the number of non-music files and the number of folders to reduce the waiting time.The playlists are updated every time the ignition is switched off or connection of a USB memory stick. The lists are memorised: if they
are not modified, the subsequent loading time will be shorter.
Audio and Telematics
Page 390 of 505
.Play starts automatically.
Control is via the audio system.
The classifications availabl")
389
Connecting Apple® players
Connect the Apple® player to the USB port using a suitable cable (not supplied).Play starts automatically.
Control is via the audio system.
The classifications available are those of the portable device connected (artists / albums / genres / playlists / audiobooks / podcasts).The default classification used is by artist. To modify the classification used, return to the first level of the menu then select the desired classification (playlists for example) and confirm to go down through the menu to the desired track.
The version of software in the audio system may not be compatible with the generation of your Apple® player.
The audio equipment will only play audio files with ".wma, .aac, .flac, .ogg and .mp3" file extensions and with a bit rate of between 32 Kbps and 320 Kbps.It also supports VBR (Variable Bit Rate) mode.
No other type of file (.mp4, ...) can be played.".wma" files must be of the standard wma 9 type.The sampling rates supported are 32, 44 and 48 KHz.
It is advisable to restrict file names to 20 characters, without using of special characters (e.g.: " " ? ; ù) to avoid any playing and displaying problems.
Information and advice
Use only USB memory sticks formatted FAT 32 (file allocation table).
The system supports USB mass storage devices, BlackBerry® devices or Apple® players via USB ports. The adaptor cable is not supplied.Control of the peripheral device is with the audio system controls.Other peripherals, not recognised on connection, must be connected to the Bluetooth streaming, depending on compatibility.
It is recommended that the USB cable for the portable device is used.
.
Audio and Telematics
Page 410 of 505
409
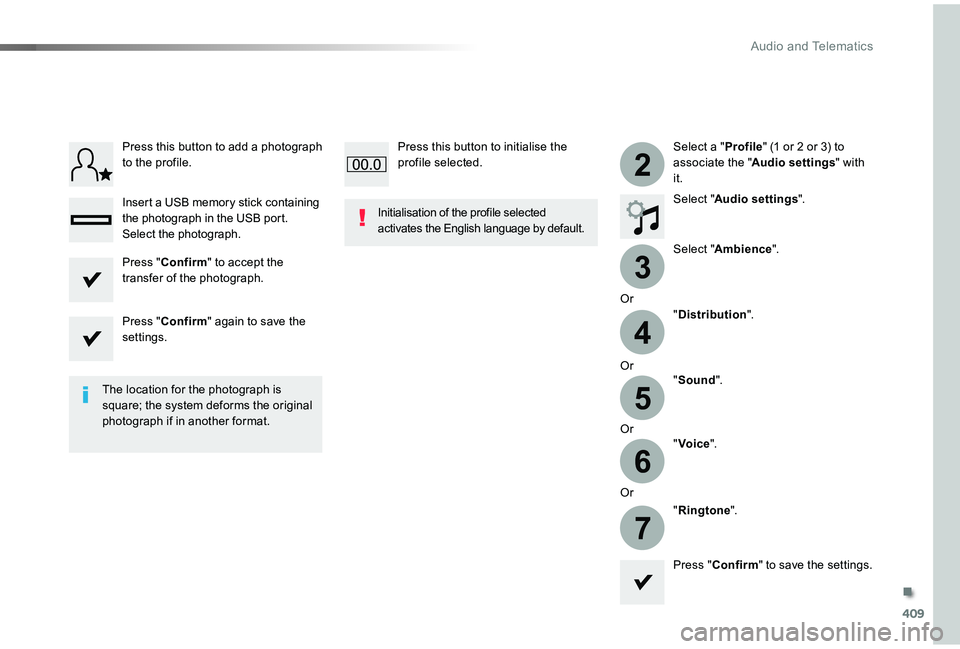
3
2
4
5
6
7
Select a "Profile" (1 or 2 or 3) to associate the "Audio settings" with it.
Select "Audio settings".
Select "Ambience".
Or
"Distribution".
Or"Sound".
Or"Voice".
Or
"Ringtone".
The location for the photograph is square; the system deforms the original photograph if in another format.
Initialisation of the profile selected activates the English language by default.
Press "Confirm" to save the settings.
Press "Confirm" to accept the transfer of the photograph.
Press "Confirm" again to save the settings.
Press this button to add a photograph to the profile.
Insert a USB memory stick containing the photograph in the USB port.Select the photograph.
Press this button to initialise the profile selected.
.
Audio and Telematics