2019 TOYOTA PROACE CITY VERSO USB port
[x] Cancel search: USB portPage 5 of 272
5
Overview
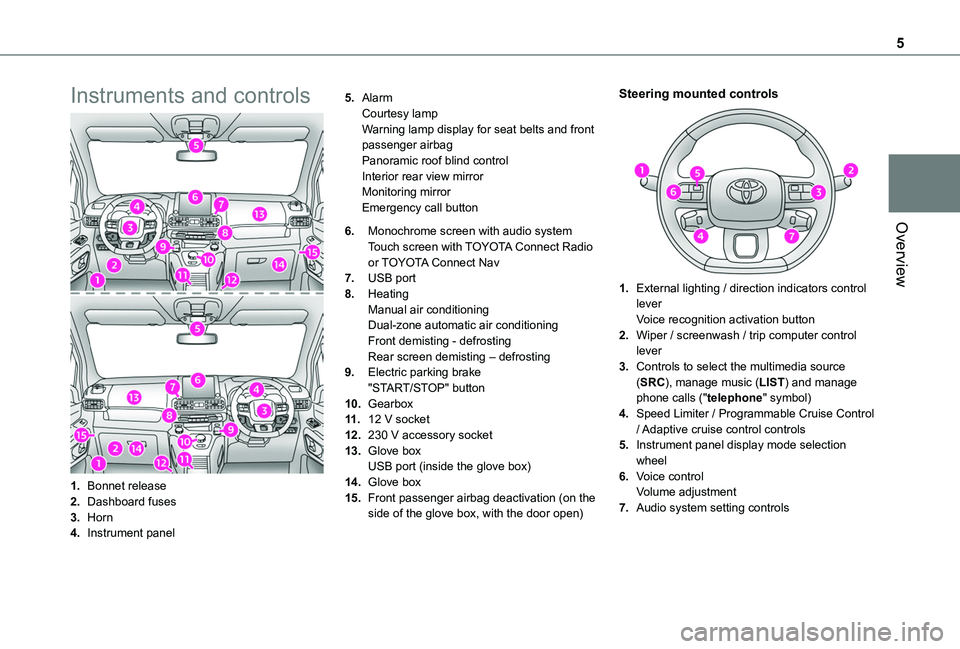
Instruments and controls
1.Bonnet release
2.Dashboard fuses
3.Horn
4.Instrument panel
5.AlarmCourtesy lampWarning lamp display for seat belts and front passenger airbagPanoramic roof blind controlInterior rear view mirrorMonitoring mirrorEmergency call button
6.Monochrome screen with audio system
Touch screen with TOYOTA Connect Radio or TOYOTA Connect Nav
7.USB port
8.HeatingManual air conditioningDual-zone automatic air conditioningFront demisting - defrostingRear screen demisting – defrosting
9.Electric parking brake"START/STOP" button
10.Gearbox
11 .12 V socket
12.230 V accessory socket
13.Glove boxUSB port (inside the glove box)
14.Glove box
15.Front passenger airbag deactivation (on the side of the glove box, with the door open)
Steering mounted controls
1.External lighting / direction indicators control leverVoice recognition activation button
2.Wiper / screenwash / trip computer control lever
3.Controls to select the multimedia source (SRC), manage music (LIST) and manage phone calls ("telephone" symbol)
4.Speed Limiter / Programmable Cruise Control / Adaptive cruise control controls
5.Instrument panel display mode selection wheel
6.Voice controlVolume adjustment
7.Audio system setting controls
Page 48 of 272
48
► To open it from the vehicle’s boot, place your thumb on the boot recess then pull the handle.
WARNI NG
Open the rear storage compartment with care, to prevent any objects stored inside from falling out.
Light ambience
The light ambience can be configured from the vehicle’s configuration menu.
Blind
Opening/Closing
► Press and hold the button; the blind opens/closes, stopping when the button is released.
WARNI NG
If the blind becomes trapped while moving, reverse its movement. To do this, press the relevant switch.When pressing the button to open/close the blind, the driver must ensure that nothing and no one might interfere with its movement.The driver must ensure that passengers use the blind correctly.Pay particular attention to children when operating the blind.
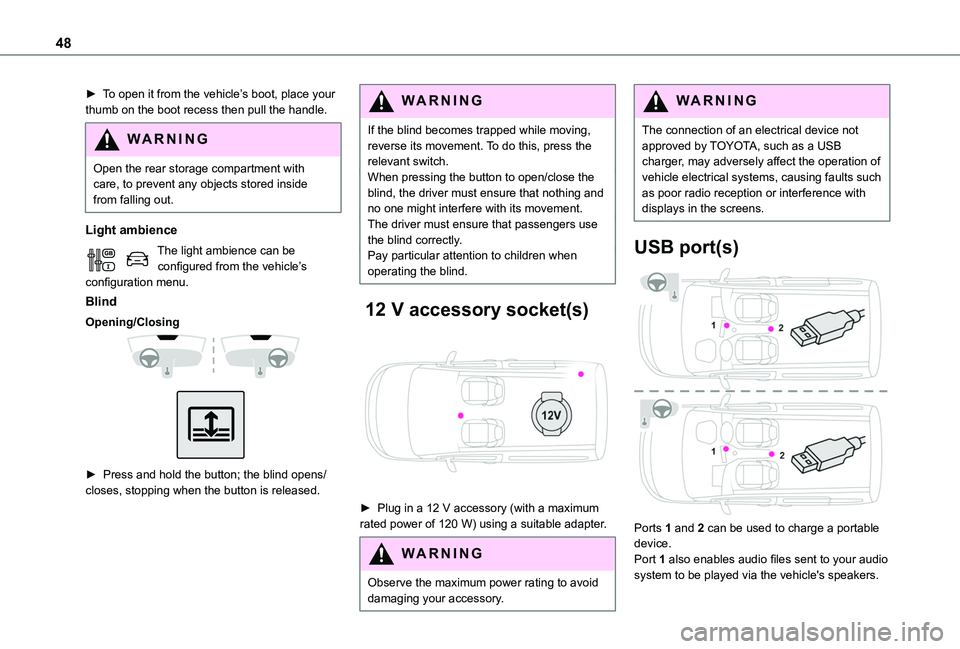
12 V accessory socket(s)
► Plug in a 12 V accessory (with a maximum rated power of 120 W) using a suitable adapter.
WARNI NG
Observe the maximum power rating to avoid damaging your accessory.
WARNI NG
The connection of an electrical device not approved by TOYOTA, such as a USB charger, may adversely affect the operation of vehicle electrical systems, causing faults such as poor radio reception or interference with displays in the screens.
USB port(s)
Ports 1 and 2 can be used to charge a portable device.
Port 1 also enables audio files sent to your audio system to be played via the vehicle's speakers.
Page 49 of 272
49
Ease of use and comfort
3
NOTIC E
When the USB port is used, the portable device charges automatically.A message is displayed if the power drawn by the portable device exceeds the current supplied by the vehicle.For more information on how to use this equipment, refer to the Audio equipment and telematics section .
Port 1 also allows a smartphone to be connected by MirrorLinkTM, Android Auto® or CarPlay®, enabling certain smartphone applications to be used on the touch screen.For best results, use a cable made or approved by the device manufacturer.These applications can be managed using the steering mounted controls or the audio system controls.
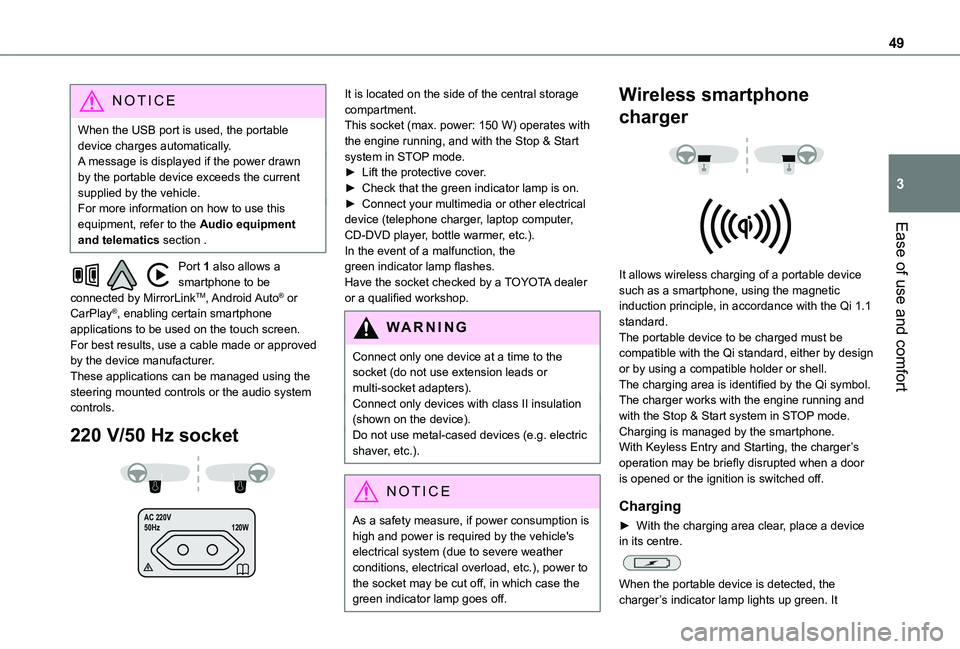
220 V/50 Hz socket
AC 220 V
50Hz 120W
It is located on the side of the central storage compartment.This socket (max. power: 150 W) operates with the engine running, and with the Stop & Start system in STOP mode.► Lift the protective cover.► Check that the green indicator lamp is on.► Connect your multimedia or other electrical device (telephone charger, laptop computer, CD-DVD player, bottle warmer, etc.).In the event of a malfunction, the green indicator lamp flashes.Have the socket checked by a TOYOTA dealer or a qualified workshop.
WARNI NG
Connect only one device at a time to the socket (do not use extension leads or multi-socket adapters).Connect only devices with class II insulation (shown on the device).Do not use metal-cased devices (e.g. electric shaver, etc.).
NOTIC E
As a safety measure, if power consumption is high and power is required by the vehicle's
electrical system (due to severe weather conditions, electrical overload, etc.), power to the socket may be cut off, in which case the green indicator lamp goes off.
Wireless smartphone
charger
It allows wireless charging of a portable device such as a smartphone, using the magnetic induction principle, in accordance with the Qi 1.1 standard.The portable device to be charged must be compatible with the Qi standard, either by design or by using a compatible holder or shell.The charging area is identified by the Qi symbol.The charger works with the engine running and with the Stop & Start system in STOP mode.Charging is managed by the smartphone.With Keyless Entry and Starting, the charger’s operation may be briefly disrupted when a door is opened or the ignition is switched off.
Charging
► With the charging area clear, place a device in its centre.
When the portable device is detected, the charger’s indicator lamp lights up green. It
Page 177 of 272
177
In the event of a breakdown
8
Fuse No.Rating (A)Functions
F110Wireless smartphone charger, interior electrochrome rear view mirror.
F415Horn.
F620Screenwash pump.
F71012 V socket (rear).
F1030Electric locks module.
F1310Telematics and radio controls.
F145Alarm, advanced telematic unit.
F193Trailer interface unit.
F235Generic trailer interface unit.
F275Additional heating.
F2920Audio system, touch screen.
Fuse No.Rating (A)Functions
F3115Audio system (as an accessory).
F321512 V socket (front).
F345Mirror control.
F365USB port.
Engine compartment fuses
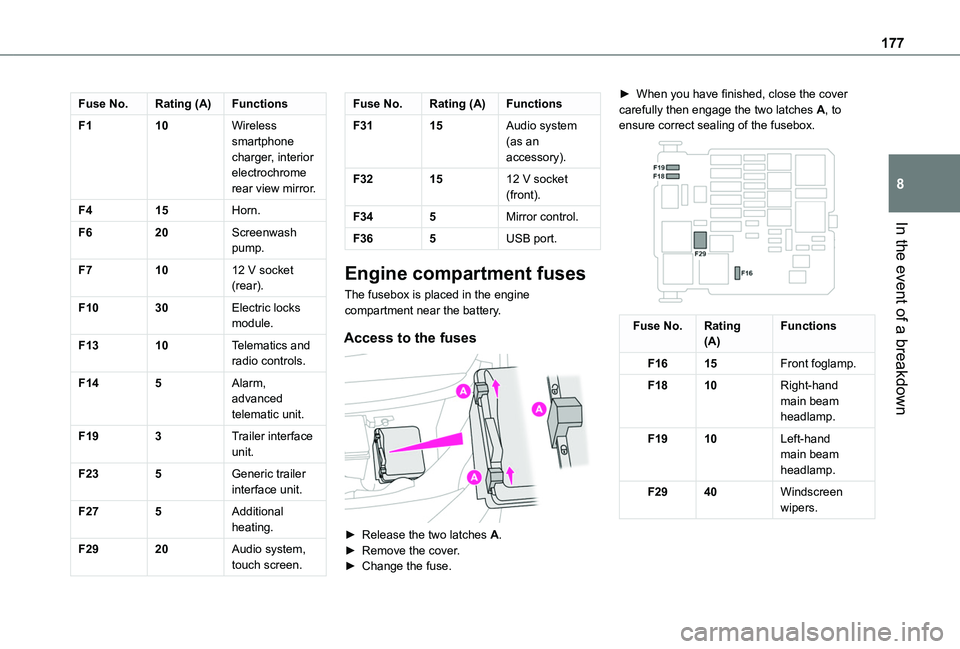
The fusebox is placed in the engine compartment near the battery.
Access to the fuses
► Release the two latches A.► Remove the cover.► Change the fuse.
► When you have finished, close the cover carefully then engage the two latches A, to ensure correct sealing of the fusebox.
Fuse No.Rating(A)Functions
F1615Front foglamp.
F1810Right-hand main beam headlamp.
F1910Left-hand main beam headlamp.
F2940Windscreen wipers.
Page 193 of 272
193
Bluetooth® audio system
10
function needs good reception of a radio station that carries this type of message. When a traffic report is transmitted, the current audio source (Radio, CD, etc.) is interrupted automatically to play the TA message. Normal play of the media previously playing is resumed at the end of the message.
WARNI NG
Take care when increasing the volume while listening to TA messages. The volume may prove too high on return to the original audio source.
Press the TA button to activate or deactivate traffic messages.
Receiving INFO messages
NOTIC E
The INFO function gives priority to TA alert messages. To be active, this function needs good reception of a radio station that transmits this type of message. When a message is transmitted, the current audio source (Radio, CD, USB, etc.) is interrupted
automatically to receive the INFO message. Normal play of the media previously playing is resumed at the end of the message.
Make a long press on this button to display the list of categories.Select or deselect categories.
Activate or deactivate the reception of the corresponding messages.
Display TEXT INFOS
NOTIC E
Radio text is information transmitted by the radio station related to the station's current programme or song.
When the radio station is displayed in the screen, press OK to display the contextual menu.Select "RadioText (TXT) display" and confirm OK to save.
DAB (Digital Audio
Broadcasting) radio
Digital Radio
Depending on version
NOTIC E
If the current DAB radio station is not available on FM, "DAB FM" is struck out.
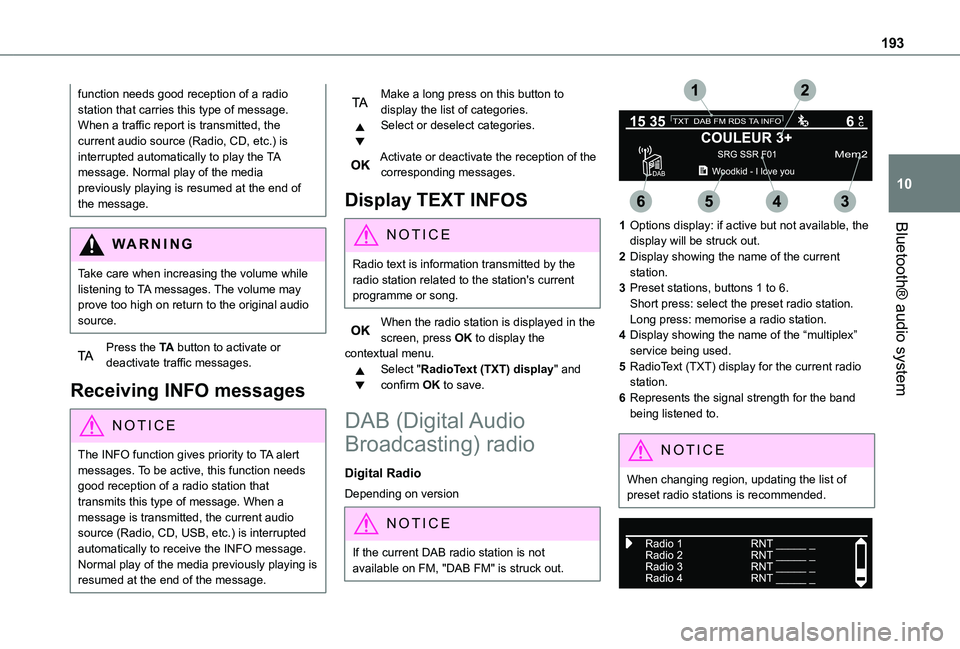
1Options display: if active but not available, the display will be struck out.
2Display showing the name of the current station.
3Preset stations, buttons 1 to 6.Short press: select the preset radio station.Long press: memorise a radio station.
4Display showing the name of the “multiplex” service being used.
5RadioText (TXT) display for the current radio station.
6Represents the signal strength for the band being listened to.
NOTIC E
When changing region, updating the list of preset radio stations is recommended.
Page 194 of 272
194
Full list of radio stations and "multiplexes".
Terrestrial digital radio
NOTIC E
Digital radio provides a superior audio quality and also additional categories of traffic announcements (TA INFO).
The different "multiplex / ensemble” services offer a choice of radio stations in alphabetical order.
Change of band (FM1, FM2, DAB, etc.)
Change of station within the same "multiplex / ensemble".Starting of a search for the previous / next "multiplex / ensemble".Long press: selection of the categories of news desired among Transport, News, Entertainment and Special Flash (available depending on the station).
NOTIC E
When the radio station is displayed in the screen , press "OK" to display the contextual menu.
(Frequency search (RDS), DAB / FM auto tracking, RadioText (TXT) display, Information on the station, etc.)
DAB / FM station tracking
NOTIC E
"DAB" does not have 100% coverage of the country.When the digital signal is weak, "DAB / FM auto tracking" allows you to continue listening to the same station, by automatically switching to the corresponding analogue FM
station (if it exists).When the "DAB / FM auto tracking" is active, the DAB station will be selected automatically.
Press the MENU button.
Select "Multimedia" and confirm.
Select "DAB / FM auto tracking" and confirm.
NOTIC E
If "DAB / FM auto tracking" tracking is enabled, there is a lag of a few seconds when the system switches to the analogue FM station sometimes with a change in volume.
WARNI NG
If the "DAB" station you are listening to is not available on FM ("DAB/FM" option struck out), or if "DAB / FM auto tracking" is not on,
the sound will be cut when the digital signal is too weak.
Media
USB port
Insert the USB memory stick into the USB port or connect the USB device to the USB port using a suitable cable (not supplied).The system changes automatically to "USB" source.
WARNI NG
To protect the system, do not use a USB hub.
NOTIC E
Any additional devices connected to the system must comply with the standard applicable to the product and/or the standard IEC 60950-1.
The system builds playlists (in temporary memory); this operation can take from a few seconds to several minutes at the first connection.
Reduce the number of non-music files and the number of folders to reduce the waiting time.
Page 195 of 272
195
Bluetooth® audio system
10
Playlists are updated every time a new USB memory stick is connected.
NOTIC E
When the USB port is used, the portable device charges automatically.
Play mode
The play modes available are:
– Normal: the tracks are played in order, depending on the classification of the selected files.– Random: the tracks in an album or folder are played in a random order.– Random on all media: all of the tracks saved in the media are played in random order.– Repeat: the tracks played are only those from the current album or folder.Press this button to display the contextual menu for the Media function.Press this button to select the chosen play mode.Press this button to confirm.
The choice made is displayed at the top of the screen.
* Depending on availability and the type of device used.
Choosing a track to play
Press one of these buttons to go to the previous / next track.Press one of these buttons to go to the previous / next folder.
File classification
Make a long press on this button to display the different classifications.Select by "Folder" / "Artist" / "Genre" / "Playlist".Depending on availability and type of device used.Press OK to select the desired classification, then press OK again to confirm.
Playing files
Make a short press on this button to display the chosen classification.Navigate in the list using the left / right and up / down buttons.Confirm the selection by pressing OK.
Press one of these buttons to go to the previous / next track in the list.Press and hold one of these buttons for fast forward or rewind.Press one of these buttons to go to the previous / next "Folder" / "Artist" / "Genre" / "Playlist"* in the list.
Input AUX socket (AUX)
Depending on equipmentConnect a portable device (MP3 player, etc.) to the auxiliary jack socket using an audio cable (not supplied).
N OTIC E
Any additional devices connected to the system must comply with the standard
applicable to the product and/or the standard IEC 60950-1.
Press the SOURCE button several times in succession and select "AUX".First adjust the volume on your portable device (to a high level). Then adjust the volume on your audio system. Controls are managed via the portable device.
WARNI NG
Do not connect the same device to both the auxiliary jack socket and the USB port at the same time.
CD player
Insert circular compact discs only.Some anti-pirating systems, on original discs
or CDs copied using a personal recorder, may
Page 196 of 272
196
cause faults which are no reflection on the quality of the original player.Insert a CD in the player, play begins automatically.
WARNI NG
External CD players connected via the USB port are not recognised by the system.
To play a disc which has already been
inserted, press the SOURCE button several times in succession and select "CD".Press one of the buttons to select a track on the CD.Press the LIST button to display the list of tracks on the CD.Press and hold one of these buttons for fast forward or rewind.
Playing an MP3 compilation
Insert an MP3 compilation in the CD player.The audio equipment searches for all of the music tracks, which may take anything between a few seconds and several tens of seconds, before play begins.
WARNI NG
On a single disc, the CD player can read up to 255 MP3 files spread over 8 directory levels.However, it is advisable to keep to a limit of two levels to reduce the access time before the CD is played.The folder structure is not observed during playback.All of the files are displayed on a single level.
To play a disc which has already been inserted, press the SOURCE button several times in succession and select "CD".Press one of the buttons to select a folder on the CD.Press one of the buttons to select a track on the CD.Press the LIST button to display the list of directories of the MP3 compilation.Press and hold one of these buttons for fast forward or rewind.
Bluetooth® audio streaming
Streaming allows music files on the telephone to be played via the vehicle's loudspeakers.Connect the telephone.(Refer to the "Pairing a Bluetooth® telephone" section).Activate the streaming source by pressing SOURCE.
In certain cases, play of the audio files must be initiated from the keypad.Audio files can be selected using the buttons on the audio system control panel and the steering mounted controls. The contextual information can be displayed in the screen.If the telephone supports the function. The audio quality depends on the quality of transmission by the telephone.
Connecting Apple® players
Connect the Apple® player to the USB port using a suitable cable (not supplied).Play starts automatically.Control is via the audio system.The classifications available are those of the portable device connected (artists / albums / genres / playlists).The version of software in the audio system may not be compatible with the generation of your Apple® player.
Information and advice
The CD player can play files with “.mp3”, “.wma”, “.wav” and “.aac” file extensions, with a bit rate of 32 to 320 Kbps.It also supports TAG mode (ID3 tag, WMA TAG).No other file types (“.mp”4, etc.) can be read.Files of the ".wma" type should be to the wma 9 standard.The sampling rates supported are 11, 22, 44 and 48 kHz.