2019 TOYOTA PROACE CITY VERSO oil
[x] Cancel search: oilPage 155 of 272
155
Practical information
7
WARNI NG
Take care when working under the bonnet, as certain areas of the engine may be extremely hot (risk of burns) and the cooling fan could start at any time (even with the ignition off).
Used products
WARNI NG
Avoid prolonged contact of used oil or fluids with the skin.Most of these fluids are harmful to health and very corrosive.
ECO
Do not discard used oil or fluids into sewers or onto the ground.Empty used oil into the containers reserved for this purpose at a TOYOTA dealer or a qualified workshop.
Engine oil
The level is checked, with the engine having been switched off for at least 30
minutes and on level ground, either using the oil level indicator in the instrument panel when the ignition is switched on (for vehicles equipped with an electric gauge), or using the dipstick.
It is normal to top up the oil level between two services (or oil changes). It is recommended that you check the level, and top up if necessary, every 5,000 km (3,000 miles).
WARNI NG
In order to maintain the reliability of the engine and emissions control system, never use additives in the engine oil.
Checking using the dipstick
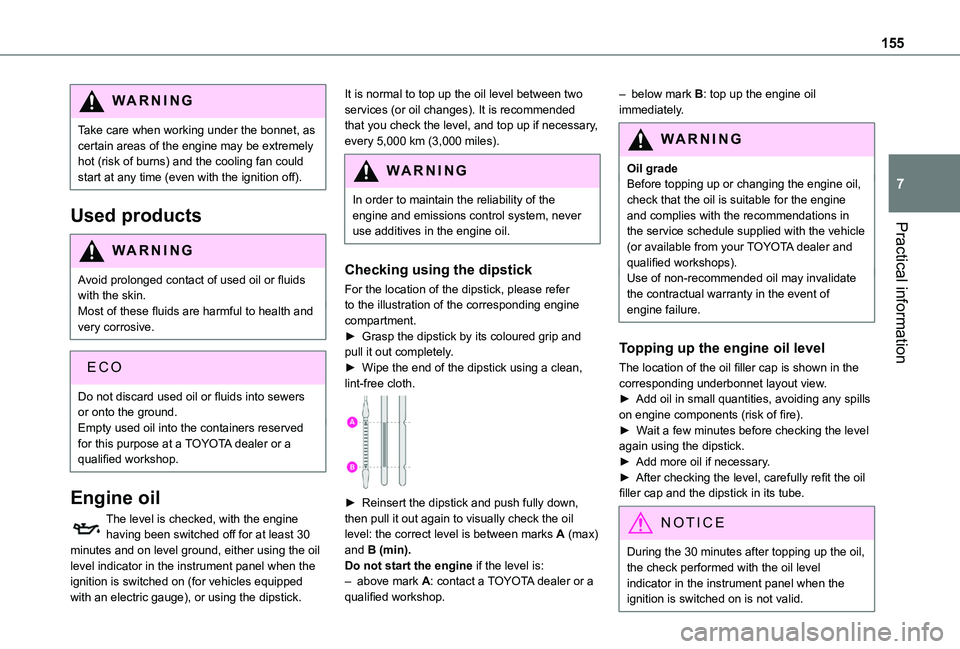
For the location of the dipstick, please refer to the illustration of the corresponding engine compartment.► Grasp the dipstick by its coloured grip and pull it out completely.► Wipe the end of the dipstick using a clean, lint-free cloth.
► Reinsert the dipstick and push fully down, then pull it out again to visually check the oil level: the correct level is between marks A (max) and B (min).Do not start the engine if the level is:– above mark A: contact a TOYOTA dealer or a qualified workshop.
– below mark B: top up the engine oil immediately.
WARNI NG
Oil gradeBefore topping up or changing the engine oil, check that the oil is suitable for the engine and complies with the recommendations in the service schedule supplied with the vehicle
(or available from your TOYOTA dealer and qualified workshops).Use of non-recommended oil may invalidate the contractual warranty in the event of engine failure.
Topping up the engine oil level
The location of the oil filler cap is shown in the corresponding underbonnet layout view.► Add oil in small quantities, avoiding any spills on engine components (risk of fire).► Wait a few minutes before checking the level again using the dipstick.► Add more oil if necessary.► After checking the level, carefully refit the oil filler cap and the dipstick in its tube.
NOTIC E
During the 30 minutes after topping up the oil, the check performed with the oil level indicator in the instrument panel when the ignition is switched on is not valid.
Page 157 of 272
157
Practical information
7
WARNI NG
Only use products recommended by TOYOTA or products of equivalent quality and specification.In order to optimise the operation of components as important as those in the braking system, TOYOTA selects and offers very specific products.
12 V battery
The battery does not require any maintenance.However, check regularly that the terminals are correctly tightened (versions without quick release terminals) and that the connections are clean.
NOTIC E
For more information on the precautions to take before any work on the 12 V battery, refer to the corresponding section.
WARNI NG
Versions equipped with Stop & Start are fitted with a 12 V lead-acid battery of specific technology and specification.Its replacement should be carried out only by a TOYOTA dealer or a qualified workshop.
Passenger compartment
filter
Depending on the environment and the use of the vehicle (e.g. dusty atmosphere, city driving), change it twice as often, if necessary.
NOTIC E
A clogged passenger compartment filter can adversely affect air conditioning system performance and generate undesirable odours.
Air filter
Depending on the environment and the use of the vehicle (e.g. dusty atmosphere, city driving), change it twice as often, if necessary.
Oil filter
Change the oil filter each time the engine oil is changed.
Particle filter (Diesel)
When the particle filter is approaching saturation, this warning lamp comes on temporarily, accompanied by a message warning of the risk of filter clogging.
As soon as the traffic conditions permit, regenerate the filter by driving at a speed of at least 60 km/h (37 mph) until the warning lamp goes off.
NOTIC E
If the warning lamp stays on, this indicates a low Diesel additive level.For more information on Checking levels,
refer to the corresponding section.
NOTIC E
Following prolonged operation of the vehicle at very low speed or at idle, you may, in exceptional circumstances, notice the emission of water vapour at the exhaust while accelerating. This has no impact on the vehicle’s behaviour or the environment.
NOTIC E
New vehicleDuring the first few particle filter regeneration operations, you may notice a "burning" smell. This is perfectly normal.
Manual gearbox
The gearbox does not require any maintenance (no oil change).
Page 158 of 272
158
Automatic gearbox
The gearbox does not require any maintenance (no oil change).
Brake pads
Brake wear depends on the style of driving, particularly in the case of vehicles used in town, over short distances. It may be necessary to have the condition of the brakes checked, even between vehicle services.Unless there is a leak in the circuit, a drop in the brake fluid level indicates that the brake pads are worn.
NOTIC E
After washing the vehicle, moisture, or in wintry conditions, ice can form on the brake discs and pads: braking efficiency may be reduced. Gently dab the brakes to dry and defrost them.
Brake disc wear
For information on checking brake disc wear, contact a TOYOTA dealer or a qualified workshop.
Manual parking brake
If you notice excessive brake lever travel or decreased effectiveness, the parking brake must be adjusted, even between two
services.
This system must be checked by a TOYOTA dealer or a qualified workshop.
Electric parking brake
This system does not require any routine servicing. However, in the event of a problem, do not hesitate to have the system checked by a TOYOTA dealer or a qualified workshop.
NOTIC E
For more information on the Electric parking brake, refer to the corresponding section.
Wheels and tyres
The inflation pressure of all tyres, including the spare wheel, must be checked on "cold” tyres.The pressures indicated on the tyre pressure label are valid for "cold" tyres. If you have driven for more than 10 minutes or more than 10 km (6 miles) at over 50 km/h (31 mph), add 0.3 bar (30 kPa) to the values indicated on the label.
WARNI NG
Under-inflation increases fuel consumption. Non-compliant tyre pressure causes
premature wear on tyres and has an adverse effect on the vehicle's road holding - risk of an accident!
Driving with worn or damaged tyres reduces the braking and road holding performance of the vehicle. It is recommended to regularly check the condition of the tyres (tread and sidewalls) and wheel rims as well as the presence of the valves.When the wear indicators no longer appear set back from the tread, the depth of the grooves is less than 1.6 mm; it is imperative to replace the tyres.Using different size wheels and tyres from those specified can affect the lifetime of tyres, wheel rotation, ground clearance, the speedometer reading and have an adverse effect on road holding.Fitting different tyres on the front and rear axles can cause the ESC to mistime.
AdBlue® (Diesel engines)
To respect the environment and ensure compliance with the Euro 6 standard, without adversely affecting the performance or fuel consumption of its Diesel engines, TOYOTA has
taken the decision to equip its vehicles with a system that associates SCR (Selective Catalytic Reduction) with a Diesel particle filter (DPF) for the treatment of exhaust gases.
SCR System SCR
Using a liquid called AdBlue® that contains urea, a catalytic converter turns up to 85% of the nitrogen oxides (NOx) into nitrogen and
Page 162 of 272
162
NOTIC E
When washing the vehicle at an automatic roller-brush car wash, be sure to lock the doors and, depending on version, remove the electronic key.When using a pressure washer, hold the lance at least 30 cm (0 ft 11") from the vehicle (particularly when cleaning areas containing chipped paint, sensors or seals).Promptly clean up any stains containing chemicals liable to damage the vehicle's paint (including tree resin, bird droppings, insect secretions, pollen and tar).If justified by the environment, clean the vehicle more frequently to remove salty deposits (in coastal areas), soot (in industrial estates) and mud (in wet or cold areas). These substances can be highly corrosive.Contact a TOYOTA dealer or a qualified workshop if you require advice on removing stubborn stains requiring special products (such as tar or insect removers).
Preferably, have paint touch-ups performed by a TOYOTA dealer or a qualified workshop.
Interior
WARNI NG
When washing the vehicle, never use a water hose or high-pressure washer to clean the interior.Liquids carried in cups or other open containers can spill, presenting a risk of damage if they come into contact with the
controls in the dashboard and centre console. Take care!
Bodywork
High-gloss paint
WARNI NG
Do not use abrasive products or solvents, petrol or oil to clean the bodywork.Never use an abrasive sponge to clean stubborn stains. Risk of scratching the paintwork!Do not apply polish in strong sunshine, or to plastic or rubber parts.
NOTIC E
Use a soft sponge and soapy water or a pH neutral product.Gently wipe the bodywork with a clean microfibre cloth.Apply polish with the vehicle clean and dry.Comply with the instructions for use stated on the product.
Decals
(Depending on version)
WARNI NG
Do not use a high pressure washer to clean the vehicle. Risk of damaging or detaching the decals!
NOTIC E
Use a high-flow hose at a temperature between 25°C and 40°C.Sweep the jet of water across the surface to be cleaned, perpendicular to it.Rinse the vehicle with demineralised water.
Page 165 of 272
165
In the event of a breakdown
8
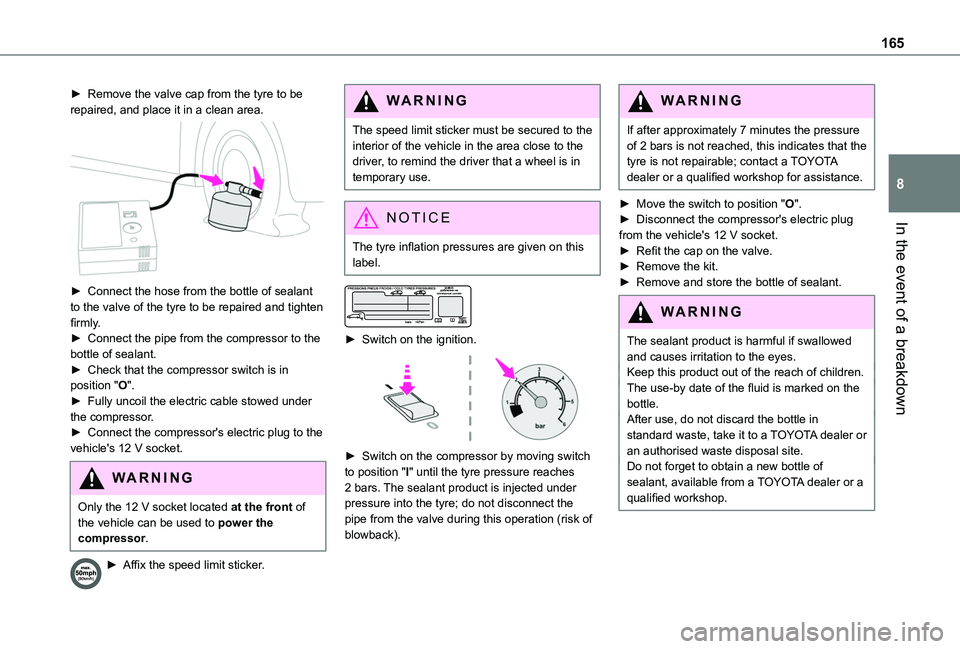
► Remove the valve cap from the tyre to be repaired, and place it in a clean area.
► Connect the hose from the bottle of sealant to the valve of the tyre to be repaired and tighten firmly.► Connect the pipe from the compressor to the bottle of sealant.► Check that the compressor switch is in position "O".► Fully uncoil the electric cable stowed under the compressor.► Connect the compressor's electric plug to the vehicle's 12 V socket.
WARNI NG
Only the 12 V socket located at the front of the vehicle can be used to power the compressor.
► Affix the speed limit sticker.
WARNI NG
The speed limit sticker must be secured to the interior of the vehicle in the area close to the driver, to remind the driver that a wheel is in temporary use.
NOTIC E
The tyre inflation pressures are given on this label.
► Switch on the ignition.
► Switch on the compressor by moving switch to position "I" until the tyre pressure reaches 2 bars. The sealant product is injected under pressure into the tyre; do not disconnect the pipe from the valve during this operation (risk of blowback).
WARNI NG
If after approximately 7 minutes the pressure of 2 bars is not reached, this indicates that the tyre is not repairable; contact a TOYOTA dealer or a qualified workshop for assistance.
► Move the switch to position "O".► Disconnect the compressor's electric plug from the vehicle's 12 V socket.► Refit the cap on the valve.► Remove the kit.► Remove and store the bottle of sealant.
WARNI NG
The sealant product is harmful if swallowed and causes irritation to the eyes.Keep this product out of the reach of children.The use-by date of the fluid is marked on the bottle.After use, do not discard the bottle in standard waste, take it to a TOYOTA dealer or an authorised waste disposal site.Do not forget to obtain a new bottle of sealant, available from a TOYOTA dealer or a qualified workshop.
Page 166 of 272
166
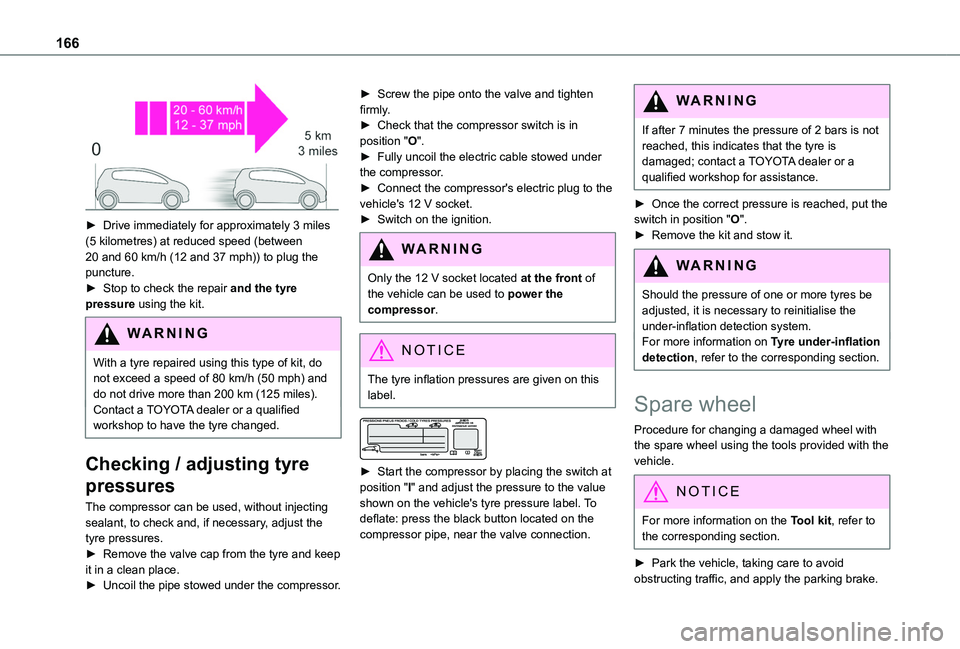
► Drive immediately for approximately 3 miles (5 kilometres) at reduced speed (between 20 and 60 km/h (12 and 37 mph)) to plug the puncture.► Stop to check the repair and the tyre pressure using the kit.
WARNI NG
With a tyre repaired using this type of kit, do not exceed a speed of 80 km/h (50 mph) and do not drive more than 200 km (125 miles).Contact a TOYOTA dealer or a qualified workshop to have the tyre changed.
Checking / adjusting tyre
pressures
The compressor can be used, without injecting sealant, to check and, if necessary, adjust the tyre pressures.► Remove the valve cap from the tyre and keep it in a clean place.► Uncoil the pipe stowed under the compressor.
► Screw the pipe onto the valve and tighten firmly.► Check that the compressor switch is in position "O".► Fully uncoil the electric cable stowed under the compressor.► Connect the compressor's electric plug to the vehicle's 12 V socket.► Switch on the ignition.
WARNI NG
Only the 12 V socket located at the front of the vehicle can be used to power the compressor.
NOTIC E
The tyre inflation pressures are given on this label.
► Start the compressor by placing the switch at position "I" and adjust the pressure to the value shown on the vehicle's tyre pressure label. To deflate: press the black button located on the compressor pipe, near the valve connection.
WARNI NG
If after 7 minutes the pressure of 2 bars is not reached, this indicates that the tyre is damaged; contact a TOYOTA dealer or a qualified workshop for assistance.
► Once the correct pressure is reached, put the switch in position "O".► Remove the kit and stow it.
WARNI NG
Should the pressure of one or more tyres be adjusted, it is necessary to reinitialise the under-inflation detection system.For more information on Tyre under-inflation detection, refer to the corresponding section.
Spare wheel
Procedure for changing a damaged wheel with
the spare wheel using the tools provided with the vehicle.
NOTIC E
For more information on the Tool kit, refer to the corresponding section.
► Park the vehicle, taking care to avoid obstructing traffic, and apply the parking brake.
Page 245 of 272
245
Alphabetical index
Checking tyre pressures (using the kit) 164, 166Checks 154, 156–158Checks, routine 156–158Child lock 94Children 81, 89, 92–94Children (safety) 94Child seats 81, 84–86, 88–89, 92–93Child seats, conventional 88Child seats, i-Size 93Child seats, ISOFIX 92–94Cleaning (advice) 161–162Closing the doors 24, 27Collision Risk Alert 128–129Connected applications 230Connection, Bluetooth 198, 2 11–213, 230–231, 235–236Connection, MirrorLink 210–2 11, 229Connection, Wi-Fi network 231Connectivity 229Container, AdBlue® 159–160Control, emergency boot release 29Control, emergency door 23, 28
Control, heated seats 40–41Control lever, lighting 63, 65Control lever, wipers 67–70Courtesy lamp 62Courtesy lamp, front 62Courtesy lamp, rear 62Courtesy lamps 62Cover, load space 52Cruise control 11 8–11 9, 121, 123–124, 128Cruise control, adaptive 124
Cruise control by speed limit recognition 11 8–11 9Cruise control, dynamic with Stop function 11 8–11 9Cup holder 47
D
DAB (Digital Audio Broadcasting) - Digital radio 193–194, 208, 233Date (setting) 215, 239Daytime running lamps 65, 171–172Deactivating the passenger airbag 82, 87Deactivation of DSC (ESC) 75Deadlocking 27–28Defrosting 42, 57–58Demisting 57–58Demisting, rear 41, 58–59Demisting, rear screen 41, 58–59Dimensions 183Dipstick 155
Direction indicators 64–65, 171, 173–174Display, head-up 11 3–11 4Doors, side 32Doors, side-hinged 27–28Driver’s attention warning 136–137Driving 95–96Driving abroad 64Driving aids camera (warnings) 11 5Driving aids (recommendations) 11 4Driving economically 7
Dynamic stability control (DSC) 75, 77
E
EBFD 74Eco-driving (advice) 7Economy mode 152Electric windows 36Electronic brake force distribution (EBFD) 74–75Emergency braking assistance (EBA) 75Emergency call 71–73Emergency warning lamps 53, 74Emissions control system, SCR 158Energy economy mode 152Engine compartment 154Engine, Diesel 146, 154, 163, 187Engine, petrol 154, 186Engines 185–187Environment 7, 30, 61ESC (electronic stability control) 74Expanded traffic sign recognition 11 9
F
Fatigue detection 136–137Filling the AdBlue® tank 156, 160Filling the fuel tank 146–147Filter, air 157Filter, oil 157Filter, particle 156–157
Page 247 of 272
247
Alphabetical index
Lamps, parking 65Lamps, rear 174Lane departure warning active 131, 136LEDs - Light-emitting diodes 65, 171Level, AdBlue® 156Level, brake fluid 156Level, Diesel additive 156–157Level, engine coolant 16, 156Level, engine oil 155Levels and checks 154–156Level, screenwash fluid 68, 156Light-emitting diodes - LEDs 65, 171Lighting 63Lighting, exterior 63Lighting, guide-me home 65Lighting, welcome 66Loading 152Load reduction mode 152Locating your vehicle 24Locking 23–24, 26–27Locking from the inside 31Low fuel level 146–147
Lumbar 39
M
Maintenance (advice) 161Maintenance, routine 11 6, 156Manoeuvring aids (recommendations) 11 4Markings, identification 189Mat 47, 11 6
Memorising a speed 128Menu 210Menu, main 192Menus (audio) 205–206, 218–219Messages 237Messages, quick 237Mirror, child surveillance 42Mirror, rear view 42Mirrors, door 41–42, 58–59, 134Misfuel prevention 147Mountings, ISOFIX 90MP3 CD 196
N
Navigation 224–226Navigation, connected 226–228Net 52–53Net, high load retaining 51Number plate lamps 175
O
Obstacle detection 137Oil change 155Oil consumption 155OIl, engine 155On-board tools 163–164Opening the bonnet 153Opening the boot 23
Opening the doors 23
P
Pads, brake 158Paint 162, 189Paint colour code 189Park Assist 142Parking brake 100, 158Parking brake, electric 101–103, 158Parking sensors, audible and visual 137Parking sensors, front 138Parking sensors, rear 138Plates, identification 189Player, Apple® 196, 209, 234Player, MP3 CD 195–196Player, USB 194, 208, 234Port, USB 48, 194, 208, 229, 234Pressures, tyres 158, 166, 170, 189Pre-tensioning seat belts 81Priming the fuel system 163
Profiles 213, 238Programmable cruise control 122Protecting children 82, 84–87, 89, 92–94Puncture 164, 166
R
Radar (warnings) 11 5Radio 192–193, 206–207, 209, 232