Page 136 of 624

136
LC200_OM_OM60Q99U_(U)
3-2. Opening, closing and locking the doors
■Battery-saving function
The battery-saving function will be activated in order to preve nt the electronic
key battery and the battery from being discharged while the veh icle is not in
operation for a long time.
● In the following situations, the smart key system may take some time to
unlock the doors.
• The electronic key has been left in an area of approximately 6 ft. (2 m) of
the outside of the vehicle for 10 minutes or longer.
• The smart key system has not been used for 5 days or longer.
● If the smart key system has not been used for 14 days or longer , the doors
cannot be unlocked at any doors except the driver’s door. In th is case, take
hold of the driver’s door handle, or use the wireless remote co ntrol or the
mechanical key, to unlock the doors.
■ Electronic Key Battery-Saving Function
When battery-saving mode is set, battery depletion is minimized by stopping
the electronic key from receiving radio waves.
■ Conditions affecting operation
The smart key system uses weak radio waves. In the following si tuations, the
communication between the electronic key and the vehicle may be affected,
preventing the smart key system, wireless remote control and en gine immobi-
lizer system from operating properly.
(Ways of coping: P. 551)
● When the electronic key battery is depleted
● Near a TV tower, electric power plant, gas station, radio stati on, large dis-
play, airport or other facility that generates strong radio wav es or electrical
noise
● When the electronic key is in contact with, or is covered by the following
metallic objects
• Cards to which aluminum foil is attached
• Cigarette boxes that have aluminum foil inside
• Metallic wallets or bags
• Coins
• Hand warmers made of metal
• Media such as CDs and DVDs
● When other wireless keys (that emit radio waves) are being used nearby
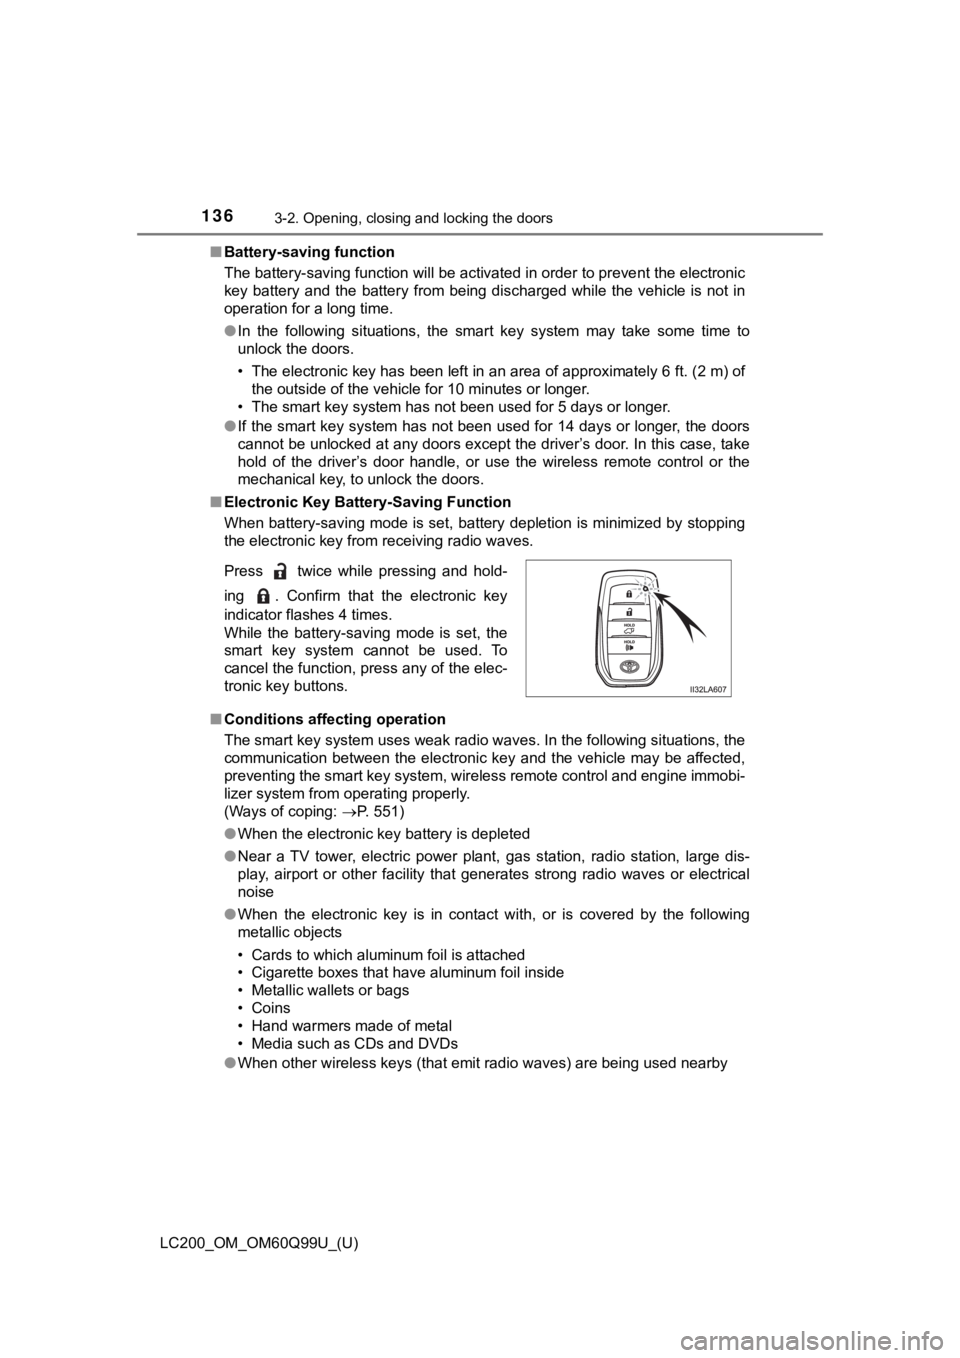
Press twice while pressing and hold-
ing . Confirm that the electronic key
indicator flashes 4 times.
While the battery-saving mode is set, the
smart key system cannot be used. To
cancel the function, press any of the elec-
tronic key buttons.
Page 144 of 624
144
LC200_OM_OM60Q99U_(U)
3-3. Adjusting the seats
For easy access to the third seat, perform in “Tumbling the se cond
seats”. ( P. 145)
■Before tumbling the second seats
Stow the seat belt buckles
and lower the head restraints
to the lowest position.
Pass the outer seat belts
through the seat belt hangers
and secure the seat belt
plates.
This prevents the shoulder belt
from being damage.
Make sure that the seat belts
are removed from the hangers
before using them.
Vehicles with rear seat enter-
tainment system: Pass the
cover belt under the display
and slide the cover up.
Slide the cover down from
the top of the display to cover
it.
Tumbling the second seats and third seat entry
1
1
2
3
Page 145 of 624
LC200_OM_OM60Q99U_(U)
1453-3. Adjusting the seats
3
Operation of each component
■Tumbling the second seatsFold down the seatback
while pulling the seatback
angle adjustment lever, and
swing the whole seat up and
forward.
Hook the holding strap to the
assist grip and secure the
seat by pulling its free end.
When returning the second seat
to its original position, stow the
holding strap.
Remove the seat hook cov-
ers from the back of the seat
cushion, and install them on
the seat hooks.
When returning the second seat
to its original position, remove
the seat hook covers from the
floor and install them in the back
of the seat cushion.
1
2
3
Page 146 of 624
146
LC200_OM_OM60Q99U_(U)
3-3. Adjusting the seats
■Before folding up the third seatsStow the seat belts buckles.
Stow the center head restraint in the seatback. ( P. 156)
Pass the outer seat belts
through the seat belt hangers
and secure the seat belt
plates.
This prevents the shoulder belt
from being damage.
Make sure that the seat belts
are removed from the hangers
before using them.
Stow the center seat belt tabs in the cover set in the roof.
( P. 33)
■Folding up the third seats
Fold down the head
restraints while pulling the
head restraint angle lever.
Folding up the third seats
1
2
3
4
1
Page 148 of 624
148
LC200_OM_OM60Q99U_(U)
3-3. Adjusting the seats
■Returning the third seatsRemove the seat hook cov-
ers from the floor and install
them into the back of the seat
cushion.
Unlock the seats by pulling
the stowed seat lock release
levers and lower the seats to
its original position.
Secure the seats by the strik-
ers.
Pull the handle and raise the
seatbacks.
Fix the handle securely in its
original position after use.
1
2
3
4
Page 149 of 624

LC200_OM_OM60Q99U_(U)
1493-3. Adjusting the seats
3
Operation of each component
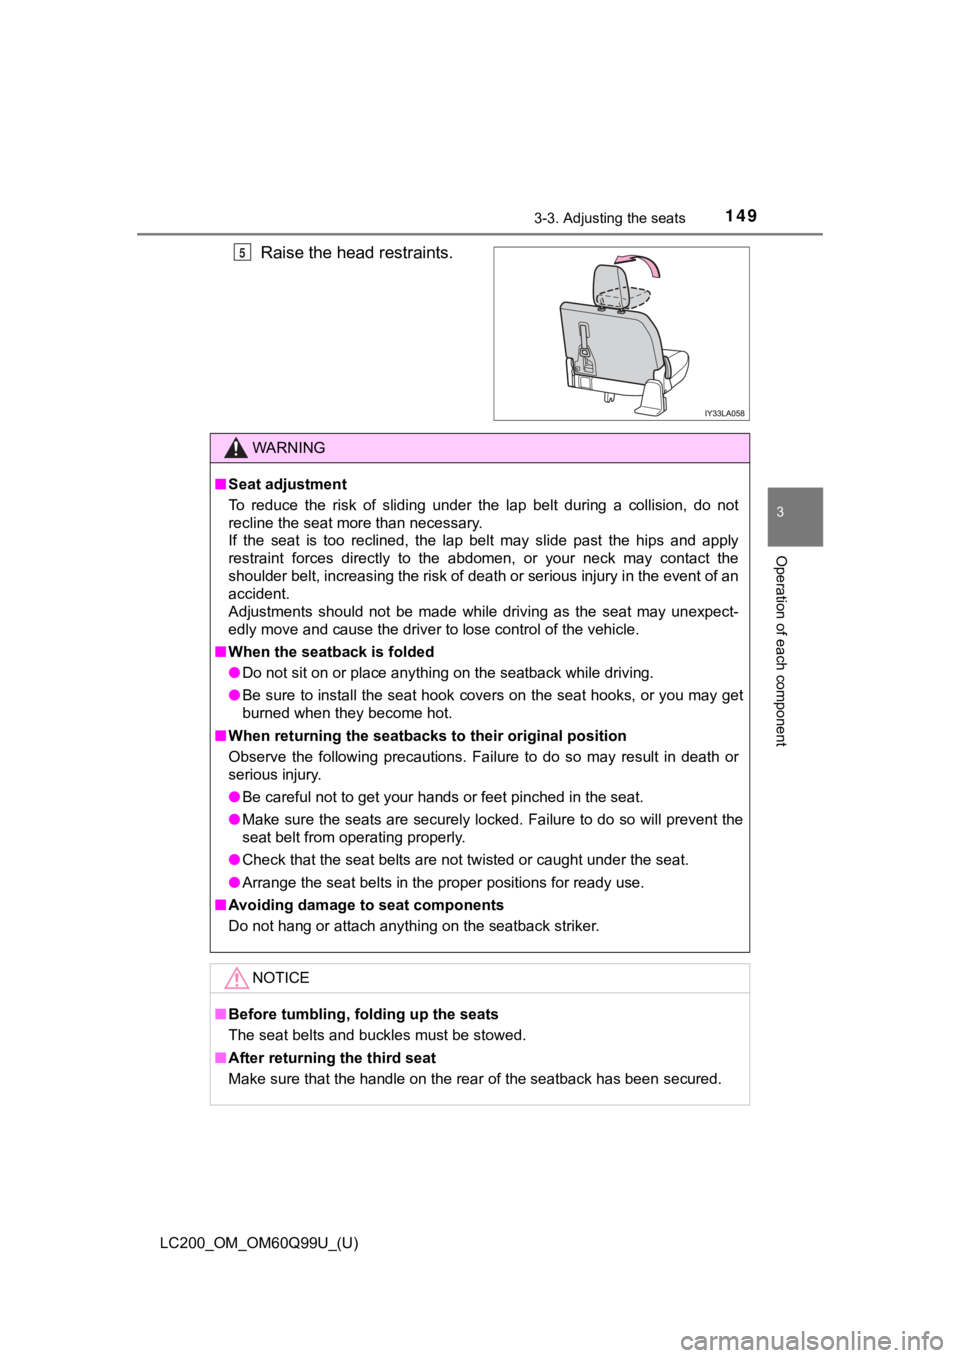
Raise the head restraints.5
WARNING
■Seat adjustment
To reduce the risk of sliding under the lap belt during a collision, do not
recline the seat more than necessary.
If the seat is too reclined, the lap belt may slide past the hips and apply
restraint forces directly to the abdomen, or your neck may contact the
shoulder belt, increasing the risk of death or serious injury in the event of an
accident.
Adjustments should not be made while driving as the seat may un expect-
edly move and cause the driver to lose control of the vehicle.
■ When the seatback is folded
● Do not sit on or place anything on the seatback while driving.
● Be sure to install the seat hook covers on the seat hooks, or y ou may get
burned when they become hot.
■ When returning the seatbacks to their original position
Observe the following precautions. Failure to do so may result in death or
serious injury.
● Be careful not to get your hands or feet pinched in the seat.
● Make sure the seats are securely locked. Failure to do so will prevent the
seat belt from operating properly.
● Check that the seat belts are not twisted or caught under the seat.
● Arrange the seat belts in the proper positions for ready use.
■ Avoiding damage to seat components
Do not hang or attach anything on the seatback striker.
NOTICE
■ Before tumbling, folding up the seats
The seat belts and buckles must be stowed.
■ After returning the third seat
Make sure that the handle on the rear of the seatback has been secured.
Page 156 of 624

156
LC200_OM_OM60Q99U_(U)
3-3. Adjusting the seats
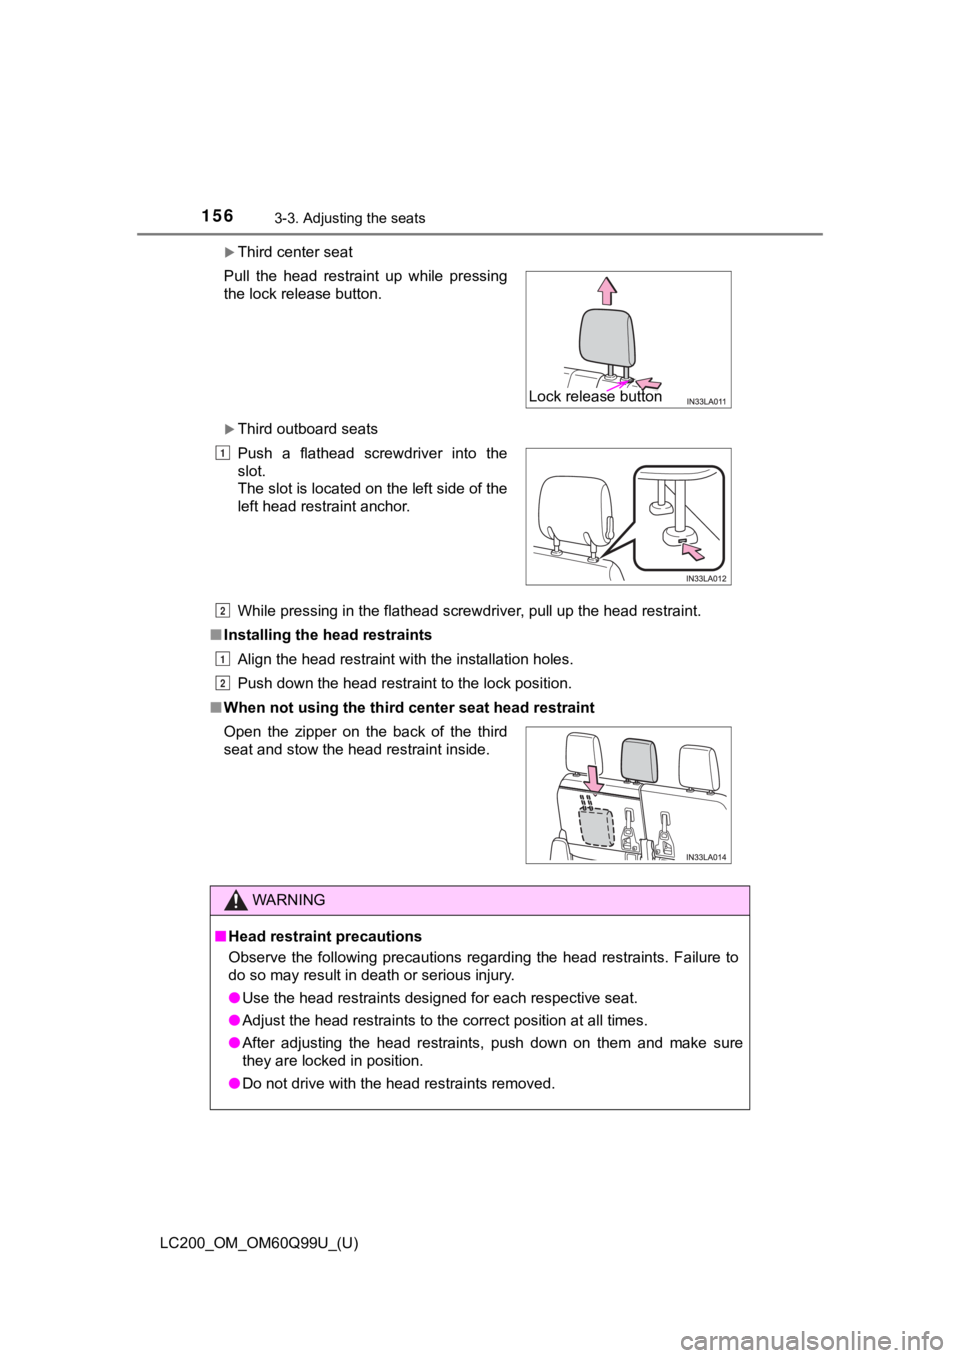
Third center seat
Third outboard seats
While pressing in the flathead screwdriver, pull up the head restraint.
■ Installing the head restraints
Align the head restraint with the installation holes.
Push down the head restraint to the lock position.
■ When not using the third center seat head restraint
Pull the head restraint up while pressing
the lock release button.
Push a flathead screwdriver into the
slot.
The slot is located on the left side of the
left head restraint anchor.
Open the zipper on the back of the third
seat and stow the head restraint inside.
WARNING
■ Head restraint precautions
Observe the following precautions regarding the head restraints. Failure to
do so may result in death or serious injury.
● Use the head restraints designed for each respective seat.
● Adjust the head restraints to the correct position at all times.
● After adjusting the head restraints, push down on them and make sure
they are locked in position.
● Do not drive with the head restraints removed.
Lock release button
1
2
1
2
Page 157 of 624
1573-4. Adjusting the steering wheel and mirrors
3
Operation of each component
LC200_OM_OM60Q99U_(U)
Steering wheel
Operating the switch moves the steering wheel in the following direc-
tions:
Up
Down
Toward the driver
Away from the driver
When the engine switch is off, the
steering wheel returns to its
stowed position by moving up and
away to enable easier driver entry
and exit.
Switching to ACCESSORY or
IGNITION ON mode will return the
steering wheel to the original posi-
tion.
To sound the horn, press on or
close to the mark.
Adjustment procedure
1
2
3
4
Auto tilt away
Horn