Page 16 of 40
15
CUSTOMIZE HOME SCREEN
Select "Change Layout."
NOTE: Home screen requires at
least 50% for Scout® GPS Link with
Moving Maps navigation
Select "General," then select "Customize Home Screen."
Select layout.
STEP
3
STEP
2
STEP
4
STEP
1
Press [MENU] on the faceplate, then select "Setup" on display screen.
Page 17 of 40
16
Select 1 of 4 color options:
• Blue/White
• Gray/Blue
• Black/Blue
• Red/Black
NOTE: Factory default is the color
option listed. (white/blue)
Select "General," then select "Theme Setting."STEP
3
STEP
2
STEP
1
Press [MENU] on the faceplate, then select "Setup" on display screen.
CUSTOMIZE THEME SETTING
Page 20 of 40
19
WI-FI HOTSPOT SETUP*
STEP
2
STEP
4
STEP
3
STEP
5
Scroll down to "Wi-Fi" and turn "ON"
by selecting "Wi-Fi Hotspot: OFF."
Make sure "Wi-Fi" is on.
Select the Wi-Fi network name of the vehicle.
Turn your vehicle into a hotspot. Connect to Wi-Fi!
Features• 4G LTE Wi-Fi Powered by Verizon• Easily connect up to 5 devices• Verizon plan customers can add Wi-Fi Connect into their current pla\
n.
STEP
1
Press [MENU] on the faceplate, then select "Setup" on display screen.
Once the multimedia system connects to the internet, the system displays the name of the Wi-Fi Hotspot when it's discoverable.
* Standard on Entune™ 3.0 Audio (excl C-HR), Audio Plus, and Premium Audio. Trial up to 2 G\
B within 6 months.** iPhone is used only as an example other mobile devices may show sligh\
tly different viewable image.
On your smartphone go to “Settings.” Tap “Wi-Fi."
ENABLE WI-FI ON DEVICE**
Wi-Fi trial is included for the first 6 months or 2GB of data usage whichever comes first.
Page 23 of 40

22
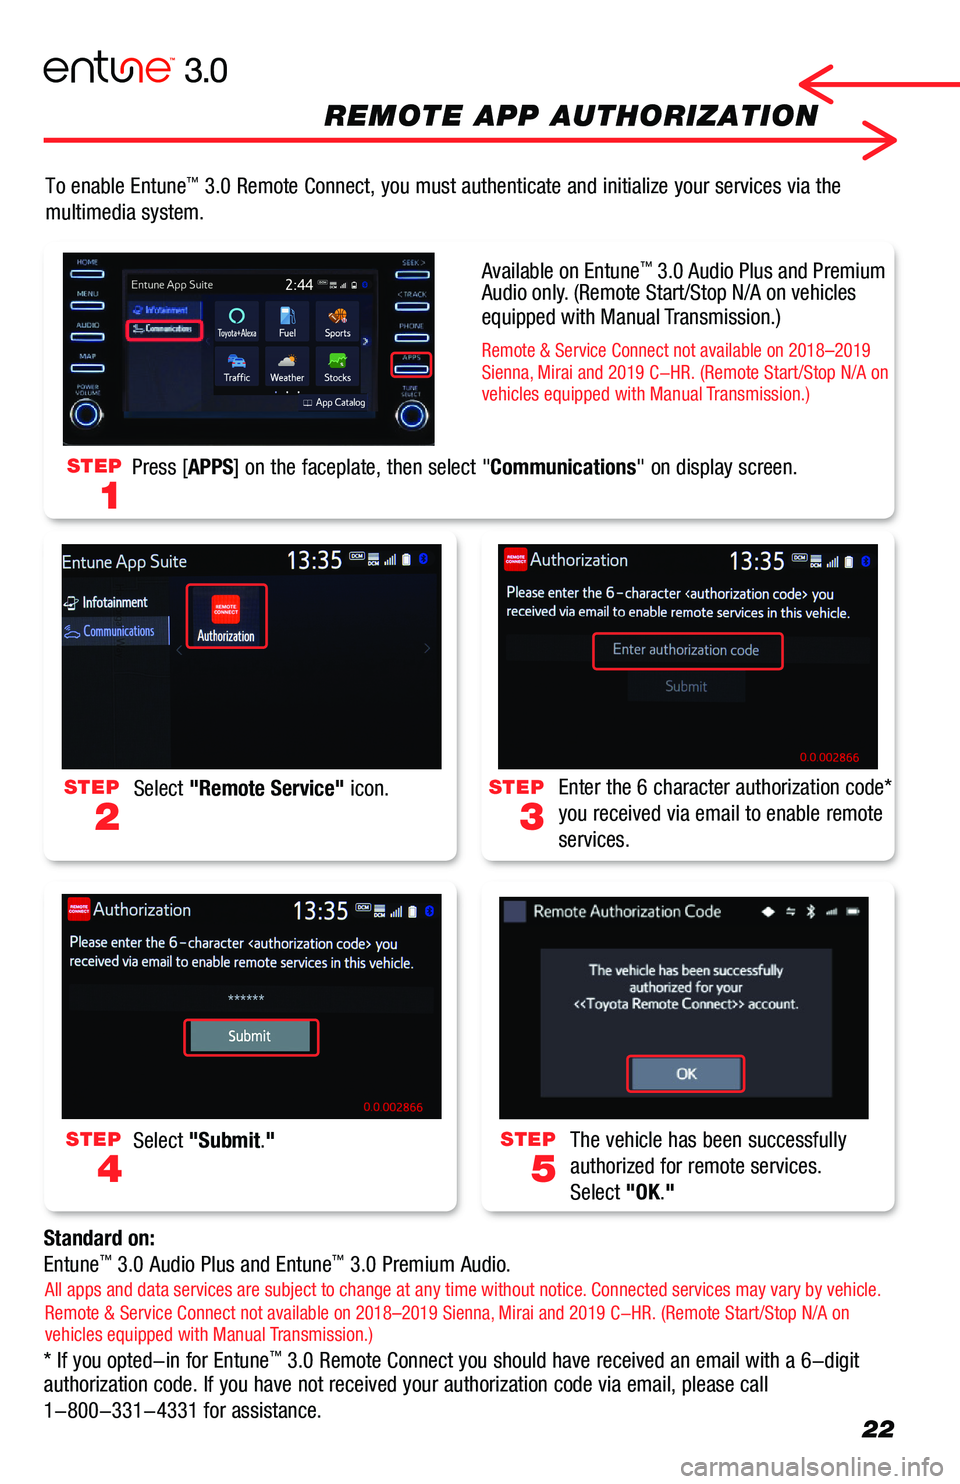
To enable Entune™ 3.0 Remote Connect, you must authenticate and initialize your services \
via the
multimedia system.
Standard on:
Entune™ 3.0 Audio Plus and Entune™ 3.0 Premium Audio.
* If you opted-in for Entune™ 3.0 Remote Connect you should have received an email with a 6-digit authorization code. If you have not received your authorization code via\
email, please call
1-800-331-4331 for assistance.
STEP
2
STEP
3
STEP
4
STEP
5
Select "Remote Service" icon.Enter the 6 character authorization code*
you received via email to enable remote
services.
Select "Submit."The vehicle has been successfully
authorized for remote services.
Select "OK."
STEP
1
Press [APPS] on the faceplate, then select "Communications" on display screen.
All apps and data services are subject to change at any time without notice. Connected services may vary by vehicle. Remote & Service Connect not available on 2018–2019 Sienna, Mirai and 2019 C-HR. (Remote Start/Stop N/A on vehicles equipped with Manual Transmission.)
Available on Entune™ 3.0 Audio Plus and Premium Audio only. (Remote Start/Stop N/A on vehicles equipped with Manual Transmission.)
Remote & Service Connect not available on 2018–2019 Sienna, Mirai and 2019 C-HR. (Remote Start/Stop N/A on vehicles equipped with Manual Transmission.)
REMOTE APP AUTHORIZATION
Page 24 of 40

23
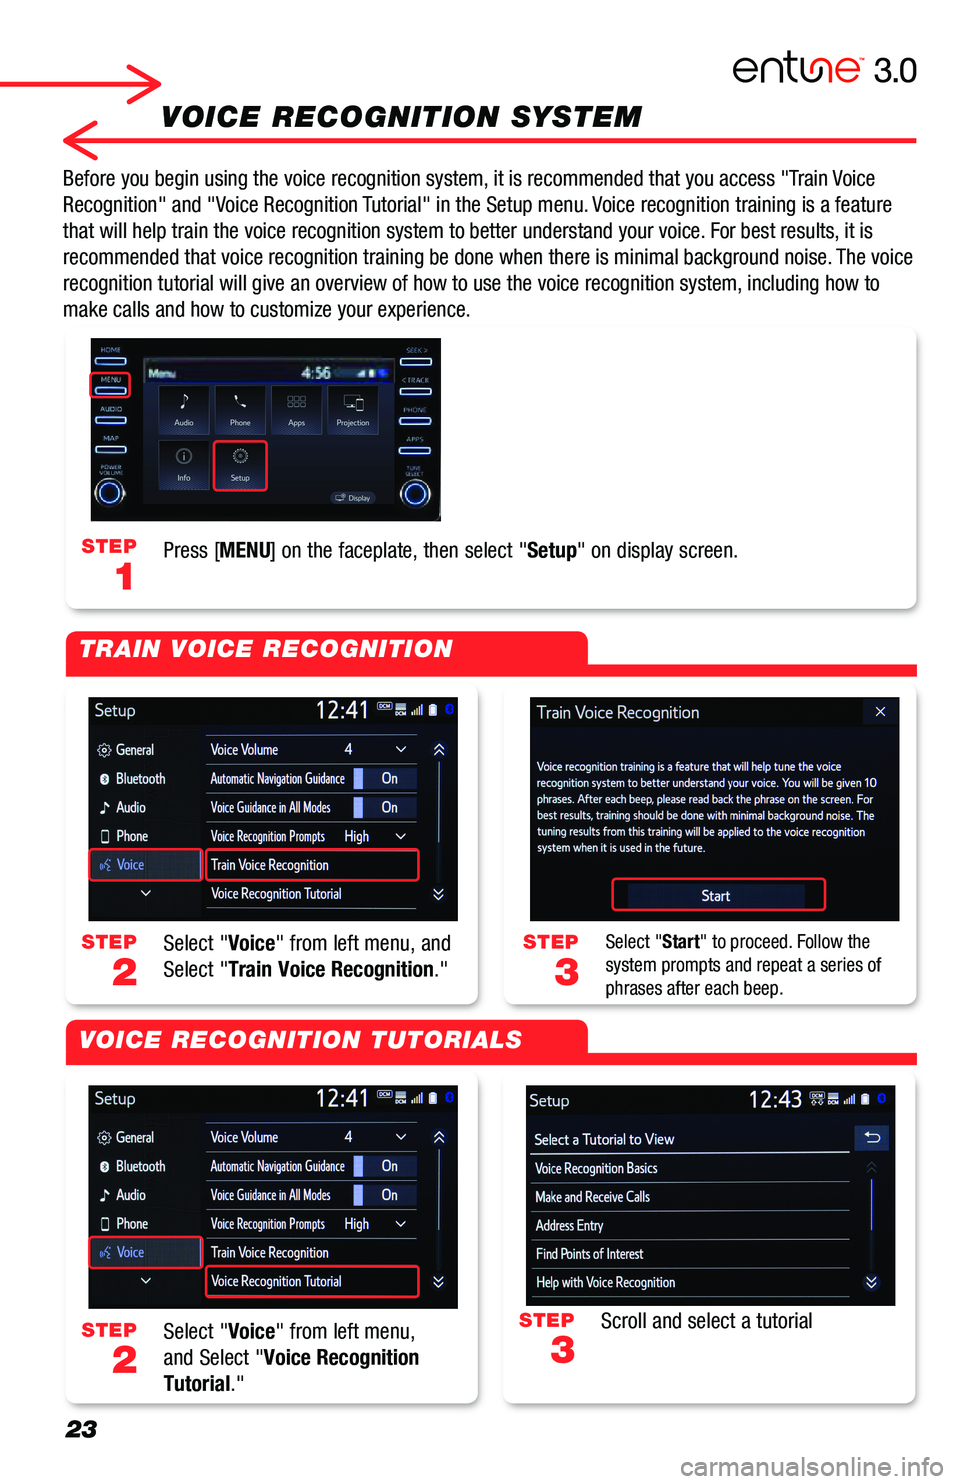
VOICE RECOGNITION SYSTEM
Before you begin using the voice recognition system, it is recommended that you access "Train Voice
Recognition" and "Voice Recognition Tutorial" in the Setup menu. Voice recognition training is a feature
that will help train the voice recognition system to better understand your\
voice. For best results, it is
recommended that voice recognition training be done when there is minimal background noise. The voice
recognition tutorial will give an overview of how to use the voice recognition system, including how to
make calls and how to customize your experience.
STEP
2
STEP
2
STEP
3
STEP
3
STEP
1
Select "Voice" from left menu, and
Select "Train Voice Recognition."
Select "Voice" from left menu,
and Select "Voice Recognition
Tutorial."
Select "Start" to proceed. Follow the system prompts and repeat a series of phrases after each beep.
Scroll and select a tutorial
Press [MENU] on the faceplate, then select "Setup" on display screen.
TRAIN VOICE RECOGNITION
VOICE RECOGNITION TUTORIALS
Page 26 of 40

25
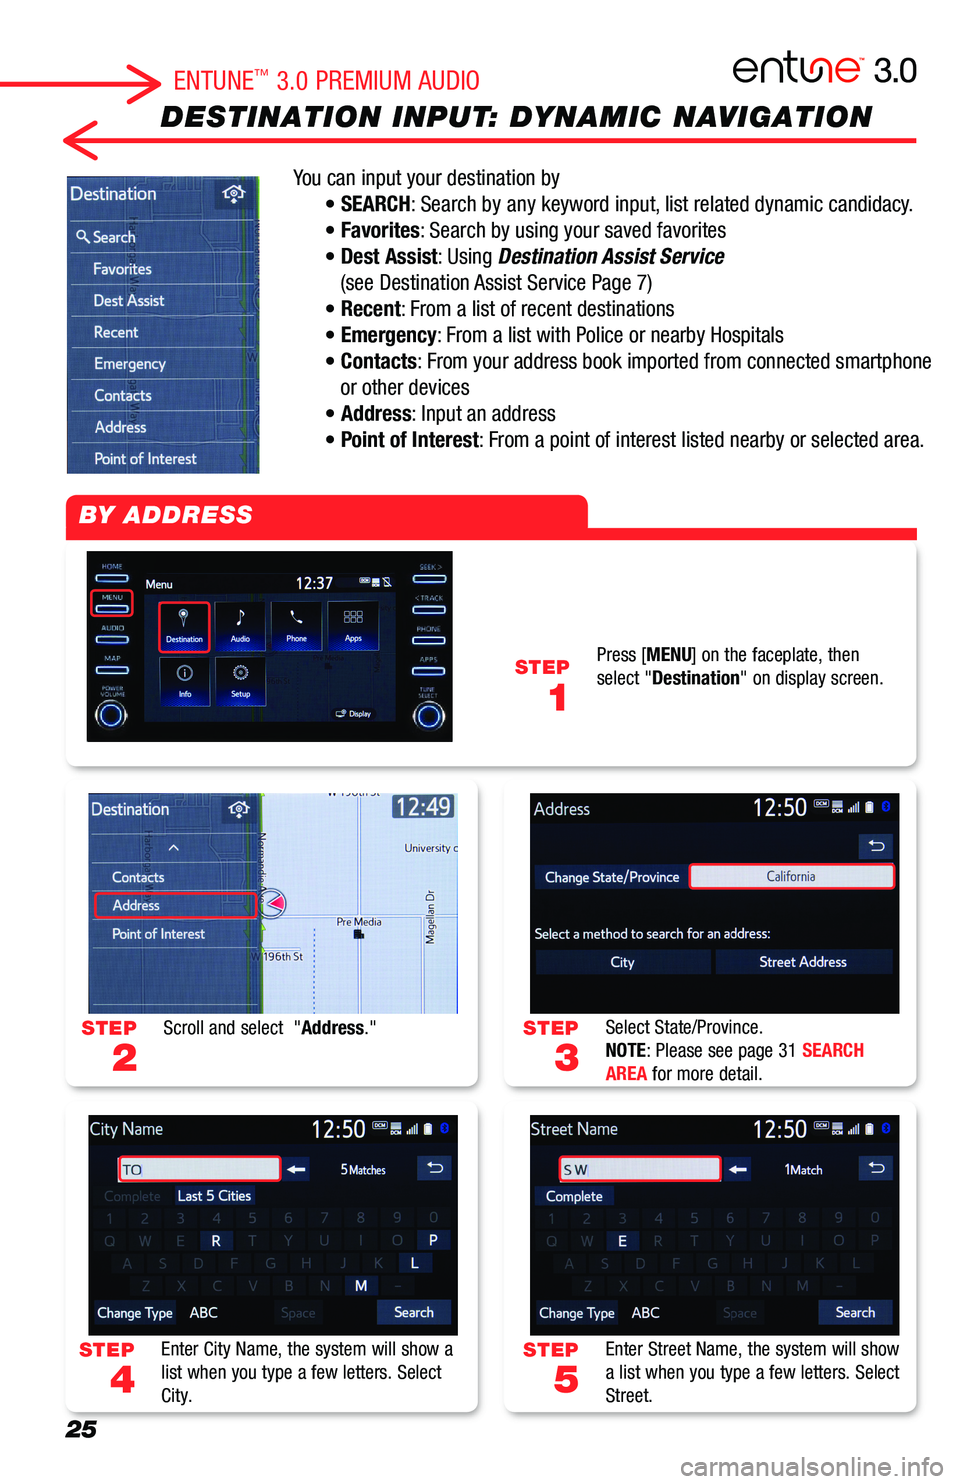
DESTINATION INPUT: DYNAMIC NAVIGATION
You can input your destination by
• SEARCH: Search by any keyword input, list related dynamic candidacy.
• Favorites: Search by using your saved favorites
• Dest Assist: Using Destination Assist Service
(see Destination Assist Service Page 7)
• Recent: From a list of recent destinations
• Emergency: From a list with Police or nearby Hospitals
• Contacts: From your address book imported from connected smartphone
or other devices
• Address: Input an address
• Point of Interest: From a point of interest listed nearby or selected area.
STEP
3
STEP
5
STEP
2
STEP
4
STEP
1
Select State/Province.NOTE: Please see page 31 SEARCH AREA for more detail.
Enter Street Name, the system will show a list when you type a few letters. Select Street.
Scroll and select "Address."
Enter City Name, the system will show a list when you type a few letters. Select City.
Press [MENU] on the faceplate, then select "Destination" on display screen.
BY ADDRESS
ENTUNE™ 3.0 PREMIUM AUDIO
Page 27 of 40
26
DESTINATION INPUT: DYNAMIC NAVIGATION
STEP
1
STEP
7
STEP
9
STEP
3
STEP
2
STEP
6
STEP
8
Push talk switch on the steering wheel.
Confirm Destination. Select "Go" on display screen to proceed. You can touch "Save" to your Favorites for easy access next time.
Select "OK" to start guidance. Select "3 Routes" to see 3 different routes, see page 31 for detail.
Say "Start Guidance," or "Go there," or "Yes" to set a destination.Say "Get direction to <...>" exact address starting from House Number, Street Name, City Name, States.
Enter House Number, the system will show the list when you type a few numbers. Select House Number.
The system optimizes the route by the cloud and sets the destination.
BY ADDRESS (cont.)
ADDRESS BY VOICE RECOGNITION
ENTUNE™ 3.0 PREMIUM AUDIO
Dynamic Search and Dynamic POI: When you see this icon . Searching candidate data is
downloading to your system from the cloud.
Page 28 of 40
27
DESTINATION INPUT: DYNAMIC POI
STEP
3
STEP
5
STEP
7
STEP
2
STEP
4
STEP
6
STEP
1
Change State/Province. Then select a method to search.
The system lists up all related POI names. Closer points start at top of list.
The system optimize route by the cloud.(Dynamic Navigation), and set destination.
Scroll and select "Point of Interest."
When you select "Name,"Enter a POI name and select "Search."
Confirm Destination. Select "Go Directly" to start the guidance.
BY POI
BY POI [NAME]
Press [MENU] on the faceplate, then select "Destination" on display screen.
ENTUNE™ 3.0 PREMIUM AUDIO