Page 16 of 592

16Pictorial index
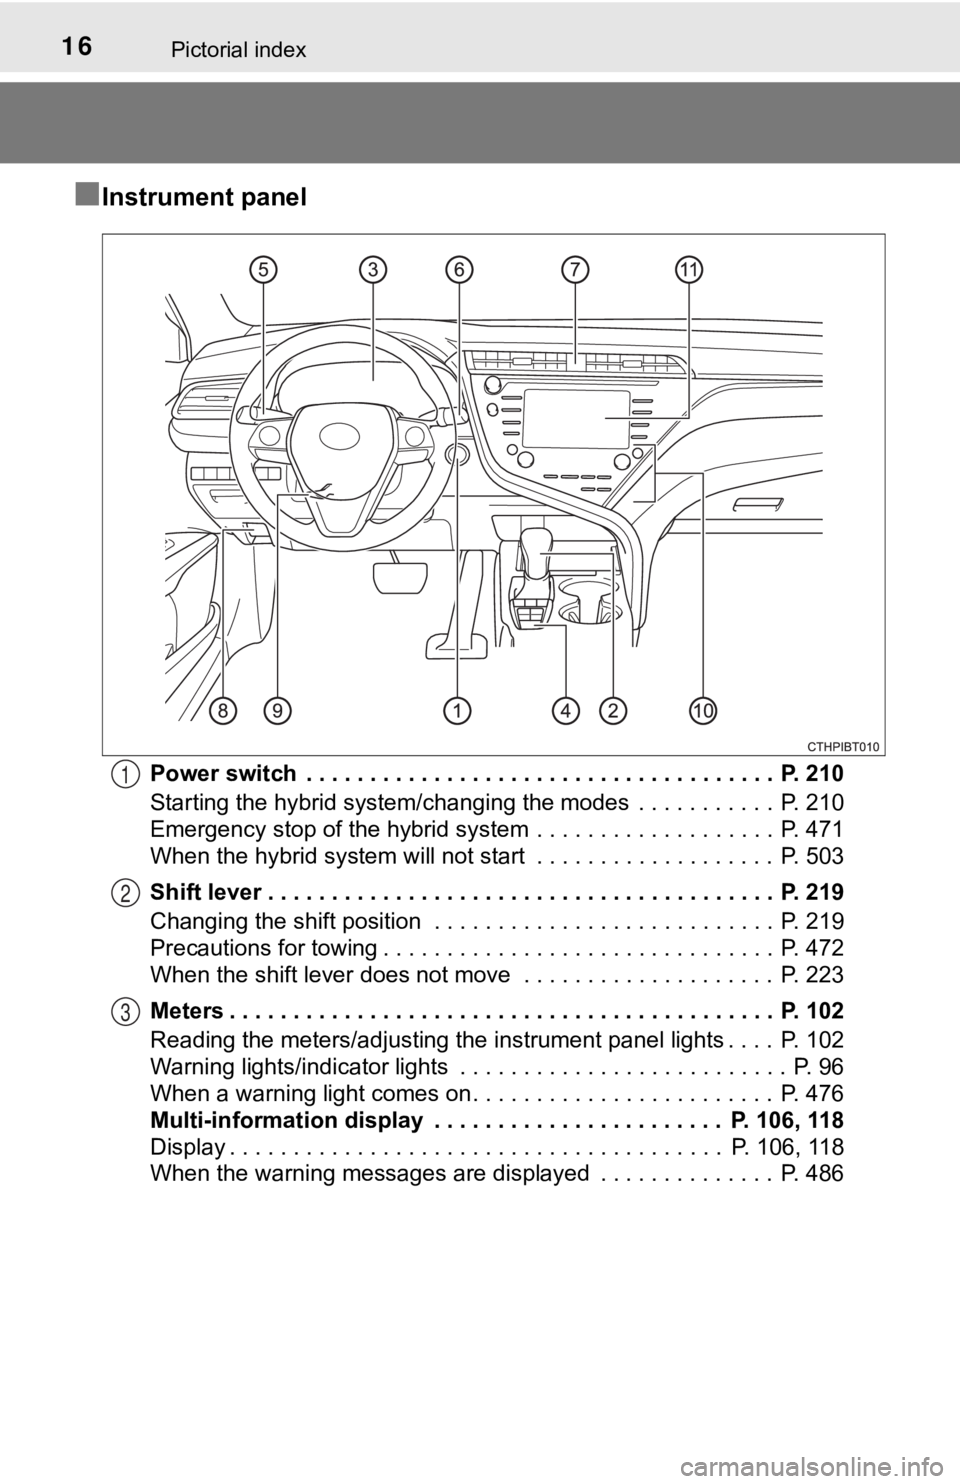
■Instrument panel
Power switch . . . . . . . . . . . . . . . . . . . . . . . . . . . . . . . . . . . . . P. 210
Starting the hybrid system/changing the modes . . . . . . . . . . . P. 210
Emergency stop of the hybrid system . . . . . . . . . . . . . . . . . . . P. 471
When the hybrid system will not start . . . . . . . . . . . . . . . . . . . P. 503
Shift lever . . . . . . . . . . . . . . . . . . . . . . . . . . . . . . . . . . . . . . . . P. 219
Changing the shift position . . . . . . . . . . . . . . . . . . . . . . . . . . . P. 219
Precautions for towing . . . . . . . . . . . . . . . . . . . . . . . . . . . . . . . P. 472
When the shift lever does not move . . . . . . . . . . . . . . . . . . . . P. 223
Meters . . . . . . . . . . . . . . . . . . . . . . . . . . . . . . . . . . . . . . . . . . . P. 102
Reading the meters/adjusting the instrument panel lights . . . . P. 102
Warning lights/indicator lights . . . . . . . . . . . . . . . . . . . . . . . . . . P. 96
When a warning light comes on . . . . . . . . . . . . . . . . . . . . . . . . P. 476
Multi-information display . . . . . . . . . . . . . . . . . . . . . . . P. 106, 118
Display . . . . . . . . . . . . . . . . . . . . . . . . . . . . . . . . . . . . . . . P. 106, 118
When the warning messages are displayed . . . . . . . . . . . . . . P. 4861
2
3
Page 18 of 592
18Pictorial index
■Switches
Automatic High Beam switch . . . . . . . . . . . . . . . . . . . . . . . . P. 236
VSC OFF switch . . . . . . . . . . . . . . . . . . . . . . . . . . . . . . . . . . . P. 291
Camera switch
*1, 2
Trunk opener switch . . . . . . . . . . . . . . . . . . . . . . . . . . . . . . . P. 162
Fuel filler door opener switch . . . . . . . . . . . . . . . . . . . . . . . . P. 246
“ODO/TRIP” switch . . . . . . . . . . . . . . . . . . . . . . . . . . . . P. 107, 120
Instrument panel light control switch . . . . . . . . . . . . . . . . . P. 103
Outside rear view mirror switch . . . . . . . . . . . . . . . . . . . . . . P. 185
Door lock switches . . . . . . . . . . . . . . . . . . . . . . . . . . . . . . . . P. 158
Power window switches . . . . . . . . . . . . . . . . . . . . . . . . . . . . P. 187
Window lock switch . . . . . . . . . . . . . . . . . . . . . . . . . . . . . . . . P. 187
1
2
3
4
5
6
7
8
9
10
11
Page 37 of 592

371-1. For safe use
1
For safety and security
WARNING
■SRS airbag precautions
Observe the following precautions regarding the SRS airbags.
Failure to do so may cause death or serious injury.
● The driver and all passengers in the vehicle must wear their se at belts
properly.
The SRS airbags are supplemental devices to be used with the se at belts.
● The SRS driver airbag deploys with considerable force, and can cause
death or serious injury especially if the driver is very close to the airbag.
The National Highway Traffic Safety Administration (NHTSA) advi ses:
Since the risk zone for the driver’s airbag is the first 2 - 3 in. (50 - 75 mm)
of inflation, placing yourself 10 in. (250 mm) from your driver airbag pro-
vides you with a clear margin of safety. This distance is measured from
the center of the steering wheel to your breastbone. If you sit less than 10
in. (250 mm) away now, you can change your driving position in several
ways:
• Move your seat to the rear as far as you can while still reach ing the ped-
als comfortably.
• Slightly recline the back of the seat. Although vehicle designs vary, many drivers can achieve the 10 in. (250
mm) distance, even with the driver seat all the way forward, si mply by
reclining the back of the seat somewhat. If reclining the back of your
seat makes it hard to see the road, raise yourself by using a f irm, non-
slippery cushion, or raise the seat if your vehicle has that feature.
• If your steering wheel is adjustable, tilt it downward. This points the air- bag toward your chest instead of your head and neck.
The seat should be adjusted as recommended by NHTSA above, whil e
still maintaining control of the foot pedals, steering wheel, and your view
of the instrument panel controls.
Page 40 of 592
401-1. For safe use
WARNING
■SRS airbag precautions
● Do not hang coat hangers or other hard objects on the coat hook s. All of
these items could become projectiles and may cause death or ser ious
injury, should the SRS curtain shield airbags deploy.
● Do not attach anything to or lean any-
thing against areas such as the dash-
board, steering wheel pad and lower
portion of the instrument panel.
These items can become projectiles
when the SRS driver, front passenger
and knee airbags deploy.
● Do not attach anything to areas such as
a door, windshield, windows, front or
rear pillar, roof side rail and assist grip.
Page 42 of 592

421-1. For safe use
WARNING
■Modification and disposal of SRS airbag system components
Do not dispose of your vehicle or perform any of the following modifications
without consulting your Toyota dealer. The SRS airbags may malfunction or
deploy (inflate) accidentally, causing death or serious injury.
● Installation, removal, disassembly and repair of the SRS airbag s
● Repairs, modifications, removal or replacement of the steering wheel,
instrument panel, dashboard, seats or seat upholstery, front, s ide and rear
pillars, roof side rails, front door panels, front door trims o r front door
speakers
● Modifications to the front door panel (such as making a hole in it)
● Repairs or modifications of the front fender, front bumper, or side of the
occupant compartment
● Installation of a grille guard (bull bars, kangaroo bar, etc.), snow plows,
winches, or roof luggage carrier
● Modifications to the vehicle’s suspension system
● Installation of electronic devices such as mobile two-way radio s and CD
players
● Modifications to your vehicle for a person with a physical disa bility
Page 46 of 592

461-1. For safe use
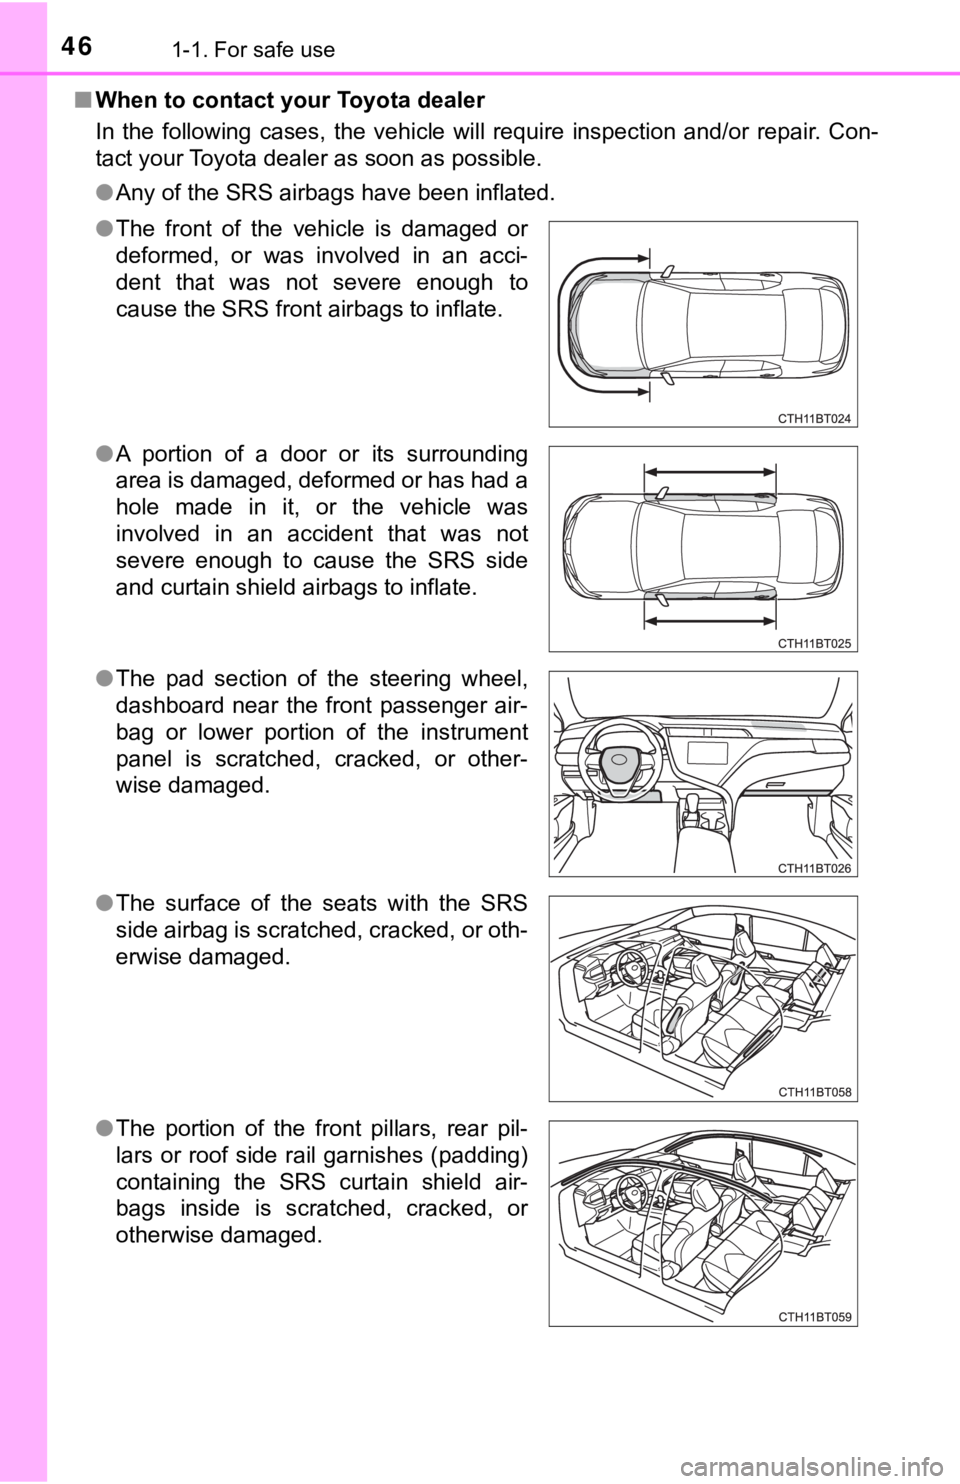
■When to contact your Toyota dealer
In the following cases, the vehicle will require inspection and /or repair. Con-
tact your Toyota dealer as soon as possible.
● Any of the SRS airbags have been inflated.
● The front of the vehicle is damaged or
deformed, or was involved in an acci-
dent that was not severe enough to
cause the SRS front airbags to inflate.
● A portion of a door or its surrounding
area is damaged, deformed or has had a
hole made in it, or the vehicle was
involved in an accident that was not
severe enough to cause the SRS side
and curtain shield airbags to inflate.
● The pad section of the steering wheel,
dashboard near the front passenger air-
bag or lower portion of the instrument
panel is scratched, cracked, or other-
wise damaged.
● The surface of the seats with the SRS
side airbag is scratched, cracked, or oth-
erwise damaged.
● The portion of the front pillars, rear pil-
lars or roof side rail garnishes (padding)
containing the SRS curtain shield air-
bags inside is scratched, cracked, or
otherwise damaged.
Page 96 of 592
962. Instrument cluster
4.2-inch display
7-inch display
The units used on the meters and some indicators may differ depending on
the target region.
Warning lights and indicators
The warning lights and indicators on the instrument cluster, ce n-
ter panel and outside rear view mirrors inform the driver of the
status of the vehicle’s various systems.
For the purpose of explanation, t he following illustrations dis-
play all warning lights a nd indicators illuminated.
Page 98 of 592
982. Instrument cluster
*1: These lights turn on when the power switch is turned to ON mode to indi-
cate that a system check is being performed. They will turn off after the
hybrid system is on, or after a few seconds. There may be a mal function in
a system if a light does not come on, or turn off. Have the veh icle
inspected by your Toyota dealer.
*2: This light flashes to indicate a malfunction.
*3: This light illuminates on the center panel.
*3
(Type A)
Rear passengers’ seat
belt reminder lights
( P. 479)*1
Master warning light
(P. 479)
*3
(Type B)
Rear passengers’ seat
belt reminder lights
(P. 479)*1
Tire pressure warning
light ( P. 479)