Page 141 of 532
141 11-7. Safety information
Before driving
Installing child restraints Follow the child restraint system m anufacturer's instructions. Firmly
secure child restraints to the r ear seats using the LATCH ancho rs or
a seat belt. Attach the top tether strap when installing a chil d
restraint.
The lap/shoulder belt can be used if your child restraint syste m is
not compatible with the LATCH (Lower Anchors and Tethers for Ch il-
dren) system.
Child restraint LATCH anchors LATCH anchors are provided
for both rear seats. (Buttons
displaying the location of the
anchors are attached to the
seats.)
Seat belts equipped with a
child restraint locking mecha-
nism (ALR/ELR belts except
driver’s seat belt) ( P. 6 0 )
Anchor bracket (for top tether
strap)
Anchor brackets are provided
for both rear seats.
Page 151 of 532

When driving
2
1512-1. Driving procedures
Driving the vehicle............ 152
Engine (ignition) switch
(vehicles with a smart
key system).................... 166
Engine (ignition) switch
(vehicles without a
smart key system).......... 175
Automatic transmission .... 178
Manual Transmission ....... 185
Turn signal lever .............. 188
Parking brake ................... 189
Horn ................................. 190
2-2. Instrument cluster
Gauges and meters ......... 191
Indicators and warning
lights .............................. 194
Multi-information display
(monochrome display) ... 200
Multi-information display
(color display) ................ 207 2-3. Operating the lights and
windshield wipers
Headlight switch ............... 222
Fog light switch ................ 228
Windshield wipers and
washer ........................... 229
2-4. Using other driving
systems
Cruise control ................... 232
Rear view monitor
system ........................... 237
Driving assist systems ..... 245
Hill-start assist control ...... 252
2-5. Driving information
Cargo and luggage .......... 256
Vehicle load limits ............ 260
Winter driving tips ............ 261
Trailer towing ................... 265
Dinghy towing .................. 266
Page 172 of 532

1722-1. Driving procedures
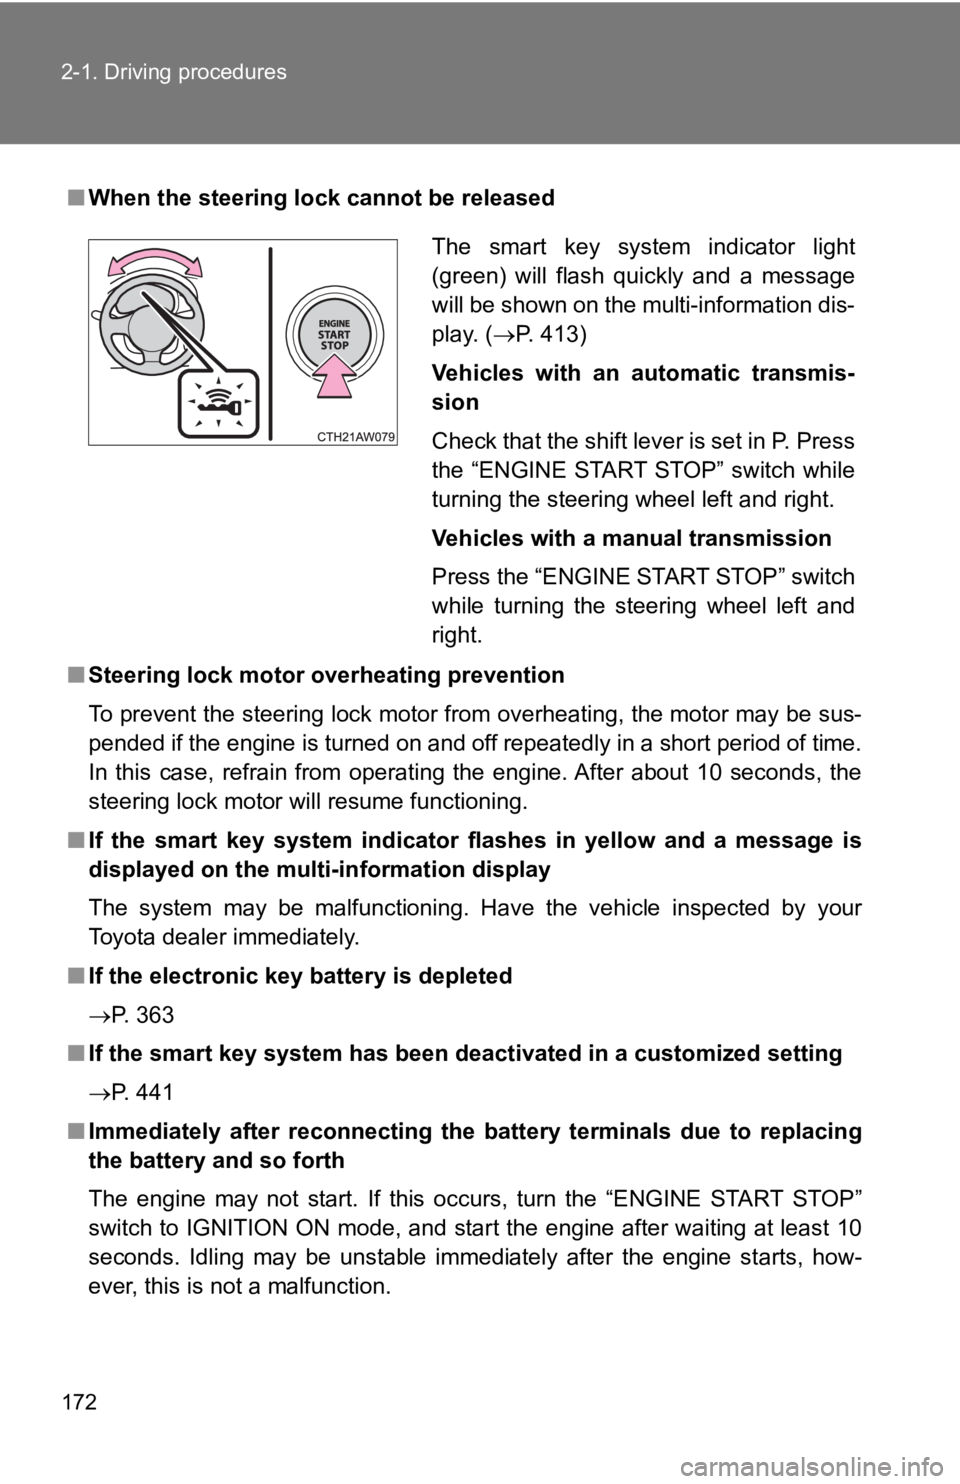
■ When the steering lock cannot be released
■ Steering lock motor o verheating prevention
To prevent the steering lock motor from overheating, the motor may be sus-
pended if the engine is turned on and off repeatedly in a short period of time.
In this case, refrain from operating the engine. After about 10 seconds, the
steering lock motor will resume functioning.
■ If the smart key system indicator flashes in yellow and a messa ge is
displayed on the multi-information display
The system may be malfunctioning. Have the vehicle inspected by your
Toyota dealer immediately.
■ If the electronic key battery is depleted
P. 363
■ If the smart key system has been deactivated in a customized se tting
P. 441
■ Immediately after reconnecting th e battery terminals due to rep lacing
the battery and so forth
The engine may not start. If this occurs, turn the “ENGINE STAR T STOP”
switch to IGNITION ON mode, and start the engine after waiting at least 10
seconds. Idling may be unstable immediately after the engine st arts, how-
ever, this is not a malfunction. The smart key system indicator light
(green) will flash quickly and a message
will be shown on the multi-information dis-
play. ( P. 413)
Vehicles with an automatic transmis-
sion
Check that the shift lever is set in P. Press
the “ENGINE START STOP” switch while
turning the steering wheel left and right.
Vehicles with a manual transmission
Press the “ENGINE START STOP” switch
while turning the steering wheel left and
right.
Page 179 of 532
1792-1. Driving procedures
2
When driving ■ Shift position uses
* : Shifting to the D position allows the system to select a gear suitable for
the driving conditions. Setting the shift lever to the D positi on is recom-
mended for normal driving. Shift
position Multi-information display
Function
Monochrome
display Color display
P Parking the vehicle/start-
ing the engine
R Reversing
N Neutral
D Normal D position driving
*(gears between “1” and “6”
are automatically
selected)(paddle shift switches
activated) (paddle shift switches
activated)
Temporary manual mode
driving ( P. 183)
M Manual mode driving
( P. 181)
Page 181 of 532

1812-1. Driving procedures
2
When driving Manual mode driving
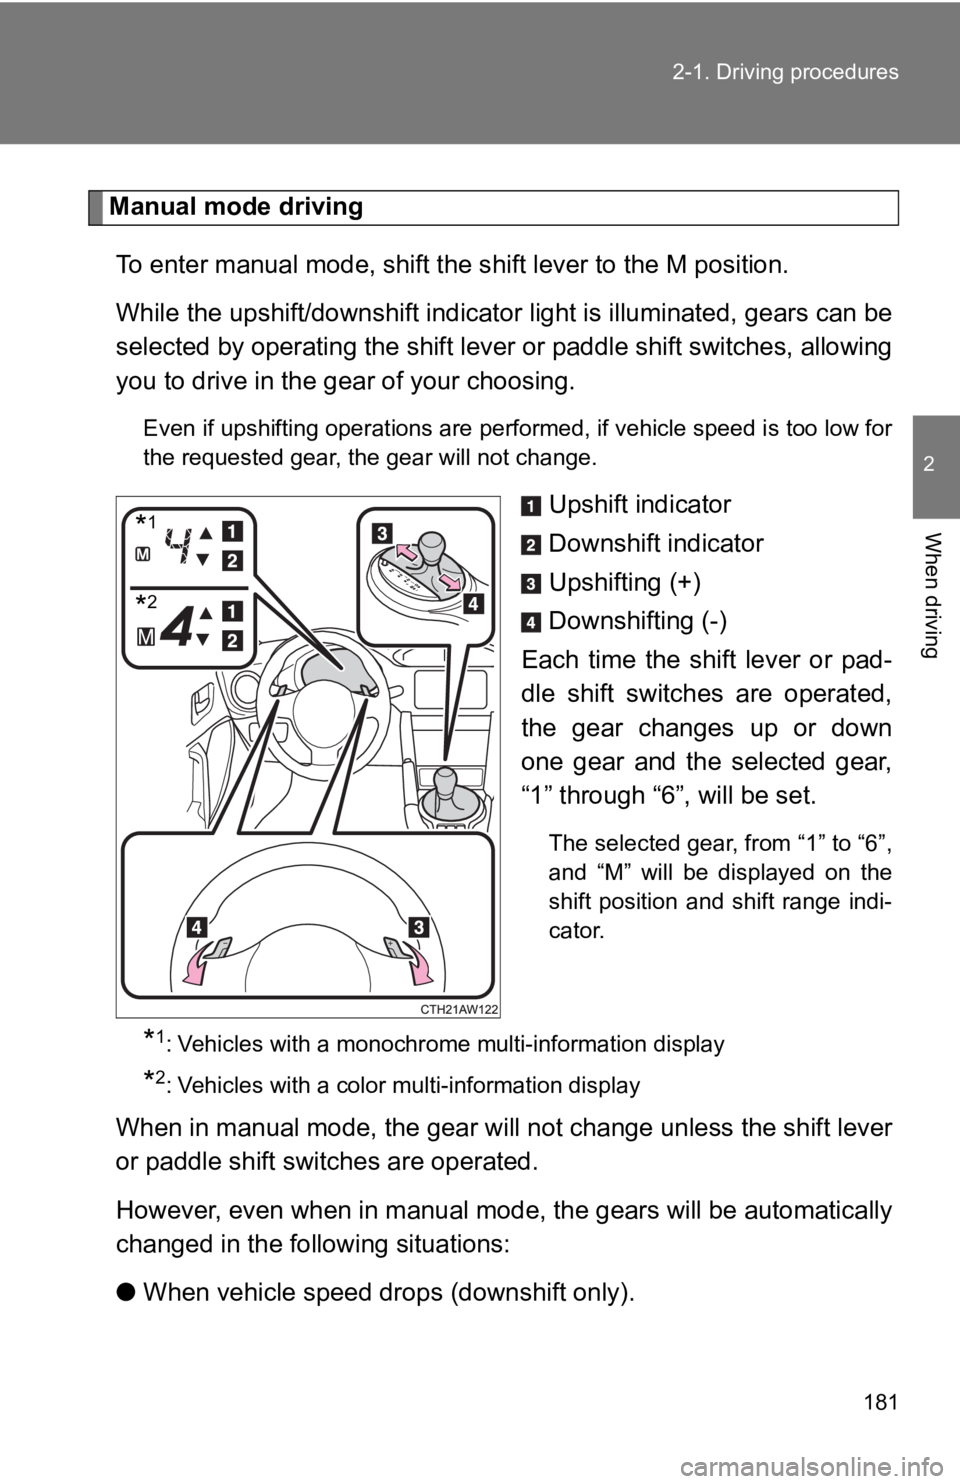
To enter manual mode, shift the s hift lever to the M position.
While the upshift/downshift indicator light is illuminated, gea rs can be
selected by operating the shift l ever or paddle shift switches, allowing
you to drive in the gea r of your choosing. Even if upshifting operations are performed, if vehicle speed i s too low for
the requested gear, the gear will not change.
Upshift indicator
Downshift indicator
Upshifting (+)
Downshifting (-)
Each time the shift lever or pad-
dle shift switches are operated,
the gear changes up or down
one gear and the selected gear,
“1” through “6 ”, will be set.The selected gear, from “1” to “6”,
and “M” will be displayed on the
shift position and shift range indi-
cator.
* 1
: Vehicles with a monochrome multi-information display
* 2
: Vehicles with a color multi-information display
When in manual mode, the gear will not change unless the shift lever
or paddle shift switches are operated.
However, even when in manual m ode, the gears will be automatica lly
changed in the following situations:
● When vehicle speed drops (downshift only).* 1
* 2
Page 183 of 532

1832-1. Driving procedures
2
When driving ■ Automatic gear selection when the vehicle is stopped
When the vehicle is idling at high rpm in order to warm up, and the vehicle is
on a slippery road, the transmission may automatically shift to 2 nd
gear for
stopping and starting off.
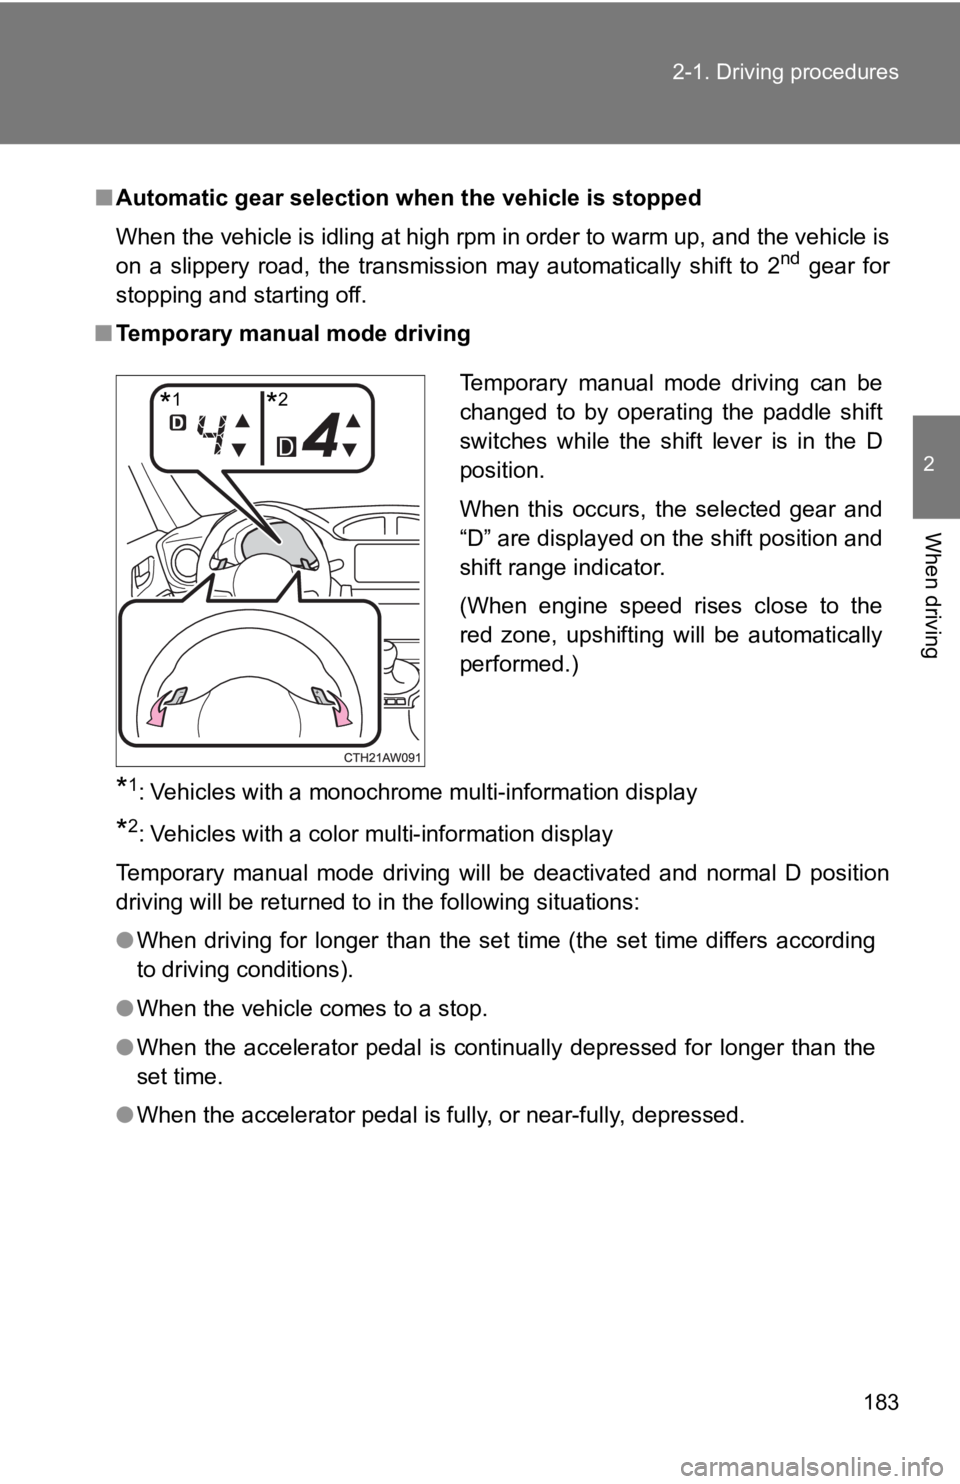
■ Temporary manual mode driving
* 1
: Vehicles with a monochrome multi-information display
* 2
: Vehicles with a color multi-information display
Temporary manual mode driving will be deactivated and normal D position
driving will be returned to in the following situations:
● When driving for longer than the set time (the set time differs according
to driving conditions).
● When the vehicle comes to a stop.
● When the accelerator pedal is continually depressed for longer than the
set time.
● When the accelerator pedal is fully, or near-fully, depressed. Temporary manual mode driving can be
changed to by operating the paddle shift
switches while the shift lever is in the D
position.
When this occurs, the selected gear and
“D” are displayed on the shift position and
shift range indicator.
(When engine speed rises close to the
red zone, upshifting will be automatically
performed.)
* 1
* 2
Page 186 of 532
1862-1. Driving procedures
Shift position indicator
The selected shift position will be
displayed on the multi-informa-
tion display. The selected shift position will not
appear in the following situations:
• When the shift lever is in N.
• When the vehicle speed is 6
mph (10 km/h) or less (except
when the shift lever is in R)
• When the clutch pedal is
depressed.
The default setting of the indicator
is off. The indicator can be turned
on/off. ( P. 204, 217)
* 1
: Vehicles with a monochrome multi-information display
* 2
: Vehicles with a color multi-information display
Shift-up indicator
To help enable fuel-efficient driv-
ing, the shift-up indicator flashes
3 times to indicate upshift timing.
The default setting of the indicator
is off. The indicator can be turned
on/off. ( P. 204, 217)
* 1
: Vehicles with a monochrome multi-information display
* 2
: Vehicles with a color multi-information display * 1
* 2
* 1
* 2
Page 191 of 532
191 2
When driving 2-2. Instrument cluster
Gauges and meters With monochrome display
With color display
Analog Speedometer
Displays the vehicle speed.
Tachometer
Displays the engine speed in revolutions per minute.
Fuel gauge
Displays the quantity of fuel remaining in the tank.