Page 5 of 224
Touchscreen Overview
The main components of the touchscreen are shown here. The touchscreen is used to control
many features that, in traditional cars, are controlled using physical buttons (for example,
adjusting the heating and air conditioning, headlights, etc.). You can also use the touchscreen to
customize Model X to suit your preferences.
Warning: Always pay attention to road and traffic conditions when driving. To minimize driver
distraction and ensure the safety of vehicle occupants as well as other road users, avoid using
the touchscreen to adjust settings while the vehicle is in motion.
Note: The image below is provided for demonstration purposes only. Depending on vehicle
options, software version and market region, your touchscreen may appear slightly different.
Touchscreen Overview
4Model X Owner
Page 135 of 224
Climate Controls
Overview of Climate Controls
Climate controls are always available at the bottom of the touchscreen. To turn the climate control system on, touch the fan icon or adjust the cabin temperature. To turn it off, touch the fan icon
and then touch the off button near the center of the popup window.
By default, climate control is set to the Auto setting, which maintains optimum comfort in all but
the most severe weather conditions. When you adjust the cabin temperature in the Auto setting,
the system automatically adjusts the heating, air conditioning, air distribution, and fan speed to maintain the cabin at your selected temperature. To override the Auto setting, touch the fan icon,
turn off the Auto setting, then manually adjust your settings (see Adjusting Climate Control
Settings on page 136). If you
Page 138 of 224
6.Choose how air is drawn into Model X:Outside air is drawn into Model X (see Ventilation on page 139).Air inside Model X is recirculated. This prevents outside air (traffic fumes)
from entering, but reduces dehumidifying performance. Recirculating the
air is the most efficient way to cool the front cabin area. To prevent the
windshield from fogging in some conditions, brie
Page 161 of 224
Charging
Electric Vehicle Components
High Voltage Components
1. Front Motor
2. Air Conditioning Compressor
3. Forward Junction Box
4. High Voltage Cabling
5. Battery Coolant Heater
6. DC-DC Converter
7. Cabin Heater
8. High Voltage Battery
9. On-board Charger
10. Charge Port
11. Rear Motor
12. HV Cable to Rear HVAC Assembly
Warning:
The high voltage system has no user serviceable parts. Do not disassemble, remove
or replace high voltage components, cables or connectors. High voltage cables are typically colored orange for easy identification.Warning: Read and follow all instructions provided on the labels that are attached to Model X.
These labels are there for your safety.Warning: In the unlikely event that a fire occurs, immediately contact your local fire
emergency responders.
Electric Vehicle Components
160Model X Owner
Page 166 of 224

If the charge port light turns red while
charging, a fault is detected. Check the instrument panel or touchscreen for a
message describing the fault. A fault can
occur due to something as common as a power outage. If a power outage occurs,
charging resumes automatically when power
is restored.
Note: When charging, particularly at high
currents, the refrigerant compressor and fan
operate as needed to keep the Battery cool.
Therefore, it is normal to hear sounds during charging.
Note: Air conditioning performance is
generally not affected by charging. However,
under certain circumstances (for example, you
are charging at high currents during a
particularly warm day), the air coming from
the vents may not be as cool as expected and
a message displays on the instrument panel.
This is normal behavior and ensures that the Battery stays within an optimum temperature
range while charging to support longevity and
optimum performance.Warning: Never spray liquid at a high
velocity (for example, if using a pressure
washer) towards the charge port while
charging. Failure to follow these
instructions can result in serious injury or
damage to the vehicle, charging
equipment, or property.
Stopping Charging
Stop charging at any time by disconnecting
the charge cable or touching Stop Charging
on the touchscreen.
Note: To prevent unauthorized unplugging of
the charge cable, the charge cable latch remains locked and Model X must be unlockedor able to recognize your key before you can
disconnect the charge cable.
To disconnect the charge cable:
1. Press and hold the button on the
connector handle to release the latch.
Alternatively, unlock the vehicle by
opening a door, using a key fob, or
touching Stop Charging on the
touchscreen. These methods unlock the
charge port as well.
2. Pull the connector from the charge port.
3. Push the charge port door closed.
Note: If Model X is equipped with a motorized
charge port door, it automatically closes shortly after you remove the charge cable.
Caution: Tesla strongly recommends
leaving Model X plugged in when not in use. This maintains the Battery at the
optimum level of charge.
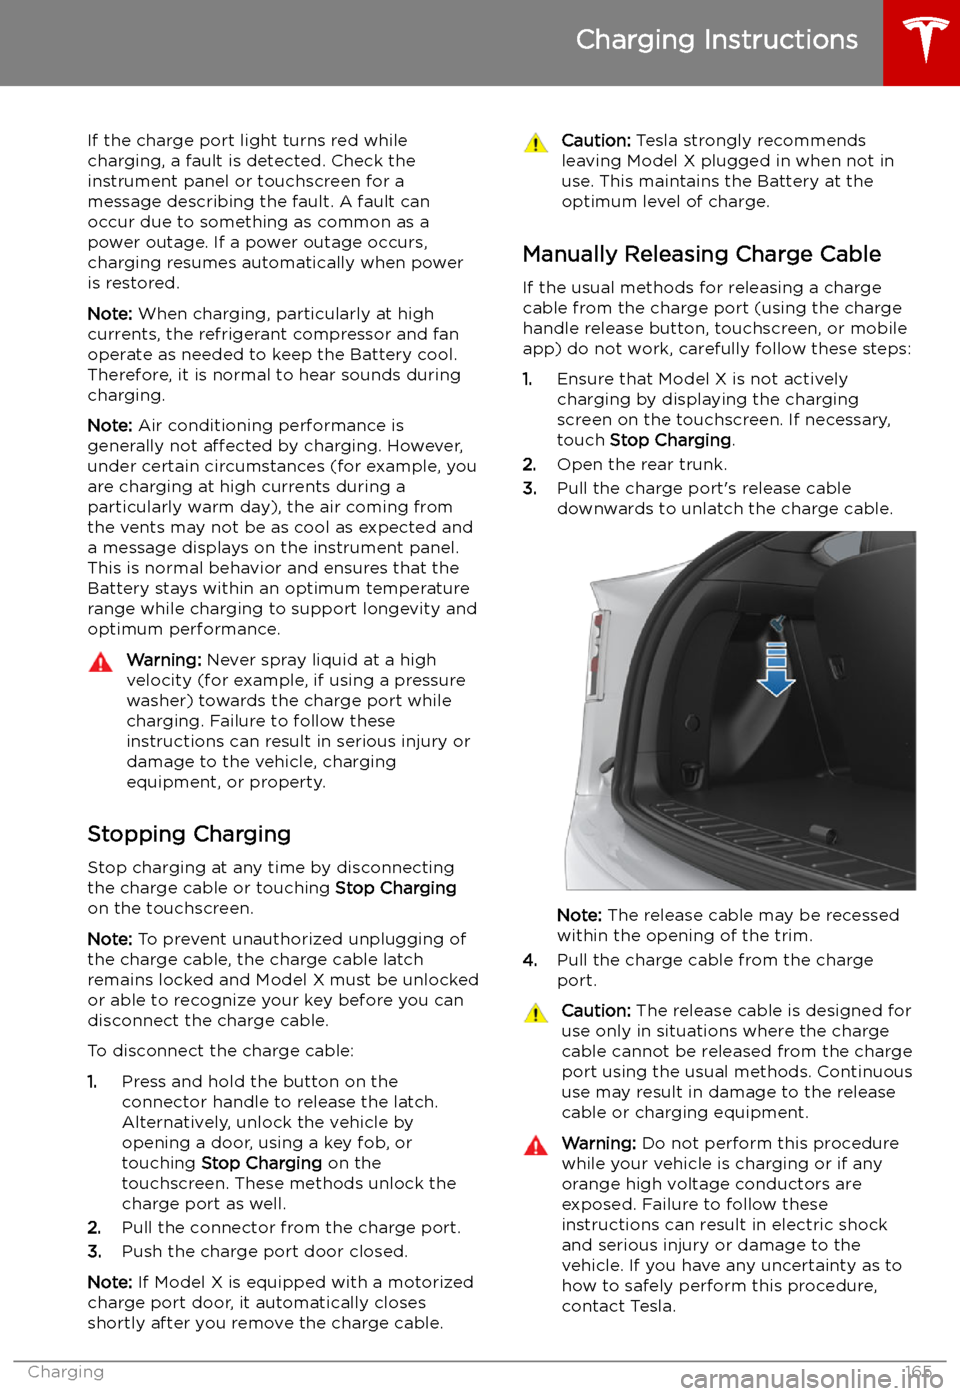
Manually Releasing Charge Cable
If the usual methods for releasing a charge
cable from the charge port (using the charge
handle release button, touchscreen, or mobile
app) do not work, carefully follow these steps:
1. Ensure that Model X is not actively
charging by displaying the charging
screen on the touchscreen. If necessary,
touch Stop Charging .
2. Open the rear trunk.
3. Pull the charge port
Page 218 of 224

Index
A ABS (Anti-lock Braking System) 72
absolute speed limit 122
Acceleration settings 79
access panel, removing 183
accessoriesplugging into power socket 22
accessory carrier 87
adaptive headlights 63
Adaptive Suspension Damping 150
air circulation 136
air conditioning 134
air distribution 136
air filter 139
air suspension 150
air vents 139
airbag, front passenger, disabling 47
airbags 45
alarm 153
all-season tires 177
always connected, setting 82
Always Show Estimated Round Trip Energy 143
anti-lock braking (ABS) 72
audioplaying files 145
steering wheel buttons 53
volume control 145
Auto High Beam 63
Auto Lane Change 108
auto-raising suspension 150
automatic emergency braking 120
Autopark 113
autopilotblind spot warning 117
side collision warning 117
staying inside lane markings 117AutopilotAuto Lane Change 108
automatic emergency braking 119
Autopark 113
Autosteer 106
collision avoidance assist 119
forward collision warning 119
Navigate on Autopilot 109
overtake acceleration 100
overview 97
speed assist 122
speed limit warning 122
staying within speed limits 122
Summon 115
Traffic-Aware Cruise Control 100
Autopilot components 97
Autosteer 106
average range 82
B
backup camera 84battery (12V)complete discharge 162
specifications 196Battery (high voltage)care of 162
coolant 183
specifications 196
temperature limits 162
battery (key), replacing 10
bicycle carrier 87
blind spot warning 117
blind spot warning chime 117
Bluetoothdevices, playing audio files from 147
general information 148
phone, pairing and using 148
body repairs 186
body touch up 181
brakesautomatic in emergencies 120