Page 97 of 207
always include the use of the HOV lane,
whenever it exists.Warning: Even when Navigate on
Autopilot deactivates at off-ramps,
Autosteer remains active. Always be
prepared to take appropriate actions such
as stopping at red lights and stop signs, and yielding to other road users.Warning: Navigate on Autopilot may not
always attempt to exit at an off-ramp,
even when the exit is determined by the
navigation route. Always remain alert and
be prepared to manually steer onto the
off-ramp, or make a required lane change.
You can cancel Navigate on Autopilot at any
time by touching the Navigate on Autopilot
button on the map
Page 116 of 207
DisplayManually control the brightness and the DAY (light background) or NIGHT
(dark background) setting of the touchscreen and instrument panel. When
set to AUTO, the brightness changes automatically between day and night
brightness based on ambient lighting conditions.
Brightness : Drag the slider to manually control the brightness level of the
displays. When Auto brightness is on, the displays are further adjusted
based on both the surroundings and by learning your preferences (it
remembers the type of manual adjustments you make).
SCREEN CLEAN MODE : Disable the touchscreen momentarily for cleaning
purposes.
You can also customize how units are displayed:
Page 139 of 207
Security Settings
About the Security System
If Model S does not detect a key nearby and a
locked door or trunk is opened, an alarm sounds and the headlights and turn signals
Page 150 of 207
Charging Instructions
Opening the Charge Port The charge port is located on the left side of
Model S, behind a door that is part of the rear
tail light assembly. Before charging, park
Model S to ensure that the charge cable easily reaches the charge port.
With Model S unlocked (or a recognized key is
within range) and in Park, press and release
the button on the Tesla charge cable to open the charge port door.
Note: If the charge cable is in range of the
charge port door, you can press the button on the charge cable to open the charge port door
even when Model S is locked or a recognized
key is not in range.
You can also open the charge port door using
any of these methods:
Page 153 of 207

Changing Charge SettingsThe charging screen displays on thetouchscreen whenever the charge port door is
open. To display the charging screen at any
time:Touch the Apps icon, then touch
the charging icon.
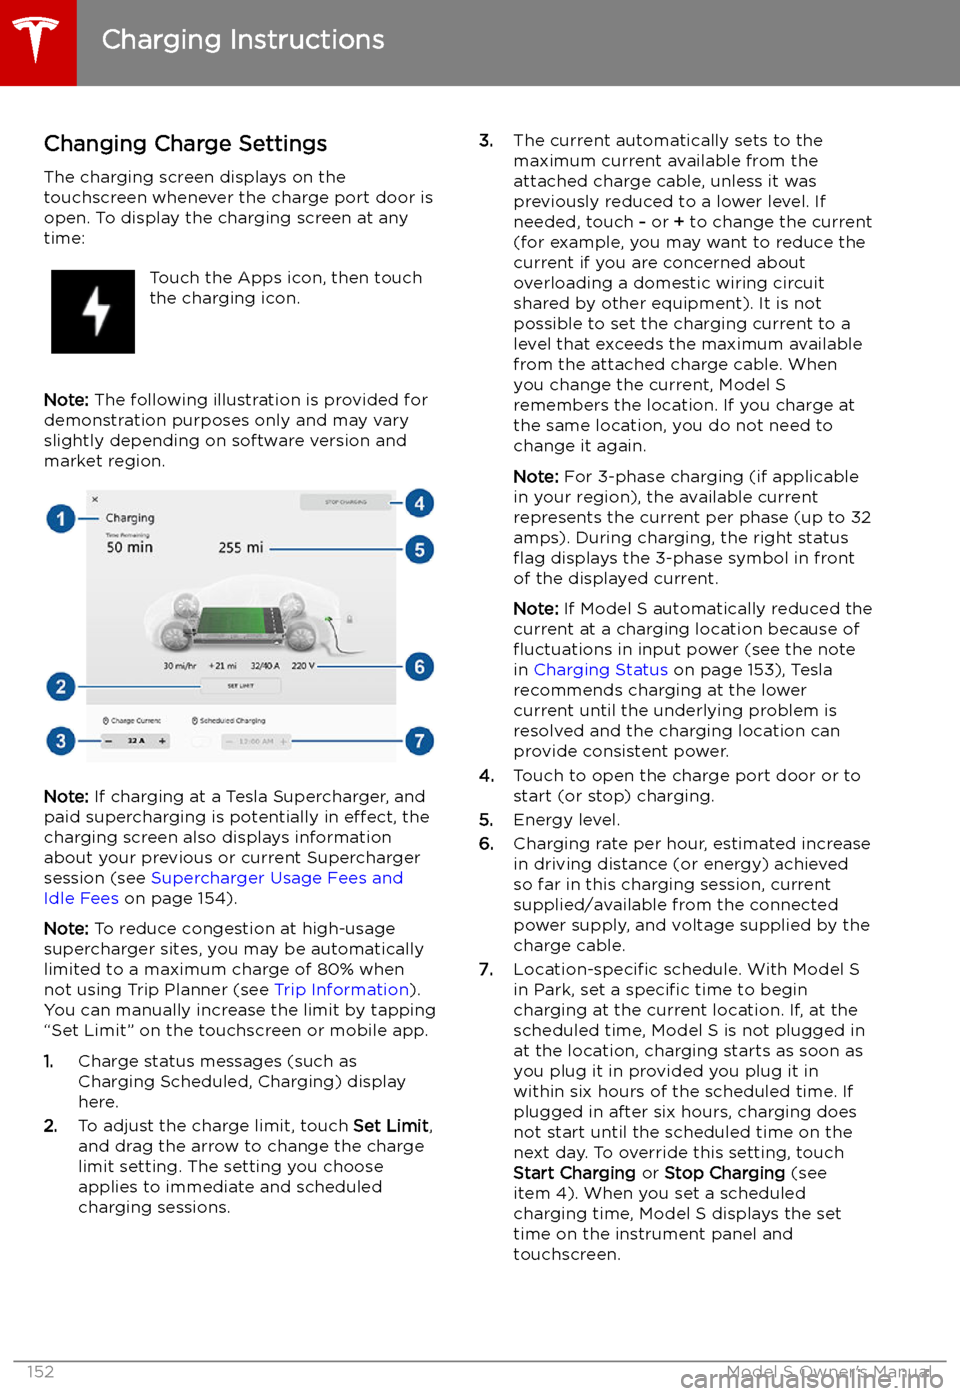
Note: The following illustration is provided for
demonstration purposes only and may vary
slightly depending on software version and
market region.
Note: If charging at a Tesla Supercharger, and
paid supercharging is potentially in effect, the
charging screen also displays information
about your previous or current Supercharger
session (see Supercharger Usage Fees and
Idle Fees on page 154).
Note: To reduce congestion at high-usage
supercharger sites, you may be automatically
limited to a maximum charge of 80% when not using Trip Planner (see Trip Information).
You can manually increase the limit by tapping
“Set Limit” on the touchscreen or mobile app.
1. Charge status messages (such as
Charging Scheduled, Charging) display
here.
2. To adjust the charge limit, touch Set Limit,
and drag the arrow to change the charge
limit setting. The setting you choose
applies to immediate and scheduled
charging sessions.
3. The current automatically sets to the
maximum current available from the
attached charge cable, unless it was
previously reduced to a lower level. If
needed, touch - or + to change the current
(for example, you may want to reduce the
current if you are concerned about
overloading a domestic wiring circuit
shared by other equipment). It is not
possible to set the charging current to a
level that exceeds the maximum available
from the attached charge cable. When
you change the current, Model S
remembers the location. If you charge at
the same location, you do not need to change it again.
Note: For 3-phase charging (if applicable
in your region), the available current
represents the current per phase (up to 32 amps). During charging, the right status
Page 154 of 207

Charging Status
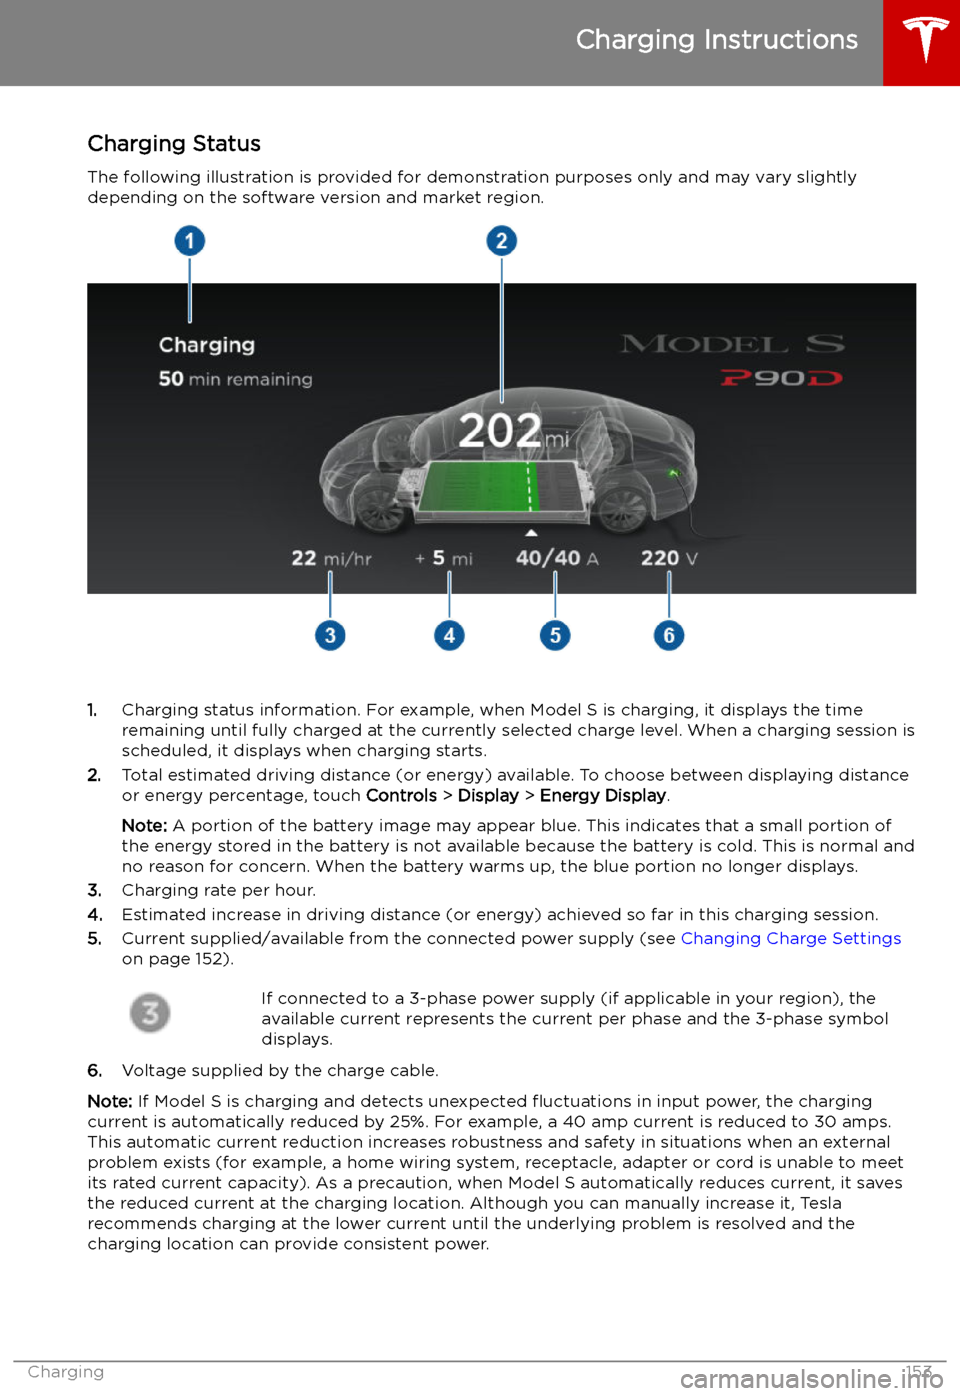
The following illustration is provided for demonstration purposes only and may vary slightly
depending on the software version and market region.
1. Charging status information. For example, when Model S is charging, it displays the time
remaining until fully charged at the currently selected charge level. When a charging session is
scheduled, it displays when charging starts.
2. Total estimated driving distance (or energy) available. To choose between displaying distance
or energy percentage, touch Controls > Display > Energy Display .
Note: A portion of the battery image may appear blue. This indicates that a small portion of
the energy stored in the battery is not available because the battery is cold. This is normal and
no reason for concern. When the battery warms up, the blue portion no longer displays.
3. Charging rate per hour.
4. Estimated increase in driving distance (or energy) achieved so far in this charging session.
5. Current supplied/available from the connected power supply (see Changing Charge Settings
on page 152).
If connected to a 3-phase power supply (if applicable in your region), the
available current represents the current per phase and the 3-phase symbol
displays.
6. Voltage supplied by the charge cable.
Note: If Model S is charging and detects unexpected
Page 162 of 207
The TPMS malfunction indicator is
combined with the tire pressure
indicator light. When the system
detects a malfunction, the indicator
Page 189 of 207
Disable the Self-Leveling AirSuspension System
If Model S is equipped with the air suspension
system, it automatically self-levels, even when
power is off. To prevent damage, you must
activate Jack Mode to disable self-leveling:
1. Touch Controls > Suspension on the
touchscreen.
2. Press the brake pedal, then touch Very
High to maximize height.
3. Touch Jack.When Jack Mode is active, Model S
displays this red indicator light on
the instrument panel, along with a message telling you that active
suspension is disabled.
Note: Jack Mode cancels when driving speed
exceeds 7 kph.
Warning: Failure to activate Jack Mode on
a vehicle equipped with the air
suspension system can result in the
vehicle becoming loose during transport,
which may cause significant damage.
Activate Transport Mode
Transport Mode keeps the parking brake
disengaged while winching Model S onto a