Page 211 of 348

Jacking Instructions
WARNING!
Carefully follow these tire changing warnings to help
prevent personal injury or damage to your vehicle:
•Always park on a firm, level surface as far from the
edge of the roadway as possible before raising the
vehicle.
• Turn on the Hazard Warning flasher.
• Chock the wheel diagonally opposite the wheel to be
raised.
• Apply the parking brake firmly and set an automatic
transmission in PARK; a manual transmission in
REVERSE.
• Never start or run the engine with the vehicle on a
jack.
• Do not let anyone sit in the vehicle when it is on a
jack.
• Do not get under the vehicle when it is on a jack. If
you need to get under a raised vehicle, take it to a
service center where it can be raised on a lift.
• Only use the jack in the positions indicated and for
lifting this vehicle during a tire change.
(Continued)
WARNING! (Continued)
•If working on or near a roadway, be extremely
careful of motor traffic.
• To assure that spare tires, flat or inflated, are securely
stowed, spares must be stowed with the valve stem
facing the ground.
• The stowed spare tire should always be checked for
security by pushing on it with your hand , at the
location under the rear bumper, behind the vehicle.
The spare tire should not move when fully secured
by the winch under the vehicle.
Jack Warning Label
7
IN CASE OF EMERGENCY 209
Page 214 of 348
CAUTION!
Do not attempt to raise the vehicle by jacking on
locations other than those indicated in the Jacking
Instructions for this vehicle.
3. Turn the handle on the jack screw to the right until the jack head is properly engaged in the described location.
Do not raise the vehicle until you are sure the jack is
securely engaged.
4. Raise the vehicle by turning the jack screw to the rightuntil the tire just clears the surface and enough clearance
is obtained to install the spare tire. Minimum tire lift
provides maximum stability.
WARNING!
Raising the vehicle higher than necessary can make the
vehicle less stable. It could slip off the jack and hurt
someone near it. Raise the vehicle only enough to
remove the tire.
Front Jacking Location Engaged
Rear Jacking Location Engaged
212 IN CASE OF EMERGENCY
Page 215 of 348
5. Remove the wheel lug bolts. For vehicles with wheelcovers, remove the cover from the wheel by hand. Do
not pry the wheel cover off. Then pull the wheel off the
hub.
6. Install the spare tire. Lightly tighten the wheel lug bolts using the bolt install wrench.
WARNING!
To avoid the risk of forcing the vehicle off the jack, do
not fully tighten the wheel bolts until the vehicle has
been lowered. Failure to follow this warning may
result in serious injury.
CAUTION!
Be sure to mount the spare tire with the valve stem
facing outward. The vehicle could be damaged if the
spare tire is mounted incorrectly.
7. Lower the vehicle by turning the jack screw to the left.
8. Refer to “Torque Specifications” in “Technical Specifica- tions” for proper wheel lug bolt torque.
9. Lower the jack to its fully-closed position.
Mounting Spare Tire
7
IN CASE OF EMERGENCY 213
Page 216 of 348

WARNING!
A loose tire or jack thrown forward in a collision or
hard stop could endanger the occupants of the vehicle.
Always stow the jack parts and the spare tire in the
places provided. Have the deflated (flat) tire repaired
or replaced immediately.
10. Stow the cable and wheel spacer before driving the vehicle. Refer to “Vehicles With Alloy Wheels” in this
section for instructions on stowing alloy wheels.
11. Stow the jack and tools under the driver ’s seat.
12. Check the spare tire pressure as soon as possible. Correct the tire pressure, as required.
13. When you place the spare tire back on the winch or if you carry the tire in need of repair on the winch,
always check that the tire is properly secured under the
vehicle by pushing on the stowed tire under the rear
bumper at the back of the vehicle. If the tire has motion
when pushed, use the tools to retighten the winch until
a loud click is heard.
Vehicles With Alloy Wheels
For stowing a damaged tire on vehicles with alloy wheels,
remove the adapter bracket and bolts from the storage bag
in the glove compartment and follow the steps below:
1. Take the adapter and fit the plastic spacer between thespring and the flange of the bracket (The adapter
bracket is sold separately through the dealer).
Adapter/Spacer
1 — Adapter
2 — Plastic Spacer
214 IN CASE OF EMERGENCY
Page 233 of 348

SERVICING AND MAINTENANCE
CONTENTS
�SCHEDULED SERVICING .................233
▫ Maintenance Plan ...................... .234
� ENGINE COMPARTMENT .................237
▫ Engine Compartment — 2.4L ..............237
▫ Checking Oil Level .....................238
▫ Adding Washer Fluid ...................238
▫ Maintenance-Free Battery .................239
� DEALER SERVICE ...................... .240
▫ Engine Oil .......................... .240
▫ Engine Oil Filter ...................... .241
▫ Engine Air Cleaner Filter .................242
▫ Air Conditioner Maintenance ..............242
▫ Body Lubrication ..................... .243
▫ Windshield Wiper Blades .................244 ▫
Exhaust System ....................... .244
▫ Cooling System ....................... .246
▫ Brake System ........................ .250
▫ Power Steering Fluid ....................252
▫ Automatic Transmission ..................252
▫ Upfitter Connectors — If Equipped ..........254
� RAISING THE VEHICLE ..................256
� TIRES ............................... .256
▫ Tire Safety Information ..................256
▫ Tires — General Information ..............266
▫ Tire Types ........................... .272
▫ Spare Tires — If Equipped ................273
▫ Wheel
And Wheel Trim Care ..............276
▫ Tire Chains (Traction Devices) .............277
8
Page 259 of 348
 — Metric tire sizing is based on U.S.
design standards. P-Metric tires have the letter “P”
molded into the sidewall preceding the size designation.
Example: P")
Tire MarkingsNOTE:
•P (Passenger) — Metric tire sizing is based on U.S.
design standards. P-Metric tires have the letter “P”
molded into the sidewall preceding the size designation.
Example: P215/65R15 95H.
• European — Metric tire sizing is based on European
design standards. Tires designed to this standard have
the tire size molded into the sidewall beginning with the
section width. The letter �P�is absent from this tire size
designation. Example: 215/65R15 96H.
• LT (Light Truck) — Metric tire sizing is based on U.S.
design standards. The size designation for LT-Metric
tires is the same as for P-Metric tires except for the letters
“LT” that are molded into the sidewall preceding the
size designation. Example: LT235/85R16.
• Temporary spare tires are designed for temporary emer-
gency use only. Temporary high pressure compact spare
tires have the letter “T” or “S” molded into the sidewall
preceding the size designation. Example: T145/80D18
103M.
• High flotation tire sizing is based on U.S. design stan-
dards and it begins with the tire diameter molded into
the sidewall. Example: 31x10.5 R15 LT.
Tire Markings
1 — U.S. DOT Safety
Standards Code (TIN) 4 — Maximum Load
2 — Size Designation 5 — Maximum Pressure
3 — Service Description 6 — Treadwear, Traction
and Temperature Grades 8
SERVICING AND MAINTENANCE 257
Page 260 of 348
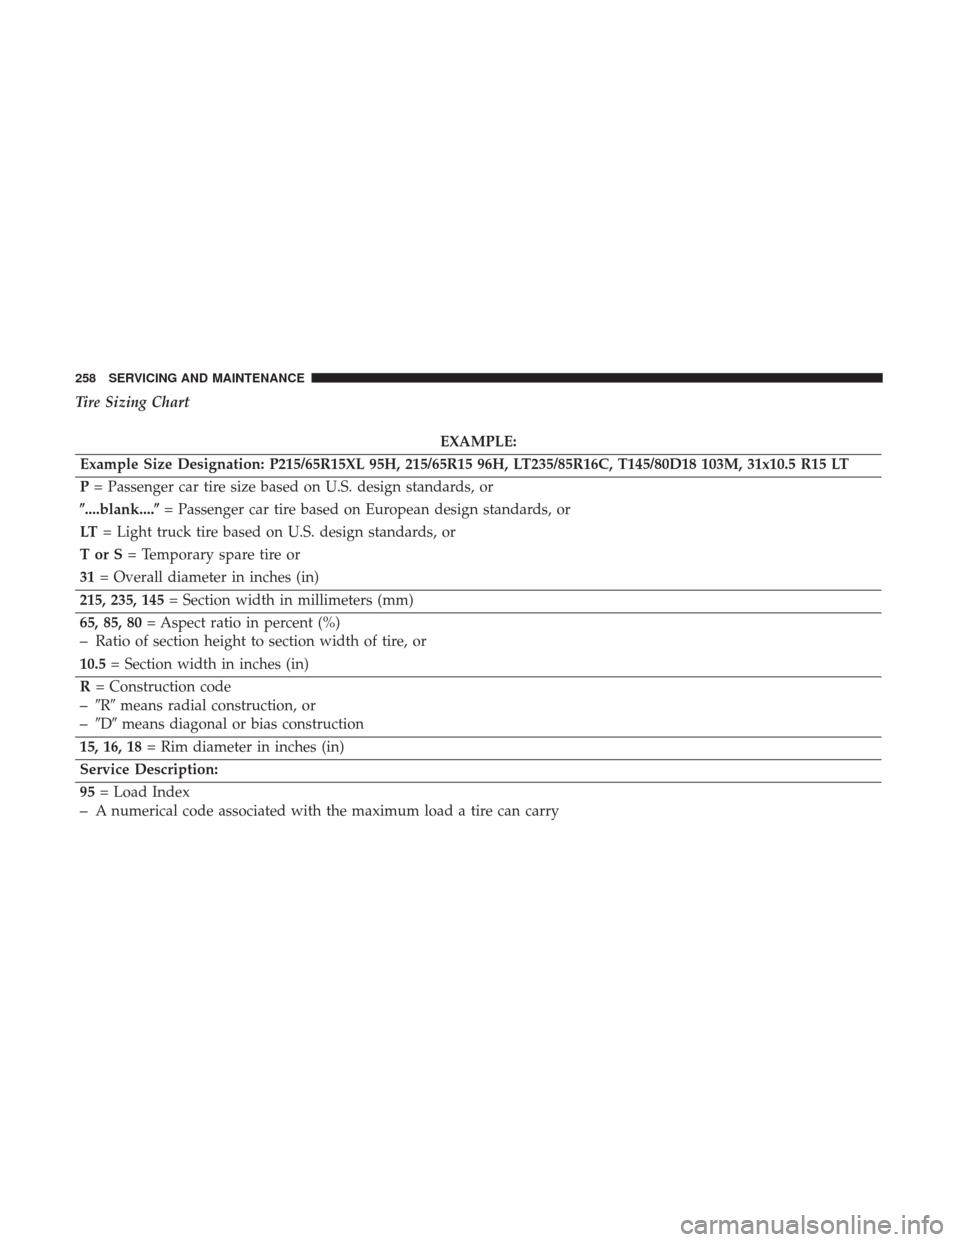
Tire Sizing Chart
EXAMPLE:
Example Size Designation: P215/65R15XL 95H, 215/65R15 96H, LT235/85R16C, T145/80D18 103M, 31x10.5 R15 LT
P = Passenger car tire size based on U.S. design standards, or
�....blank....� = Passenger car tire based on European design standards, or
LT = Light truck tire based on U.S. design standards, or
TorS= Temporary spare tire or
31 = Overall diameter in inches (in)
215, 235, 145 = Section width in millimeters (mm)
65, 85, 80 = Aspect ratio in percent (%)
–Ratio of section height to section width of tire, or
10.5 = Section width in inches (in)
R = Construction code
–�R� means radial construction, or
–�D� means diagonal or bias construction
15, 16, 18 = Rim diameter in inches (in)
Service Description:
95 = Load Index
–A numerical code associated with the maximum load a tire can carry
258 SERVICING AND MAINTENANCE
Page 264 of 348
Tire Loading And Tire Pressure
NOTE:The proper cold tire inflation pressure is listed on
the driver ’s side B-Pillar or the rear edge of the driver’s
side door.
Check the inflation pressure of each tire, including the
spare tire (if equipped), at least monthly and inflate to the
recommended pressure for your vehicle.
Example Tire Placard Location (Door)
Example Tire Placard Location (B-Pillar)
262 SERVICING AND MAINTENANCE