Page 597 of 696

MULTIMEDIA 595
Restore Default Settings
After pressing the “Restore Default Settings” button on the touchscreen, the following settings will be available:NOTE:
New vehicle purchasers or lessees will receive a free limited time subscription to SiriusXM Satellite Radio with your radio.
Following the expiration of the free services, it will be necessary to access the information on the Subscription Information
screen to re-subscribe.
1. Press the “Subscription Info” button on the touchscreen to access the Subscription Information screen.
2. Write down the SIRIUS ID numbers for your receiver. To reactivate your service, either call the number listed on the
screen or visit the provider online. Setting Name
Selectable Options
Setting NameSelectable Options
Restore Default Settings YesCancel
NOTE:
When the “Restore Default Settings” feature is selected it will reset the Display, Clock, Audio, and Radio Settings to their
default settings. If “Yes” is selected a pop-up will appear asking "Are you sure you want to reset your settings to default?”
select “Yes” to restore, or “Cancel” to exit.
9
Page 599 of 696

MULTIMEDIA 597
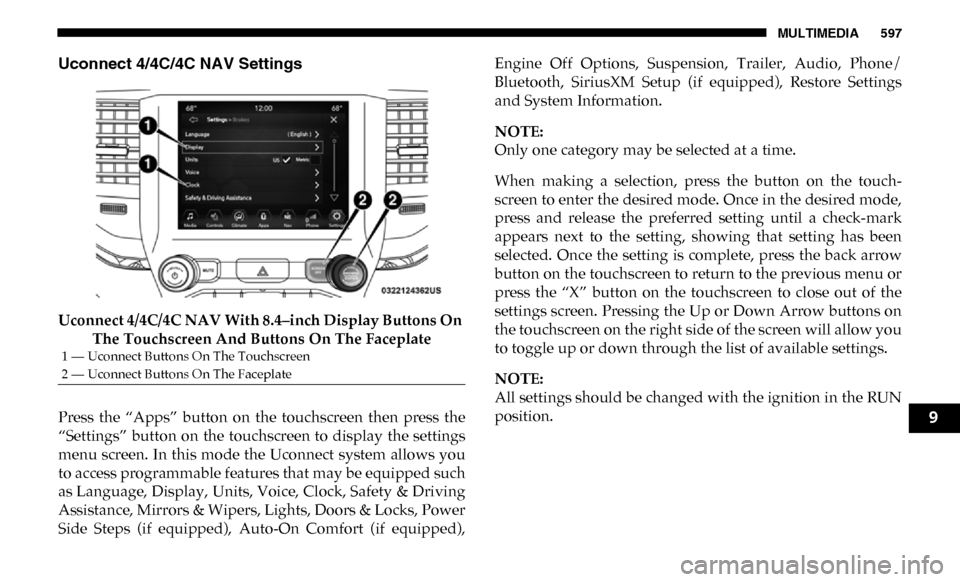
Uconnect 4/4C/4C NAV Settings
Uconnect 4/4C/4C NAV With 8.4–inch Display Buttons On The Touchscreen And Buttons On The Faceplate
Press the “Apps” button on the touchscreen then press the
“Settings” button on the touchscreen to display the settings
menu screen. In this mode the Uconnect system allows you
to access programmable features that may be equipped such
as Language, Display, Units, Voice, Clock, Safety & Driving
Assistance, Mirrors & Wipers, Lights, Doors & Locks, Power
Side Steps (if equipped), Auto-On Comfort (if equipped), Engine Off Options, Suspension, Trailer, Audio, Phone/
Bluetooth, SiriusXM Setup (if equipped), Restore Settings
and System Information.
NOTE:
Only one category may be selected at a time.
When making a selection, press the button on the touch
-
screen to enter the desired mode. Once in the desired mode,
press and release the preferred setting until a check-mark
appears next to the setting, showing that setting has been
selected. Once the setting is complete, press the back arrow
button on the touchscreen to return to the previous menu or
press the “X” button on the touchscreen to close out of the
settings screen. Pressing the Up or Down Arrow buttons on
the touchscreen on the right side of the screen will allow you
to toggle up or down through the list of available settings.
NOTE:
All settings should be changed with the ignition in the RUN
position.
1 — Uconnect Buttons On The Touchscreen
2 — Uconnect Buttons On The Faceplate
9
Page 618 of 696

616 MULTIMEDIA
Trailer Brake
After pressing the “Trailer Brake” button on the touchscreen, the following settings will be available:
Audio
After pressing the “Audio” button on the touchscreen, the following settings will be available:Setting Name
Selectable Options
Trailer Select Trailer 1Trailer 2Trailer 3 Trailer 4
Trailer Brake Type Light Electric Heavy Electric Light EOHHeavy EOH
Trailer Name List of Trailer Names Available
NOTE:
You can select and personalize your trailer name depending on the type of trailer you are hauling. Select the trailer name
from the following list: trailer, boat, car, cargo, dump, equipment, flatbed, gooseneck, horse, livestock, motorcycle, snow
mobile, travel, utility, and 5th wheel.
Setting Name Selectable Options
Balance/Fade FrontRearLeftRight
NOTE:
The “Balance/Fade” feature allows you to adjust the Balance and Fade settings. Press and drag the speaker icon or use the
arrows to adjust, tap the “C” icon to readjust to the center.
Equalizer + –
NOTE:
When in the “Equalizer” display you may adjust the Bass, Mid and Treble settings.
Page 619 of 696
MULTIMEDIA 617
Speed Adjusted
VolumeOff
123
NOTE:
The “Speed Adjusted Volume” feature increases or decreases volume relative to vehicle speed.
Surround Sound — If
Equipped On
Off
NOTE:
The “Surround Sound” feature provides simulated surround sound mode.
AUX Volume Offset
— If Equipped On
Off
NOTE:
The “AUX Volume Offset” feature provides the ability to tune the audio level for portable devices connected through the
AUX input.
Auto Play On Off
Setting Name
Selectable Options
9
Page 620 of 696

618 MULTIMEDIA
Phone/Bluetooth Settings
After pressing the “Phone/Bluetooth Settings” button on the touchscreen, the following settings will be available:
SiriusXM Setup — If Equipped
After pressing the “SiriusXM Setup” button on the touchscreen, the following settings will be available:Setting Name
Selectable Options
Phone Pop-ups Displayed in Cluster — If Equipped On
Off
Do Not Disturb List of Settings
NOTE:
Press “Do Not Disturb” to access the available settings. The following settings are: Auto Reply (both, text, call), Auto Reply
Message (custom, default) and Custom Auto Reply Message (create message). Paired Phones and Audio Devices List Of Paired Phones and Audio Sources
NOTE:
The “Paired Phones and Audio Devices” feature shows which phones and audio sources are paired to the Phone and Audio
Sources Settings system. For further information, refer to the Uconnect Owner’s Manual Supplement. Smartphone Projection Manager OnOff
Setting Name Selectable Options
Tune Start OnOff
Page 622 of 696
620 MULTIMEDIA
Restore Default Settings
After pressing the “Restore Default Settings” button on the touchscreen, the following settings will be available:
System Information
After pressing the “System Information” button on the touchscreen, the following settings will be available:Setting Name
Selectable Options
Restore Default Settings YesCancel
NOTE:
When the “Restore Settings” feature is selected it resets clock, audio and other features to their default settings.
Setting Name Selectable Options
Software License System Software Information Screen
NOTE:
When the “Software License” feature is selected, a “System Software Information” screen will appear, displaying the system
software version.
Page 623 of 696

MULTIMEDIA 621
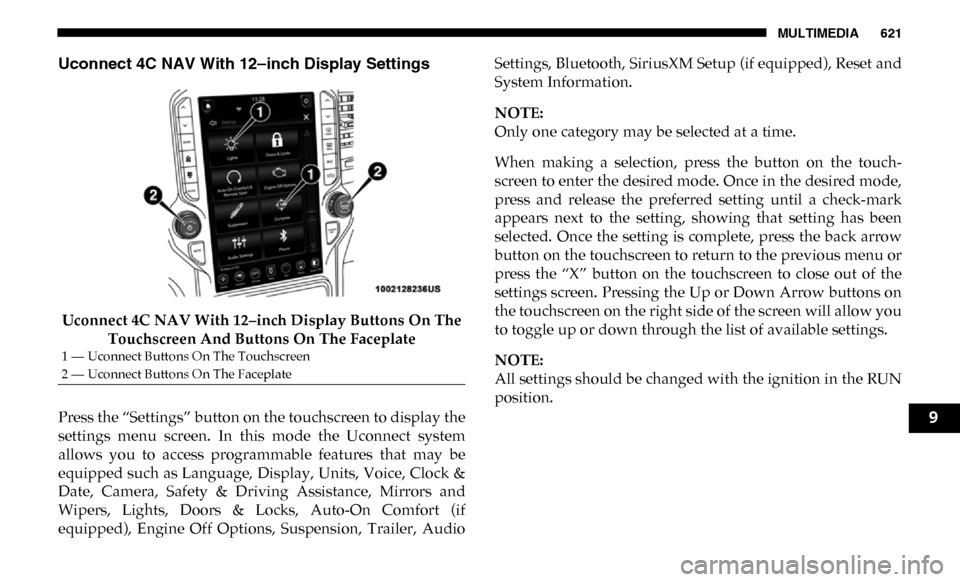
Uconnect 4C NAV With 12–inch Display Settings
Uconnect 4C NAV With 12–inch Display Buttons On The Touchscreen And Buttons On The Faceplate
Press the “Settings” button on the touchscreen to display the
settings menu screen. In this mode the Uconnect system
allows you to access programmable features that may be
equipped such as Language, Display, Units, Voice, Clock &
Date, Camera, Safety & Driving Assistance, Mirrors and
Wipers, Lights, Doors & Locks, Auto-On Comfort (if
equipped), Engine Off Options, Suspension, Trailer, Audio Settings, Bluetooth, SiriusXM Setup (if equipped), Reset and
System Information.
NOTE:
Only one category may be selected at a time.
When making a selection, press the button on the touch
-
screen to enter the desired mode. Once in the desired mode,
press and release the preferred setting until a check-mark
appears next to the setting, showing that setting has been
selected. Once the setting is complete, press the back arrow
button on the touchscreen to return to the previous menu or
press the “X” button on the touchscreen to close out of the
settings screen. Pressing the Up or Down Arrow buttons on
the touchscreen on the right side of the screen will allow you
to toggle up or down through the list of available settings.
NOTE:
All settings should be changed with the ignition in the RUN
position.
1 — Uconnect Buttons On The Touchscreen
2 — Uconnect Buttons On The Faceplate
9
Page 639 of 696
MULTIMEDIA 637
Audio
After pressing the “Audio” button on the touchscreen, the following settings will be available:Setting Name Selectable Options
Balance/Fade FrontRight Back Left
NOTE:
The “Balance/Fade” feature allows you to adjust the Balance and Fade settings. Press and drag the speaker icon or use the
arrows to adjust, tap the “C” icon to readjust to the center.
Equalizer + –
NOTE:
When in the “Equalizer” display you may adjust the Bass, Mid and Treble settings.
Speed Adjusted
Volume Off
123
NOTE:
The “Speed Adjusted Volume” feature increases or decreases volume relative to vehicle speed.
Surround Sound — If
Equipped On
Off
NOTE:
The “Surround Sound” feature provides simulated surround sound mode.
9