2019 Ram 2500 ignition
[x] Cancel search: ignitionPage 572 of 696

570 TECHNICAL SPECIFICATIONS
Fuel System Cautions
NOTE:
Intentional tampering with the emissions control system can
result in civil penalties being assessed against you.
Carbon Monoxide Warnings
CAUTION!
Follow these guidelines to maintain your vehicle’s
performance:
• The use of leaded gasoline is prohibited by Federal law. Using leaded gasoline can impair engine perfor -
mance and damage the emissions control system.
• An out-of-tune engine or certain fuel or ignition malfunctions can cause the catalytic converter to over -
heat. If you notice a pungent burning odor or some
light smoke, your engine may be out of tune or
malfunctioning and may require immediate service.
Contact an authorized dealer for service assistance.
• The use of fuel additives, which are now being sold as octane enhancers, is not recommended. Most of these
products contain high concentrations of methanol. Fuel
system damage or vehicle performance problems
resulting from the use of such fuels or additives is not the
responsibility of the manufacturer and may void or not
be covered under the New Vehicle Limited Warranty.
WARNING!
Carbon monoxide (CO) in exhaust gases is deadly.
Follow the precautions below to prevent carbon
monoxide poisoning:
• Do not inhale exhaust gases. They contain carbon monoxide, a colorless and odorless gas, which can kill.
Never run the engine in a closed area, such as a garage,
and never sit in a parked vehicle with the engine
running for an extended period. If the vehicle is
stopped in an open area with the engine running for
more than a short period, adjust the ventilation system
to force fresh, outside air into the vehicle.
• Guard against carbon monoxide with proper mainte -
nance. Have the exhaust system inspected every time
the vehicle is raised. Have any abnormal conditions
repaired promptly. Until repaired, drive with all side
windows fully open.
Page 580 of 696

578 MULTIMEDIA
UCONNECT SETTINGS
The Uconnect system uses a combination of buttons on the
touchscreen and buttons on the faceplate located on the
center of the instrument panel that allows you to access and
change the customer programmable features. Many features
can vary by vehicle.
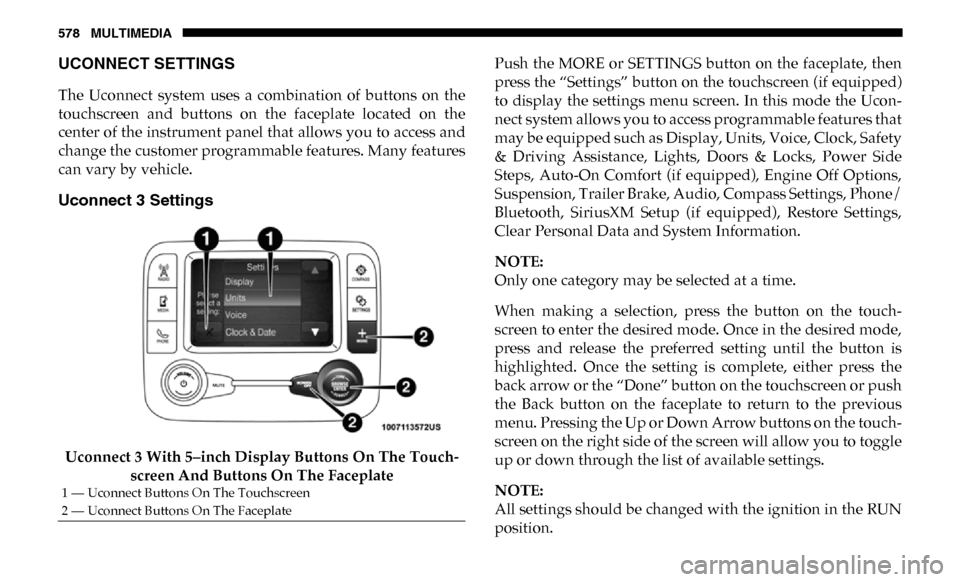
Uconnect 3 Settings
Uconnect 3 With 5–inch Display Buttons On The Touch-
screen And Buttons On The Faceplate Push the MORE or SETTINGS button on the faceplate, then
press the “Settings” button on the touchscreen (if equipped)
to display the settings menu screen. In this mode the Ucon
-
nect system allows you to access programmable features that
may be equipped such as Display, Units, Voice, Clock, Safety
& Driving Assistance, Lights, Doors & Locks, Power Side
Steps, Auto-On Comfort (if equipped), Engine Off Options,
Suspension, Trailer Brake, Audio, Compass Settings, Phone/
Bluetooth, SiriusXM Setup (if equipped), Restore Settings,
Clear Personal Data and System Information.
NOTE:
Only one category may be selected at a time.
When making a selection, press the button on the touch -
screen to enter the desired mode. Once in the desired mode,
press and release the preferred setting until the button is
highlighted. Once the setting is complete, either press the
back arrow or the “Done” button on the touchscreen or push
the Back button on the faceplate to return to the previous
menu. Pressing the Up or Down Arrow buttons on the touch -
screen on the right side of the screen will allow you to toggle
up or down through the list of available settings.
NOTE:
All settings should be changed with the ignition in the RUN
position.
1 — Uconnect Buttons On The Touchscreen
2 — Uconnect Buttons On The Faceplate
Page 583 of 696

MULTIMEDIA 581
Safety/Assistance
After pressing the “Safety/Assistance” button on the touchscreen, the following settings will be available:Setting Name Selectable Options
Forward Collision Warning
— If Equipped Off
Warning Only Warning & Braking
Forward Collision Warning
Sensitivity — If Equipped Near
Med Far
Front ParkSense Chime
Volume Low
MedHigh
Rear ParkSense Chime
Volume — If Equipped Low
MedHigh
Tilt Side Mirrors In Reverse
— If Equipped On
Off
NOTE:
When the “Tilt Side Mirrors In Reverse” feature is selected, the exterior side-view mirrors tilt downward when the ignition
is in the RUN position and the transmission gear selector is in the REVERSE position. The mirrors move back to their
previous position when the transmission is shifted out of REVERSE.
Surround View Camera — If
Equipped On
Off
NOTE:
The “Surround View Camera” feature displays a complete 360 degree view of the vehicle's exterior environment while
backing up.
9
Page 584 of 696

582 MULTIMEDIA
Surround View Camera
Delay — If EquippedOn
Off
NOTE:
The “Surround View Camera Delay” setting determines whether or not the screen will display the 360 degree view image
with guidelines for up to ten seconds after the vehicle is shifted out of REVERSE. This delay will be canceled if the vehicle’s
speed exceeds 8 mph (13 km/h), the transmission is shifted into PARK, or the ignition is switched to the OFF position.
Surround View Camera
Guidelines — If Equipped On
Off
NOTE:
The “Surround View Rear Back Up Camera Active Guidelines” feature allows you to see active guidelines over the Surround
View camera display whenever the gear selector is put into REVERSE or the Surround View button on the touchscreen is
pressed. The image will be displayed on the radio touchscreen display.
ParkView Backup Camera
Active Guidelines On
Off
NOTE:
Your vehicle may be equipped with the ParkView Rear Back Up Camera Active Guidelines that allows you to see active
guidelines over the ParkView Back up camera display whenever the gear selector is put into REVERSE. The image will be
displayed on the radio touchscreen display along with a caution note to “check entire surroundings” across the top of the
screen. After five seconds, this note disappears.
ParkView Backup Camera
Delay On
Off
Setting Name
Selectable Options
Page 585 of 696

MULTIMEDIA 583
NOTE:
When the vehicle is shifted out of REVERSE (with camera delay turned OFF), the rear camera mode is exited and the navi-
gation or audio screen appears again. When the vehicle is shifted out of REVERSE (with camera delay turned ON), the rear
view image with dynamic grid lines will be displayed for up to ten seconds after shifting out of REVERSE unless the forward
vehicle speed exceeds 8 mph (12 km/h), the transmission is shifted into PARK or the ignition is switched to the OFF position.
Forward Facing Camera
Guidelines — If Equipped On
Off
NOTE:
The “Forward Facing Camera Guidelines” feature is an off-road type of feature that shows the path of the tires based on the
steering wheel input.
CHMSL (Center High
Mounted Stop Lamp)
Camera Dynamic Centerline
— If Equipped On
Off
NOTE:
When the “CHMSL Camera Dynamic Centerline” feature is selected, it will assist in backing up for trailer alignment and
hook up.
Rain Sensing Auto Wipers
— If Equipped On
Off
NOTE:
When the “Rain Sensing Auto Wipers” feature is selected, the system automatically activates the windshield wipers if it
senses moisture on the windshield. Setting Name
Selectable Options
9
Page 599 of 696

MULTIMEDIA 597
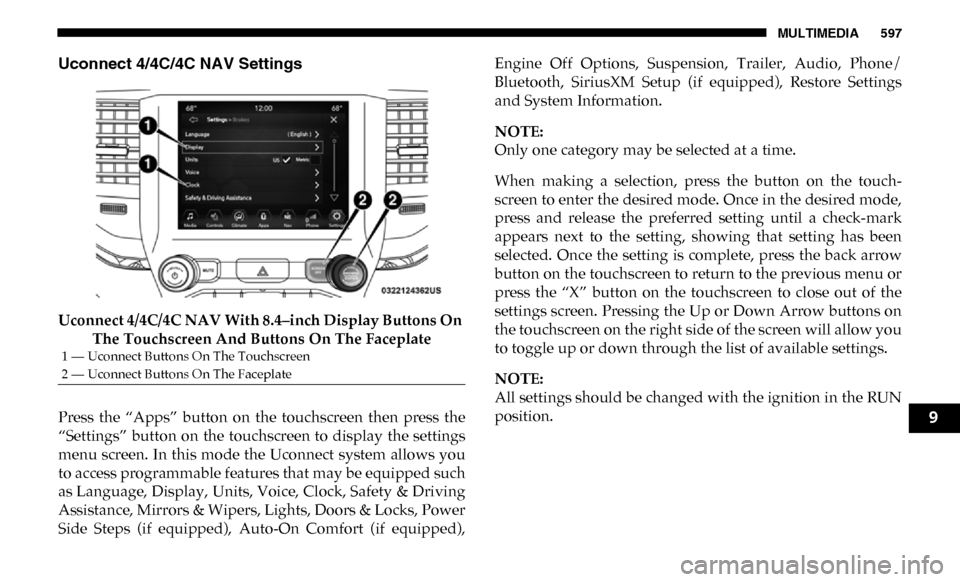
Uconnect 4/4C/4C NAV Settings
Uconnect 4/4C/4C NAV With 8.4–inch Display Buttons On The Touchscreen And Buttons On The Faceplate
Press the “Apps” button on the touchscreen then press the
“Settings” button on the touchscreen to display the settings
menu screen. In this mode the Uconnect system allows you
to access programmable features that may be equipped such
as Language, Display, Units, Voice, Clock, Safety & Driving
Assistance, Mirrors & Wipers, Lights, Doors & Locks, Power
Side Steps (if equipped), Auto-On Comfort (if equipped), Engine Off Options, Suspension, Trailer, Audio, Phone/
Bluetooth, SiriusXM Setup (if equipped), Restore Settings
and System Information.
NOTE:
Only one category may be selected at a time.
When making a selection, press the button on the touch
-
screen to enter the desired mode. Once in the desired mode,
press and release the preferred setting until a check-mark
appears next to the setting, showing that setting has been
selected. Once the setting is complete, press the back arrow
button on the touchscreen to return to the previous menu or
press the “X” button on the touchscreen to close out of the
settings screen. Pressing the Up or Down Arrow buttons on
the touchscreen on the right side of the screen will allow you
to toggle up or down through the list of available settings.
NOTE:
All settings should be changed with the ignition in the RUN
position.
1 — Uconnect Buttons On The Touchscreen
2 — Uconnect Buttons On The Faceplate
9
Page 604 of 696

602 MULTIMEDIA
Camera
After pressing the “Camera” button on the touchscreen, the following settings will be available:Setting Name Selectable Options
Surround View Camera — If Equipped On
Off
NOTE:
The “Surround View Camera” feature displays a complete 360 degree view of the vehicle's exterior environment while
backing up. Surround View Camera Delay — If Equipped On
Off
NOTE:
The “Surround View Camera Delay” setting determines whether or not the screen will display the 360 degree view image
with guidelines for up to ten seconds after the vehicle is shifted out of REVERSE. This delay will be canceled if the vehicle’s
speed exceeds 8 mph (13 km/h), the transmission is shifted into PARK, or the ignition is switched to the OFF position. Surround View Camera Guidelines — If Equipped On
Off
NOTE:
The “Surround View Rear Back Up Camera Active Guidelines” feature allows you to see active guidelines over the Surround
View camera display whenever the gear selector is put into REVERSE or the Surround View button on the touchscreen is
pressed. The image will be displayed on the radio touchscreen display. ParkView Backup Camera Delay OnOff
Page 605 of 696

MULTIMEDIA 603
NOTE:
The “ParkView Backup Camera Delay” setting determines whether or not the screen will display the rear view image with dynamic
grid lines for up to ten seconds after the vehicle is shifted out of REVERSE. This delay will be canceled if the vehicle’s speed exceeds
8 mph (13 km/h), the transmission is shifted into PARK, or the ignition is switched to the OFF position.
Active Parkview Backup Camera Guidelines On
Off
NOTE:
The “ParkView Backup Camera Active Guide Lines” feature overlays the Rear Backup Camera image with active, or
dynamic, grid lines to help illustrate the width of the vehicle and its project back up path, based on the steering wheel posi -
tion when the option is checked. A dashed center line overlay indicates the center of the vehicle to assist with parking or
aligning to a hitch/receiver.
Fixed Parkview Backup Camera Guidelines On
Off
Forward Facing Camera Guidelines — If Equipped On
Off
Setting Name
Selectable Options
9