Page 427 of 698
 is al-
lowedONLY if the rear wheels")
Recreational Towing — Two-Wheel Drive Models
DO NOT flat tow this vehicle. Damage to the drivetrain
will result.
Recreational towing (for two-wheel drive models) is al-
lowedONLY if the rear wheels are OFFthe ground. This
may be accomplished using a tow dolly or vehicle trailer. If
using a tow dolly, follow this procedure:
NOTE: If vehicle is equipped with air suspension, ensure
the vehicle is set to Normal Ride Height.
1. Properly secure the dolly to the tow vehicle, following the dolly manufacturer’s instructions.
2. Drive the rear wheels onto the tow dolly.
3. Apply the parking brake. Place the transmission in PARK.
4. Properly secure the rear wheels to the dolly, following the dolly manufacturer’s instructions.
5. Turn the ignition OFF.
6. Install a suitable clamping device, designed for towing, to secure the front wheels in the straight position.
CAUTION!
Towing with the rear wheels on the ground will cause
severe transmission damage. Damage from improper
towing is not covered under the New Vehicle Limited
Warranty.
Recreational Towing — Four-Wheel Drive Models
NOTE: The transfer case must be shifted into NEUTRAL
(N) for recreational towing. The transmission must be
shifted into PARK for recreational towing. Refer to the
following for the proper transfer case NEUTRAL (N)
shifting procedure for your vehicle.
CAUTION!
• DO NOT dolly tow any 4WD vehicle. Towing with
only one set of wheels on the ground (front or rear)
will cause severe transmission and/or transfer case
damage. Tow with all four wheels either ON the
ground, or OFF the ground (using a vehicle trailer).
• Tow only in the forward direction. Towing this
vehicle backwards can cause severe damage to the
transfer case.
(Continued)
6
STARTING AND OPERATING 425
Page 429 of 698
 so that
the transmission will remain in NEUTRAL when th")
2. Press and hold the brake pedal.
3. Shift the transmission to NEUTRAL. The driver’s doormust be closed (or the driver’s seat belt buckled) so that
the transmission will remain in NEUTRAL when the
brake pedal is released.
NOTE: If vehicle is equipped with air suspension, ensure
the vehicle is set to Normal Ride Height.
4. Using a ballpoint pen or similar object, push and hold the recessed transfer case NEUTRAL (N) button (at the
center of the transfer case switches). The NEUTRAL (N)
indicator light will illuminate, and remain lit, when the
shift to NEUTRAL (N) is complete. After the shift is
completed and the NEUTRAL (N) light stays on, release
the NEUTRAL (N) button.
5. Release the parking brake.
6. Shift the transmission into REVERSE. 7. Release the brake pedal for five seconds and ensure that
there is no vehicle movement.
8. Repeat steps 6 and 7 with the transmission in DRIVE.
9. Shift the transmission to NEUTRAL. Apply the parking brake. Turn OFF the engine. For vehicles with Keyless
Enter-N-Go, push and hold the ENGINE START/STOP
button until the engine shuts off. The transmission will
automatically select PARK when the engine is turned
off.
10. Turn the ignition to the OFF mode.
11. Attach the vehicle to the tow vehicle using a suitable tow bar.
12. Turn the ignition to the ON/RUN mode, but do not start the engine.
13. Release the parking brake.
14. Turn the ignition OFF.
6
STARTING AND OPERATING 427
Page 430 of 698
 button, and must continue
to be met until the shift has been completed. If any of
these requirements are not met")
NOTE:
•Steps 2 and 3 are requirements that must be met before
pushing the NEUTRAL (N) button, and must continue
to be met until the shift has been completed. If any of
these requirements are not met before pushing the
NEUTRAL (N) button or are no longer met during the
shift, the NEUTRAL (N) indicator light will flash con-
tinuously until all requirements are met or until the
NEUTRAL (N) button is released.
• The ignition must be in the ON/RUN mode for a shift to
take place and for the position indicator lights to be
operable. If the ignition is not in the ON/RUN mode, the
shift will not take place and no position indicator lights
will be on or flashing.
• A flashing NEUTRAL (N) position indicator light indi-
cates that shift requirements have not been met.
• If the vehicle is equipped with air suspension, the engine
should be started and left running for a minimum of 60
seconds (with all the doors closed) at least once every 24
hours. This process allows the air suspension to adjust
the vehicle’s ride height to compensate for temperature
effects.Shifting Out Of NEUTRAL (N)
Use the following procedure to prepare your vehicle for
normal usage:
1. Bring the vehicle to a complete stop, leaving it con- nected to the tow vehicle.
2. Press and hold the brake pedal.
3. Start the engine. Apply the parking brake. Shift the transmission into NEUTRAL.
4. Using a ballpoint pen or similar object, push and hold the recessed transfer case NEUTRAL (N) button (at the
center of the transfer case switches).
5. When the NEUTRAL (N) indicator light turns off, release the NEUTRAL (N) button.
6. Turn the engine OFF. The transmission will automati- cally select PARK when the engine is turned off.
7. Release the brake pedal.
8. Disconnect vehicle from the tow vehicle.
9. Press and hold the brake pedal.
10. Start the engine.
11. Release the parking brake.
428 STARTING AND OPERATING
Page 526 of 698
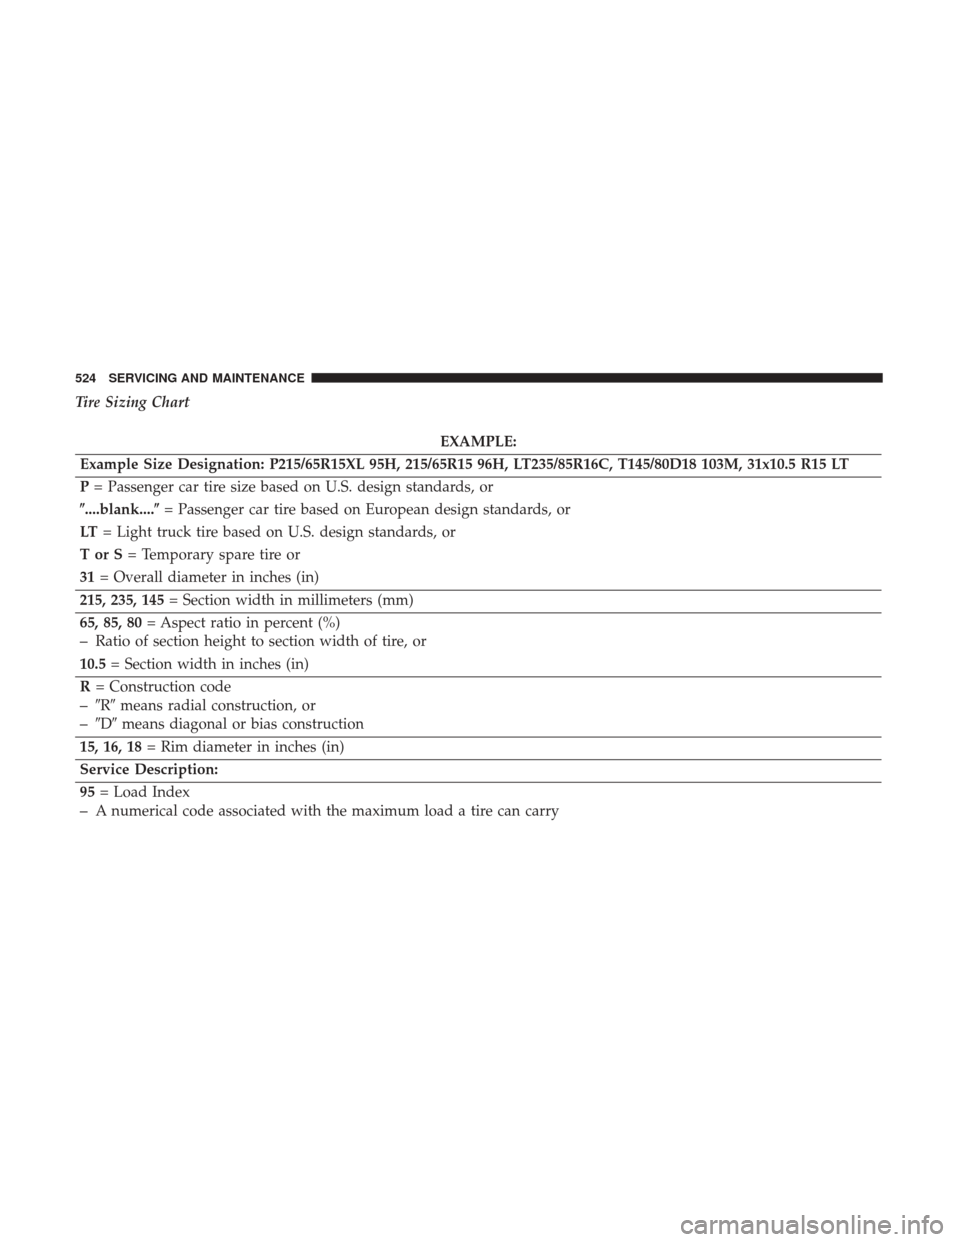
Tire Sizing Chart
EXAMPLE:
Example Size Designation: P215/65R15XL 95H, 215/65R15 96H, LT235/85R16C, T145/80D18 103M, 31x10.5 R15 LT
P = Passenger car tire size based on U.S. design standards, or
�....blank....� = Passenger car tire based on European design standards, or
LT = Light truck tire based on U.S. design standards, or
TorS= Temporary spare tire or
31 = Overall diameter in inches (in)
215, 235, 145 = Section width in millimeters (mm)
65, 85, 80 = Aspect ratio in percent (%)
–Ratio of section height to section width of tire, or
10.5 = Section width in inches (in)
R = Construction code
–�R� means radial construction, or
–�D� means diagonal or bias construction
15, 16, 18 = Rim diameter in inches (in)
Service Description:
95 = Load Index
–A numerical code associated with the maximum load a tire can carry
524 SERVICING AND MAINTENANCE
Page 586 of 698
Setting NameSelectable Options
Auto Entry/Exit Suspension OnOff
NOTE:
When the “Auto Entry/Exit Suspension” feature is selected, the vehicle automatically lowers from ride height posi-
tion when vehicle shifted to park for easy entry/exit. Display Suspension Messages AllWarning Only
Automatic Aero Mode OnOff
NOTE:
When the “Automatic Aero Mode” feature is selected, the Ride Height will automatically be adjusted depending on
the vehicle speed. Tire Jack Mode OnOff
NOTE:
When this feature is selected the air suspension system is disabled to prevent auto leveling of the suspension, while
the vehicle is on a jack changing a tire. Transport Mode OnOff
NOTE:
When the “Transport Mode” feature is selected, the air suspension system is disabled to assist with flat bed towing.
584 MULTIMEDIA
Page 611 of 698
Air Suspension — If Equipped
After pressing the “Suspension” button on the touchscreen,
the following settings will be available:
Setting NameSelectable Options
Sound Horn With Lower On Off
NOTE:
When the “Sound Horn With Lower” feature is selected, a short horn sound will occur when the key fob remote
lower button is pushed. Flash Lights With Lower On Off
NOTE:
When the “Flash Lights With Lower” feature is selected, the front and rear turn signals will flash when the key fob
remote lower button is pressed twice. This feature may be selected with or without the Sound Horn on Lower feature
selected. Display Suspension Mes- sages All
Warnings Only
Aero Mode On Off
NOTE:
When the “Automatic Aero Mode” feature is selected, the Ride Height will automatically be adjusted depending on
the vehicle speed.
10
MULTIMEDIA 609
Page 634 of 698
Suspension — If Equipped
After pressing the “Suspension” button on the touchscreen,
the following settings will be available:
Setting NameSelectable Options
Sound Horn With Lower On Off
NOTE:
When the “Sound Horn With Lower” feature is selected, a short horn sound will occur when the key fob remote
lower button is pushed. Flash Lights With Lower On Off
NOTE:
When the “Flash Lights With Lower” feature is selected, the front and rear turn signals will flash when the key fob
remote lower button is pressed twice. This feature may be selected with or without the Sound Horn on Lower feature
selected. Display Suspension Mes- sages All
Warning Only
Aero Mode On Off
NOTE:
When the “Automatic Aero Mode” feature is selected, the Ride Height will automatically be adjusted depending on
the vehicle speed.
632 MULTIMEDIA