2019 Peugeot Partner contents
[x] Cancel search: contentsPage 4 of 312

2
.
.
Instrument Panel 11
Warning and indicator lamps 1 3
Indicators
28
Trip computer
3
3
Setting the time and date
3
5
Key
37
Central locking/unlocking
4
8
Doors
5
0
General recommendations for the
sliding side doors
5
0
Rear roof flap
5
2
Alarm
5
3
Electric windows
5
5Tilting rear door windows
5
6
Steering wheel adjustment
5
7
Mirrors
5
7
General recommendations for the seats
5
8
Front seats
5
9
PEUGEOT i- Cockpit
5
9
2-seat front bench seat
6
1
Rear bench seat
6
3
Interior fittings
6
4
Multi-Flex bench seat
7
0
Crew cab
7
2
Heating 75
Manual air conditioning 7 5
Dual-zone automatic air conditioning 7
5
Recirculation of interior air
7
7
Front demist – defrost
7
8
Rear screen and/or door mirrors demisting –
defrosting
79
Additional Heating/Ventilation
7
9Lighting control stalk
8
5
Direction indicators (flashers)
8
6
Automatic illumination of headlamps
8
6
Daytime running lamps/Sidelamps
8
7
Intelligent beam headlights
8
8
Manual headlamp beam height adjustment
9
1
Wiper control stalk
9
1
Changing a wiper blade
9
3
Automatic wiping
9
4
General safety recommendations
9
5
Emergency or assistance call
9
6
Hazard warning lamps
9
7
Horn
97
Electronic stability control (ESC)
9
7
Advanced Grip Control
1
01
Hill Assist Descent Control
1
02
Seat belts
1
03
Airbags
106
Child seats
1
09
Deactivating the front passenger airbag
1
10
Manual child lock
1
14
Electric child lock
1
14
Over view
Instruments Access Ease of use and comfort
Safety
Lighting and visibility
Eco-driving
Eco-driving 8
Eco-coaching 10
Labels
4
Contents
Page 5 of 312

3
bit.ly/helpPSA
.
.
Driving recommendations 115
Starting/switching off the engine 1 16
Anti-theft protection
1
20
Manual parking brake
1
21
Automatic electronic parking brake
1
21
Hill start assist
1
24
5-speed manual gearbox
1
25
6-speed manual gearbox
1
26
Automatic gearbox
1
26
Gear efficiency indicator
1
30
Stop & Start
1
30
Speed Limit recognition and
recommendation
133
Speed limiter
1
37
Programmable cruise control
1
39
Dynamic cruise control
1
42
Memorising speeds
1
49
Active Safety Brake with Distance Alert
and Intelligent emergency braking
assistance
150
Active Lane Departure Warning System
1
53
Blind Spot Detection
1
57
Fatigue detection system
1
59
Parking sensors
1
60
Reversing camera
1
63
Surround Rear Vision
1
64
Under-inflation detection
1
67Compatibility of fuels 1
70
Fuel tank 1 71
Diesel misfuel prevention
1
72
Snow chains
1
73
Towing device
1
73
Overload indicator
1
75
Energy economy mode
1
76
Roof bars/Roof rack
1
77
B o n n et
17 7
Engines
1
78
Checking levels
1
79
Checks
181
AdBlue
® (BlueHDi) 1 83
Advice on care 1 86
Running out of fuel (Diesel)
1
87
Tool kit
1
87
Temporary puncture repair kit
1
89
Spare wheel
1
91
Changing a bulb
1
95
Changing a fuse
2
01
12
V battery
2
03
To w i n g
2 0 6Dimensions
208
Engine technical data and towed loads
2
10
Identification markings
2
17
Driving
Practical information
In the event of a breakdown Technical data
Access to additional videos
Alphabetical index
Audio equipment and telematics
Bluetooth audio system
PEUGEOT Connect Radio
PEUGEOT Connect Nav
.
Contents
Page 61 of 312

59
Front seats
PEUGEOT i-Cockpit
Before going out on the road and to benefit from the
ergonomic layout of the PEUGEOT i- Cockpit, adjust in
the following order:
-
t
he height of the head restraint,
-
t
he seat backrest angle,
-
t
he seat cushion height,
-
t
he longitudinal position of the seat,
-
t
he depth and then the height of the steering wheel,
-
t
he rear view mirror and door mirrors.
Before carrying out the manoeuvres, check
that nothing and no one is obstructing the
moving elements and their locking.
To avoid sudden folding, take care to
hold the backrest and support it until it is
horizontal.
Never put your hand underneath the seat
cushion to guide the seat downwards
or upwards, you could get your fingers
trapped. Place your hand on the grip/strap
(depending on equipment) at the top of the
seat cushion.
Please note: an incorrectly latched
backrest compromises the safety of
passengers in the event of sudden braking
or an impact.
The contents of the boot may be thrown
for ward – risk of severe injury!
Adjustments
Forwards-backwards
Height
(driver only)
F If fitted to your vehicle, pull the control upwards to raise or push it downwards to
lower, as many times as necessary to obtain
the position required.
F
Ra
ise the control and slide the seat
forwards or backwards.
Once these adjustments have been made,
ensure that from your driving position you can
see the "head-up" instrument panel clearly,
over the reduced diameter steering wheel.
3
Ease of use and comfort
Page 94 of 312

92
Automatic wiping (press down,
then release).
Single wipe (pull the stalk briefly
towards you).
Front screenwash
F Pull the wiper control stalk towards you and hold.
The screenwash and windscreen wiper operate
for as long as the control stalk is pulled.
Termination of the screenwash is followed by a
final wiping cycle.
On vehicles fitted with automatic
air conditioning, any action on the
screenwash control results in temporary
closing of the air intake to avoid odours
inside the passenger compartment.
The screenwash jets are integrated in the
tips of each arm.
The screenwash fluid is sprayed along the
length of the wiper blade. This improves
visibility and reduces the consumption of
screenwash fluid.
In some cases, depending on the contents
or colour of the liquid and on the exterior
brightness, the liquid spray may be hardly
noticeable. To avoid damaging the wiper blades,
do not operate the screenwash if the
screenwash reservoir is empty.
Only operate the screenwash if there
is no risk of the fluid freezing on the
windscreen and hindering visibility. Always
use a screenwash fluid suitable for low
temperatures during the winter period.
Never top up with water.
Rear wiper
Rear wiper selection ring:
Of f.
Intermittent wiping (proportional to
the speed of the vehicle).
Wash-wipe (set duration).
Reverse gear
When reverse gear is engaged, the rear wiper
will come into operation automatically if the
windscreen wipers are operating.
Activation/Deactivation
Activation or deactivation is set via
the vehicle configuration menu.
This system is activated by default.
If a significant accumulation of snow or ice
is present, or when using a bicycle carrier
on the boot, deactivate the automatic rear
w i p e r.
Special position of the
windscreen wipers
This position is used for cleaning or
replacement of the wiper blades. It can also
be useful, in winter (ice, snow), to release the
wiper blades from the windscreen.
or
Lighting and visibility
Page 187 of 312

185
cannot be discounted: do not inhale the fluid.
Ammonia vapour has an irritant effect on mucous
membranes (eyes, nose and throat).
Keep AdBlue® out of reach of children, in
its original container or bottle.
Procedure
Before starting the top up procedure, ensure
that the vehicle is parked on a flat and level
sur face.
In winter, check that the temperature of the
vehicle is above -11°C. If not, due to freezing,
the AdBlue
® cannot be poured into the tank.
Park your vehicle somewhere warmer for a few
hours before topping up.
In the event of an AdBlue
® breakdown,
confirmed by the message "Add AdBlue:
Starting impossible", you must top up with
at least 5
litres.
Never pour AdBlue
® into the Diesel fuel
tank. If any AdBlue
® is splashed, or if there are
any spillages on the side of the body, rinse
immediately with cold water or wipe with a
damp cloth.
If the fluid has crystallised, clean it off
using a sponge and hot water.
Access to the AdBlue® tank
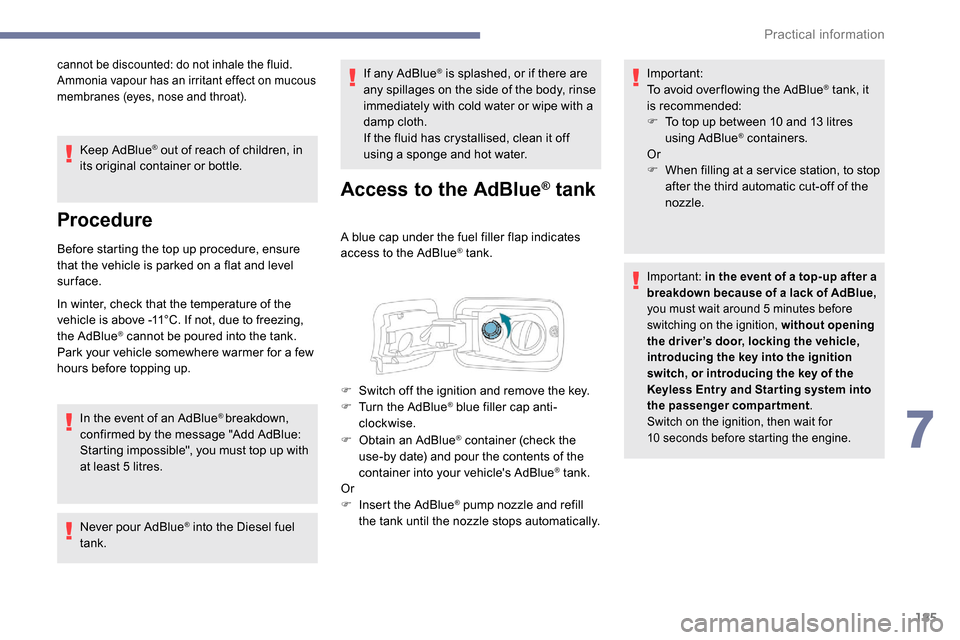
A blue cap under the fuel filler flap indicates
access to the AdBlue® tank.
F
O
btain an AdBlue
® container (check the
use-by date) and pour the contents of the
container into your vehicle's AdBlue
® tank.
Or
F
I
nsert the AdBlue
® pump nozzle and refill
the tank until the nozzle stops automatically. Important:
To avoid over flowing the AdBlue
® tank, it
i
s recommended:
F
T
o top up between 10 and 13
litres
using AdBlue
® containers.
Or
F
W
hen filling at a ser vice station, to stop
after the third automatic cut-off of the
nozzle.
Important: in the event of a top-up after a
breakdown because of a lack of AdBlue,
you must wait around 5
minutes before
switching on the ignition, without opening
the driver’s door, locking the vehicle,
introducing the key into the ignition
switch, or introducing the key of the
K
eyless Entr y and Star ting system into
the passenger compartment.
Switch on the ignition, then wait for
10
seconds before starting the engine.
F Switch off the ignition and remove the key.
F T urn the AdBlue® blue filler cap anti-
clockwise.
7
Practical information
Page 221 of 312

1
Bluetooth® audio system
Contents
First steps
2
S
teering mounted controls
2
M
enus
4
R
adio 4
DAB radio (Digital Audio Broadcasting)
6
M
edia 7
Telephone
10
Frequently asked questions
1
4 The different functions and settings
described vary according to the version
and configuration of your vehicle.
As a safety measure and because it
requires sustained attention by the
driver, the pairing of a Bluetooth mobile
telephone with the Bluetooth hands-free
system of your audio system must be
done with the vehicle stationary
and the
ignition on.
Your audio system is coded in such a way
that it will only operate in your vehicle.
All work on the system must be
carried out exclusively by a dealer or
qualified workshop, to avoid any risk of
electrocution, fire or mechanical faults.
To avoid discharging the battery, the audio
system may switch off after a few minutes
if the engine is not running.
.
Bluetooth® audio system
Page 239 of 312

1
PEUGEOT Connect Radio
Multimedia audio system –
Applications – Bluetooth®
telephone
Contents
First steps
2
S
teering mounted controls
3
M
enus
4
A
pplications
5
Radio
6
DAB radio (Digital Audio Broadcasting)
8
M
edia 9
Telephone
10
Settings
16
Frequently asked questions
1
8The different functions and settings
described vary according to the version
and configuration of your vehicle.
As a safety measure and because it
requires sustained attention by the
driver, the pairing of a Bluetooth mobile
telephone with the Bluetooth hands-free
system of your audio system must be
done with the vehicle stationary
and the
ignition on.
The system is protected in such a way that
it will only operate in your vehicle.
The display of the message Energy
Economy Mode signals that a change to
standby is imminent.
The link below gives access to OSS (Open
Source Software) codes for the system.
https://www.groupe-psa.com/fr/oss/
https://www.groupe-psa.com/en/oss/
.
PEUGEOT Connect Radio
Page 261 of 312

1
PEUGEOT Connect Nav
GPS satellite navigation –
Applications – Multimedia
audio system – Bluetooth
®
telephone
Contents
First steps
2
S
teering mounted controls
3
M
enus
4
V
oice commands
5
N
avigation
13
Connected navigation
1
5
Applications
18
Radio
23
DAB radio (Digital Audio Broadcasting)
2
4
Media
25
Telephone
27
Configuration
31
Frequently asked questions
3
3The different functions and settings
described vary depending on the version
and configuration of your vehicle.
As a safety measure and because it
requires sustained attention by the
driver, the pairing of a Bluetooth mobile
telephone with the Bluetooth hands-free
system of your audio system must be
done with the vehicle stationary
and the
ignition on.
The system is protected in such a way that
it will only operate in your vehicle.
The display of the Energy Economy
Mode message signals that a change to
standby is imminent.
The link below gives access to OSS (Open
Source Software) codes for the system.
https://www.groupe-psa.com/fr/oss/
https://www.groupe-psa.com/en/oss/
.
PEUGEOT Connect Nav