2019 Peugeot Partner display
[x] Cancel search: displayPage 163 of 312

161
Adjusting the audible signalOn versions equipped with
PEUGEOT Connect Radio,
pressing this button opens the
audible signal volume adjustment
window.
Visual assistance
It supplements the audible assistance, without
taking account of the vehicle's trajectory, by
displaying bars on the screen that represent the
distance between the obstacle and the vehicle
(white: more distant obstacles, orange: close
obstacles, red: very close obstacles).
When the obstacle is very close, the "Danger"
symbol is displayed on the screen.
Front parking sensors
The sound emitted by the speaker (front or
rear) locates the obstacle in relation to the
vehicle – in the vehicle trajectory, in front
or behind.
In addition to the rear parking sensors, the
front parking sensors are triggered when an
obstacle is detected in front and the speed of
the vehicle is still below 6
mph (10
km/h).
The front parking sensors are interrupted if
the vehicle stops for more than three seconds
in for ward gear, if an obstacle is no longer
detected or when the speed of the vehicle
exceeds 6
mph (10
km/h).
Side parking sensors
Using four additional sensors located on the
sides of the front and rear bumpers, the system
records the position of fixed obstacles during
the manoeuvre and signals them when they are
located by the sides of the vehicle.
The proximity information is given by an intermittent
audible signal, the frequency of which increases as
the vehicle approaches the obstacle.
When the distance between the vehicle and
the obstacle becomes less than about thirty
centimetres, the audible signal becomes
continuous.
The sound emitted by the speaker (right or left)
allows you to identify the side on which the obstacle
is located.
Only fixed obstacles are signalled
correctly. Moving obstacles detected
at the beginning of the manoeuvre may
be signalled mistakenly, while moving
obstacles which appear at the sides of
the vehicle and which were not previously
recorded will not be signalled.
Depending on version, in the example shown,
only the obstacles present in the shaded area
will be signalled by the audible assistance.
6
Driving
Page 164 of 312

162
With audio system or touch screen
The deactivation or activation
is carried out via the vehicle
configuration menu.
The state of the system stays in the memory
when the ignition is switched off. The rear parking sensors system will
be deactivated automatically if a trailer
or bicycle carrier is connected to a
towing device installed in line with the
manufacturer's recommendations.
In this case, the outline of a trailer is
displayed at the rear of the image of the
vehicle.
The parking sensors are deactivated while the
Park Assist system is measuring a space.
For more information on the Park Assist , refer
to the corresponding section.
Operating limits Maintenance
recommendations
In bad or wintry weather, ensure that the
sensors are not covered with mud, ice or
snow. When reverse gear is engaged, an
audible signal (long beep) indicates that
the sensors may be dirty.
-
C
ertain obstacles located in the sensors’
blind spots may not be detected or no
longer be detected during the manoeuvre.
-
S
ounds such as those emitted by noisy
vehicles and machinery (e.g. lorries,
pneumatic drills, etc.) may inter fere with the
vehicle's sensors. High pressure jet wash
When washing your vehicle, keep the
lance at least 12 inches (30
cm) away from
the sensors.
Deactivation/Activation
Without audio system
F To deactivate or activate the system, press this button.
The indicator lamp is lit when the system is
deactivated .
The objects memorised during the
manoeuvre will no longer be stored after
switching off the ignition.
-
C
ertain materials (fabrics) absorb sound
waves: pedestrians may not be detected.
-
A
ccumulated snow or dead leaves on the
road sur face can inter fere with the vehicle's
sensors.
-
A f
ront or rear impact to the vehicle can
distort the settings of the sensors, which is
not always detected by the system: distance
measurements may be incorrect.
-
T
he tilting of the vehicle if the boot is
very loaded can affect the distance
measurements.
-
T
he sensors may be affected by poor
weather conditions (heavy rain, thick fog,
snowfall, etc.).
Driving
Page 165 of 312

163
Malfunction
If a fault occurs when shifting to
reverse, this warning lamp comes on
in the instrument panel, accompanied
by a message and an audible signal
(short beep).
Contact a PEUGEOT dealer or a qualified
workshop to have the system checked.
Reversing camera
With the ignition on, this system uses a camera
located near the third brake lamp to display a
view of the rear of your vehicle on the output
screen (if it is a panel van or has a solid
partition).
The reversing camera is activated automatically
when reverse gear is engaged. The image is
displayed on the output screen. The output
screen switches off when the gearbox is in
neutral or in a for ward gear. The blue lines 1 represent the general direction
of the vehicle (the gap corresponds to the width
of your vehicle with the mirrors).
The red line 2 represents a distance of about
30
cm beyond the edge of your vehicle's rear
b u m p e r.
The green lines 3 represent distances of
about 1 and 2
metres beyond the edge of your
vehicle's rear bumper.
The turquoise blue curves 4 represent the
maximum turning circle.
The reversing camera is a driving aid which
cannot, in any circumstances, replace the
need for vigilance on the part of the driver.
Some objects may not be seen by the
camera. Certain vehicles may be difficult to see
(dark colours, headlamps off) when the
brightness of the screen is reduced by the
vehicle’s lighting dimmer.
The image quality may be affected by the
environment, the exterior conditions (rain,
dirt, dust), the driving mode, the lighting
conditions (night, low sun).
In the presence of areas in shade, or in
conditions of bright sunlight or inadequate
lighting, the image may be darkened and
with lower contrast.
Obstacles may appear further away than
they actually are in reality.
During parking manoeuvres and lane
changes, it is important to check the sides
of the vehicle using the mirrors.
The rear parking sensors also provide
information on the vehicle's surroundings.
6
Driving
Page 166 of 312

164
Maintenance
recommendations
In bad or wintry weather, ensure that the
camera is not covered by mud, frost or snow.
Check the cleanliness of the camera lens
regularly.
If necessary, clean the camera with a soft, dry
cloth.
When washing the vehicle using a high-
pressure jet, keep the spray directed at least
30 cm away from the camera.
Surround Rear Vision
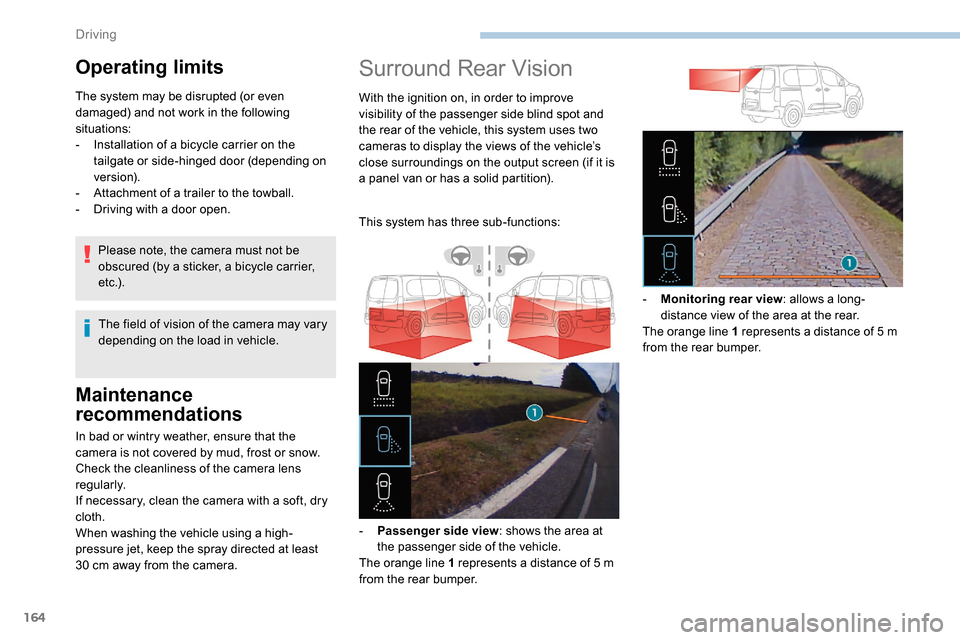
With the ignition on, in order to improve
visibility of the passenger side blind spot and
the rear of the vehicle, this system uses two
cameras to display the views of the vehicle’s
close surroundings on the output screen (if it is
a panel van or has a solid partition).
This system has three sub-functions:
-
P
assenger side view : shows the area at
the passenger side of the vehicle.
The orange line 1 represents a distance of 5
m
from the rear bumper. -
M
onitoring rear view: allows a long-
distance view of the area at the rear.
The orange line 1 represents a distance of 5
m
from the rear bumper.
Operating limits
The system may be disrupted (or even
damaged) and not work in the following
situations:
-
I
nstallation of a bicycle carrier on the
tailgate or side-hinged door (depending on
ve r s i o n).
-
A
ttachment of a trailer to the towball.
-
D
riving with a door open.
The field of vision of the camera may vary
depending on the load in vehicle.
Please note, the camera must not be
obscured (by a sticker, a bicycle carrier,
e t c .) .
Driving
Page 168 of 312

166
Operating limits
The system may be disrupted (or even
damaged) and not work in the following
situations:
-
I
nstallation of a bicycle carrier on the
tailgate or side-hinged door (depending on
ve r s i o n).
-
A
ttachment of a trailer to the towball.
-
D
riving with a door open.
Please note, the cameras must not be
obscured (by a sticker, a bicycle carrier,
e t c .) .
The field of vision of the rear camera
( monitoring rear view and visual
reversing aid ) may vary depending on the
load in the vehicle.
If the side-hinged door is opened during
use of the monitoring rear view or the
visual reversing aid, in for ward gear or
reverse gear, the output screen becomes
grey.
If the front passenger door is opened
during use of the passenger side view ,
in for ward gear or reverse gear, the output
screen becomes grey.
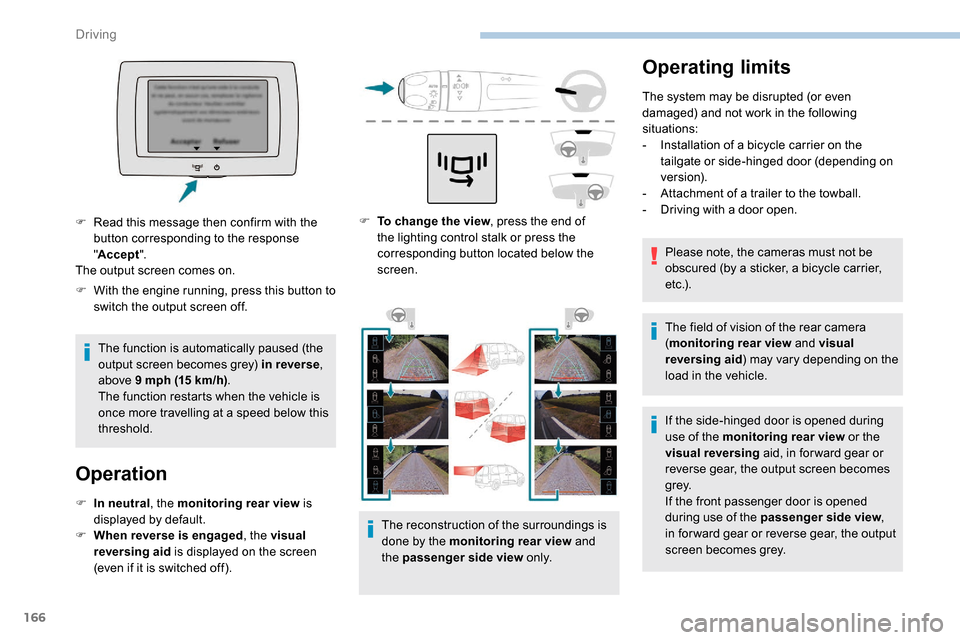
F
T
o change the view , press the end of
the lighting control stalk or press the
corresponding button located below the
screen.
The reconstruction of the surroundings is
done by the monitoring rear view and
the passenger side view o n l y.
F
W
ith the engine running, press this button to
switch the output screen off.
The function is automatically paused (the
output screen becomes grey) in reverse ,
above 9
mph (15
km/h) .
The function restarts when the vehicle is
once more travelling at a speed below this
threshold.
Operation
F In neutral , the monitoring rear view is
displayed by default.
F
W
hen reverse is engaged , the visual
reversing aid is displayed on the screen
(even if it is switched off).
F
R
ead this message then confirm with the
button corresponding to the response
" Accept ".
The output screen comes on.
Driving
Page 169 of 312

167
If a trailer is attached to the towball,
when reverse gear is engaged the visual
reversing aid will no longer work until the
trailer is disconnected. The monitoring
rear view becomes the default view.
If the system develops a malfunction, go
to a PEUGEOT dealer to avoid any safety
problems.
Maintenance
recommendations
In bad or wintry weather, ensure that the
sensors and cameras are not covered with
mud, ice or snow.
Check the cleanliness of the camera lenses
regularly.
If necessary, clean the cameras with a soft, dry
cloth.
When washing your vehicle at high-pressure,
direct the spray from at least 30
cm away from
the cameras and parking sensors.
Under-inflation detection
This system automatically monitors the tyre
pressure while driving.
The system monitors the pressure in all four
tyres, once the vehicle is moving.
It compares the information given by the
wheel speed sensors with reference values,
which must be reinitialised after ever y tyre
pressure adjustment or wheel change .
The system triggers an alert as soon as it
detects a drop in the pressure of one or more
tyres.
The tyre under-inflation detection system
does not replace the need for vigilance on
the part of the driver.
This system still requires you to check
the tyre inflation pressures (including
the spare wheel) every month as well as
before a long journey.
Driving with under-inflated tyres impairs
handling, extends braking distances and
causes early tyre wear, particularly in
adverse conditions (heavy loads, high
speeds, long journeys). Driving with under-inflated tyres
increases fuel consumption.
The tyre pressure specifications for your
vehicle can be found on the tyre pressure
label.
For more information on the
Identification markings , refer to the
corresponding section.
Tyre pressures should be checked when
the tyres are "cold" (vehicle stopped for
1
hour or after a journey of less than
6
miles (10 km) at moderate speeds).
Other wise (when hot), add 0.3
bar to the
pressures shown on the label.
Snow chains
The system does not have to be
reinitialised after fitting or removing snow
chains.
Under-inflation alert
This warning is indicated by fixed
illumination of the warning lamp, an
audible signal and, depending on
the equipment installed, a message
displayed on the screen.
6
Driving
Page 177 of 312

175
ON
ON
ON
Overload indicator
The overload indicator is a driving aid and
informs you that the maximum authorised
weight has been exceeded; this may be
either the gross vehicle weight (GV W) or the
maximum authorised weight on either axle
(front and rear) (GAWR).
The indicator does not relieve the user
from the responsibility.
Even if you correctly measure the weight
of the vehicle's load, any factor that
may vary this weight (seating the driver/
additional passengers or taking on
additional fuel) after the measurement
may put the vehicle into the overload
condition. -
T
he load includes the weight of the
items stored in the loading area
(including any fittings such as shelves),
but also the weight of all persons on
board the vehicle, the amount of fuel
and various equipment fitted on the
vehicle.
-
F
or optimal per formance, the vehicle
must be parked and loaded on level
ground (avoid the following conditions:
parking on a slope or straddling a
pavement).
Attaching a trailer to your vehicle may
affect the operation of the system.
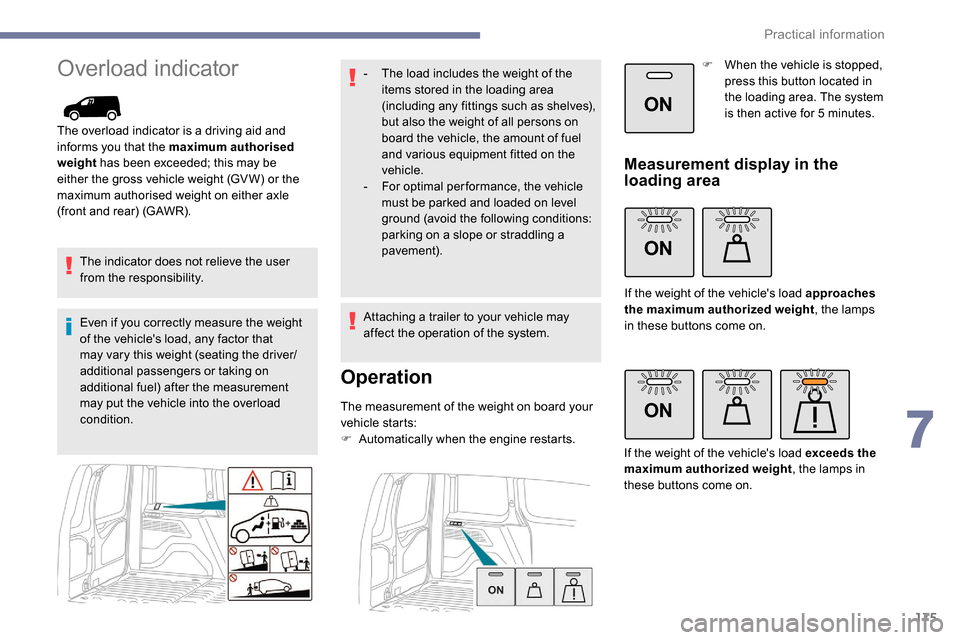
Operation
The measurement of the weight on board your
vehicle starts:
F
A
utomatically when the engine restarts. F
W
hen the vehicle is stopped,
press this button located in
the loading area. The system
is then active for 5 minutes.
Measurement display in the
loading area
If the weight of the vehicle's load approaches
the maximum authorized weight
, the lamps
in these buttons come on.
If the weight of the vehicle's load exceeds the
maximum authorized weight , the lamps in
these buttons come on.
7
Practical information
Page 178 of 312

176
ON
Measurement display on the
instrument panel.
If the weight of the vehicle's load
exceeds the maximum authorized
weight, this warning lamp comes
on.
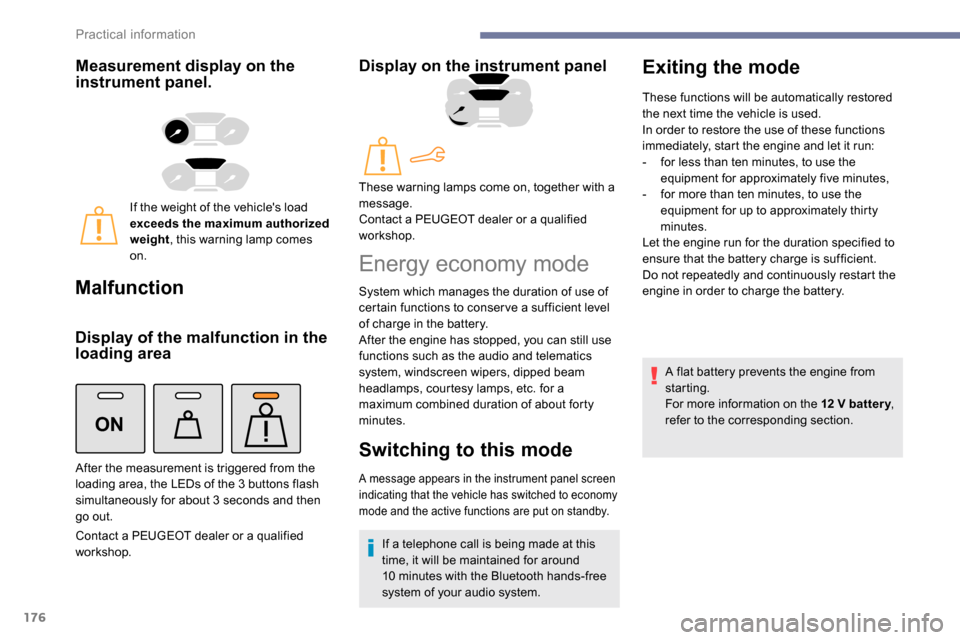
Malfunction
Display of the malfunction in the
loading area
Contact a PEUGEOT dealer or a qualified
workshop.
Display on the instrument panel
After the measurement is triggered from the
loading area, the LEDs of the 3 buttons flash
simultaneously for about 3
seconds and then
go out. These warning lamps come on, together with a
message.
Contact a PEUGEOT dealer or a qualified
workshop.
Energy economy mode
System which manages the duration of use of
certain functions to conser ve a sufficient level
of charge in the battery.
After the engine has stopped, you can still use
functions such as the audio and telematics
system,
windscreen wipers, dipped beam
headlamps,
courtesy lamps, etc. for a
maximum combined duration of about forty
minutes.
Switching to this mode
A message appears in the instrument panel screen
indicating that the vehicle has switched to economy
mode and the active functions are put on standby.
If a telephone call is being made at this
time, it will be maintained for around
10
minutes with the Bluetooth hands-free
system of your audio system.
Exiting the mode
These functions will be automatically restored
the next time the vehicle is used.
In order to restore the use of these functions
immediately, start the engine and let it run:
-
f
or less than ten minutes, to use the
equipment for approximately five minutes,
-
f
or more than ten minutes, to use the
equipment for up to approximately thirty
minutes.
Let the engine run for the duration specified to
ensure that the battery charge is sufficient.
Do not repeatedly and continuously restart the
engine in order to charge the battery.
A flat battery prevents the engine from
starting.
For more information on the 12
V batter y,
refer to the corresponding section.
Practical information