2019 Peugeot Partner wheel
[x] Cancel search: wheelPage 167 of 312

165
The blue dimension lines 1 represent the width
of your vehicle with the mirrors unfolded.
The red line 2 represents a distance of 30 cm
from the rear bumper; the two green lines 3 and
4 represent 1
m and 2 m, respectively.
The blue cur ves 5 appear successively; they
are based on the position of the steering wheel
and represent the turning circle radius of your
vehicle.
The orange dashes 6 represent the opening
radii of the rear doors. - The
visual reversing aid : allows a view of
the area close to the rear of the vehicle. Some items may not be seen by the rear
camera.
Certain vehicles may be difficult to see
(dark colours, headlamps off) when the
brightness of the screen is reduced by the
vehicle’s lighting dimmer.
The image quality may be affected by the
environment, the exterior conditions (rain,
dirt, dust), the driving mode, the lighting
conditions (night, low sun).
In the presence of areas in shade, or in
conditions of bright sunlight or inadequate
lighting, the image may be darkened and
with lower contrast.Obstacles may appear further away than
they actually are in reality.
During parking manoeuvres and lane
changes, it is important to check the sides
of the vehicle using the mirrors.
The rear parking sensors also provide
information on the vehicle's surroundings.
Activation/Deactivation
The system starts when the ignition is switched
on.
This system is a driving aid which cannot,
in any circumstances, replace the need for
vigilance on the part of the driver.
Please routinely check your exterior
mirrors while driving and during
manoeuvres.
F
W
ith the ignition on, press the
corresponding button below the screen to
switch the output screen on/off.
A message appears.
6
Driving
Page 169 of 312

167
If a trailer is attached to the towball,
when reverse gear is engaged the visual
reversing aid will no longer work until the
trailer is disconnected. The monitoring
rear view becomes the default view.
If the system develops a malfunction, go
to a PEUGEOT dealer to avoid any safety
problems.
Maintenance
recommendations
In bad or wintry weather, ensure that the
sensors and cameras are not covered with
mud, ice or snow.
Check the cleanliness of the camera lenses
regularly.
If necessary, clean the cameras with a soft, dry
cloth.
When washing your vehicle at high-pressure,
direct the spray from at least 30
cm away from
the cameras and parking sensors.
Under-inflation detection
This system automatically monitors the tyre
pressure while driving.
The system monitors the pressure in all four
tyres, once the vehicle is moving.
It compares the information given by the
wheel speed sensors with reference values,
which must be reinitialised after ever y tyre
pressure adjustment or wheel change .
The system triggers an alert as soon as it
detects a drop in the pressure of one or more
tyres.
The tyre under-inflation detection system
does not replace the need for vigilance on
the part of the driver.
This system still requires you to check
the tyre inflation pressures (including
the spare wheel) every month as well as
before a long journey.
Driving with under-inflated tyres impairs
handling, extends braking distances and
causes early tyre wear, particularly in
adverse conditions (heavy loads, high
speeds, long journeys). Driving with under-inflated tyres
increases fuel consumption.
The tyre pressure specifications for your
vehicle can be found on the tyre pressure
label.
For more information on the
Identification markings , refer to the
corresponding section.
Tyre pressures should be checked when
the tyres are "cold" (vehicle stopped for
1
hour or after a journey of less than
6
miles (10 km) at moderate speeds).
Other wise (when hot), add 0.3
bar to the
pressures shown on the label.
Snow chains
The system does not have to be
reinitialised after fitting or removing snow
chains.
Under-inflation alert
This warning is indicated by fixed
illumination of the warning lamp, an
audible signal and, depending on
the equipment installed, a message
displayed on the screen.
6
Driving
Page 170 of 312

168
F Reduce speed immediately, avoid excessive steering movements and sudden braking.
F
S
top the vehicle as soon as it is safe to do
so.
The loss of pressure detected does not
always cause visible bulging of the tyre.
Do not satisfy yourself with just a visual
check.
F
I
n the event of a puncture, use the
temporary puncture repair kit or the spare
wheel (depending on equipment),
or
F
i
f you have a compressor, such as the one
in the temporary puncture repair kit, check
the pressures of the four tyres when cold,
or
F
i
f it is not possible to carry out this check
immediately, drive carefully at reduced
speed.
The alert is kept active until the system is
reinitialised.
Reinitialisation
The system must be reinitialised after any
adjustment to the pressure of one or more
tyres, and after changing one or more wheels. Before reinitialising the system, ensure
that the pressures of the four tyres
are correct for the conditions of use
of the vehicle and conform to the
recommendations on the tyre pressure
label.
The under-inflation alert can only be relied
on if the reinitialisation of the system has
been done with the pressures in the four
tyres correctly adjusted.
The under-inflation detection system
does not give a warning if a pressure is
incorrect at the time of reinitialisation.
The system is initialised with the ignition on and
the vehicle stationary. The new pressure parameters saved
are considered reference values by the
system.
Without audio system
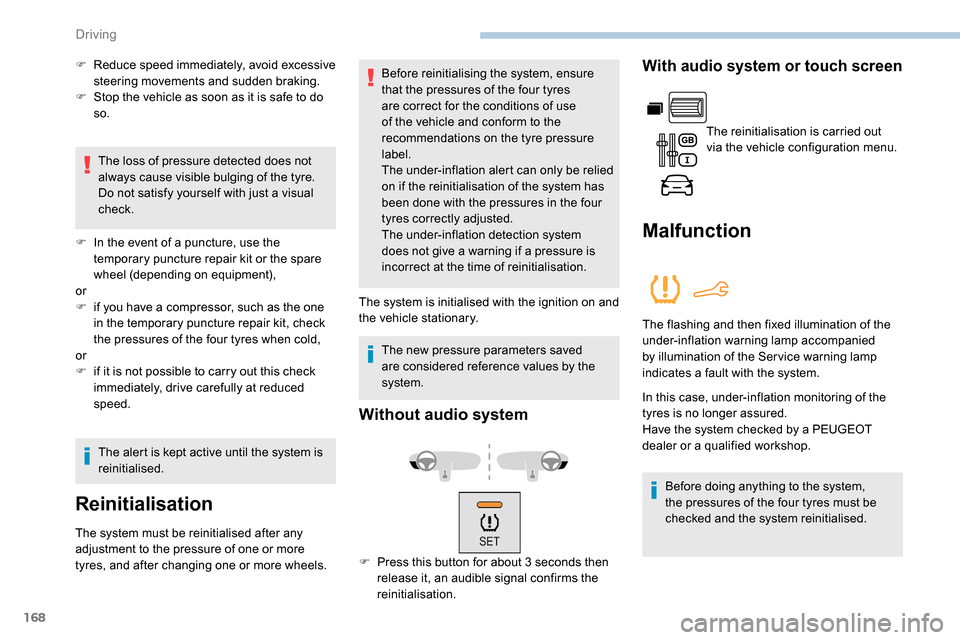
F Press this button for about 3 seconds then
release it, an audible signal confirms the
reinitialisation.
With audio system or touch screen
The reinitialisation is carried out
via the vehicle configuration menu.
Malfunction
The flashing and then fixed illumination of the
under-inflation warning lamp accompanied
by illumination of the Ser vice warning lamp
indicates a fault with the system.
In this case, under-inflation monitoring of the
tyres is no longer assured.
Have the system checked by a PEUGEOT
dealer or a qualified workshop.
Before doing anything to the system,
the pressures of the four tyres must be
checked and the system reinitialised.
Driving
Page 175 of 312

173
Snow chains
In wintry conditions, snow chains
improve traction as well as the
behaviour of the vehicle when
braking.
Snow chains must be fitted only to the
front wheels. They must never be fitted to
"space-saver" type spare wheels.
Take account of the legislation in force in
your country on the use of snow chains
and the maximum authorised speed.
Installation tips
F If you have to fit the chains during a journey, stop the vehicle on a flat sur face on the side
of the road.
F
A
pply the parking brake and position any
wheel chocks under the wheels to prevent
movement of your vehicle.
F
F
it the chains following the instructions
provided by the manufacturer.
F
M
ove off gently and drive for a few
moments, without exceeding 31
mph
(50
km/h).
F
S
top your vehicle and check that the snow
chains are correctly tightened. It is strongly recommended that before
you leave, you practise fitting the snow
chains on a level and dry sur face.
Avoid driving with snow chains on roads
that have been cleared of snow to avoid
damaging your vehicle's tyres and the
road sur face. If your vehicle is fitted with
alloy wheels, check that no part of the
chain or its fixings is in contact with the
wheel rim.
Use only the chains designed to be fitted to the
type of wheel fitted to your vehicle:
Original tyre size Maximum link size
(m m)
195/65 R15
9
205/60 R16
205/55 R17 215/65 R16215/60 R17
cannot be fitted with chains
You can also use snow socks.
For more information, contact a PEUGEOT
dealer or a qualified workshop.
Towing device
Load distribution
F D istribute the load in the trailer so that the
heaviest items are as close as possible to
the axle, and the nose weight approaches
the maximum permitted without exceeding
it.
Air density decreases with altitude, thus
reducing engine performance. The maximum
towed load must be reduced by 10
% for every
1,000
metres of altitude.
Use towing devices and their original
harnesses approved by PEUGEOT. It
is recommended that the installation be
per formed by a PEUGEOT dealer or a
qualified workshop.
If the towing device is not fitted by
a PEUGEOT dealer, it must still be
fitted in accordance with the vehicle
manufacturer's instructions.
Certain driving assistance or manoeuvring
assistance functions are automatically
deactivated if an approved towbar is used.
7
Practical information
Page 185 of 312

183
Automatic electronic
parking brake
This system does not require any
routine servicing. However, in case
of an issue, do not hesitate to have
the system checked by a PEUGEOT
dealer or a qualified workshop.
For more information on the Automatic
electronic parking brake , refer to the
corresponding section.
Wheels and tyres
The pressure must be checked on
all tyres, including the spare wheel,
when the tyres are "cold", at least
once a month and before a long
j o u r n ey. Driving with worn or damaged tyres reduces
braking efficiency and control of the vehicle's
steering. Regular inspections of the condition
of tyres (tread and sides) and rims are
recommended as well as making sure that
valves are fitted.
Using different size wheels and tyres from
those specified can affect the lifetime of tyres,
wheel rotation, ground clearance and the
speedometer reading and have an adverse
effect on road holding.
Fitting different tyres on the front and rear axles
can cause unwanted ESC regulation.
The pressures given on the tyre pressure label
are valid for "cold" tyres. If you have driven for
more than 10 minutes or more than 6 miles
(10
kilometres) at more than 31 mph (50 km/h),
0.3
bar (30 kPa) should be added to the values
given on the label.
Under-inflation increases fuel consumption.
Non-compliant tyre pressure causes premature
wear on tyres and has an adverse effect on the
vehicle's road holding – Risk of an accident! Only use products recommended by
PEUGEOT or products of equivalent
quality and specification.
In order to optimise the operation of
components as important as those in the
braking system, PEUGEOT selects and
offers very specific products.
After washing the vehicle, dampness, or
in wintry conditions, ice can form on the
brake discs and pads: braking efficiency
may be reduced. Make light brake
applications to dry and defrost the brakes.
AdBlue® (BlueHDi)
To respect the environment and ensure
compliance with the Euro 6 standard, without
adversely affecting the per formance or fuel
consumption of Diesel engines, PEUGEOT
has taken the decision to equip its vehicles
with a system that associates SCR (Selective
Catalytic Reduction) with a Diesel particle filter
(DPF) for the treatment of exhaust gases.
SCR system
Using a liquid called AdBlue® that contains
urea, a catalytic converter turns up to 85% of
the nitrogen oxides (NOx) into nitrogen and
water, which are harmless to health and the
environment.
The AdBlue
® is contained in
a special tank holding about
17
litres.
Its capacity allows a driving range of
approximately 5,600
miles (9,000 km), highly
dependent on your driving style.
An alert system is triggered automatically once
the reser ve level is reached: you can then drive
for a further 1,500
miles (2,400 km) before the
tank is empty.
7
Practical information
Page 189 of 312

187
Running out of fuel
(Diesel)
On vehicles fitted with Diesel engines, the fuel
system must be primed if you run out of fuel.
If the engine does not start first time, do not
keep trying, but start the procedure again from
the beginning.For more information on Misfuel
prevention (Diesel) , refer to the
corresponding section.
With 1.5 BlueHDi (Euro 6.2)
F Fill the fuel tank with at least 5 litres of
Diesel.
F
S
witch on the ignition (without starting the
engine).
Other engines
F Fill the fuel tank with at least five litres of diesel.
F
O
pen the engine bonnet.
F
I
f necessary, unclip the style cover to
access the priming pump.
F
O
perate the priming pump
repeatedly until resistance is felt
(there may be resistance on the
first press).
F
O
perate the starter to start the engine (if the
engine does not start at the first attempt,
wait around 15
seconds before trying
again).
F
I
f the engine does not start after a few
attempts, operate the priming pump again
then start the engine.
F
P
ut the style cover in place and clip it in.
F
C
lose the bonnet again.
Tool kit
With 1.6 BlueHDi (Euro 6 .1)
F Fill the fuel tank with at least 5 litres of
Diesel.
F
S
witch on the ignition (without starting the
engine).
F
W
ait around 6 seconds and switch off the
ignition.
F
R
epeat the last two operations 10 times.
F
O
perate the starter to start the engine. F
W
ait around 1 minute and switch off the
ignition.
F
O
perate the starter to start the engine.
If the engine does not start, repeat the
procedure. F
F
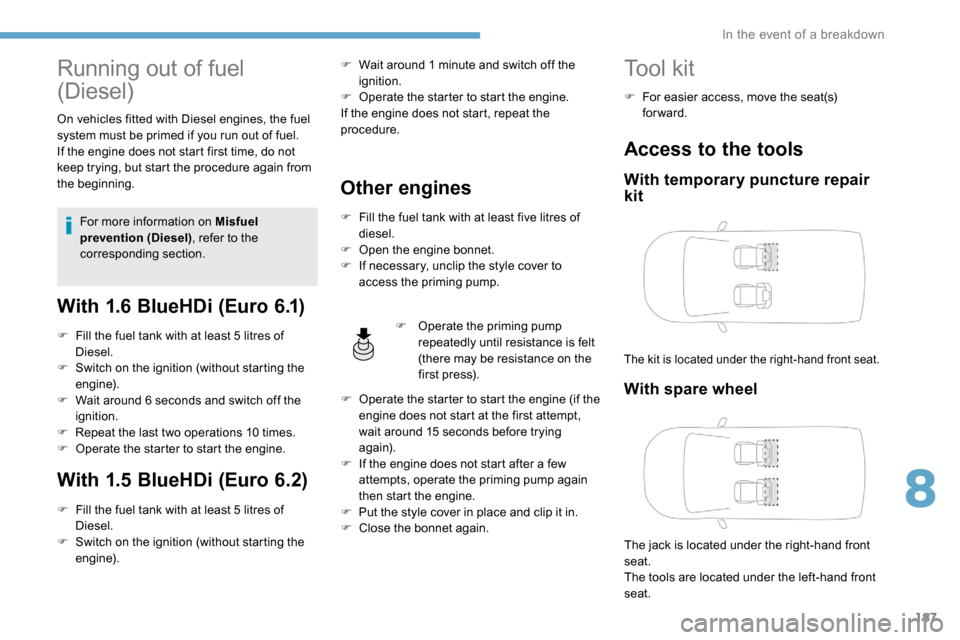
or easier access, move the seat(s)
forward.
Access to the tools
With temporary puncture repair
kit
The kit is located under the right-hand front seat.
With spare wheel
The jack is located under the right-hand front
seat.
The tools are located under the left-hand front
seat.
8
In the event of a breakdown
Page 190 of 312

188
Details of the tool kit
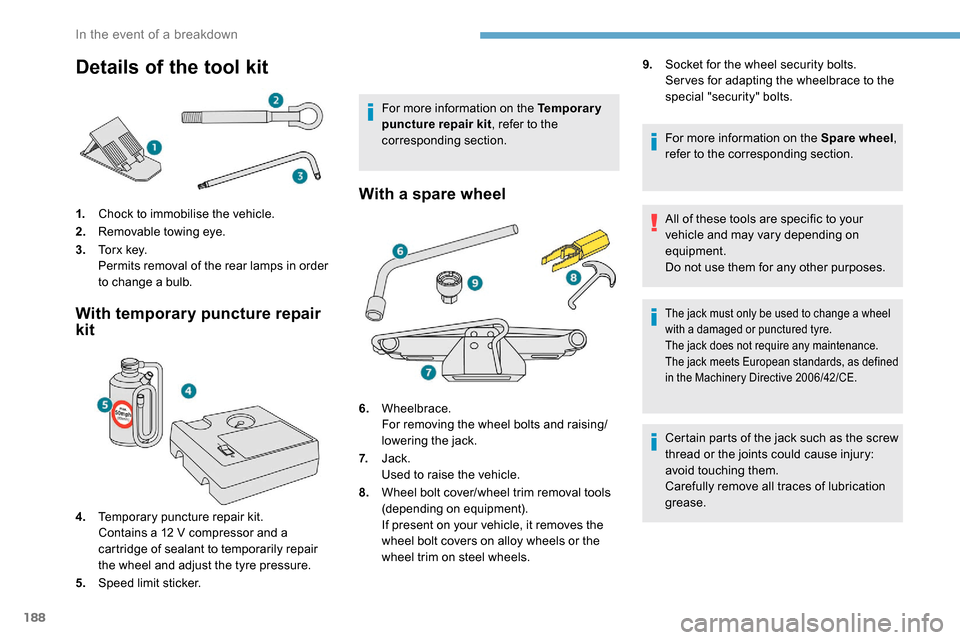
1.Chock to immobilise the vehicle.
2. Removable towing eye.
3. To r x k e y.
Permits removal of the rear lamps in order
to change a bulb.
With temporary puncture repair
kit
4.Temporary puncture repair kit.
Contains a 12
V compressor and a
cartridge of sealant to temporarily repair
the wheel and adjust the tyre pressure.
5. Speed limit sticker. For more information on the Temporary
puncture repair kit
, refer to the
corresponding section.
With a spare wheel
6. Wheelbrace.
For removing the wheel bolts and raising/
lowering the jack.
7. Jack.
Used to raise the vehicle.
8. Wheel bolt cover/wheel trim removal tools
(depending on equipment).
If present on your vehicle, it removes the
wheel bolt covers on alloy wheels or the
wheel trim on steel wheels. 9.
Socket for the wheel security bolts.
Ser ves for adapting the wheelbrace to the
special "security" bolts.
For more information on the Spare wheel ,
refer to the corresponding section.
All of these tools are specific to your
vehicle and may vary depending on
equipment.
Do not use them for any other purposes.
The jack must only be used to change a wheel
with a damaged or punctured tyre.
The jack does not require any maintenance.
The jack meets European standards, as defined
in the Machinery Directive 2006/42/CE.
Certain parts of the jack such as the screw
thread or the joints could cause injury:
avoid touching them.
Carefully remove all traces of lubrication
grease.
In the event of a breakdown
Page 192 of 312

190
The speed limit sticker must be secured
to the interior of the vehicle in the driver's
field of vision, to remind you that a wheel
is in temporary use.F
S
witch on the ignition.
If a pressure of 2 bars is not reached
after about 7
minutes, this indicates
that the tyre is not repairable; contact a
PEUGEOT dealer or a qualified workshop
for assistance.
F
P
lace the switch in the "O" position.
F
D
isconnect the compressor's electric plug
from the vehicle's 12
V socket.
F
R
eplace the cap on the valve.
F
R
emove the kit.
F
R
emove and then store the bottle of sealant.Take care, the sealant product is harmful
if swallowed and causes irritation to the
eyes.
Keep this product out of the reach of
children.
The use-by date of the fluid is marked on
the bottle.
After use, do not discard the bottle in
standard waste, take it to a PEUGEOT
dealer or an authorised waste disposal
site.
Do not forget to obtain a new bottle of
sealant, available from a PEUGEOT
dealer or a qualified workshop.
The tyre inflation pressures are given on
this label. F
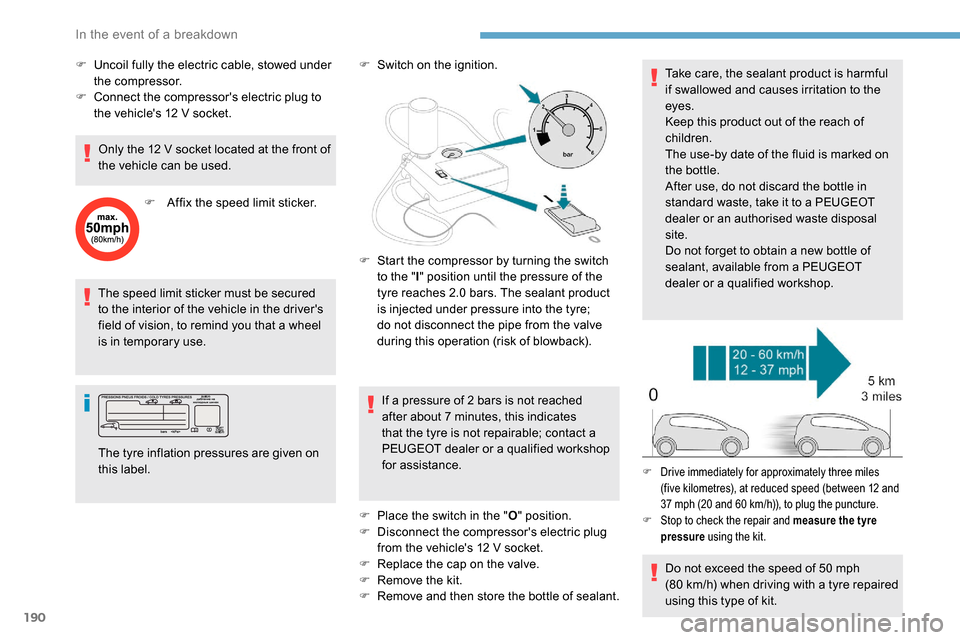
S
tart the compressor by turning the switch
to the " l" position until the pressure of the
tyre reaches 2.0 bars. The sealant product
is injected under pressure into the tyre;
do not disconnect the pipe from the valve
during this operation (risk of blowback).
Do not exceed the speed of 50
mph
(80
km/h) when driving with a tyre repaired
using this type of kit.
F Drive immediately for approximately three miles (five kilometres), at reduced speed (between 12 and
37
mph (20 and 60 km/h)), to plug the puncture.
F
S
top to check the repair and measure the tyre
pressure using the kit.
F Uncoil fully the electric cable, stowed under
the compressor.
F
C
onnect the compressor's electric plug to
the vehicle's 12
V socket.
Only the 12
V socket located at the front of
the vehicle can be used.
F
A
ffix the speed limit sticker.
In the event of a breakdown