2019 Peugeot Partner Side door
[x] Cancel search: Side doorPage 167 of 312

165
The blue dimension lines 1 represent the width
of your vehicle with the mirrors unfolded.
The red line 2 represents a distance of 30 cm
from the rear bumper; the two green lines 3 and
4 represent 1
m and 2 m, respectively.
The blue cur ves 5 appear successively; they
are based on the position of the steering wheel
and represent the turning circle radius of your
vehicle.
The orange dashes 6 represent the opening
radii of the rear doors. - The
visual reversing aid : allows a view of
the area close to the rear of the vehicle. Some items may not be seen by the rear
camera.
Certain vehicles may be difficult to see
(dark colours, headlamps off) when the
brightness of the screen is reduced by the
vehicle’s lighting dimmer.
The image quality may be affected by the
environment, the exterior conditions (rain,
dirt, dust), the driving mode, the lighting
conditions (night, low sun).
In the presence of areas in shade, or in
conditions of bright sunlight or inadequate
lighting, the image may be darkened and
with lower contrast.Obstacles may appear further away than
they actually are in reality.
During parking manoeuvres and lane
changes, it is important to check the sides
of the vehicle using the mirrors.
The rear parking sensors also provide
information on the vehicle's surroundings.
Activation/Deactivation
The system starts when the ignition is switched
on.
This system is a driving aid which cannot,
in any circumstances, replace the need for
vigilance on the part of the driver.
Please routinely check your exterior
mirrors while driving and during
manoeuvres.
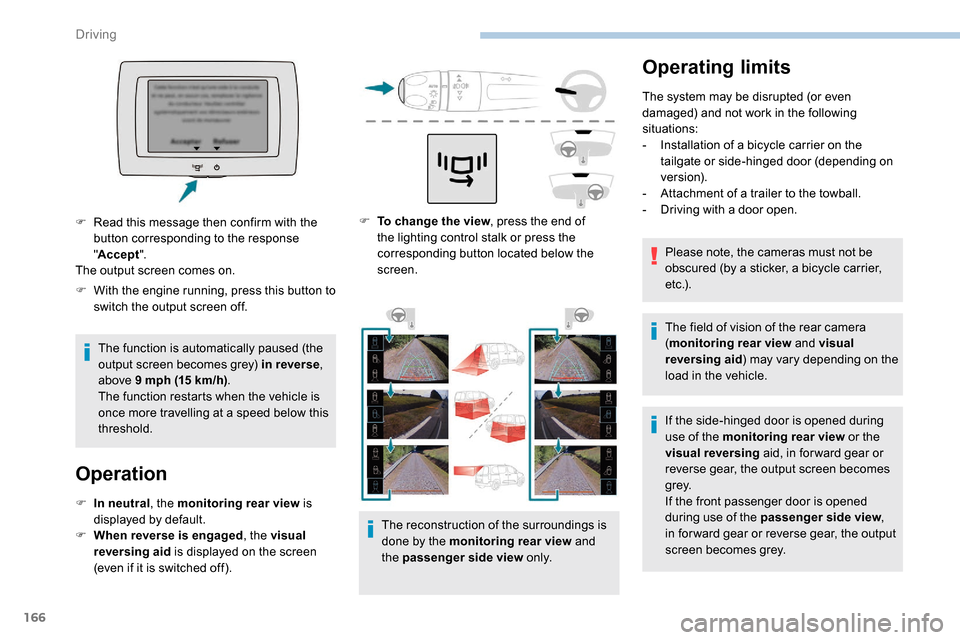
F
W
ith the ignition on, press the
corresponding button below the screen to
switch the output screen on/off.
A message appears.
6
Driving
Page 168 of 312

166
Operating limits
The system may be disrupted (or even
damaged) and not work in the following
situations:
-
I
nstallation of a bicycle carrier on the
tailgate or side-hinged door (depending on
ve r s i o n).
-
A
ttachment of a trailer to the towball.
-
D
riving with a door open.
Please note, the cameras must not be
obscured (by a sticker, a bicycle carrier,
e t c .) .
The field of vision of the rear camera
( monitoring rear view and visual
reversing aid ) may vary depending on the
load in the vehicle.
If the side-hinged door is opened during
use of the monitoring rear view or the
visual reversing aid, in for ward gear or
reverse gear, the output screen becomes
grey.
If the front passenger door is opened
during use of the passenger side view ,
in for ward gear or reverse gear, the output
screen becomes grey.
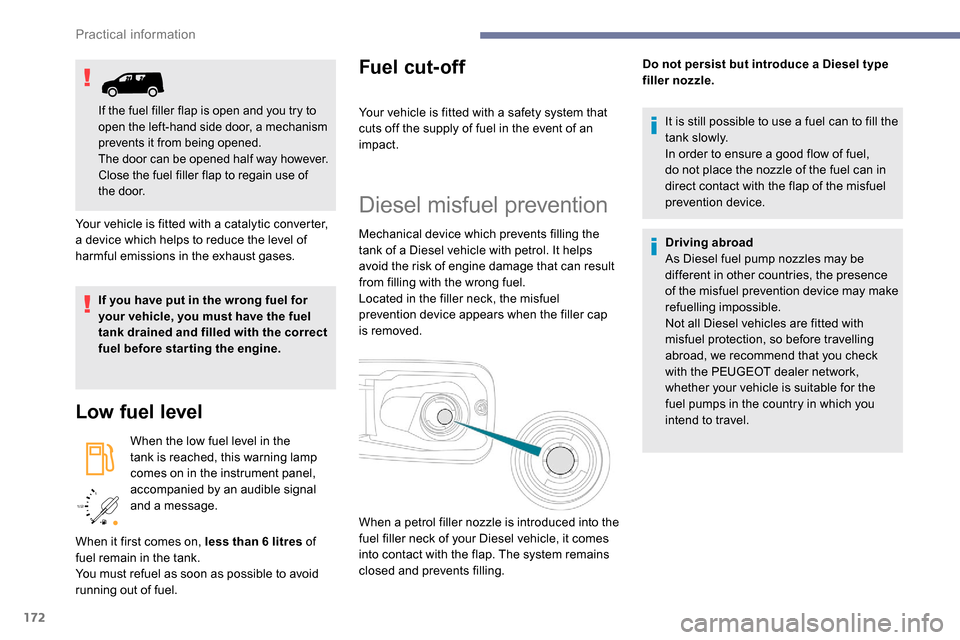
F
T
o change the view , press the end of
the lighting control stalk or press the
corresponding button located below the
screen.
The reconstruction of the surroundings is
done by the monitoring rear view and
the passenger side view o n l y.
F
W
ith the engine running, press this button to
switch the output screen off.
The function is automatically paused (the
output screen becomes grey) in reverse ,
above 9
mph (15
km/h) .
The function restarts when the vehicle is
once more travelling at a speed below this
threshold.
Operation
F In neutral , the monitoring rear view is
displayed by default.
F
W
hen reverse is engaged , the visual
reversing aid is displayed on the screen
(even if it is switched off).
F
R
ead this message then confirm with the
button corresponding to the response
" Accept ".
The output screen comes on.
Driving
Page 173 of 312

171
Fuel tank
Capacity of the tank:
- around 61
litres (petrol).
-
around 50
litres (Diesel).
Opening the fuel filler flap
F You must switch off the engine.
F W ith K eyless Entry and Starting, unlock the
vehicle.
F
O
pen the fuel filler flap.
If your vehicle is fitted with Stop & Start,
never refuel with the engine in STOP
mode; you must switch off the ignition
using the key, or the START/STOP button
if your vehicle has
K
eyless Entry and
Starting.
At least 6
litres of fuel must be added, in order
to be registered by the fuel gauge.
Opening the filler cap may create a noise
caused by an inrush of air. This vacuum is
entirely normal, resulting from the sealing of the
fuel system.
F
T
ake care to select the pump that delivers
the correct fuel type for your vehicle's
engine (see a reminder label on the inside
of the fuel filler flap). F
W
ith a conventional key, insert the key into
the filler cap, then turn the key to the left. F
F
ill the tank. Do not continue past the third
cut-off of the nozzle, as this may cause
malfunctions.
F
P
ut the filler cap back in place and close it
by turning to the right.
F
P
ush the fuel filler flap to close it (your
vehicle must be unlocked).
F
U
nscrew and remove the filler cap, then
place it on the holder located on the fuel
filler flap.
F
I
nsert the nozzle and push it in fully
(pushing on the metal valve A ).If your vehicle is equipped with one, do
not open the left-hand sliding side door
when the fuel filler flap is open, other wise
there is a risk that the fuel filler flap and
the sliding door may be damaged and the
person filling up may be injured.
7
Practical information
Page 174 of 312

172
/2
1 1
Your vehicle is fitted with a catalytic converter,
a device which helps to reduce the level of
harmful emissions in the exhaust gases.
If you have put in the wrong fuel for
your vehicle, you must have the fuel
tank drained and filled with the correct
fuel before star ting the engine.
Low fuel level
When the low fuel level in the
tank is reached, this warning lamp
comes on in the instrument panel,
accompanied by an audible signal
and a message.
Fuel cut- of f
When it first comes on, less than 6 litres of
f uel remain in the tank.
You must refuel as soon as possible to avoid
running out of fuel. Your vehicle is fitted with a safety system that
cuts off the supply of fuel in the event of an
impact.
Diesel misfuel prevention
Mechanical device which prevents filling the
tank of a Diesel vehicle with petrol. It helps
avoid the risk of engine damage that can result
from filling with the wrong fuel.
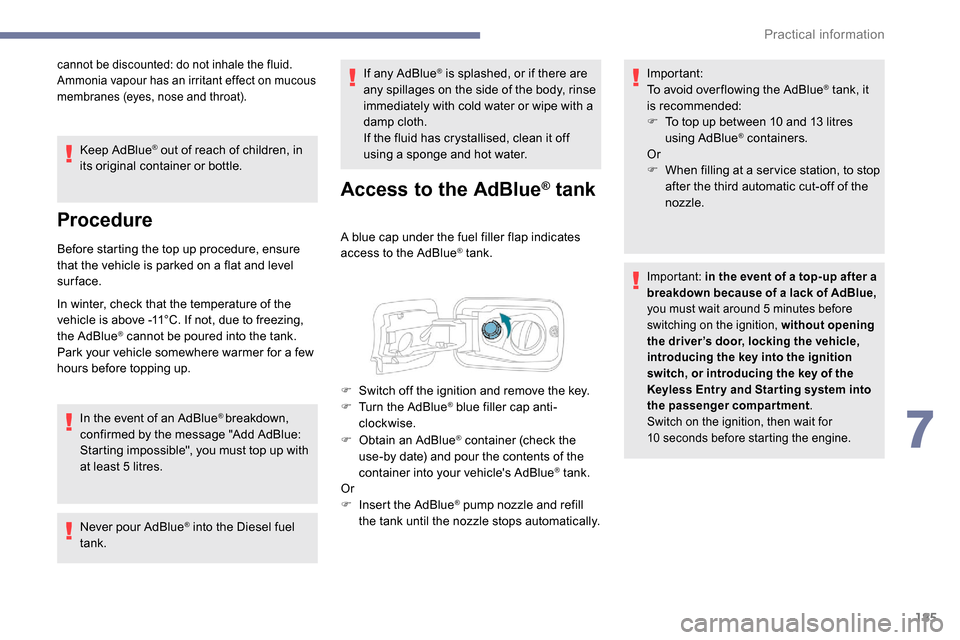
Located in the filler neck, the misfuel
prevention device appears when the filler cap
is removed.
It is still possible to use a fuel can to fill the
t a n k s l ow l y.
In order to ensure a good flow of fuel,
do not place the nozzle of the fuel can in
direct contact with the flap of the misfuel
prevention device.
Driving abroad
As Diesel fuel pump nozzles may be
different in other countries, the presence
of the misfuel prevention device may make
refuelling impossible.
Not all Diesel vehicles are fitted with
misfuel protection, so before travelling
abroad, we recommend that you check
with the PEUGEOT dealer network,
whether your vehicle is suitable for the
fuel pumps in the country in which you
intend to travel.
When a petrol filler nozzle is introduced into the
fuel filler neck of your Diesel vehicle, it comes
into contact with the flap. The system remains
closed and prevents filling. Do not persist but introduce a Diesel type
filler nozzle.
If the fuel filler flap is open and you try to
open the left-hand side door, a mechanism
prevents it from being opened.
The door can be opened half way however.
Close the fuel filler flap to regain use of
the door.
Practical information
Page 187 of 312

185
cannot be discounted: do not inhale the fluid.
Ammonia vapour has an irritant effect on mucous
membranes (eyes, nose and throat).
Keep AdBlue® out of reach of children, in
its original container or bottle.
Procedure
Before starting the top up procedure, ensure
that the vehicle is parked on a flat and level
sur face.
In winter, check that the temperature of the
vehicle is above -11°C. If not, due to freezing,
the AdBlue
® cannot be poured into the tank.
Park your vehicle somewhere warmer for a few
hours before topping up.
In the event of an AdBlue
® breakdown,
confirmed by the message "Add AdBlue:
Starting impossible", you must top up with
at least 5
litres.
Never pour AdBlue
® into the Diesel fuel
tank. If any AdBlue
® is splashed, or if there are
any spillages on the side of the body, rinse
immediately with cold water or wipe with a
damp cloth.
If the fluid has crystallised, clean it off
using a sponge and hot water.
Access to the AdBlue® tank
A blue cap under the fuel filler flap indicates
access to the AdBlue® tank.
F
O
btain an AdBlue
® container (check the
use-by date) and pour the contents of the
container into your vehicle's AdBlue
® tank.
Or
F
I
nsert the AdBlue
® pump nozzle and refill
the tank until the nozzle stops automatically. Important:
To avoid over flowing the AdBlue
® tank, it
i
s recommended:
F
T
o top up between 10 and 13
litres
using AdBlue
® containers.
Or
F
W
hen filling at a ser vice station, to stop
after the third automatic cut-off of the
nozzle.
Important: in the event of a top-up after a
breakdown because of a lack of AdBlue,
you must wait around 5
minutes before
switching on the ignition, without opening
the driver’s door, locking the vehicle,
introducing the key into the ignition
switch, or introducing the key of the
K
eyless Entr y and Star ting system into
the passenger compartment.
Switch on the ignition, then wait for
10
seconds before starting the engine.
F Switch off the ignition and remove the key.
F T urn the AdBlue® blue filler cap anti-
clockwise.
7
Practical information
Page 201 of 312

199
Front foglamps
Ty p e D, H11
Rear lamps
For more information on Changing a bulb
and, in particular, the types of bulb, refer to the
corresponding section.
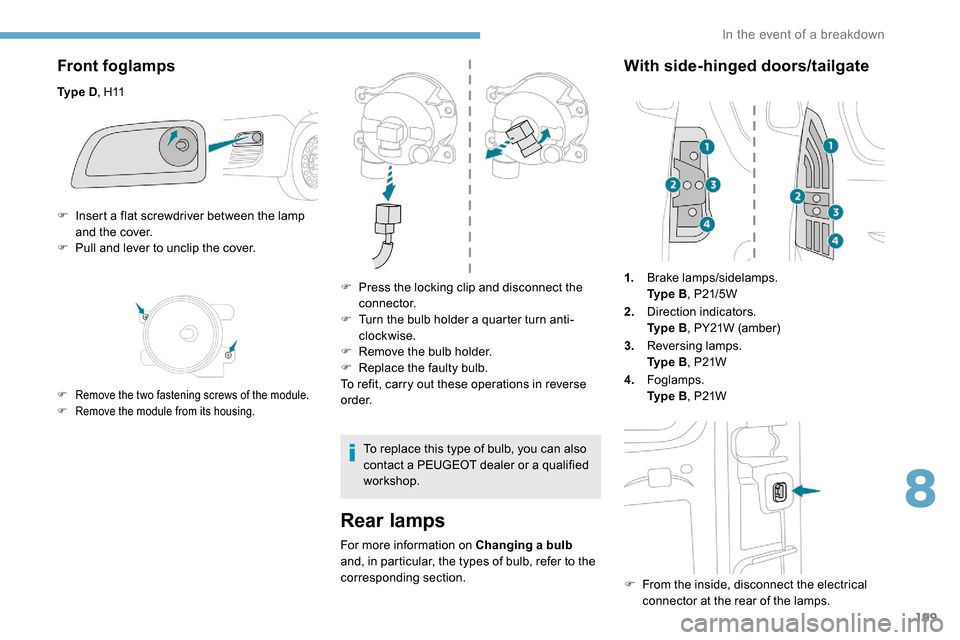
With side-hinged doors/tailgate
1. Brake lamps/sidelamps.
Ty p e
B, P21/5W
2. Direction indicators.
Ty p e
B, PY21W (amber)
3. Reversing lamps.
Ty p e
B, P21W
4. Foglamps.
Ty p e
B, P21W
F
F
rom the inside, disconnect the electrical
connector at the rear of the lamps.
F
I
nsert a flat screwdriver between the lamp
and the cover.
F
P
ull and lever to unclip the cover.
F Remove the two fastening screws of the module.
F
R emove the module from its housing.
F Press the locking clip and disconnect the connector.
F
T
urn the bulb holder a quarter turn anti-
clockwise.
F
R
emove the bulb holder.
F
R
eplace the faulty bulb.
To refit, carry out these operations in reverse
o r d e r.
To replace this type of bulb, you can also
contact a PEUGEOT dealer or a qualified
workshop.
8
In the event of a breakdown
Page 202 of 312

200
Take care to reposition the tabs and the supply
wire correctly to avoid trapping the wire.
After changing a rear direction
indicator bulb, the reinitialisation time is
approximately 2
minutes or more.
Number plate lamps
Ty p e A, W5W -5W
F
R
emove the two fixing bolts using the Torx
key provided in your vehicle.
For more information on the Tool kit , refer
to the corresponding section.
F
F
rom the outside, pull the whole lamp unit
towards you (with side-hinged doors )
or towards the centre of the vehicle (with
tailgate ).
F
M
ove aside the tabs, then extract the bulb
h o l d e r.
F
R
emove the faulty bulb by pressing lightly
on it, then turning it a quarter turn anti-
clockwise. F
C
hange the bulb.
To refit, carry out these operations in reverse
o r d e r.
With side-hinged doors
F Unclip the interior trim.
F D isconnect the connector by moving aside
its tab.
F
T
urn the bulb holder a quarter turn anti-
clockwise.
F
C
hange the bulb.
F
P
ut the bulb holder back in place and
reconnect the connector.
F
P
ut the trim back in place.
With tailgate
F Remove the plastic lens using a screwdriver.
F
C
hange the bulb.
F
R
efit the plastic lens and press on it.
Third brake lamp
Ty p e A , W16W -16W
F
U
nscrew the two nuts.
F
P
ush the pins.
F
I
f necessary, disconnect the connector to
remove the lamp.
F
C
hange the bulb.
In the event of a breakdown
Page 211 of 312

209
Vehicle length
Standard (L1) Long (L2)
M Useable height of the opening 1,072
N Interior load height
(varies depending on the angle of the floor and the cur ve of
the roof) 1, 20 0 to 1, 270
O Loading sill height Standard version
548 to 588 X
Standard version with increased
payload 568 to 578 561 to 565
Commercial vehicle version 602 to 610 605 to 610
P Useable width of
the opening Without Multi-Flex bench seat
675
With Multi-Flex bench seat 6 41
Q Loading sill height Standard version
534 to 558
Standard version with increased
payload 551 to 558 543 to 552
Commercial vehicle version 574 to 581 575 to 587Vehicle length
Standard (L1) Long (L2)
I Interior width between wheel arches 1, 2 2 9
J Maximum interior
width Without sliding side door
1,73 3
With 1 sliding side door 1,6 3 0
With 2 sliding side doors 1,527
K Useable height of
the opening With side-hinged doors
1,13 7
With tailgate 1,1 9 7
L Useable width of the opening 1, 242
9
Technical data