2019 Peugeot Partner Side door
[x] Cancel search: Side doorPage 112 of 312
110
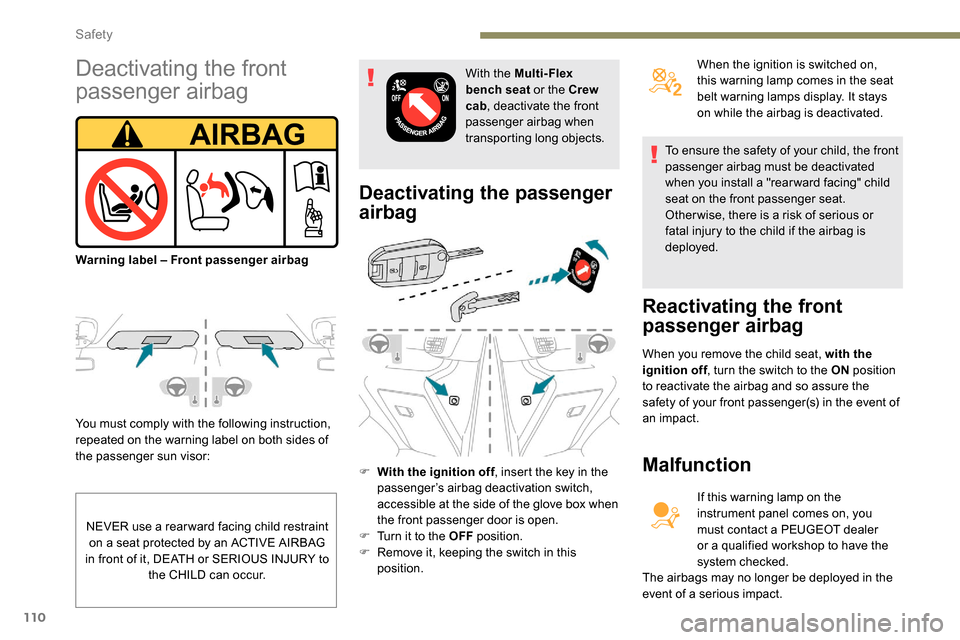
You must comply with the following instruction,
repeated on the warning label on both sides of
the passenger sun visor:
Deactivating the passenger
airbag
F With the ignition off, insert the key in the
passenger’s airbag deactivation switch,
accessible at the side of the glove box when
the front passenger door is open.
F
T
urn it to the OFF position.
F
R
emove it, keeping the switch in this
position. When the ignition is switched on,
this warning lamp comes in the seat
belt warning lamps display. It stays
on while the airbag is deactivated.
With the Multi- Flex
bench seat
or the Crew
cab , deactivate the front
passenger airbag when
transporting long objects. To ensure the safety of your child, the front
passenger airbag must be deactivated
when you install a "rear ward facing" child
seat on the front passenger seat.
Other wise, there is a risk of serious or
fatal injury to the child if the airbag is
deployed.
Reactivating the front
passenger airbag
When you remove the child seat, with the
ignition off, turn the switch to the ON position
to reactivate the airbag and so assure the
safety of your front passenger(s) in the event of
an impact.
Malfunction
If this warning lamp on the
instrument panel comes on, you
must contact a PEUGEOT dealer
or a qualified workshop to have the
system checked.
The airbags may no longer be deployed in the
event of a serious impact.
NEVER use a rear ward facing child restraint
on a seat protected by an ACTIVE AIRBAG
in front of it, DEATH or SERIOUS INJURY to the CHILD can occur.
Deactivating the front
passenger airbag
Warning label – Front passenger airbag
Safety
Page 115 of 312
113
Advice
An incorrectly installed child seat
compromises the child's safety in the
event of an accident.
Ensure that there is no seat belt or seat
belt buckle under the child seat, as this
could destabilise it.
Remember to fasten the seat belts or the
child seat harnesses keeping the slack
relative to the child's body to a minimum,
even for short journeys.
When installing a child seat using the seat
belt, ensure that the seat belt is tightened
correctly on the child seat and that it
secures the child seat firmly on the seat
of your vehicle. If your passenger seat is
adjustable, move it forwards if necessary.
The head restraint must be removed
before installing a child seat with a
backrest on a passenger seat.
Ensure that the head restraint is stored or
attached securely to prevent it from being
thrown around the vehicle in the event
of sharp braking. Refit the head restraint
once the child seat has been removed.Children in the front
Deactivate the front passenger airbag
when a rear ward facing child seat is
installed on the front passenger seat.
Otherwise, the child would risk being
seriously injured or killed if the airbag
were deployed.Installing a booster seat
The chest part of the seat belt must be
positioned on the child's shoulder without
touching the neck.
Ensure that the lap part of the seat belt
passes correctly over the child's thighs.
We recommend using a booster seat with
a backrest equipped with a belt guide at
shoulder level.
Additional protections
To prevent accidental opening of the doors
and rear windows, use the child lock.
Take care not to open the rear windows by
more than one third.
To protect young children from the rays
of the sun, fit side blinds on the rear
windows.
As a safety precaution, do not leave:
-
a c
hild or children alone and
unattended in a vehicle,
-
a c
hild or an animal in a vehicle
which is exposed to the sun, with the
windows closed,
-
t
he keys within reach of children inside
the vehicle.
Children in the rear
In the rear seats, always leave sufficient
space between the front seat and:
-
a r
ear ward facing child seat,
-
t
he child's feet for a child seat fitted
forward facing.
To do this, move the front seat for wards
and, if necessary, move its backrest into
the upright position.
For optimal installation of the forward
facing child seat, verify that its backrest is
as close as possible to the backrest of the
vehicle seat, if possible in contact with it.
5
Safety
Page 116 of 312
114
Manual child lock
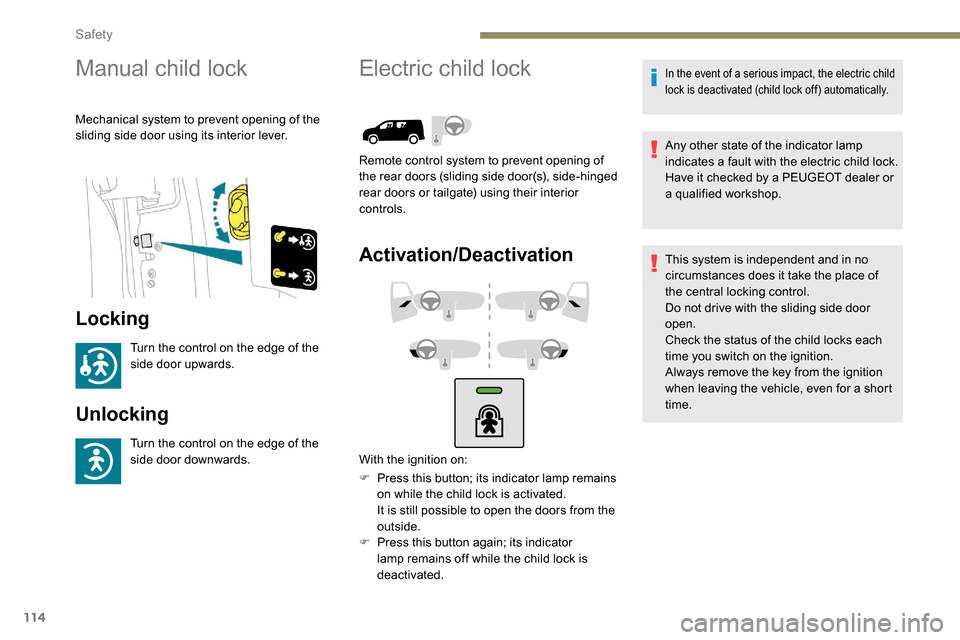
Mechanical system to prevent opening of the
sliding side door using its interior lever.
Locking
Turn the control on the edge of the
side door upwards.
Unlocking
Turn the control on the edge of the
side door downwards.
Electric child lock
Remote control system to prevent opening of
the rear doors (sliding side door(s), side-hinged
rear doors or tailgate) using their interior
controls.
Activation/Deactivation
F Press this button; its indicator lamp remains on while the child lock is activated.
It is still possible to open the doors from the
outside.
F
P
ress this button again; its indicator
lamp remains off while the child lock is
deactivated.
In the event of a serious impact, the electric child
lock is deactivated (child lock off) automatically.
Any other state of the indicator lamp
indicates a fault with the electric child lock.
Have it checked by a PEUGEOT dealer or
a qualified workshop.
This system is independent and in no
circumstances does it take the place of
the central locking control.
Do not drive with the sliding side door
open.
Check the status of the child locks each
time you switch on the ignition.
Always remove the key from the ignition
when leaving the vehicle, even for a short
time.
With the ignition on:
Safety
Page 122 of 312
120
To avoid any risk of jamming the pedals:
- o nly use mats which are suited to the
fixings already present in the vehicle;
these fixings must be used,
-
n
ever place one mat on top of another.
The use of mats not approved by
PEUGEOT may inter fere with access to
the pedals and hinder the operation of the
cruise control/speed limiter.
The mats approved by PEUGEOT have
two fixings located below the seat.
Switching the ignition on
with
K
eyless Entry and
Starting
With the Keyless Entry and Starting
electronic key inside the vehicle,
pressing the " START/STOP " button,
without pressing any of the pedals ,
allows the ignition to be switched on.
F
P
ress the " START/STOP " button, the
instrument panel comes on but the engine
does not start.
F
P
ress this button again to switch off the
ignition and allow the vehicle to be locked. With the ignition on, the system
automatically goes into energy economy
mode to maintain an adequate state of
charge in the battery.
Back-up starting with
K
eyless Entry and Starting
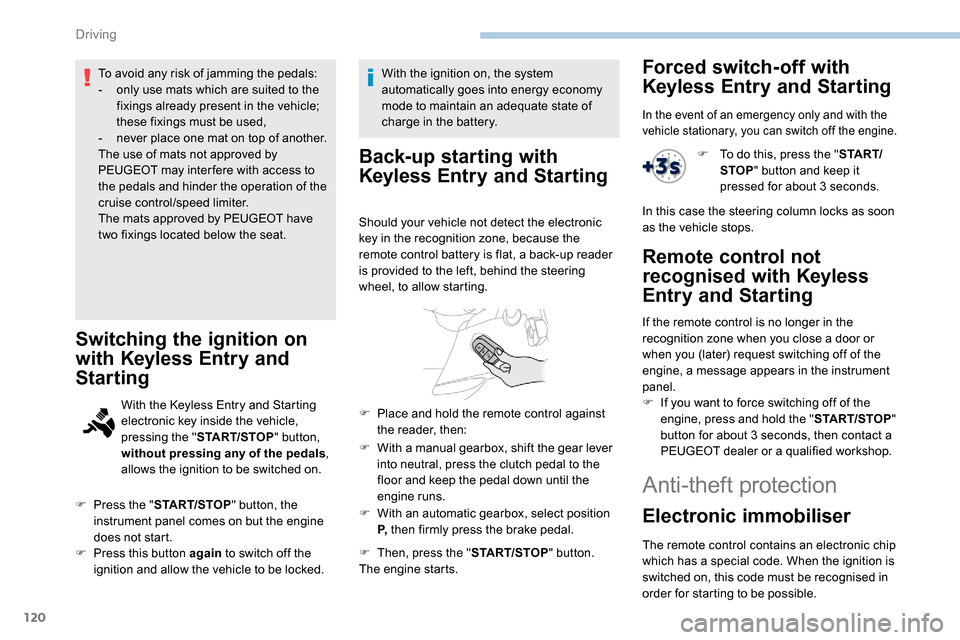
Should your vehicle not detect the electronic
key in the recognition zone, because the
remote control battery is flat, a back-up reader
is provided to the left, behind the steering
wheel, to allow starting.
F
W
ith a manual gearbox, shift the gear lever
into neutral, press the clutch pedal to the
floor and keep the pedal down until the
engine runs.
F
W
ith an automatic gearbox, select position
P, then firmly press the brake pedal.
F
T
hen, press the " START/STOP" button.
The engine starts.
F
P
lace and hold the remote control against
the reader, then:
Forced switch-off with
Keyless Entry and Starting
In the event of an emergency only and with the
vehicle stationary, you can switch off the engine.
F To do this, press the " S TA R T/
STOP " button and keep it
pressed for about 3
seconds.
In this case the steering column locks as soon
as the vehicle stops.
Remote control not
recognised with
K
eyless
Entry and Starting
If the remote control is no longer in the
recognition zone when you close a door or
when you (later) request switching off of the
engine, a message appears in the instrument
panel.
F
I
f you want to force switching off of the
engine, press and hold the " START/STOP"
button for about 3
seconds, then contact a
PEUGEOT dealer or a qualified workshop.
Anti-theft protection
Electronic immobiliser
The remote control contains an electronic chip
which has a special code. When the ignition is
switched on, this code must be recognised in
order for starting to be possible.
Driving
Page 124 of 312
122
In the event of a battery failure, the
automatic electronic parking brake no
longer works.
As a safety measure with a manual
gearbox, if the parking brake is not
applied, immobilise the vehicle by
engaging a gear.
As a safety measure with an automatic
gearbox, if the parking brake is not
applied, immobilise the vehicle by placing
one of the chocks supplied against one of
the wheels.
Contact a PEUGEOT dealer or a qualified
workshop.
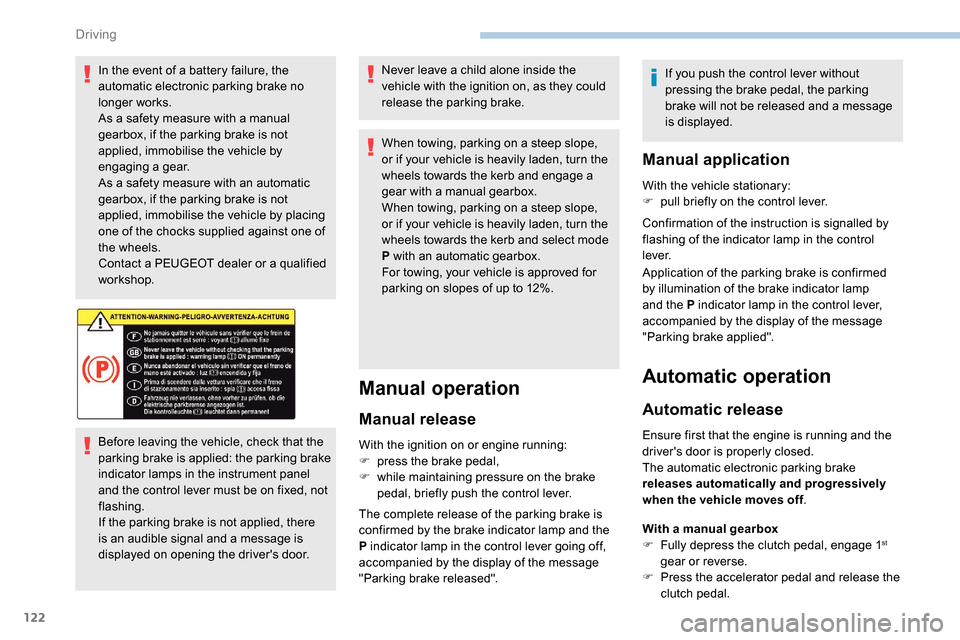
Before leaving the vehicle, check that the
parking brake is applied: the parking brake
indicator lamps in the instrument panel
and the control lever must be on fixed, not
flashing.
If the parking brake is not applied, there
is an audible signal and a message is
displayed on opening the driver's door.Never leave a child alone inside the
vehicle with the ignition on, as they could
release the parking brake.
When towing, parking on a steep slope,
or if your vehicle is heavily laden, turn the
wheels towards the kerb and engage a
gear with a manual gearbox.
When towing, parking on a steep slope,
or if your vehicle is heavily laden, turn the
wheels towards the kerb and select mode
P with an automatic gearbox.
For towing, your vehicle is approved for
parking on slopes of up to 12%.
Manual operation
Manual release
With the ignition on or engine running:
F
p ress the brake pedal,
F
w
hile maintaining pressure on the brake
pedal, briefly push the control lever.
The complete release of the parking brake is
confirmed by the brake indicator lamp and the
P indicator lamp in the control lever going off,
accompanied by the display of the message
"Parking brake released". If you push the control lever without
pressing the brake pedal, the parking
brake will not be released and a message
is displayed.
Manual application
With the vehicle stationary:
F
p ull briefly on the control lever.
Confirmation of the instruction is signalled by
flashing of the indicator lamp in the control
l eve r.
Application of the parking brake is confirmed
by illumination of the brake indicator lamp
and the P indicator lamp in the control lever,
accompanied by the display of the message
"Parking brake applied".
Automatic operation
Automatic release
Ensure first that the engine is running and the
driver's door is properly closed.
The automatic electronic parking brake
releases automatically and progressively
when the vehicle moves off .
With a manual gearbox
F
F
ully depress the clutch pedal, engage 1
st
gear or reverse.
F
P
ress the accelerator pedal and release the
clutch pedal.
Driving
Page 133 of 312
131
Special cases: STOP mode
not available
STOP mode is not activated in certain
temporary conditions (examples: battery
charge, engine temperature, braking
assistance, ambient temperature) to assure
correct operation of the system and mainly
when:
-
t
he vehicle is on a steep slope (rising or
falling),
-
t
he driver's door is open,
-
a s
liding side door is open,
-
t
he driver's seat belt is not fastened,
-
t
he vehicle has not exceeded 6 mph
(10
km/h) since the last engine start by the
driver,
-
t
he automatic electronic parking brake is
applied or being applied,
-
t
he engine is needed to maintain a
comfortable temperature in the passenger
compartment, In this case, this indicator lamp
flashes for a few seconds, then goes
of f.
Going into engine START
mode
With a manual gearbox
, the Stop
& Start warning lamp goes off on
the instrument panel and the engine
restarts automatically when you press
the clutch pedal fully down to the floor.
With an automatic gearbox , the Stop & Start
warning lamp on the instrument panel goes off
and the engine restarts automatically when:
-
y
ou release the brake pedal with the gear
selector in position D or M ,
-
y
ou are in position N with the brake pedal
released and you move the gear selector to
position D or M,
-
y
ou engage reverse.
-
d
emisting is active,
-
t
he ambient temperature is lower than about
0°C or higher than about 35°C.
This operation is perfectly normal.
Stop & Start time counter
(minutes/seconds or hours/minutes)
If your vehicle is fitted with Stop & Start, a time
counter calculates the time spent in STOP
mode during a journey.
It resets to zero every time the ignition is
switched on.
Special cases: START
mode triggered
automatically
START mode is activated automatically in
certain temporary conditions (examples:
battery charge, engine temperature, braking
assistance, air conditioning setting) to assure
correct operation of the system and mainly
when:
-
y
ou open the driver's door,
-
y
ou open a sliding side door,
-
y
ou unfasten the driver's seat belt,
-
t
he speed of the vehicle exceeds 2 mph
(3
km/h) (depending on the engine)In this case, this indicator lamp
flashes for a few seconds, then goes
of f.
This operation is perfectly normal.
6
Driving
Page 159 of 312

157
A warning lamp appears in the door mirror on
the side in question:
-
f
ixed , immediately, when being overtaken,
-
f
lashing , after a delay of about one second,
when overtaking a vehicle slowly, and when
the direction indicator is used. This system is designed to improve safety
when driving and is in no circumstances
a substitute for the use of the interior rear
view mirror and door mirrors. It is the
driver's responsibility to constantly check
the traffic, to assess the distances and
relative speeds of other vehicles and to
predict their movements before deciding
whether to change lane.
The alert is given by a warning lamp which
comes on in the door mirror on the side in
question as soon as a vehicle – car, lorry,
bicycle – is detected and the following
conditions are fulfilled:
-
a
ll the vehicles must be moving in the same
direction and in adjacent lanes,
-
t
he speed of the vehicle must be between 7
and 87 mph (12 and 140 km/h),
-
y
ou overtake a vehicle with a speed
difference of less than 6 mph (10 km/h),
-
a v
ehicle overtakes you with a speed
difference of less than 15 mph (25 km/h),
-
t
he traffic must be flowing normally,
-
i
n the case of an overtaking manoeuvre,
if this is prolonged and the vehicle being
overtaken returns to the blind spot,
-
y
ou are driving on a straight or slightly
curved road,
-
y
our vehicle is not towing a trailer, a
caravan, etc.
Blind Spot Detection
This driving assistance system warns the driver
of the presence of another vehicle in the blind
spot angle of his vehicle (areas masked from
the driver's field of vision), as soon as this
presents a potential danger. No alert will be given in the following situations:
-
i
n the presence of non-moving objects
(parked vehicles, barriers, street lamps,
road signs, etc.),
-
w
ith vehicles moving in the opposite
direction,
-
d
riving on a winding road or a sharp corner,
6
Driving
Page 166 of 312
164
Maintenance
recommendations
In bad or wintry weather, ensure that the
camera is not covered by mud, frost or snow.
Check the cleanliness of the camera lens
regularly.
If necessary, clean the camera with a soft, dry
cloth.
When washing the vehicle using a high-
pressure jet, keep the spray directed at least
30 cm away from the camera.
Surround Rear Vision
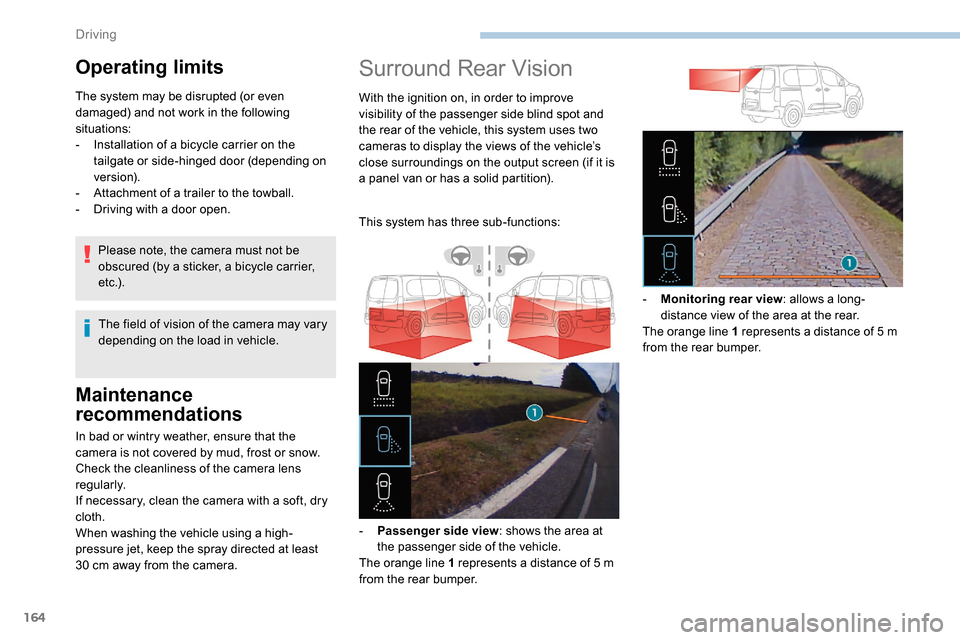
With the ignition on, in order to improve
visibility of the passenger side blind spot and
the rear of the vehicle, this system uses two
cameras to display the views of the vehicle’s
close surroundings on the output screen (if it is
a panel van or has a solid partition).
This system has three sub-functions:
-
P
assenger side view : shows the area at
the passenger side of the vehicle.
The orange line 1 represents a distance of 5
m
from the rear bumper. -
M
onitoring rear view: allows a long-
distance view of the area at the rear.
The orange line 1 represents a distance of 5
m
from the rear bumper.
Operating limits
The system may be disrupted (or even
damaged) and not work in the following
situations:
-
I
nstallation of a bicycle carrier on the
tailgate or side-hinged door (depending on
ve r s i o n).
-
A
ttachment of a trailer to the towball.
-
D
riving with a door open.
The field of vision of the camera may vary
depending on the load in vehicle.
Please note, the camera must not be
obscured (by a sticker, a bicycle carrier,
e t c .) .
Driving