2019 Peugeot Partner Screen
[x] Cancel search: ScreenPage 94 of 312

92
Automatic wiping (press down,
then release).
Single wipe (pull the stalk briefly
towards you).
Front screenwash
F Pull the wiper control stalk towards you and hold.
The screenwash and windscreen wiper operate
for as long as the control stalk is pulled.
Termination of the screenwash is followed by a
final wiping cycle.
On vehicles fitted with automatic
air conditioning, any action on the
screenwash control results in temporary
closing of the air intake to avoid odours
inside the passenger compartment.
The screenwash jets are integrated in the
tips of each arm.
The screenwash fluid is sprayed along the
length of the wiper blade. This improves
visibility and reduces the consumption of
screenwash fluid.
In some cases, depending on the contents
or colour of the liquid and on the exterior
brightness, the liquid spray may be hardly
noticeable. To avoid damaging the wiper blades,
do not operate the screenwash if the
screenwash reservoir is empty.
Only operate the screenwash if there
is no risk of the fluid freezing on the
windscreen and hindering visibility. Always
use a screenwash fluid suitable for low
temperatures during the winter period.
Never top up with water.
Rear wiper
Rear wiper selection ring:
Of f.
Intermittent wiping (proportional to
the speed of the vehicle).
Wash-wipe (set duration).
Reverse gear
When reverse gear is engaged, the rear wiper
will come into operation automatically if the
windscreen wipers are operating.
Activation/Deactivation
Activation or deactivation is set via
the vehicle configuration menu.
This system is activated by default.
If a significant accumulation of snow or ice
is present, or when using a bicycle carrier
on the boot, deactivate the automatic rear
w i p e r.
Special position of the
windscreen wipers
This position is used for cleaning or
replacement of the wiper blades. It can also
be useful, in winter (ice, snow), to release the
wiper blades from the windscreen.
or
Lighting and visibility
Page 95 of 312

93
To maintain the effectiveness of the wiper
blades, it is advisable to:
-
h
andle them with care,
-
c
lean them regularly using soapy
water,
-
a
void using them to retain cardboard
on the windscreen,
-
r
eplace them at the first signs of wear.
Before removing a windscreen
wiper blade
F In the minute following ignition switch-off, any operation of the wiper control stalk will
position the wiper blades vertically.
F
P
roceed to the desired operation or to
replacement of the wiper blades.
After refitting a windscreen wiper
blade
F To return the wiper blades to their initial position, switch on the ignition and operate
the wiper stalk.
Changing a wiper blade
Removing/refitting at the front
Do not touch the wiper blade in case you
cause irreparable damage.
Do not release them while moving them –
Risk of damaging the windscreen! F
C
lean the windscreen using a windscreen
cleaning fluid.
Do not apply "Rain X" type beading
products.
F
U
nclip the worn wiper blade closest to you
and remove it.
F
I
nstall the new wiper blade and clip it to the
arm.
F
R
epeat the procedure for the other wiper
blade.
F
S
tarting with the wiper blade closest to you,
once again hold the each arm by the rigid
section, then fold it carefully, guiding it to
the windscreen.
Removing/refitting at the rear
F Hold the arm by the rigid section and lift it to the stop position.
F
C
lean the rear window using windscreen
washing fluid.
F
U
nclip the worn wiper blade and remove it.
F
I
nstall the new wiper blade and clip it to the
arm.
F
O
nce again hold the arm by the rigid section
then fold it carefully, guiding it to the rear
window.
F
C
arry out these wiper blade replacement
operations from the driver's side.
F
S
tarting with the wiper blade farthest from
you, hold each arm by the rigid section and
lift to the stop position.
4
Lighting and visibility
Page 96 of 312

94
Switching on
Give a short downwards push to the control
stalk.
A wiping cycle confirms that the instruction has
been accepted.Depending on version, this symbol
appears in the display screen or
this indicator lamp comes on in the
instrument panel and a message is
displayed.
Switching off
Give the control stalk a brief push
downwards or shift the control stalk
to a different position (Int, 1 or 2).
This indicator lamp goes off in the
instrument panel and a message is
displayed.
The automatic rain sensitive windscreen
wipers must be reactivated by pushing the
control stalk downwards, if the ignition has
been off for more than one minute.
Malfunction
If a fault occurs with the automatic windscreen
wipers, the wipers will operate in intermittent
mode.
Have it checked by a PEUGEOT dealer or a
qualified workshop.
Do not cover the rain sensor, located at
the top of the windscreen behind the rear
view mirror (depending on equipment); the
associated functions would no longer be
controlled.
Switch off the automatic windscreen
wipers when using an automatic car wash.
In winter, it is advisable to wait until
the windscreen is completely clear of
ice before activating the automatic rain
sensitive wipers.
Automatic windscreen
wipers
The windscreen wipers operate automatically
once rain is detected (sensor behind the
rear view mirror), adapting their speed to the
intensity of the rain without any action on the
part of the driver.
Lighting and visibility
Page 123 of 312

121
In the event of a fault, you are
informed by illumination of this
warning lamp, an audible signal and
a message in the screen.
A few seconds after switching off the ignition,
this system locks the engine control system,
therefore preventing the engine from being
started in the event of a break-in.
The vehicle will not start; contact a PEUGEOT
dealer as soon as possible.
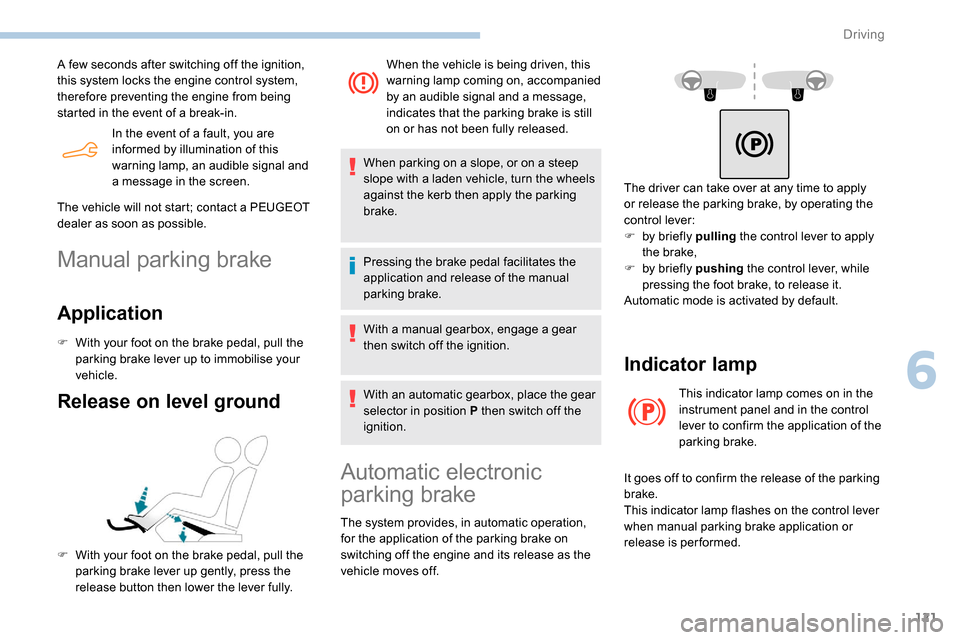
Manual parking brake
Application
F With your foot on the brake pedal, pull the
parking brake lever up to immobilise your
vehicle.
Release on level ground
F With your foot on the brake pedal, pull the parking brake lever up gently, press the
release button then lower the lever fully. When the vehicle is being driven, this
warning lamp coming on, accompanied
by an audible signal and a message,
indicates that the parking brake is still
on or has not been fully released.
When parking on a slope, or on a steep
slope with a laden vehicle, turn the wheels
against the kerb then apply the parking
brake.
Pressing the brake pedal facilitates the
application and release of the manual
parking brake.
With a manual gearbox, engage a gear
then switch off the ignition.
With an automatic gearbox, place the gear
selector in position P then switch off the
ignition.
Automatic electronic
parking brake
The system provides, in automatic operation,
for the application of the parking brake on
switching off the engine and its release as the
vehicle moves off. The driver can take over at any time to apply
or release the parking brake, by operating the
control lever:
F
b
y briefly pulling
the control lever to apply
the brake,
F
b
y briefly pushing
the control lever, while
pressing the foot brake, to release it.
Automatic mode is activated by default.
Indicator lamp
This indicator lamp comes on in the
instrument panel and in the control
lever to confirm the application of the
parking brake.
It goes off to confirm the release of the parking
brake.
This indicator lamp flashes on the control lever
when manual parking brake application or
release is performed.
6
Driving
Page 129 of 312

127
Position N can be used in traffic jams or in
a washing tunnel.
Steering mounted controls
F Pull the right-hand "+" or left-hand " -"
control paddle towards you to change up or
down.
The steering mounted controls do not
allow neutral to be selected and reverse
gear to be engaged or disengaged.
Displays in the instrument panel
When you move the gear selector or press
button M , the corresponding symbol appears in
the instrument panel.
P. Park
R. Reverse
N. Neutral
D. Drive (automatic operation)
M. Manual (manual operation)
1 to 8. Gear engaged
- Invalid value
F
I
f the message " Foot on the
brake " is displayed in the
instrument panel, press the brake
pedal firmly.
Starting the vehicle
F Start the engine.
If the conditions are not met, there is an audible
signal, accompanied by a message on the
instrument panel screen.
F
R
elease the parking brake.
F
Sel
ect position R , N or D.
F
W
ith your foot on the brake, select
position P .
If you have to move off on a steep slope
with a loaded vehicle, press the brake
pedal , select position D , release the
parking brake, then release the brake
pedal. F
P
rogressively release the brake pedal.
The vehicle moves off immediately.
If P is displayed on the instrument panel
but the selector is in another position,
place the selector in position P to allow
the engine to be started.
If position N is selected inadvertently while
driving, allow the engine to return to idle,
then select position D to accelerate.
If position R , D or M is selected when the
engine is running at idle, with the brakes
released, the vehicle moves even without
the accelerator being pressed.
Never leave children in the vehicle
unsupervised.
As a safety measure, never leave the
vehicle without taking your key or remote
control with you, even for a short time.
When carrying out maintenance with the
engine running, apply the parking brake
and select position P .
If your vehicle has an automatic gearbox,
do not try to start the engine by pushing
the vehicle.
6
Driving
Page 131 of 312

129
If the engine speed is too low or too
high, the selected gear flashes for a few
seconds, then the actual activated gear is
displayed.
When the vehicle is stationary or moving
very slowly, the gearbox selects gear M1
automatically.
To save the brakes when descending
a steep incline, use engine braking to
reduce your speed (change down to a
lower gear).
Keeping the brake pedal pressed
continuously for long periods can overheat
the brakes, with the risk of damaging the
braking system or making it inoperative.
Only use the brakes when necessary, to
slow or stop the vehicle.
Depending on the road configuration (e.g.
mountainous road), manual operation is
preferable.
This is because automatic operation may
not be best suited, not allowing the use of
engine braking.Invalid value during manual
operation
This symbol is displayed if a gear is
not engaged correctly (gear selector
between two positions).
F
P
lace the selector "correctly" at a position.
Stopping the vehicle
Before switching off the engine, select position
P then apply the parking brake to immobilise
the vehicle. A point of resistance may be noticed when
moving to position P .
If the selector is not in position P , when the
driver's door is opened or approximately
45
seconds after the ignition is switched
off, an audible signal sounds and a
message appears.
F
R
eturn the selector to position P ; the
audible signal stops and the message
disappears.
On a steep slope with a loaded vehicle,
press the brake pedal , select position P,
apply the parking brake then release the
brake pedal. In all circumstances, ensure that the
selector is in position P before leaving
your vehicle.
Malfunction
When the ignition is on, a message appears
in the instrument panel screen to indicate a
gearbox fault.
In this case, the gearbox switches to back-up
mode and is locked in 3
rd gear. You may feel
a substantial knock when changing from P
to R and from N to R. This will not cause any
damage to the gearbox.
Do not exceed 60
mph (100 km/h), local speed
restrictions permitting.
Have it checked by a PEUGEOT dealer or a
qualified workshop.
There is a risk of damage to the gearbox:
-
i
f you press the accelerator and brake
pedals at the same time (braking or
acceleration must be done only with
the right foot),
-
i
f you force the selector from position P
to another position when the battery is
flat.
6
Driving
Page 134 of 312

132
Deactivation/Activation
With button
With audio system/touch screen
Activation or deactivation is done
via the vehicle configuration menu.
If the system has been deactivated
in STOP mode, the engine restarts
immediately. The system reactivates automatically
every time the engine is started by the
driver.
Opening the bonnet
Before doing anything under the bonnet,
deactivate the Stop & Start system to
avoid the risk of injury related to an
automatic change to START mode.
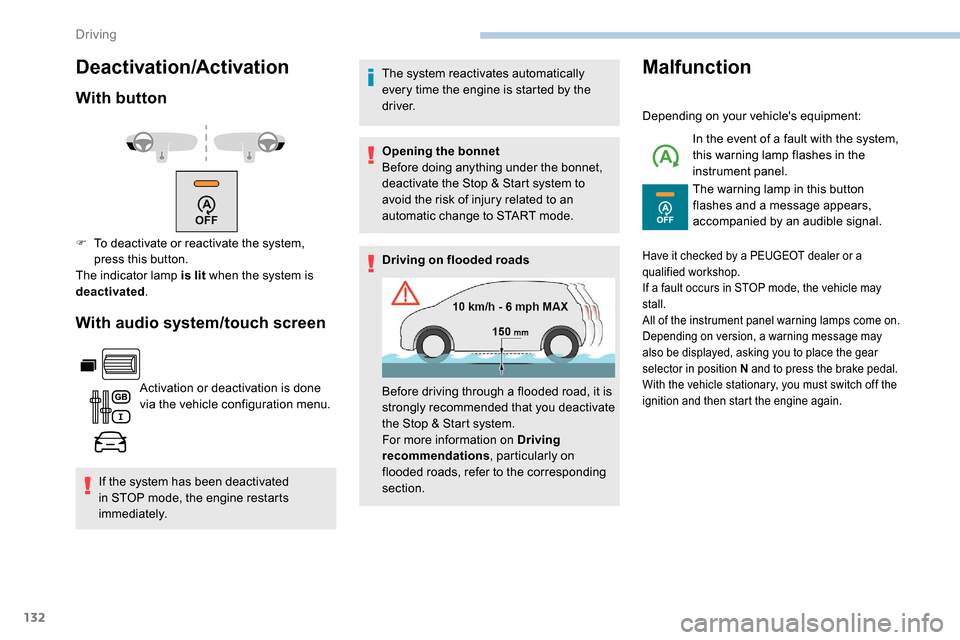
Driving on flooded roads
Malfunction
Depending on your vehicle's equipment:
In the event of a fault with the system,
this warning lamp flashes in the
instrument panel.
The warning lamp in this button
flashes and a message appears,
accompanied by an audible signal.
F
T
o deactivate or reactivate the system,
press this button.
The indicator lamp is lit when the system is
deactivated .
Before driving through a flooded road, it is
strongly recommended that you deactivate
the Stop & Start system.
For more information on Driving
recommendations, particularly on
flooded roads, refer to the corresponding
section.
Have it checked by a PEUGEOT dealer or a
qualified workshop.
If a fault occurs in STOP mode, the vehicle may
stall.
All of the instrument panel warning lamps come on.
Depending on version, a warning message may
also be displayed, asking you to place the gear
selector in position N and to press the brake pedal.
With the vehicle stationary, you must switch off the
ignition and then start the engine again.
Driving
Page 137 of 312

135
To maintain correct operation of the
system: regularly clean the area in front of
the camera.
The internal sur face of the windscreen can
also become misted around the camera.
In humid and cold weather, demist the
windscreen regularly.
Specific speed limits, such as those for
heavy goods vehicles, are not displayed.
The display of the speed limit in the
instrument panel is updated as you pass
a speed limit sign intended for cars (light
vehicles).
Activation/Deactivation
By default, the system is automatically
activated at every engine start.Activation and deactivation is done
via the vehicle configuration menu.
Displays in the instrument panel
1.Detected speed limit indication.
or
2. Indication of the end of the speed limit.
The system is active but is not detecting speed
limit information.
On detection of speed limit information, the
system displays the value.
Operating limits
The legislation on speed limits is specific to
each country.
The system does not take account of reduced
speed limits in the following cases:
-
a
tmospheric pollution,
-
w
hen towing,
-
d
riving with a space-saver type spare wheel
or snow chains fitted,
-
p
uncture repair using the temporary repair
kit,
-
y
oung drivers, etc.
For a suggested maximum speed, the first
time that the vehicle’s speed exceeds it by
more than 3
mph (5 km/h) (example: 59 mph
(95 km/h)), the speed flashes for 10 seconds.
The following situations may interfere with
the operation of the system or prevent it from
working:
-
p
oor visibility (inadequate street lighting,
falling snow, rain, fog),
-
w
indscreen area located in front of the
camera: dirty, misted, frost-covered, snow-
covered, damaged or covered by a sticker,
-
f
ault with the camera,
6
Driving