2019 Peugeot Partner belt
[x] Cancel search: beltPage 113 of 312

111
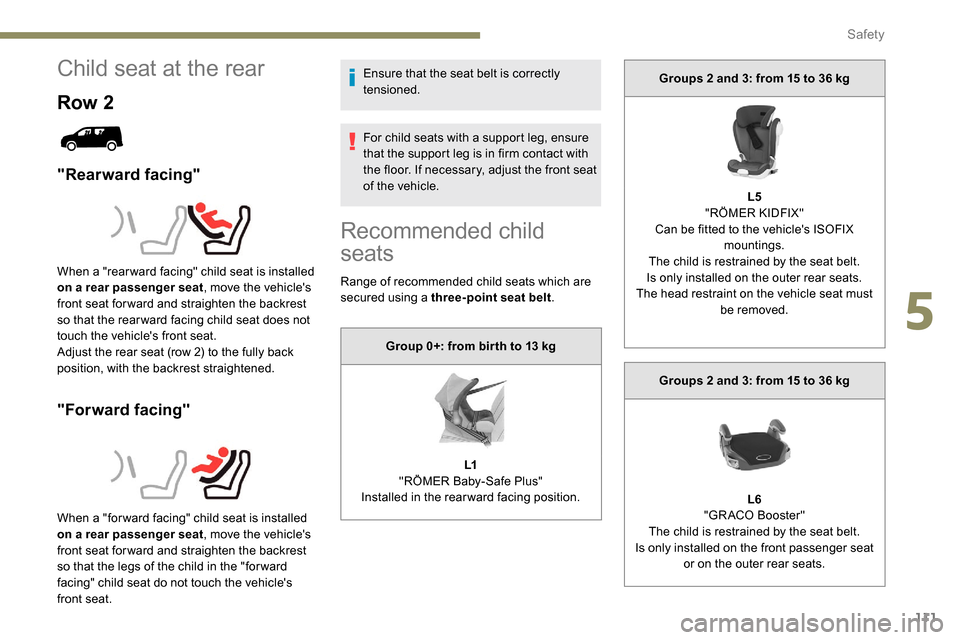
Child seat at the rear
Row 2
"Rearward facing"
"Forward facing"
Ensure that the seat belt is correctly
tensioned.
For child seats with a support leg, ensure
that the support leg is in firm contact with
the floor. If necessary, adjust the front seat
of the vehicle.
When a "rear ward facing" child seat is installed
on a rear passenger seat , move the vehicle's
front seat for ward and straighten the backrest
so that the rear ward facing child seat does not
touch the vehicle's front seat.
Adjust the rear seat (row 2) to the fully back
position, with the backrest straightened.
When a "for ward facing" child seat is installed
on a rear passenger seat , move the vehicle's
front seat for ward and straighten the backrest
so that the legs of the child in the "for ward
facing" child seat do not touch the vehicle's
front seat.
Recommended child
seats
Range of recommended child seats which are
secured using a three-point seat belt .
Group 0+: from bir th to 13
kg
L1
"RÖMER Baby-Safe Plus"
Installed in the rearward facing position. Groups 2 and 3: from 15 to 36
kg
L5
"RÖMER KIDFIX"
Can be fitted to the vehicle's ISOFIX mountings.
The child is restrained by the seat belt.
Is only installed on the outer rear seats.
The head restraint on the vehicle seat must be removed.
Groups 2 and 3: from 15 to 36
kg
L6
"GRACO Booster"
The child is restrained by the seat belt.
Is only installed on the front passenger seat or on the outer rear seats.
5
Safety
Page 114 of 312

112
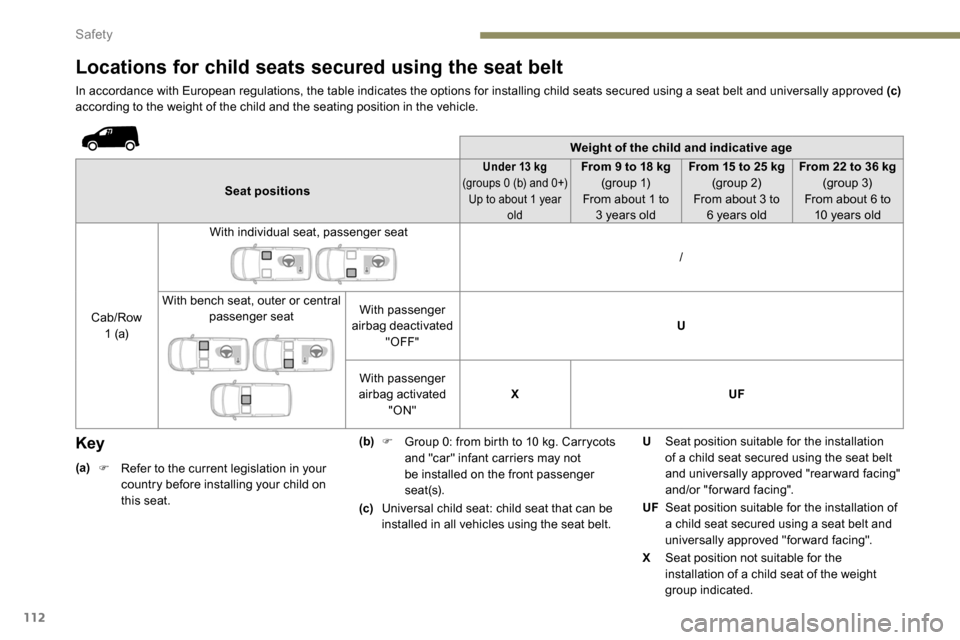
Locations for child seats secured using the seat belt
In accordance with European regulations, the table indicates the options for installing child seats secured using a seat belt and universally approved (c)
according to the weight of the child and the seating position in the vehicle.
Weight of the child and indicative age
Seat positions
Under 13 kg
(
groups 0 (b) and 0+)
Up to about 1 year oldFrom 9 to 18 kg
( group 1)
From about 1 to 3
years old From 15 to 25
kg
(group 2)
From about 3 to 6
years oldFrom 22 to 36
kg
(group 3)
From about 6 to 10
years old
Cab/Row 1 (a) With individual seat, passenger seat
/
With bench seat, outer or central passenger seat With passenger
airbag deactivated "OFF" U
With passenger
airbag activated "ON" X
UF
Key
(a)
F R efer to the current legislation in your
country before installing your child on
this seat. (b)
F
G
roup 0: from birth to 10 kg. Carrycots
and "car" infant carriers may not
be installed on the front passenger
seat(s).
(c) Universal child seat: child seat that can be
installed in all vehicles using the seat belt. U
Seat position suitable for the installation
of a child seat secured using the seat belt
and universally approved "rearward facing"
and/or "forward facing".
UF Seat position suitable for the installation of
a child seat secured using a seat belt and
universally approved "forward facing".
X Seat position not suitable for the
installation of a child seat of the weight
group indicated.
Safety
Page 115 of 312

113
Advice
An incorrectly installed child seat
compromises the child's safety in the
event of an accident.
Ensure that there is no seat belt or seat
belt buckle under the child seat, as this
could destabilise it.
Remember to fasten the seat belts or the
child seat harnesses keeping the slack
relative to the child's body to a minimum,
even for short journeys.
When installing a child seat using the seat
belt, ensure that the seat belt is tightened
correctly on the child seat and that it
secures the child seat firmly on the seat
of your vehicle. If your passenger seat is
adjustable, move it forwards if necessary.
The head restraint must be removed
before installing a child seat with a
backrest on a passenger seat.
Ensure that the head restraint is stored or
attached securely to prevent it from being
thrown around the vehicle in the event
of sharp braking. Refit the head restraint
once the child seat has been removed.Children in the front
Deactivate the front passenger airbag
when a rear ward facing child seat is
installed on the front passenger seat.
Otherwise, the child would risk being
seriously injured or killed if the airbag
were deployed.Installing a booster seat
The chest part of the seat belt must be
positioned on the child's shoulder without
touching the neck.
Ensure that the lap part of the seat belt
passes correctly over the child's thighs.
We recommend using a booster seat with
a backrest equipped with a belt guide at
shoulder level.
Additional protections
To prevent accidental opening of the doors
and rear windows, use the child lock.
Take care not to open the rear windows by
more than one third.
To protect young children from the rays
of the sun, fit side blinds on the rear
windows.
As a safety precaution, do not leave:
-
a c
hild or children alone and
unattended in a vehicle,
-
a c
hild or an animal in a vehicle
which is exposed to the sun, with the
windows closed,
-
t
he keys within reach of children inside
the vehicle.
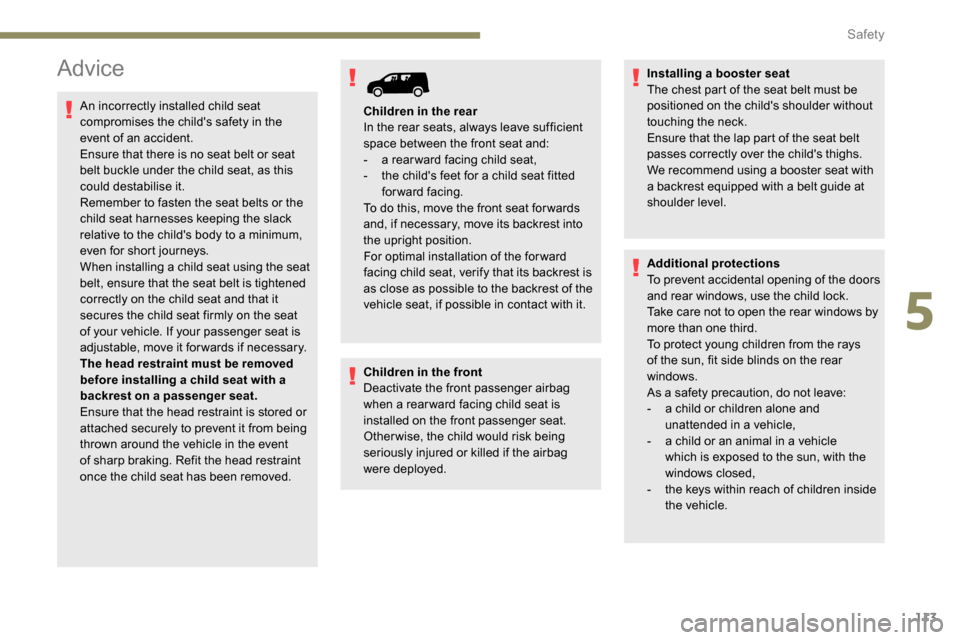
Children in the rear
In the rear seats, always leave sufficient
space between the front seat and:
-
a r
ear ward facing child seat,
-
t
he child's feet for a child seat fitted
forward facing.
To do this, move the front seat for wards
and, if necessary, move its backrest into
the upright position.
For optimal installation of the forward
facing child seat, verify that its backrest is
as close as possible to the backrest of the
vehicle seat, if possible in contact with it.
5
Safety
Page 133 of 312

131
Special cases: STOP mode
not available
STOP mode is not activated in certain
temporary conditions (examples: battery
charge, engine temperature, braking
assistance, ambient temperature) to assure
correct operation of the system and mainly
when:
-
t
he vehicle is on a steep slope (rising or
falling),
-
t
he driver's door is open,
-
a s
liding side door is open,
-
t
he driver's seat belt is not fastened,
-
t
he vehicle has not exceeded 6 mph
(10
km/h) since the last engine start by the
driver,
-
t
he automatic electronic parking brake is
applied or being applied,
-
t
he engine is needed to maintain a
comfortable temperature in the passenger
compartment, In this case, this indicator lamp
flashes for a few seconds, then goes
of f.
Going into engine START
mode
With a manual gearbox
, the Stop
& Start warning lamp goes off on
the instrument panel and the engine
restarts automatically when you press
the clutch pedal fully down to the floor.
With an automatic gearbox , the Stop & Start
warning lamp on the instrument panel goes off
and the engine restarts automatically when:
-
y
ou release the brake pedal with the gear
selector in position D or M ,
-
y
ou are in position N with the brake pedal
released and you move the gear selector to
position D or M,
-
y
ou engage reverse.
-
d
emisting is active,
-
t
he ambient temperature is lower than about
0°C or higher than about 35°C.
This operation is perfectly normal.
Stop & Start time counter
(minutes/seconds or hours/minutes)
If your vehicle is fitted with Stop & Start, a time
counter calculates the time spent in STOP
mode during a journey.
It resets to zero every time the ignition is
switched on.
Special cases: START
mode triggered
automatically
START mode is activated automatically in
certain temporary conditions (examples:
battery charge, engine temperature, braking
assistance, air conditioning setting) to assure
correct operation of the system and mainly
when:
-
y
ou open the driver's door,
-
y
ou open a sliding side door,
-
y
ou unfasten the driver's seat belt,
-
t
he speed of the vehicle exceeds 2 mph
(3
km/h) (depending on the engine)In this case, this indicator lamp
flashes for a few seconds, then goes
of f.
This operation is perfectly normal.
6
Driving
Page 153 of 312

151
Operating conditions and
limits
The ESC system must not be faulty.
The DSC/ASR systems must not be
deactivated.
All passenger seat belts must be fastened.
Driving at a steady speed on roads with few
bends is required.The system is automatically deactivated
after the use of certain "space-saver"
type spare wheels is detected (smaller
diameter).
The system is automatically deactivated
after detection of a fault with the brake
pedal switch or with at least two brake
lamps. After an impact, the function automatically
stops operating. Contact a PEUGEOT
dealer or a qualified workshop to have the
system checked.
Distance Alert
It warns the driver if his vehicle is at risk of
collision with the vehicle in front or a pedestrian
present in his traffic lane.
In the following cases, deactivating the system
via the vehicle's configuration menu is advised:
-
t
owing a trailer,
-
c
arrying long objects on roof bars or roof
rack,
-
w
ith snow chains fitted,
-
b
efore using an automatic car wash, with
the engine running,
-
b
efore placing the vehicle on a rolling road
in a workshop,
-
t
owed vehicle, engine running,
-
f
ollowing an impact to the windscreen close
to the detection camera. It is possible that warnings are not given,
are given too late or seem unjustified.
Consequently, always stay in control of
your vehicle and be prepared to react at
any time to avoid an accident.
The current threshold can
be modified via the vehicle
configuration menu.
You can select one of three pre-defined
thresholds:
- "
Distant ",
- "
Normal ",
- "
Close ".
The last threshold selected is memorised when
the ignition is switched off.
Operation
Depending on the degree of risk of collision
detected by the system and the alert threshold
chosen by the driver, different levels of
alert can be triggered and displayed in the
instrument panel.
They take account of the vehicle dynamics, the
speed of your vehicle and the one in front, the
environmental conditions, the operation of the
vehicle (cornering, actions on the pedals, etc.)
to trigger the alert at the best moment.
Modifying the alert trigger
threshold
This threshold determines how you wish to be
warned of the presence of a vehicle moving
or stationary in front of you, or a pedestrian
present in your traffic lane. Level 1 (orange)
: visual alert only,
signalling to you that the vehicle in
front is very close.
The message " Vehicle close" is
displayed.
6
Driving
Page 161 of 312

159
Fatigue detection system
Take a break as soon as you feel tired or at
least every two hours.
These systems cannot in any circumstances
replace the need for vigilance on the part of
the driver who must remain in control of their
decisions. It is never the intention of these
systems to keep the driver awake or to prevent
the driver from falling asleep at the wheel.
It is the driver’s responsibility to stop if feeling
tired.
Activation/Deactivation
The function is activated or
deactivated via the vehicle
configuration menu.
The state of the system stays in the memory
when the ignition is switched off.
Driver Attention Warning
The system triggers an alert as soon
as it detects that the driver has not
taken a break after two hours of driving
at a speed above 40
mph (65 km/h).
This alert is issued via the display of a
message encouraging you to take a break,
accompanied by an audible signal.
If the driver does not follow this advice, the
alert is repeated hourly until the vehicle is
stopped.
The system resets itself if one of the following
conditions is met:
-
e
ngine running, the vehicle has been
stationary for more than 15
minutes,
-
t
he ignition has been switched off for a few
minutes,
-
t
he driver's seat belt is unfastened and their
door is opened.
As soon as the speed of the vehicle drops
below 40
mph (65 km/h), the system goes
into standby.
The driving time is counted again once the
speed is above 40
mph (65 km/h).
Driver Attention Alert
Depending on version, the "Driver Attention
Warning" system is combined with the "Driver
Attention Alert" system.Using a camera placed at the top of
the windscreen, the system assesses
the driver's level of vigilance by
identifying variations in trajectory
compared to the lane markings.
This system is particularly suited to fast roads
(speed higher than 40
mph (65 km/h)).
When the system interprets the behaviour of
the vehicle as indicating a certain threshold of
driver fatigue or inattention, it triggers the first
level of alert.
The driver is then alerted by the message
" Ta k e c a r e ! ", accompanied by an audible
signal.
Depending on version, the function consists of
just the "Driver Attention Warning" system or of
this combined with the "Driver Attention Alert"
system.
6
Driving
Page 206 of 312

204
Access to the battery
The battery is located under the bonnet.
F O pen the bonnet using the interior release
lever, then the exterior safety catch.
F
S
ecure the bonnet stay.
For more information on the Bonnet and
the Engine , refer to the corresponding
sections.
Starting using another
battery
When your vehicle's battery is flat, the engine
can be started using a backup battery (external
or from another vehicle) and jump leads or a
battery booster. Never try to start the engine by connecting
a battery charger.
Never use a 24
V or higher battery
b o o s t e r.
First check that the backup battery has
a nominal voltage of 12 V and a capacity
at least equal to that of the discharged
battery.
The two vehicles must not be in contact
with each other.
Switch off all the electrical consumers
on both vehicles (audio system, wipers,
lighting, etc.).
Make sure that the jump leads are not
close to moving parts of the engine (fan,
belts, etc.).
Do not disconnect the (+) terminal while
the engine is running. F
S
tart the engine of the vehicle with the
good battery and leave it running for a few
minutes.
F
O
perate the starter on the broken down
vehicle and let the engine run.
If the engine does not start straight away,
switch off the ignition and wait a few moments
before trying again.
F
W
ait for it to return to idle.
F
D
isconnect the jump lead cables in reverse
order .
F
A
llow the engine to run for at least
30 minutes, by driving or with the vehicle
stationary, so that the battery reaches an
adequate state of charge.
Some functions, including Stop & Start,
are not available if the battery is not
sufficiently charged.
The battery (-) terminal is not accessible.
A remote earth point is provided at the front of
the vehicle.
F
C
onnect the red cable to the (+) terminal of
flat battery A (at the metal elbow), then to
the (+) terminal of backup battery B or the
b o o s t e r. F
C
onnect one end of the green or black
cable to the (-) terminal of backup battery
B or the booster (or an earth point on the
other vehicle).
F
C
onnect the other end of the green or black
cable to earth point C on the broken down
vehicle.
In the event of a breakdown
Page 304 of 312

222
PPads, brake ............................................ 182-183
Paint colour code .......................................... 217
Parking brake
................................. 121, 182-183
Parking brake, automatic electronic
..................... 16, 20 , 24-25 , 121-124
Parking sensors, audible and visual
.............160
Parking sensors, front
...................................161
Parking sensors, rear .................................... 160
Petrol
...................................................... 211-212
PEUGEOT Connect Nav
...................................1
PEUGEOT Connect Radio
...............................1
P
lates, identification ...................................... 217
Player, Apple
® ....................................... 10, 9, 26
Player, MP3 CD ............................... ............9, 25
Player, USB
............................................. 7, 9 , 25
Port, USB
.......................................... 65, 7, 9 , 25
Power steering
...............................
.................15
Pre-heater, Diesel
........................................... 18
Pressures, tyres
.................... 183, 191 , 195 , 217
Pre-tensioning seat belts
.............................. 105
Priming the fuel system
................................ 187
Profiles
...................................................... 16, 31
Programmable cruise control
.......................13 9
Protecting children
......................... 10 6, 1 0 9 -113
Puncture
................................................ 189, 191
RRadio ...................................... 4-5, 6 -7 , 9, 23 , 25
Radio, digital (Digital Audio Broadcasting - DAB)
.............................6,
8, 24
Range, AdBlue
........................................... 31- 32
RDS
................
........................................ 7, 23 -24
Rear screen, demisting
...................................79
Recharging the battery
.................................205
Recirculation, air
....................................... 75 -77
Reduction of electrical load
..........................17 7
Regeneration of the particle filter
.................182
Reinitialisation of the under-inflation
detection system ......................................... 168
Reinitialising the remote control
............... 45
-46
Reminder, key in ignition
...............................11
9
Reminder, lighting on
...................................... 86
R
emote control
...........37- 3 9, 42, 44 , 47- 4 8 , 120
Removing a wheel
................................. 193 -195
Removing the mat
..................................... 64-65
Replacing bulbs
..................................... 19
5 -197
Replacing fuses
.................................... 201-203
Replacing the air filter
................................... 18
1
Replacing the oil filter
................................... 18
2
Replacing the passenger compartment filter ....181Reservoir, screenwash ..........................18 0 -181
Resetting the service indicator .......................28
Resetting the trip recorder
..............................29
Reversing camera
...............................
..........163
Reversing lamps
..............................
.............19 9
Roof bars
....................................................... 17 7
Running out of fuel (Diesel)
..........................187
SSafety, children .............................. 10 6, 1 0 9 -113
Saturation of the particle filter (Diesel) .........182
Screen, instrument panel
................................29
Screen menu map
........................................... 12
Screen, multifunction (with audio system)
........4
Screenwash, front
........................................... 92
Screenwash, rear
............................................ 92
SCR (Selective Catalytic Reduction)
............183
Seat belts
................................. 15, 103 -105 , 111
Seat, bench front, 2-seat
.................. 61,
63, 104
Seat, rear bench
............................................. 63
Seats, front
...............................
.................59-63
Seats, front bench
..................................... 61- 63
Seats, heated
.................................................. 61
Seats, Multiflex ~ Extenso Cab
......................70Seats, rear
.....................................
58, 61 , 63-64
Serial number, vehicle
..................................
217
Service indicator
.............................................
28
Servicing
......................................................... 28
S
ettings, equipment
........................................
29
Settings, system
..................................
29, 16 , 32
Sidelamps
......................................... 85,
87
, 198
Side parking sensors
.................................... 16
1
Side repeater
................................................
197
Sliding side door, electric ....................
42, 5 0 - 51
Snow chains
..........................................
167, 173
Snow chains, link
..........................................
173
Socket, 12 V accessory ............................
64-65
Socket, 220 V ..................................................
66
Socket, auxiliary
...................................... 8,
9
, 25
Socket, Jack
................................................
8, 25
Speed limiter
.......................... 13
6 -13 9
, 14 9 -15 0
Speed limit recognition
......... 13
3
, 13 5 , 13 9, 141
Stability control (ESC) ..........25, 97- 9 8 , 10 0 -102
Starting a Diesel engine
............................... 17
0
Starting the engine
....................................... 11
6
Starting the vehicle
.............................
16 ,
20
, 24-25 , 115, 11 8 , 120 , 126 -129
Starting using another battery
......................
204
Station, radio ............................... ...
4, 6 -7 , 23 -24
Stay, bonnet ..................................................178
Steering mounted controls, audio ........ 2-
3, 3 , 3
Steering wheel, adjustment
............................ 57
S
topping the vehicle
...........................
16 , 20 , 24-25 , 115, 11 8 -12 0 , 126 -129
Stop & Start ...........................................
26 , 35 , 78, 83 , 13 0 -132 , 171, 17 7 , 181 , 203 , 206
STOP (warning lamp) ...................................... 17
St orage ............................................................ 65
Stowing rings
.................................................. 68
Surround Rear Vision
................................... 16
4
Switching off the engine
.......................11 6, 11 9
Synchronising the remote control
.............45-46
Alphabetical index