2019 Peugeot Partner weight
[x] Cancel search: weightPage 114 of 312

112
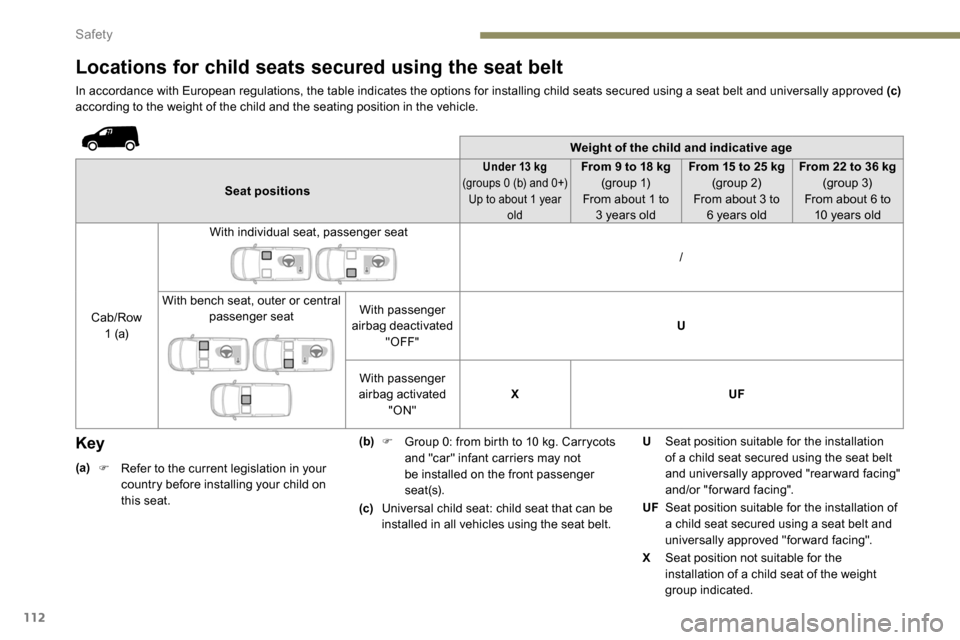
Locations for child seats secured using the seat belt
In accordance with European regulations, the table indicates the options for installing child seats secured using a seat belt and universally approved (c)
according to the weight of the child and the seating position in the vehicle.
Weight of the child and indicative age
Seat positions
Under 13 kg
(
groups 0 (b) and 0+)
Up to about 1 year oldFrom 9 to 18 kg
( group 1)
From about 1 to 3
years old From 15 to 25
kg
(group 2)
From about 3 to 6
years oldFrom 22 to 36
kg
(group 3)
From about 6 to 10
years old
Cab/Row 1 (a) With individual seat, passenger seat
/
With bench seat, outer or central passenger seat With passenger
airbag deactivated "OFF" U
With passenger
airbag activated "ON" X
UF
Key
(a)
F R efer to the current legislation in your
country before installing your child on
this seat. (b)
F
G
roup 0: from birth to 10 kg. Carrycots
and "car" infant carriers may not
be installed on the front passenger
seat(s).
(c) Universal child seat: child seat that can be
installed in all vehicles using the seat belt. U
Seat position suitable for the installation
of a child seat secured using the seat belt
and universally approved "rearward facing"
and/or "forward facing".
UF Seat position suitable for the installation of
a child seat secured using a seat belt and
universally approved "forward facing".
X Seat position not suitable for the
installation of a child seat of the weight
group indicated.
Safety
Page 136 of 312

134
- Certain road sign qualifier plates detected by the camera (e.g. the speed limit if towing).Qualifier plate detected Displaying the speed associated with
the qualifier plate
Speed limit in rain
Examples: If the wiper control stalk is in the
"intermittent wiping" or "automatic
wiping" position (so that the rain sensor is
activated):
68
mph (110 km/h) (for example)
Speed limit if towing If an approved towing device is fixed to
the vehicle:
56
mph (90 km/h) (for example)
Speed limit applicable over a cer tain distance
Example: 43
mph (70 km/h) (for example)
Speed limit for vehicles whose gross vehicle
weight or gross train weight is less than
3.5 tonnes 56
mph (90 km/h) (for example)
Speed limit in snow
Example: If the exterior temperature is below 3°C:
19
mph (30 km/h) (for example)
with a "snowflake" symbol
Speed limit at cer tain times
Example: 19
mph (30 km/h) (for example)
with a "clock" symbol The units for the speed limits (mph or
km/h) depend on the country you are
driving in.
It should be taken into account so that you
obser ve the speed limit.
For the system to operate correctly when
you change country, the units for speed in
the instrument panel must be those for the
country you are driving in.
The automatic reading of road signs is a
driving aid system and does not always
display speed limits correctly.
The speed limit signs present on the road
always take priority over the display by the
system.
The system cannot, in any circumstances,
replace the need for vigilance on the part
of the driver.
The driver must observe the driving
regulations and must adapt the speed of
the vehicle to suit the weather and traffic
conditions.
It is possible for the system to not display
the speed limit if it does not detect a
speed limit sign within a preset period.
The system is designed to detect signs
that conform to the Vienna Convention on
road signs.
Driving
Page 175 of 312

173
Snow chains
In wintry conditions, snow chains
improve traction as well as the
behaviour of the vehicle when
braking.
Snow chains must be fitted only to the
front wheels. They must never be fitted to
"space-saver" type spare wheels.
Take account of the legislation in force in
your country on the use of snow chains
and the maximum authorised speed.
Installation tips
F If you have to fit the chains during a journey, stop the vehicle on a flat sur face on the side
of the road.
F
A
pply the parking brake and position any
wheel chocks under the wheels to prevent
movement of your vehicle.
F
F
it the chains following the instructions
provided by the manufacturer.
F
M
ove off gently and drive for a few
moments, without exceeding 31
mph
(50
km/h).
F
S
top your vehicle and check that the snow
chains are correctly tightened. It is strongly recommended that before
you leave, you practise fitting the snow
chains on a level and dry sur face.
Avoid driving with snow chains on roads
that have been cleared of snow to avoid
damaging your vehicle's tyres and the
road sur face. If your vehicle is fitted with
alloy wheels, check that no part of the
chain or its fixings is in contact with the
wheel rim.
Use only the chains designed to be fitted to the
type of wheel fitted to your vehicle:
Original tyre size Maximum link size
(m m)
195/65 R15
9
205/60 R16
205/55 R17 215/65 R16215/60 R17
cannot be fitted with chains
You can also use snow socks.
For more information, contact a PEUGEOT
dealer or a qualified workshop.
Towing device
Load distribution
F D istribute the load in the trailer so that the
heaviest items are as close as possible to
the axle, and the nose weight approaches
the maximum permitted without exceeding
it.
Air density decreases with altitude, thus
reducing engine performance. The maximum
towed load must be reduced by 10
% for every
1,000
metres of altitude.
Use towing devices and their original
harnesses approved by PEUGEOT. It
is recommended that the installation be
per formed by a PEUGEOT dealer or a
qualified workshop.
If the towing device is not fitted by
a PEUGEOT dealer, it must still be
fitted in accordance with the vehicle
manufacturer's instructions.
Certain driving assistance or manoeuvring
assistance functions are automatically
deactivated if an approved towbar is used.
7
Practical information
Page 176 of 312

174
Obser ve the maximum authorised towable
weight, indicated on your vehicle's
registration certificate, the manufacturer's
label and in the Technical data section of
this guide.
Complying with the maximum
authorised nose weight (towball)
also includes the use of accessories
(bicycle carriers, tow boxes, etc.).
Obser ve the legislation in force in the
country in which you are driving.
Towing devices
Depending on equipment, the vehicle can be
fitted with one of the following towing devices: Mounting position then towing device
reference
Type of towing device Plate fixed at the
bottom and towing
device fixed at the top
Plate fixed at the bottom and towing device fixed at the bottom
Plate+
G1 towball -
L CV std (standard)
L1
-
L
CV std (standard) L2 -
L CV cross (heavy-
duty) L1
-
L
CV cross (heavy-duty) L2
Plate +
Simple hook CL -
L
CV std (standard) L1
-
L
CV std (standard) L2
-
L
CV cross (heavy-duty) L1
-
L
CV cross (heavy-duty) L2 X
Plate +
Combined hook CK
Approval No.: E1 R55 (reference 2)
For more information on your towing
device, refer to the user guide supplied
with this equipment.Remove the quickly detachable towball
when not towing a trailer.
Practical information
Page 177 of 312

175
ON
ON
ON
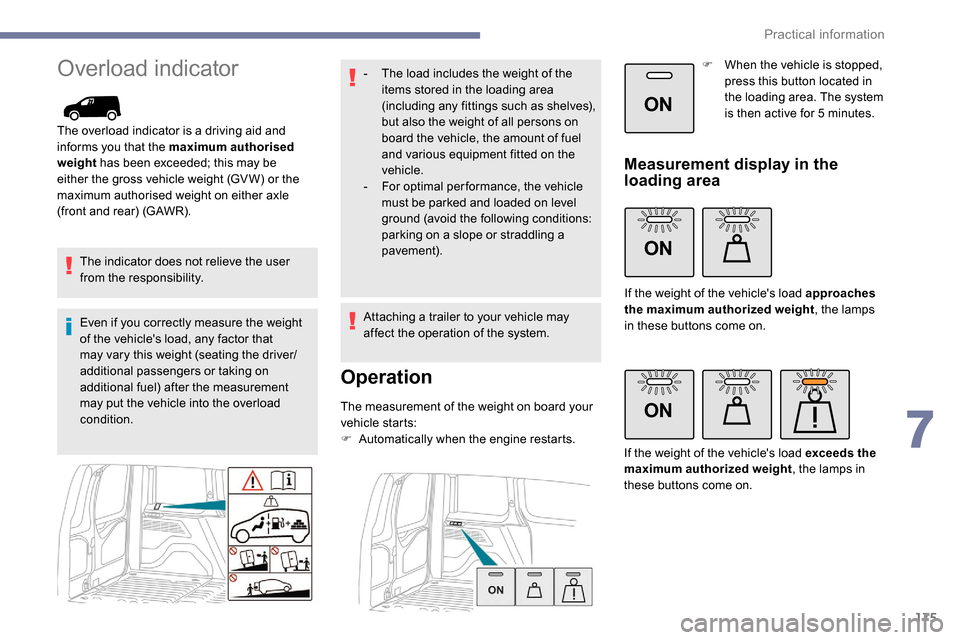
Overload indicator
The overload indicator is a driving aid and
informs you that the maximum authorised
weight has been exceeded; this may be
either the gross vehicle weight (GV W) or the
maximum authorised weight on either axle
(front and rear) (GAWR).
The indicator does not relieve the user
from the responsibility.
Even if you correctly measure the weight
of the vehicle's load, any factor that
may vary this weight (seating the driver/
additional passengers or taking on
additional fuel) after the measurement
may put the vehicle into the overload
condition. -
T
he load includes the weight of the
items stored in the loading area
(including any fittings such as shelves),
but also the weight of all persons on
board the vehicle, the amount of fuel
and various equipment fitted on the
vehicle.
-
F
or optimal per formance, the vehicle
must be parked and loaded on level
ground (avoid the following conditions:
parking on a slope or straddling a
pavement).
Attaching a trailer to your vehicle may
affect the operation of the system.
Operation
The measurement of the weight on board your
vehicle starts:
F
A
utomatically when the engine restarts. F
W
hen the vehicle is stopped,
press this button located in
the loading area. The system
is then active for 5 minutes.
Measurement display in the
loading area
If the weight of the vehicle's load approaches
the maximum authorized weight
, the lamps
in these buttons come on.
If the weight of the vehicle's load exceeds the
maximum authorized weight , the lamps in
these buttons come on.
7
Practical information
Page 178 of 312

176
ON
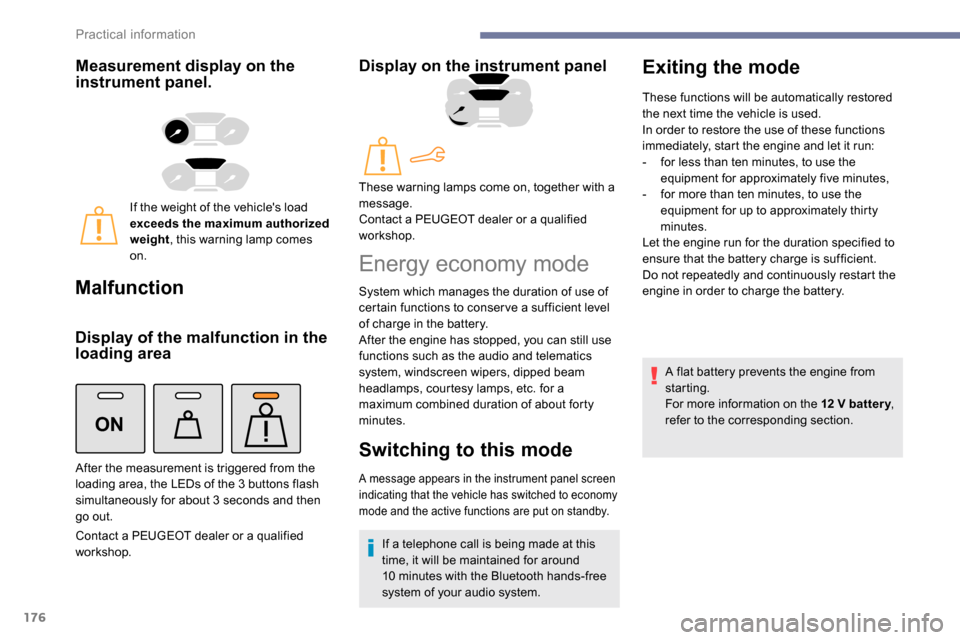
Measurement display on the
instrument panel.
If the weight of the vehicle's load
exceeds the maximum authorized
weight, this warning lamp comes
on.
Malfunction
Display of the malfunction in the
loading area
Contact a PEUGEOT dealer or a qualified
workshop.
Display on the instrument panel
After the measurement is triggered from the
loading area, the LEDs of the 3 buttons flash
simultaneously for about 3
seconds and then
go out. These warning lamps come on, together with a
message.
Contact a PEUGEOT dealer or a qualified
workshop.
Energy economy mode
System which manages the duration of use of
certain functions to conser ve a sufficient level
of charge in the battery.
After the engine has stopped, you can still use
functions such as the audio and telematics
system,
windscreen wipers, dipped beam
headlamps,
courtesy lamps, etc. for a
maximum combined duration of about forty
minutes.
Switching to this mode
A message appears in the instrument panel screen
indicating that the vehicle has switched to economy
mode and the active functions are put on standby.
If a telephone call is being made at this
time, it will be maintained for around
10
minutes with the Bluetooth hands-free
system of your audio system.
Exiting the mode
These functions will be automatically restored
the next time the vehicle is used.
In order to restore the use of these functions
immediately, start the engine and let it run:
-
f
or less than ten minutes, to use the
equipment for approximately five minutes,
-
f
or more than ten minutes, to use the
equipment for up to approximately thirty
minutes.
Let the engine run for the duration specified to
ensure that the battery charge is sufficient.
Do not repeatedly and continuously restart the
engine in order to charge the battery.
A flat battery prevents the engine from
starting.
For more information on the 12
V batter y,
refer to the corresponding section.
Practical information
Page 209 of 312

207
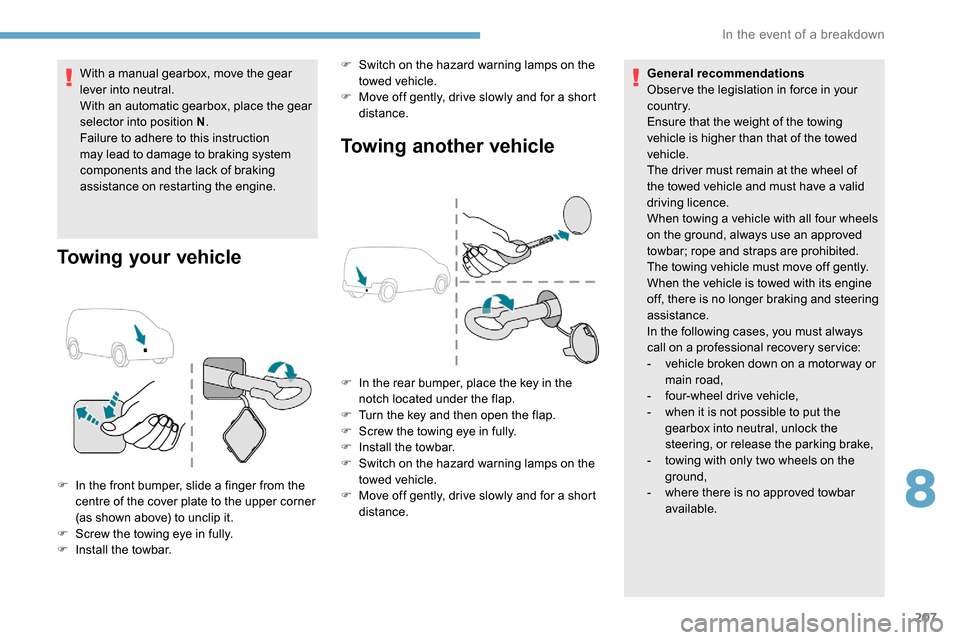
With a manual gearbox, move the gear
lever into neutral.
With an automatic gearbox, place the gear
selector into position N.
Failure to adhere to this instruction
may lead to damage to braking system
components and the lack of braking
assistance on restarting the engine.
Towing your vehicle Towing another vehicle
F In the front bumper, slide a finger from the
centre of the cover plate to the upper corner
(as shown above) to unclip it.
F
S
crew the towing eye in fully.
F
I
nstall the towbar. F
S
witch on the hazard warning lamps on the
towed vehicle.
F
M
ove off gently, drive slowly and for a short
distance. General recommendations
Obser ve the legislation in force in your
c o u nt r y.
Ensure that the weight of the towing
vehicle is higher than that of the towed
vehicle.
The driver must remain at the wheel of
the towed vehicle and must have a valid
driving licence.
When towing a vehicle with all four wheels
on the ground, always use an approved
towbar; rope and straps are prohibited.
The towing vehicle must move off gently.
When the vehicle is towed with its engine
off, there is no longer braking and steering
assistance.
In the following cases, you must always
call on a professional recovery ser vice:
-
v
ehicle broken down on a motor way or
main road,
-
f
our-wheel drive vehicle,
-
w
hen it is not possible to put the
gearbox into neutral, unlock the
steering, or release the parking brake,
-
t
owing with only two wheels on the
ground,
- w here there is no approved towbar
available.
F
I
n the rear bumper, place the key in the
notch located under the flap.
F
T
urn the key and then open the flap.
F
S
crew the towing eye in fully.
F
I
nstall the towbar.
F
S
witch on the hazard warning lamps on the
towed vehicle.
F M ove off gently, drive slowly and for a short
distance.
8
In the event of a breakdown
Page 212 of 312

210
Vehicle length
Standard (L1) Long (L2)
R Length of interior
floor With Multi-Flex bench seat
1, 8172 ,1 6 7
With ladder 1,79 02 ,14 0
S Maximum loading length
(protective cover in place) 3,090
3,440
Engine technical data and
towed loads
Engines
The engine characteristics are given in the
vehicle's registration document, as well as in
sales brochures.
The maximum power corresponds to the
value type-approved on a test bed, under
conditions defined in European legislation
(Directive 1999/99/EC). For more information, contact a PEUGEOT
dealer or a qualified workshop.
Weights and towed loads
The weights and towed loads relating to
your vehicle are indicated on the registration
document, as well as in sales brochures.
These values are also indicated on the
manufacturer's plate or label.
For more information, contact a PEUGEOT
dealer or a qualified workshop. The GTW (Gross Train Weight) and towed load
values indicated are valid up to a maximum
altitude of 1,000
metres. The towed load value
must be reduced by 10% for each additional
1,000 metres of altitude.
The maximum authorised nose weight
corresponds to the weight permitted on the
towball.
When exterior temperatures are high,
the vehicle per formance may be limited
in order to protect the engine. When the
exterior temperature is higher than 37°C,
limit the towed weight.
Towing even with a lightly loaded vehicle
can adversely affect its road holding.
Braking distances are increased when
towing a trailer.
When using a vehicle to tow, never exceed
a speed of 62 mph (100 km/h) (obser ve
the local legislation in force).
If the exterior temperature is high, it is
recommended that the engine is allowed
to idle for 1 to 2
minutes after the vehicle
comes to a stop, to facilitate its cooling.
Technical data