2019 Peugeot Expert change Km to miles
[x] Cancel search: change Km to milesPage 10 of 324

8
Limit the causes of excess
consumption
Spread loads throughout the vehicle; place
the heaviest items in the boot, as close as
possible to the rear seats.
Limit the loads carried in the vehicle and
reduce wind resistance (roof bars, roof rack,
bicycle carrier, trailer, etc.). Preferably, use a
roof box.
Remove roof bars and roof racks after use.
At the end of winter, remove snow tyres and
refit the summer tyres.
Comply with servicing
instructions
Check the tyre pressures regularly, when cold,
referring to the label in the door aperture,
driver's side.
Carry out this check in particular:
-
b
efore a long journey,
-
a
t each change of season,
-
a
fter a long period out of use.
Do not forget the spare wheel and the tyres on
any trailer or caravan. Have your vehicle ser viced regularly (engine
oil, oil filter, air filter, cabin filter, etc.) and
obser ve the schedule of operations in the
manufacturer's service schedule.
When filling the tank, do not continue after the
3
rd cut-off of the nozzle to avoid over flow.
You will only see the fuel consumption
of your new vehicle settle down to a
consistent average after the first 1,900 miles
(3,000
kilometres).
With a BlueHDi Diesel engine, if the SCR
system is faulty, your vehicle becomes
polluting. Visit a PEUGEOT dealer or a
qualified workshop as soon as possible to
bring your vehicle’s nitrogen oxides emissions
back in line with the regulations.
Eco-driving
Page 11 of 324

9
Instrument panel
Speedometer
Analogue speedometer (mph or km/h).
Indicators with LCD text or
matrix instrument panel
1.Fuel gauge.
2. Engine coolant temperature gauge.
Display screen
When travelling abroad, it may be
necessary to change the units of distance:
the display of road speed must be in the
official units (miles or km) for the country.
The change of units is done via the screen
configuration menu, with the vehicle
stationary.
With LCD instrument panel
With LCD text instrument panel With matrix instrument panel
1.
Cruise control or speed limiter settings.
2. Gear efficiency indicator.
Gear with an automatic or electronic
gearbox.
3. Digital speedometer (mph or km/h) with
LCD and LCD text instrument panel.
Display area with matrix instrument
panel: alert or function status message,
trip computer, digital speedometer (mph
or km/h), etc.
4. Ser vice indicator, then total distance
recorder (miles or km), trip distance
recorder (miles or km).
Display zone with LCD text instrument
panel: alert or function status message,
trip computer, etc.
5. Engine coolant temperature gauge.
6. Engine oil level indicator.
7. Fuel gauge.
1
Instruments
Page 31 of 324

29
F Press this button for more than 2 seconds. F
P
ress the knob on the steering wheel
for
more than 2 seconds.
A few definitions
Range
(miles or km)
The distance which can still be
travelled with the fuel remaining in
the tank (depending on the average
fuel consumption over the last few
miles (kilometres) travelled). When the range falls below 19 miles (30
km),
dashes are displayed.
After filling with at least 5 litres of fuel, the
range is recalculated and is displayed if it
exceeds 62 miles (100 km).
If dashes instead of figures continue to be
displayed when driving, contact a PEUGEOT
dealer or a qualified workshop.
This value may vary following a change in
the style of driving or the terrain, resulting
in a significant change in the current fuel
consumption.
Current fuel consumption
(mpg or l/100 km or km/l)
C alculated during the last few
seconds.
This function is only displayed from 19 mph
(30
km/h).
Average fuel consumption
(mpg or l/100 km or km/l)
C alculated since the last trip
computer reset.
Average speed
(mph or km/h)
Calculated since the last trip
computer reset.
Distance travelled
(miles or km)
Calculated since the last trip
computer reset.
Stop & Start time counter
(minutes/seconds or hours/minutes)
If your vehicle is fitted with Stop & Start, a time
counter calculates the time spent in STOP
mode during a journey.
It resets to zero every time the ignition is
switched on.
Setting the time and date
Without audio system
1
Instruments
Page 96 of 324

94
F Press "Temperature
programming ".
F
P
ress the " Status" tab to activate/deactivate
the system.
F
P
ress the " Parameters " tab to select
" Heating " mode to heat the engine and
passenger compartment or " Ventilation"
mode to ventilate the passenger
compartment.
F
T
hen programme/preset the activation time
for each selection.
F
P
ress " OK" to confirm.
Long range remote control
This enables you to switch the heating in
the passenger compartment on or off from a
distance.
The range of the remote control is about
0.6
miles (1 km) in open country.
Switching on
F Pressing and holding this button starts the heating immediately
(confirmed by the temporary
illumination of the green
indicator lamp).
Switching off
F Pressing and holding this button stops the heating immediately
(confirmed by the temporary
illumination of the red indicator
lamp).
The indicator lamp in the remote control flashes
for about 2 seconds if the vehicle has not
received the signal.
Then repeat the command after having
changed location.
Changing the battery
If the indicator lamp in the remote control
becomes orange, the state of charge of the
battery is low.
If the indicator lamp is not on, the battery is
discharged. F
U
se a coin to unscrew the cap and replace
the battery.
Do not throw remote control batteries
away as they contain metals which are
harmful to the environment. Take them
to an approved collection point.
The maximum heating period is about
45 minutes depending on the climatic
conditions.
The ventilation is activated provided that
the battery is sufficiently charged.
The heating is activated provided that:
-
t
he fuel and the battery charge levels
are sufficient,
-
t
he engine has been started since the
previous heating cycle.
Ease of use and comfort
Page 194 of 324

192
The fluids must comply with the
manufacturer's requirements and with the
vehicle's engine.
Take care when working under the bonnet,
as certain areas of the engine may be
extremely hot (risk of burns) and the
cooling fan could start at any time (even
with the ignition off).
Used products
Avoid prolonged contact of used oil or
fluids with the skin.
Most of these fluids are harmful to health
and very corrosive.Do not discard used oil or fluids into
sewers or onto the ground.
Empty used oil into the containers
reser ved for this purpose at a PEUGEOT
dealer or a qualified workshop.
Engine oil
The oil level is checked on a level
sur face with the engine stopped for
at least 30 minutes, either using the
oil level indicator in the instrument
panel when the ignition is switched
on (for vehicles equipped with an
electric gauge), or using the dipstick.
It is normal to top up the oil level between two
ser vices (or oil changes). It is recommended
that you check the level, and top up if
necessary, every 3,000 miles (5,000
km).
In order to maintain the reliability of the
engine and emissions control system,
never use additives in the engine oil.
Checking using the dipstick
The location of the dipstick is shown in the
corresponding underbonnet layout view.
F
T
ake the dipstick by its coloured grip and
pull it out completely.
F
W
ipe the end of the dipstick using a clean,
non-fluffy cloth.
F
R
efit the dipstick and push fully down, then
pull it out again to make the visual check:
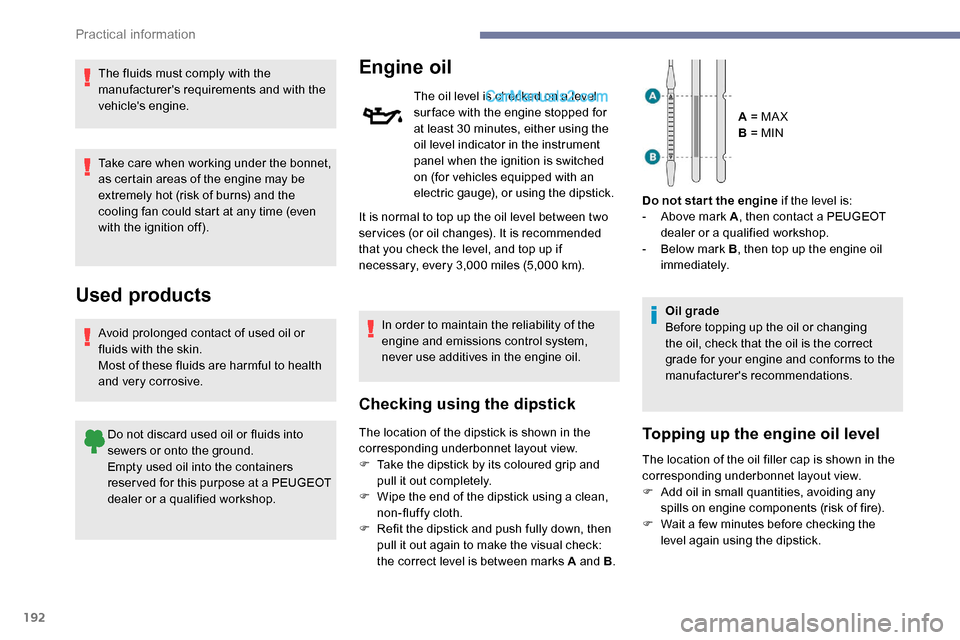
the correct level is between marks A and B .A = MA X
B = MIN
Do not star t the engine if the level is:
-
A
bove mark A
, then contact a PEUGEOT
dealer or a qualified workshop.
-
B
elow mark B
, then top up the engine oil
immediately.
Oil grade
Before topping up the oil or changing
the oil, check that the oil is the correct
grade for your engine and conforms to the
manufacturer's recommendations.Topping up the engine oil level
The location of the oil filler cap is shown in the
corresponding underbonnet layout view.
F
A
dd oil in small quantities, avoiding any
spills on engine components (risk of fire).
F
W
ait a few minutes before checking the
level again using the dipstick.
Practical information
Page 207 of 324

205
F Turn selector A to the "Inflation" position.
F
U
ncoil the white pipe G fully.
F
C
onnect the white pipe to the
valve of the repaired wheel.
F
C
onnect the compressor's electrical plug to
the vehicle's 12 V socket again.
F
S
tart the vehicle and leave the engine
running.
As soon as possible, go to a PEUGEOT
dealer or a qualified workshop.
You must inform the technician that this kit
was used. After inspection, the technician
will tell you whether the tyre can be
repaired or if it must be replaced.
F
A
djust the pressure using the compressor
(to inflate: switch B in position " I"; to deflate:
switch B
in position " O" and press button
C),
in accordance with the vehicle's tyre
pressure label, located on the driver’s door
aperture.
A significant loss of pressure indicates that
the puncture has not been fully plugged;
contact a PEUGEOT dealer or a qualified
workshop for assistance.
F
R
emove the kit and stow it. F
D rive at reduced speed (50 mph
(80
km/h) max.) limiting the distance
travelled to approximately 125
miles
(2 0 0
k m).
It is also possible to use the compressor,
without injecting sealant, to check and, if
necessary, adjust the tyre pressures.
If after 7
minutes this pressure is not
reached, this indicates that the tyre is not
repairable; contact a PEUGEOT dealer or
a qualified workshop for assistance.
Do not drive more than 125 miles (200 km)
with a repaired tyre; contact a PEUGEOT
dealer or a qualified workshop to change
the tyre.
Should the pressure of one or more tyres
be adjusted, it is necessary to reinitialise
the under-inflation detection system.
For more information on Tyre under-
inflation detection , refer to the
corresponding section.Removing the pipe and
cartridge
F Turn the pipe assembly 2 to the left until it comes into contact with the unit.
F
D
isconnect the connector 1 from the
cartridge by turning it a quarter turn anti-
clockwise.
F
P
ull the pipe assembly 2 out slightly, then
disconnect the connector 3 from the air
intake pipe by turning it a quarter turn anti-
clockwise.
8
In the event of a breakdown