2019 Peugeot Expert Tail light
[x] Cancel search: Tail lightPage 4 of 324

2
.
.
Instrument Panel 9
W arning and indicator lamps 1 0
Indicators
23
Distance recorders
2
7
Lighting dimmer
2
7
Trip computer
2
8
Setting the time and date
2
9
Electronic key with remote control function
and built-in key,
3
1
Unlocking/Complete or selective unlocking
3
3
Back-up procedures
3
8
Central locking / unlocking
4
1
Electric sliding side door(s)
4
3
General recommendations
for the sliding side doors
4
5
Hands-free sliding side door(s)
4
7
Side-hinged rear doors
4
9
Tailgate
5
0
Tailgate rear screen
5
0
Alarm
51
Electric windows
5
3Correct driving position
5
4
Front seats
5
4
2-seat front bench seat
5
6
Steering wheel adjustment
5
8
Mirrors 59
Moduwork
6
0
Precautions for the seats and bench seats
6
3
Fixed one-piece bench seat 6 4
Fixed rear seat and bench seat 6 6
Rear seat and bench seat on rails 6 8
Individual rear seat(s) on rails
7
1
Crew cab, fixed
7
3
Crew cab, folding
7
4
Interior fittings
7
5
Loading area fittings
7
9
Seating area fittings
8
1
Panoramic sunroof
8
2
Retractable sliding table
8
3
Heating and Ventilation
8
6
Heating
87
Manual air conditioning
8
7
Dual-zone automatic air conditioning
8
8
Recirculation of interior air
9
0
Front demisting - defrosting
9
0
Rear screen and/or door mirrors
demisting - defrosting
9
1
Rear heating - air conditioning
9
2
Additional Heating / Ventilation
9
2
Courtesy lamp(s)
9
5Lighting control stalk
9
7
Direction indicators
9
8
Daytime running lamps/Sidelamps
9
9
Automatic illumination of headlamps
9
9
Guide-me-home and welcome lighting
9
9
Cornering lighting
1
00
Automatic headlamp dipping
1
01
Manual headlamp beam height adjustment 1 02
Interior ambient lighting 1 02
Wiper control stalk 1 03
Automatic wiping
1
04
Changing a wiper blade
1
06
General safety recommendations
1
07
Hazard warning lamps
1
08
Emergency or assistance call
1
08
Audible warning
1
09
Electronic stability control (ESC)
1
09
Advanced Grip Control
1
12
Seat belts
1
13
Airbags
117
Child seats
1
20
Deactivating the front passenger airbag
1
22
ISOFIX child seats
1
29
Manual child lock
1
36
Electric child lock
1
36
Child lock on rear windows
1
37
Over view
Instruments
Access Ease of use and comfort
Safety
Lighting and visibility
Instruments and controls 4
L abels 5
Eco-driving
Contents
Page 27 of 324

25
Oil level indicator fault
This is indicated by a message on the
instrument panel. Contact a PEUGEOT dealer
or a qualified workshop.To locate the dipstick and the oil filler
cap for the Diesel engine , refer to the
corresponding section.
AdBlue® range indicators
(BlueHDi)
The Diesel BlueHDi engines are equipped with
a system that associates the SCR (Selective
Catalytic Reduction) emissions control system
and the Diesel particle filter (DPF) for the
treatment of exhaust gases. They cannot
function without AdBlue
®fluid.
When the level of AdBlue® falls below the
reser ve level (between 1,500 miles and 0
miles (2,400 and 0
km)), a warning lamp lights
up when the ignition is switched on and an
estimate of the distance that can be travelled
before engine starting is prevented is displayed
in the instrument panel.
The engine starting prevention system
required by regulations is activated
automatically once the AdBlue
® tank is
empty. It is then no longer possible to
start the engine until the minimum level of
AdBlue
® has been topped up.
Manual display of the range
While the range is greater than 1,500 miles
(2,400 km), it is not displayed automatically. With touch screen
Actions required related to a lack
of AdBlue®
The following warning lamps light up when the
quantity of AdBlue® is lower than the reser ve
level corresponding to a range of 1,500 miles
(2, 4 0 0
k m).
Together with the warning lamps, messages
regularly remind you of the need to top up to
avoid engine starting being prevented. Refer to
the Warning and indicator lamps section for
details of the messages displayed. You can access this information via
the "
Driving/Vehicle " menu.
F
P
ress this button to temporarily display the
driving range.
For more information on AdBlue
®
(BlueHDi engines) , and in particular on
topping up, refer to the corresponding
section.
1
Instruments
Page 41 of 324

39
F To deadlock it, turn the key towards the rear again within 5 seconds of locking
(confirmed by the temporary lighting of the
direction indicators).
If the vehicle is fitted with an alarm, this
function will not be activated when locking
with the key.
If the alarm is activated, the siren sounds
on opening the door; switch on the ignition
to stop it.Central locking not
functioning
Use these procedures in the following cases:
- c entral locking fault,
-
b
attery disconnected or discharged.
In the event of a malfunction with the
central locking system, the battery must
be disconnected to lock the boot and thus
ensure that the vehicle is locked fully.
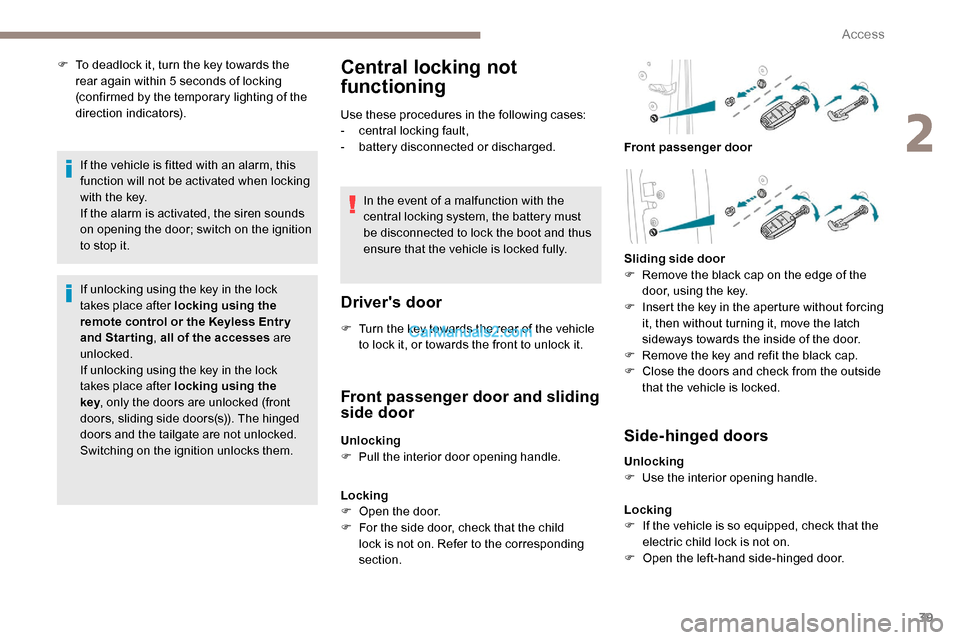
Driver's door
F Turn the key towards the rear of the vehicle to lock it, or towards the front to unlock it.
If unlocking using the key in the lock
takes place after locking using the
remote control or the Keyless Entr y
and Starting
, all of the accesses are
unlocked.
If unlocking using the key in the lock
takes place after locking using the
key , only the doors are unlocked (front
doors, sliding side doors(s)). The hinged
doors and the tailgate are not unlocked.
Switching on the ignition unlocks them.
Front passenger door and sliding
side door
Unlocking
F P ull the interior door opening handle.
Locking
F
O
pen the door.
F
F
or the side door, check that the child
lock is not on. Refer to the corresponding
section. Front passenger door
Sliding side door
F
R
emove the black cap on the edge of the
door, using the key.
F
I
nsert the key in the aperture without forcing
it, then without turning it, move the latch
sideways towards the inside of the door.
F
R
emove the key and refit the black cap.
F
C
lose the doors and check from the outside
that the vehicle is locked.Side-hinged doors
Unlocking
F U se the interior opening handle.
Locking
F
I
f the vehicle is so equipped, check that the
electric child lock is not on.
F
O
pen the left-hand side-hinged door.
2
Access
Page 106 of 324

104
Windscreen and headlamp
wash
Switching on
Give a short downwards push to the
control stalk.
A wiping cycle confirms that the
instruction has been accepted.
This indicator lamp comes on in the
instrument panel and a message is
displayed.
Switching off
Give the control stalk a brief push
downwards or shift the control stalk
to a different position (Int, 1 or 2).
This indicator lamp goes off in the
instrument panel and a message is
displayed.
The automatic rain sensitive windscreen
wipers must be reactivated by pushing the
control stalk downwards, if the ignition has
been off for more than one minute.
Operating fault
If a fault occurs with the automatic windscreen
wipers, the wipers will operate in intermittent
mode.
Have it checked by a PEUGEOT dealer or a
qualified workshop. Do not cover the rain sensor, linked with
the sunshine sensor and located in the
top of the windscreen behind the rear view
m i r r o r.
Switch off the automatic windscreen
wipers when using an automatic car wash.
In winter, it is advisable to wait until
the windscreen is completely clear of
ice before activating the automatic rain
sensitive wipers.
Rear wiper
Of f.
Intermittent wipe.
Wash-wipe (set duration).
Reverse gear
When reverse gear is engaged, the rear wiper
will come into operation automatically if the
windscreen wipers are operating.
Activation/Deactivation
With audio system or touch
screen
The system is activated or
deactivated via the vehicle
configuration menu.
This system is activated by default.
If a significant accumulation of snow or ice
is present, or when using a bicycle carrier
on the tailgate, deactivate the automatic
rear wiper.
F
P
ull the wiper control stalk towards you.
Lighting and visibility
Page 217 of 324

215
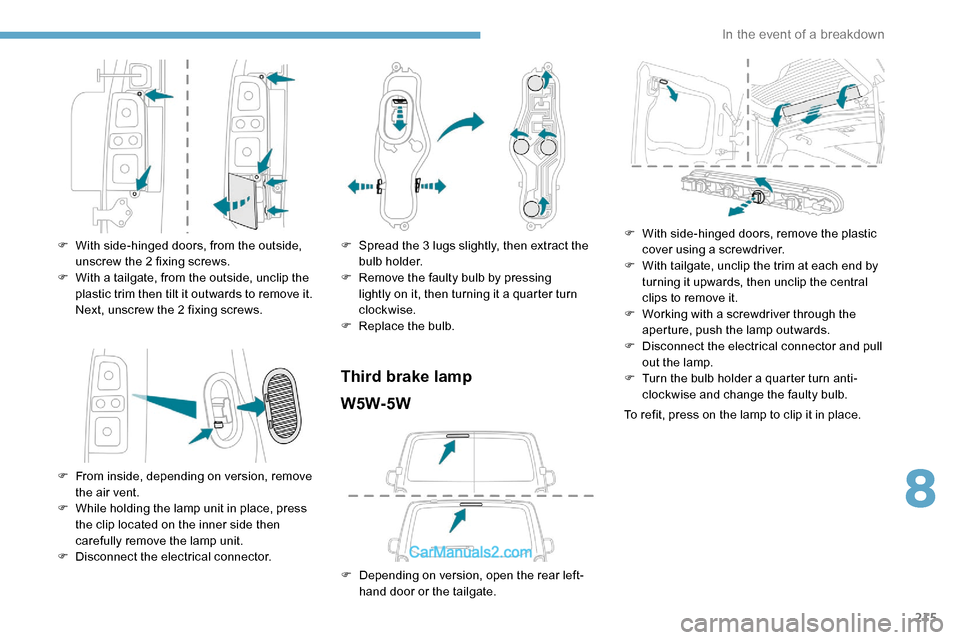
F With side-hinged doors, from the outside, unscrew the 2 fixing screws.
F
W
ith a tailgate, from the outside, unclip the
plastic trim then tilt it outwards to remove it.
Next, unscrew the 2 fixing screws.
F
F
rom inside, depending on version, remove
the air vent.
F
W
hile holding the lamp unit in place, press
the clip located on the inner side then
carefully remove the lamp unit.
F
D
isconnect the electrical connector. F
S pread the 3 lugs slightly, then extract the
bulb holder.
F
R
emove the faulty bulb by pressing
lightly on it, then turning it a quarter turn
clockwise.
F
R
eplace the bulb.
Third brake lampW5W-5W
F Depending on version, open the rear left- hand door or the tailgate. F
W
ith side-hinged doors, remove the plastic
cover using a screwdriver.
F
W
ith tailgate, unclip the trim at each end by
turning it upwards, then unclip the central
clips to remove it.
F
W
orking with a screwdriver through the
aperture, push the lamp outwards.
F
D
isconnect the electrical connector and pull
out the lamp.
F
T
urn the bulb holder a quarter turn anti-
clockwise and change the faulty bulb.
To refit, press on the lamp to clip it in place.
8
In the event of a breakdown
Page 313 of 324

237
Table of weights ............................................2 25
Table position .................................................. 55
Table, retractable sliding
...........................83-85
Tables, aircraft
................................................ 76
Tables of fuses
....................................... 217-219
Table top, working
........................................... 63
Tailgate rear screen
........................................ 50
Ta n k , f u e l
................................................ 185 -187
Technical data
............................................... 225
Temperature, coolant
................................12, 24
Textured Paint
............................................... 19 9
Third brake lamp
........................................... 215
Time (setting)
.................................................. 30
Tool box
................
................................. 201-202
To o l s
..................................................... 202, 206
Topping-up AdBlue
®...................................... 198
Total distance recorder ................................... 27
To w b a r
...............................
............................ 188
Towed loads
.......................................... 224-225
Towing another vehicle
......................... 222-223
Towing eye
.................................................... 222
Traction control (ASR)
..................... 17, 1 0 9 -11 3
Tr a i l e r
...............
............................................. 188
Trajectory control systems
..................... 10
9 -110
Triangle, warning ........................................... 200
Trip computer
............................................ 28-29
Trip distance recorder
..................................... 2
7
Ty r e s
.............................................................. 19 6
Tyre under-inflation detection
....................... 1
8, 154-155, 205, 210
T
V
U
W
Ventilation ............................... 86 - 87, 90, 92, 94
Visiopark 1 .................................................... 18 0
Under-inflation (detection)
............................
15 4
Unlocking
.......................................
31-32, 34-36
Unlocking from the inside .........................
41- 4 3
Unlocking, selective
..................................
33-36
Unlocking the doors
................................... 4
1- 42
Unlocking, total
.........................................
33-36
Updating the date
............................................ 3
0
Updating the time
...............................
.............
30
USB
.................................................................
77
Warning and indicator lamps
..................... 1
0 -11
Warning lamp, airbag
...................................... 18
W
arning lamp, braking system
..................11 -12
Warning lamp, Diesel engine pre-heater
.......18
Warning lamp, driver''s seat belt not fastened
...............................
..........115
Warning lamp, low fuel level
...........................19
Warning lamp, parking brake
..........................12
Warning lamps
................................................ 11
Warning lamp, seat belts
........................12 , 115
Warning lamp, Service ....................................13
Warnings and indicators
............................1 0 -11
Washer jets, heated
........................................ 91
Washing
........................................................ 15 8
Weights
...............
.................................. 224-225
Welcome lighting ............................................. 32
Wheel, spare
................. 1
55, 196, 206 -207, 210
Windows, rear
................................................. 82
Windscreen, heated
........................................ 91Wiper blades (changing)
.......................
105 -10 6
Wiper, rear ..................................................... 104
Wipers
.............................................
20, 103 -104
Wipers, automatic rain sensitive
...........
103 -104
.
Alphabetical index