2019 Peugeot Expert ESP
[x] Cancel search: ESPPage 198 of 324

196
Wheels and tyres
The pressure must be checked on
all tyres, including the spare wheel,
when the tyres are "cold".
The pressures indicated on the tyre pressure
label are valid for "cold" tyres. If you have
driven for more than 10 minutes or more
than 6
miles (10 kilometres) at over 31 mph
(50
km/h), add 0.3 bar (30 kPa) to the values
indicated on the label.
Driving with under-inflated tyres increases
fuel consumption. Non-compliant tyre
pressure causes premature wear on tyres
and has an adverse effect on the vehicle's
road holding - risk of an accident!
Driving with worn or damaged tyres reduces
the braking and road holding per formance of
the vehicle. It is recommended to regularly
check the condition of the tyres (tread and
sidewalls) and wheel rims as well as the
presence of the valves.
Using different size wheels and tyres from
those specified can affect the lifetime of
tyres, wheel rotation, ground clearance, the
speedometer reading and have an adverse
effect on road holding.
AdBlue® (BlueHDi)
To respect the environment and ensure
compliance with the Euro 6 standard, without
adversely affecting the per formance or fuel
consumption of its Diesel engines, PEUGEOT
has taken the decision to equip its vehicles
with a system that associates SCR (Selective
Catalytic Reduction) with a Diesel particle filter
(DPF) for the treatment of exhaust gases.
SCR system
Using a liquid called AdBlue® that contains
urea, a catalytic converter turns up to 85%
of nitrogen oxides (NOx) into nitrogen and
water, which are harmless to health and the
environment.
The AdBlue
® is contained in a
special tank holding about 20
litres. Its capacity allows a driving range of
approximately 4,300
miles (7,000 km)
( highly dependent on your driving style
and the vehicle). An alert system is triggered
automatically when the remaining range
reaches 1,500 miles (2,400 km), i.e. once the
reserve level has been reached.
Several alerts are triggered successively during
the remaining 1,500 miles (2,400 km) before
the tank is empty and the vehicle is disabled.
If the estimated distance travelled by the
vehicle between two ser vices is greater than
3,700 miles (6,000 km), it will be necessary to
top up the AdBlue.
For more information on the Warning
and indicator lamps and the associated
alerts, or the Indicators , refer to the
corresponding sections.
Fitting different tyres on the front and rear axles
can cause the ESC to mistime.
Practical information
Page 202 of 324

200
Warning triangle
This safety equipment should be used in
addition to the hazard warning lamps.
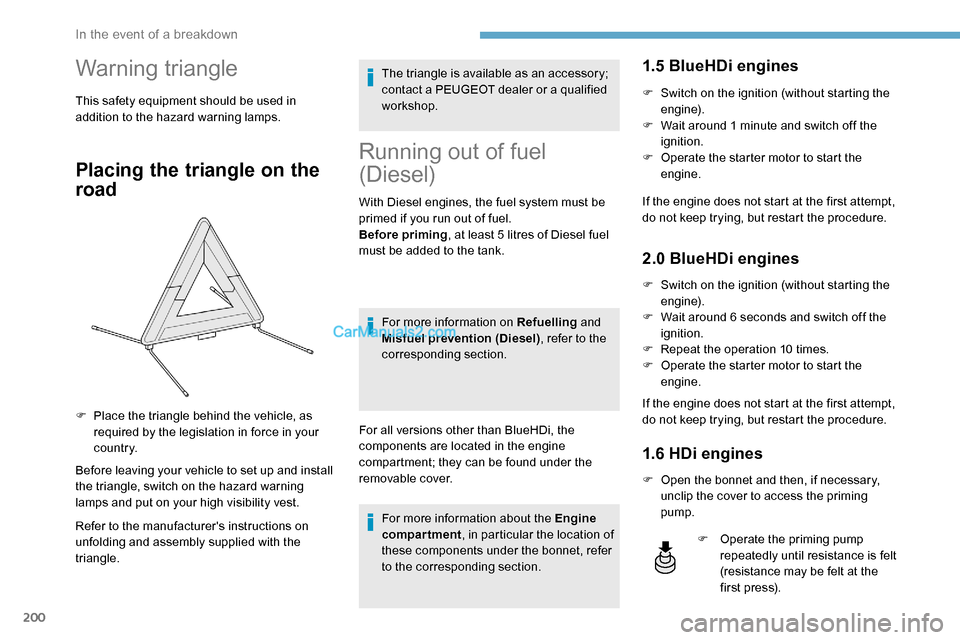
Placing the triangle on the
road
Before leaving your vehicle to set up and install
the triangle, switch on the hazard warning
lamps and put on your high visibility vest.
Refer to the manufacturer's instructions on
unfolding and assembly supplied with the
triangle.The triangle is available as an accessory;
contact a PEUGEOT dealer or a qualified
workshop.
Running out of fuel
(Diesel)
With Diesel engines, the fuel system must be
primed if you run out of fuel.
Before priming
, at least 5
litres of Diesel fuel
must be added to the tank.
For more information on Refuelling and
Misfuel prevention (Diesel) , refer to the
corresponding section.
For all versions other than BlueHDi, the
components are located in the engine
compartment; they can be found under the
removable cover. For more information about the Engine
compartment , in particular the location of
these components under the bonnet, refer
to the corresponding section.
1.5 BlueHDi engines
F Switch on the ignition (without starting the engine).
F
W
ait around 1 minute and switch off the
ignition.
F
O
perate the starter motor to start the
engine.
If the engine does not start at the first attempt,
do not keep trying, but restart the procedure.
2.0 BlueHDi engines
F Switch on the ignition (without starting the engine).
F
W
ait around 6 seconds and switch off the
ignition.
F
R
epeat the operation 10
times.
F
O
perate the starter motor to start the
engine.
If the engine does not start at the first attempt,
do not keep trying, but restart the procedure.
1.6 HDi engines
F Open the bonnet and then, if necessary, unclip the cover to access the priming
pump.
F
P
lace the triangle behind the vehicle, as
required by the legislation in force in your
c o u nt r y.
F
O
perate the priming pump
repeatedly until resistance is felt
(resistance may be felt at the
f i r st p r e s s).
In the event of a breakdown
Page 204 of 324

202
Opening
Storage
F Refit the cover on the box and clip fixings B.
F
P
osition the box with the front inclined
upwards.
F
T
o take it past bar 2 , push the box in and
down.
F
T
o take it past bar 1 , raise the box slightly
then push it fully in. F
O
nce the box is fully home
in its housing,
push it against the floor carpet then slide
latches A outwards to secure it.
Pull on the box to check that it is secure in
its housing.
Temporary puncture
repair kit
Scan the QR code on page 3 to view
explanatory videos.
Comprising a compressor and a sealant
cartridge, it allows the temporary repair of
a tyre so that you can drive to the nearest
garage. It is designed to repair most punctures
which could affect the tyre, located on the
tyre tread or shoulder.
Its compressor can be used to check and
adjust the pressure of the tyre.
Access to the kit
This kit is stowed in a tool box.
For more information on the Tool box ,
refer to the corresponding section.
List of tools
These tools are specific to the vehicle and may
vary according to the level of equipment. Do
not use them for any other purpose.
F
U
nclip fixings B on the cover, then open it
for access to the tools.
In the event of a breakdown
Page 205 of 324

203
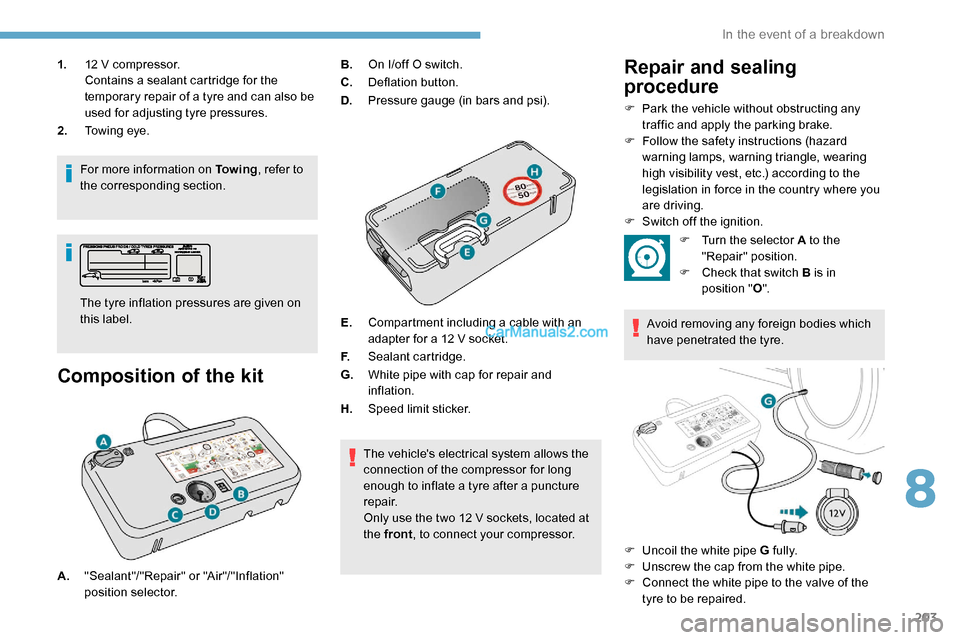
1.12 V compressor.
Contains a sealant cartridge for the
temporary repair of a tyre and can also be
used for adjusting tyre pressures.
2. Towing eye.
For more information on To w i n g , refer to
the corresponding section.
Composition of the kit
The tyre inflation pressures are given on
this label. B.
On I/off O switch.
C. Deflation button.
D. Pressure gauge (in bars and psi).
E. Compartment including a cable with an
adapter for a 12 V socket.
F. Sealant cartridge.
G. White pipe with cap for repair and
inflation.
H. Speed limit sticker.
The vehicle's electrical system allows the
connection of the compressor for long
enough to inflate a tyre after a puncture
repair.
Only use the two 12 V sockets, located at
the front , to connect your compressor.
Repair and sealing
procedure
F Park the vehicle without obstructing any
traffic and apply the parking brake.
F
F
ollow the safety instructions (hazard
warning lamps, warning triangle, wearing
high visibility vest, etc.) according to the
legislation in force in the country where you
are driving.
F
S
witch off the ignition.
A. "Sealant"/"Repair" or "Air"/"Inflation"
position selector. F
T
urn the selector A to the
"Repair" position.
F
C
heck that switch B is in
position " O".
Avoid removing any foreign bodies which
have penetrated the tyre.
F
U
ncoil the white pipe G fully.
F
U
nscrew the cap from the white pipe.
F
C
onnect the white pipe to the valve of the
tyre to be repaired.
8
In the event of a breakdown
Page 207 of 324

205
F Turn selector A to the "Inflation" position.
F
U
ncoil the white pipe G fully.
F
C
onnect the white pipe to the
valve of the repaired wheel.
F
C
onnect the compressor's electrical plug to
the vehicle's 12 V socket again.
F
S
tart the vehicle and leave the engine
running.
As soon as possible, go to a PEUGEOT
dealer or a qualified workshop.
You must inform the technician that this kit
was used. After inspection, the technician
will tell you whether the tyre can be
repaired or if it must be replaced.
F
A
djust the pressure using the compressor
(to inflate: switch B in position " I"; to deflate:
switch B
in position " O" and press button
C),
in accordance with the vehicle's tyre
pressure label, located on the driver’s door
aperture.
A significant loss of pressure indicates that
the puncture has not been fully plugged;
contact a PEUGEOT dealer or a qualified
workshop for assistance.
F
R
emove the kit and stow it. F
D rive at reduced speed (50 mph
(80
km/h) max.) limiting the distance
travelled to approximately 125
miles
(2 0 0
k m).
It is also possible to use the compressor,
without injecting sealant, to check and, if
necessary, adjust the tyre pressures.
If after 7
minutes this pressure is not
reached, this indicates that the tyre is not
repairable; contact a PEUGEOT dealer or
a qualified workshop for assistance.
Do not drive more than 125 miles (200 km)
with a repaired tyre; contact a PEUGEOT
dealer or a qualified workshop to change
the tyre.
Should the pressure of one or more tyres
be adjusted, it is necessary to reinitialise
the under-inflation detection system.
For more information on Tyre under-
inflation detection , refer to the
corresponding section.Removing the pipe and
cartridge
F Turn the pipe assembly 2 to the left until it comes into contact with the unit.
F
D
isconnect the connector 1 from the
cartridge by turning it a quarter turn anti-
clockwise.
F
P
ull the pipe assembly 2 out slightly, then
disconnect the connector 3 from the air
intake pipe by turning it a quarter turn anti-
clockwise.
8
In the event of a breakdown
Page 208 of 324

206
Be careful of fluid discharge.
The expiry date of the fluid is indicated on
the cartridge.
The sealant cartridge is designed for
single use; it must be replaced even if only
partly used.
After use, do not discard the cartridge into
the environment, take it to an authorised
waste disposal site or a PEUGEOT dealer.
Do not forget to obtain a new sealant
cartridge, available from PEUGEOT
dealers or from a qualified workshop.
Spare wheel
Scan the QR code on page 3 to view
explanatory videos.
Procedure for changing a damaged wheel with
the spare wheel using the tools provided with
the vehicle.
Access to the tools
The tools are stowed in a tool box. For more information on the Tool box ,
refer to the corresponding section.
List of tools
For more information on To w i n g , refer to
the corresponding section.
All of these tools are specific to your
vehicle and may vary depending on
equipment.
Do not use them for any other purposes.
F
R
emove the pipe assembly 2
.
F
K
eep the compressor vertical.
F
U
nscrew the cartridge 4 from the bottom.
To fit the new cartridge and new pipe, carry out
these operations in reverse order. 1.
Wheelbrace.
For removing the wheel bolts and raising/
lowering the jack.
2. Jack.
Used to raise the vehicle.
3. Wheel bolt cover/wheel trim removal tool.
If present on your vehicle, it is used to
remove the wheel bolt covers on alloy
wheels or the wheel trim on steel wheels.
4. Socket for the wheel security bolts.
Used for adapting the wheelbrace to the
special "security" bolts.
5. Towing eye.
In the event of a breakdown
Page 209 of 324

207
The jack must only be used to change
a wheel with a damaged or punctured tyre.
Do not use any jack other than the one
supplied with this vehicle.
If the vehicle does not have its original
jack, contact a PEUGEOT dealer or a
qualified workshop to obtain the correct
jack for it.
The jack meets European standards,
as defined in the Machinery Directive
2006/42/CE.
The jack does not require any
maintenance.
Access to the spare wheel
F Access to the spare wheel is from the rear.
F D epending on version, open the side-
hinged doors or the tailgate.
To avoid any unwanted opening of the
electric side door(s), deactivate the
Hands-Free Access function in the vehicle
configuration menu.
For more information on the Hands-
Free Sliding Side Door , refer to the
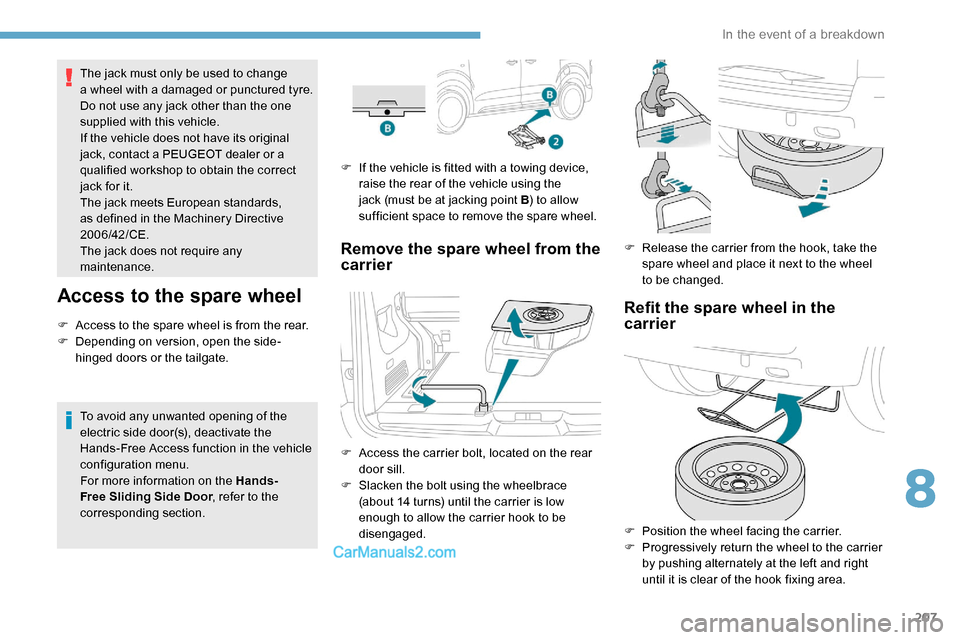
corresponding section. F
I
f the vehicle is fitted with a towing device,
raise the rear of the vehicle using the
jack (must be at jacking point B ) to allow
sufficient space to remove the spare wheel.
Remove the spare wheel from the
carrier
F Access the carrier bolt, located on the rear door sill.
F
S
lacken the bolt using the wheelbrace
(about 14 turns) until the carrier is low
enough to allow the carrier hook to be
disengaged. F
R
elease the carrier from the hook, take the
spare wheel and place it next to the wheel
to be changed.
Refit the spare wheel in the
carrier
F Position the wheel facing the carrier.
F P rogressively return the wheel to the carrier
by pushing alternately at the left and right
until it is clear of the hook fixing area.
8
In the event of a breakdown
Page 212 of 324

210
F Lower the vehicle again fully.
F F old the jack 2 and detach it.
F
I
f the vehicle is so equipped, tighten the
security bolt using the wheelbrace 1 fitted
with the security socket 4 .
F
T
ighten the other bolts using wheelbrace 1
o n l y.
F
S
tow the tools in the tool box. After changing a wheel
Stow the punctured wheel in the carrier.
Go to a PEUGEOT dealer or a qualified
workshop as soon as possible.
Have the punctured tyre examined. After
inspection, the technician will advise you
on whether the tyre can be repaired or if it
must be replaced. Fitting a steel or "space-saver" spare
wheel
If your vehicle is fitted with alloy wheels,
when tightening the bolts on fitting it is
normal to notice that the washers do not
come into contact with the steel or "space-
saver" spare wheel. The wheel is secured
by the conical contact of each bolt.
Some driving aid functions should be
disabled, e.g. the Active Safety Brake. If your vehicle has tyre under-inflation
detection, check the tyre pressures and
reinitialise the system.
For more information on Under-inflation
detection
, refer to the corresponding
section.
Tyre under-inflation detection
The steel spare wheel does not have a
sensor.
Wheel with hub cap
When refitting the wheel , refit the hub
cap starting by placing its notch facing the
valve and press around its edge with the
palm of your hand.
In the event of a breakdown