2019 Peugeot Expert Tail
[x] Cancel search: TailPage 80 of 324

78
When the USB socket is used, the
portable device charges automatically.
While charging, a message is displayed
if the power consumption of the portable
device exceeds the amperage supplied by
the vehicle.
For more information on the use of this
equipment, refer to the Audio equipment
and telematics section.
JACK socket
This allows the connection of a portable device
for listening to audio files via the vehicle's
speakers.
The files are managed using the portable
device.
For more details on how to use this
equipment, refer to the Audio equipment
and telematics section.
220 V socket
If your vehicle is so equipped, a 220 V/50 Hz
socket (maximum power: 150 W) is located
underneath the front right-hand seat and is
therefore accessible from the second row.
It operates with the engine running, as well as
in STOP mode of Stop & Start.
F
Ra
ise the cover.
F
C
heck that the indicator lamp is on in green.
F
C
onnect your multimedia or other electrical
device (telephone charger, laptop computer,
CD-DVD player, bottle warmer, etc.).
In the event of a fault, the warning lamp flashes
green.
Have it checked by a PEUGEOT dealer or a
qualified workshop.
Luggage retaining net
Attached to the stowing rings on the rear floor,
it allows objects to be held down. Connect only one device at a time to the
socket (no extension lead or multi-socket
connector).
Connect only devices with class II
insulation (shown on the device).
Do not use a device with a metal case.
As a safety measure, when electrical
consumption is high and when required by
the vehicle's electrical system (particular
weather conditions, electrical overload,
etc.), the current supply to the socket will
be cut off; the green indicator lamp goes
of f.
Ease of use and comfort
Page 97 of 324
95
To avoid the risks of poisoning or
asphyxia, the programmable heating must
not be used, even for short periods, in a
closed environment such as a garage or
workshop which is not equipped with an
exhaust gas extraction system.
Do not park the vehicle on a flammable
sur face (dry grass, fallen leaves, paper,
etc.) - risk of fire!Glazed sur faces such as the rear screen
or windscreen can become very hot in
places.
Never put objects on these sur faces;
never touch these sur faces - risk of burns!
The programmable heating is supplied by
the vehicle's fuel tank. Before use, ensure
that there is enough fuel left in the tank.
If the fuel in the tank is at the reser ve
level, it is strongly recommended not to
programme the heating.
The additional heating must always be
switched off while refuelling to avoid any
risk of fire or explosion.
Independent additional
heating
Depending on the country of sale, this is an
additional and independent system which heats
the hot water circuit of the Diesel engine to
improve comfort and to raise the temperature
of the cold engine. It improves demisting and
defrosting performance. With the engine idling
or the vehicle stationary, it is normal to notice a
high-pitched whistling and some emissions of
smoke or odour.
The temperature near the heating system must
not exceed 120°C. A higher temperature (e.g. in
a paint oven) could damage the components of
electronic circuits.
The additional heating is supplied by the
vehicle's fuel tank. Make sure that the low fuel
warning lamp is not on. To avoid the risks of poisoning or
suffocation, the additional heating must
not be used, even for short periods, in a
closed environment such as a garage or
workshop which is not equipped with an
exhaust gas extraction system.
Do not park the vehicle on a flammable
sur face (for example: dry grass, fallen
leaves, paper, etc.) - risk of fire!
Have the additional heating checked at
least once a year, at the beginning of
w i n t e r.
For maintenance and repairs, you must
only contact a PEUGEOT dealer or a
qualified workshop.
Courtesy lamp(s)
Front: comes on when one of
the front or rear doors is opened
(sliding side door and depending
on equipment, left-hand side-
hinged door or tailgate).
Rear or row 2 and row 3: comes
on when one of the rear doors
is opened (sliding side door
and depending on equipment,
left-hand side-hinged door or
tailgate).
3
Ease of use and comfort
Page 106 of 324

104
Windscreen and headlamp
wash
Switching on
Give a short downwards push to the
control stalk.
A wiping cycle confirms that the
instruction has been accepted.
This indicator lamp comes on in the
instrument panel and a message is
displayed.
Switching off
Give the control stalk a brief push
downwards or shift the control stalk
to a different position (Int, 1 or 2).
This indicator lamp goes off in the
instrument panel and a message is
displayed.
The automatic rain sensitive windscreen
wipers must be reactivated by pushing the
control stalk downwards, if the ignition has
been off for more than one minute.
Operating fault
If a fault occurs with the automatic windscreen
wipers, the wipers will operate in intermittent
mode.
Have it checked by a PEUGEOT dealer or a
qualified workshop. Do not cover the rain sensor, linked with
the sunshine sensor and located in the
top of the windscreen behind the rear view
m i r r o r.
Switch off the automatic windscreen
wipers when using an automatic car wash.
In winter, it is advisable to wait until
the windscreen is completely clear of
ice before activating the automatic rain
sensitive wipers.
Rear wiper
Of f.
Intermittent wipe.
Wash-wipe (set duration).
Reverse gear
When reverse gear is engaged, the rear wiper
will come into operation automatically if the
windscreen wipers are operating.
Activation/Deactivation
With audio system or touch
screen
The system is activated or
deactivated via the vehicle
configuration menu.
This system is activated by default.
If a significant accumulation of snow or ice
is present, or when using a bicycle carrier
on the tailgate, deactivate the automatic
rear wiper.
F
P
ull the wiper control stalk towards you.
Lighting and visibility
Page 138 of 324
136
(a)Refer to the current legislation in the
country where you are driving, before
installing a child at this seat position.
(b) The seat can be installed centrally in the
vehicle; it then prevents the use of the
outer seats.
IUF Seat position suitable for installing an
Isofix U niversal seat, " For ward facing",
secured using the upper strap.
IL Seat position suitable for installing an I sofix
semi-universa L child seat which can be:
-
"
rear ward facing" fitted with an upper
strap or a support leg,
-
"
for ward facing" fitted with a support
leg,
-
a c
arrycot fitted with an upper strap or
a support leg.
For securing the upper strap using
the ISOFIX mountings , refer to the
corresponding section.
X Seat position unsuitable for the installation
of an ISOFIX child seat or carrycot of the
weight group indicated. (4)
The seat in row 2 must be adjusted so that
there is no contact between the child in
row 3 and the seat immediately in front.
(5) The front seat must be adjusted so that
there is no contact between the child in
row 2 and the seat immediately in front.
(6) The front seat must be adjusted so that
there is no contact between the child in
row 2 and the seat immediately in front
(with the front seat adjusted to 2 notches
ahead of the centre of the runner).
(1) The installation of a carrycot on this seat
may prevent the use of one or more of the
other seats in this row.
(2) Installation possible only behind the
driver's seat.
(3) Installation possible only behind the
driver's seat with individual passenger
seat.
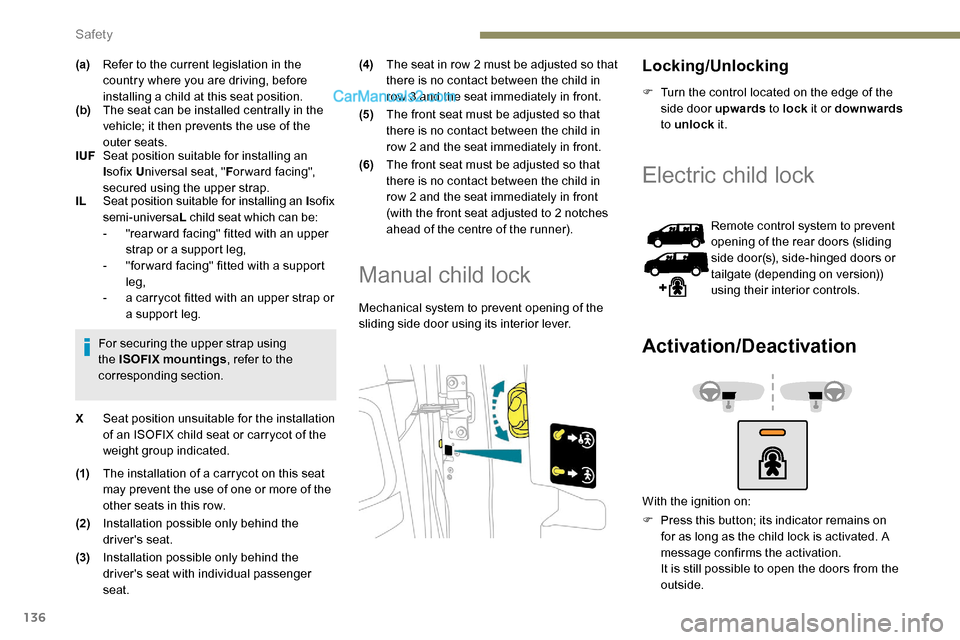
Manual child lock
Mechanical system to prevent opening of the
sliding side door using its interior lever.
Locking/Unlocking
F Turn the control located on the edge of the
side door upwards to lock it or downwards
to unlock it.
Electric child lock
Remote control system to prevent
opening of the rear doors (sliding
side door(s), side-hinged doors or
tailgate (depending on version))
using their interior controls.
Activation/Deactivation
With the ignition on:
F
P
ress this button; its indicator remains on
for as long as the child lock is activated. A
message confirms the activation.
It is still possible to open the doors from the
outside.
Safety
Page 162 of 324
160
F Enter the new value using the numerical keypad and confirm.
F
C
onfirm to record the changes and quit the
menu.
Memorised speeds are recalled
by pressing this button.
F
P
ress the button corresponding to the
speed setting you want to change.
Speed Limit recognition
and recommendation
Refer to the General recommendations on
the use of driving and manoeuvring aids .
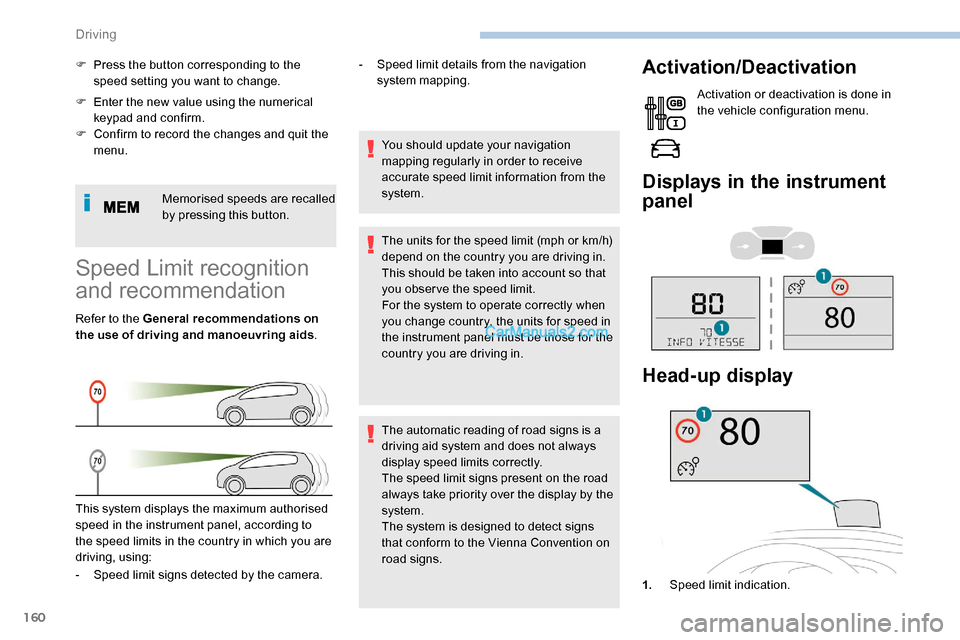
This system displays the maximum authorised
speed in the instrument panel, according to
the speed limits in the country in which you are
driving, using: -
S
peed limit details from the navigation
system mapping.
You should update your navigation
mapping regularly in order to receive
accurate speed limit information from the
system.
The units for the speed limit (mph or km/h)
depend on the country you are driving in.
This should be taken into account so that
you obser ve the speed limit.
For the system to operate correctly when
you change country, the units for speed in
the instrument panel must be those for the
country you are driving in.
The automatic reading of road signs is a
driving aid system and does not always
display speed limits correctly.
The speed limit signs present on the road
always take priority over the display by the
system.
The system is designed to detect signs
that conform to the Vienna Convention on
road signs.
Activation/Deactivation
Activation or deactivation is done in
the vehicle configuration menu.
Displays in the instrument
panel
- Speed limit signs detected by the camera. 1.Speed limit indication.
Head-up display
Driving
Page 182 of 324

180
Malfunction
Reversing camera with
display in the interior
mirror
Refer to the General recommendations on
the use of driving and manoeuvring aids.
The visual reversing assistance camera is
activated automatically when reverse gear is
engaged. If a malfunction occurs, when
shifting to reverse, this warning lamp
comes on in the instrument panel,
accompanied by the display of a
message and an audible signal (short
b e e p).
Contact a PEUGEOT dealer or a qualified
workshop to have the system checked. The function may be supplemented by parking
sensors.
The image is displayed in the interior mirror. They are represented as lines marked
"on the ground" and do not indicate the
position of the vehicle in relation to tall
obstacles (e.g. other vehicles).
Some distortion of the image is normal.
It is normal to have a part of the number
plate showing at the bottom of the screen.
Opening the tailgate or rear door
(depending on equipment) can interfere
with the display.
If a side-hinged door is open, allow for the
space it occupies.
The blue lines ( 1) represent the width of the
vehicle including the mirrors.
The red line ( 2) represents a distance of 30 cm
from the rear bumper and the thin blue lines
1
m (A) and 2 m ( B) respectively. Check the cleanliness of the camera lens
regularly.
Clean the reversing camera regularly
using a soft, dry cloth.
Visiopark 1
Refer to the General recommendations on
the use of driving and manoeuvring aids
.
Driving
Page 184 of 324
182
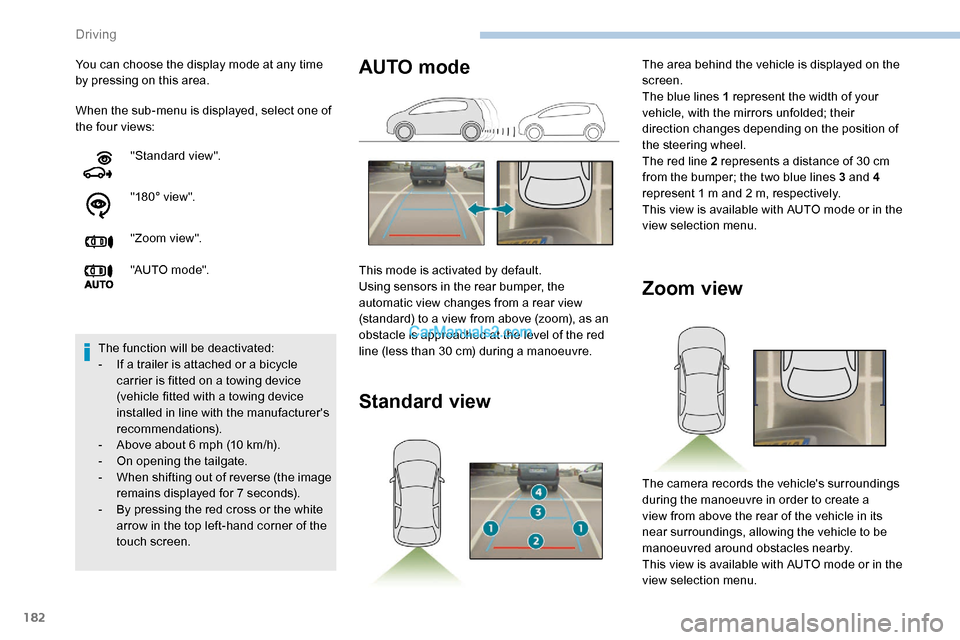
When the sub-menu is displayed, select one of
the four views: You can choose the display mode at any time
by pressing on this area."Standard view".
"180° view".
"Zoom view".
"AUTO m o de".
The function will be deactivated:
-
I
f a trailer is attached or a bicycle
carrier is fitted on a towing device
(vehicle fitted with a towing device
installed in line with the manufacturer's
recommendations).
-
A
bove about 6 mph (10 km/h).
-
O
n opening the tailgate.
-
W
hen shifting out of reverse (the image
remains displayed for 7 seconds).
-
B
y pressing the red cross or the white
arrow in the top left-hand corner of the
touch screen.
Zoom view
The camera records the vehicle's surroundings
during the manoeuvre in order to create a
view from above the rear of the vehicle in its
near surroundings, allowing the vehicle to be
manoeuvred around obstacles nearby.
This view is available with AUTO mode or in the
view selection menu.
AUTO mode
This mode is activated by default.
Using sensors in the rear bumper, the
automatic view changes from a rear view
(standard) to a view from above (zoom), as an
obstacle is approached at the level of the red
line (less than 30 cm) during a manoeuvre.
Standard view
The area behind the vehicle is displayed on the
screen.
The blue lines 1 represent the width of your
vehicle, with the mirrors unfolded; their
direction changes depending on the position of
the steering wheel.
The red line 2 represents a distance of 30 cm
from the bumper; the two blue lines 3 and 4
represent 1 m and 2 m, respectively.
This view is available with AUTO mode or in the
view selection menu.
Driving
Page 209 of 324
207
The jack must only be used to change
a wheel with a damaged or punctured tyre.
Do not use any jack other than the one
supplied with this vehicle.
If the vehicle does not have its original
jack, contact a PEUGEOT dealer or a
qualified workshop to obtain the correct
jack for it.
The jack meets European standards,
as defined in the Machinery Directive
2006/42/CE.
The jack does not require any
maintenance.
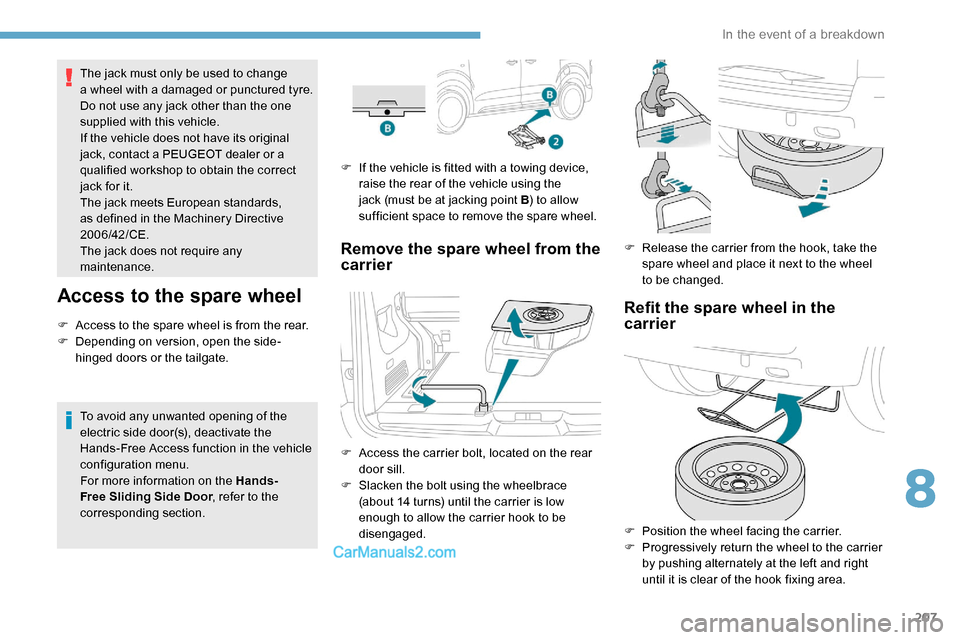
Access to the spare wheel
F Access to the spare wheel is from the rear.
F D epending on version, open the side-
hinged doors or the tailgate.
To avoid any unwanted opening of the
electric side door(s), deactivate the
Hands-Free Access function in the vehicle
configuration menu.
For more information on the Hands-
Free Sliding Side Door , refer to the
corresponding section. F
I
f the vehicle is fitted with a towing device,
raise the rear of the vehicle using the
jack (must be at jacking point B ) to allow
sufficient space to remove the spare wheel.
Remove the spare wheel from the
carrier
F Access the carrier bolt, located on the rear door sill.
F
S
lacken the bolt using the wheelbrace
(about 14 turns) until the carrier is low
enough to allow the carrier hook to be
disengaged. F
R
elease the carrier from the hook, take the
spare wheel and place it next to the wheel
to be changed.
Refit the spare wheel in the
carrier
F Position the wheel facing the carrier.
F P rogressively return the wheel to the carrier
by pushing alternately at the left and right
until it is clear of the hook fixing area.
8
In the event of a breakdown