2019 Peugeot Expert Change mph
[x] Cancel search: Change mphPage 162 of 324
160
F Enter the new value using the numerical keypad and confirm.
F
C
onfirm to record the changes and quit the
menu.
Memorised speeds are recalled
by pressing this button.
F
P
ress the button corresponding to the
speed setting you want to change.
Speed Limit recognition
and recommendation
Refer to the General recommendations on
the use of driving and manoeuvring aids .
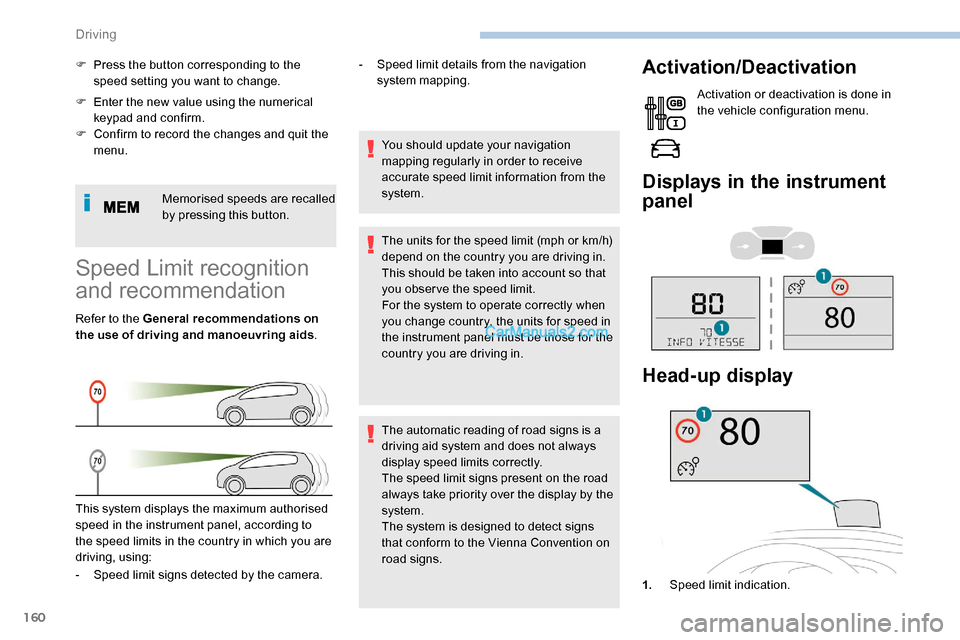
This system displays the maximum authorised
speed in the instrument panel, according to
the speed limits in the country in which you are
driving, using: -
S
peed limit details from the navigation
system mapping.
You should update your navigation
mapping regularly in order to receive
accurate speed limit information from the
system.
The units for the speed limit (mph or km/h)
depend on the country you are driving in.
This should be taken into account so that
you obser ve the speed limit.
For the system to operate correctly when
you change country, the units for speed in
the instrument panel must be those for the
country you are driving in.
The automatic reading of road signs is a
driving aid system and does not always
display speed limits correctly.
The speed limit signs present on the road
always take priority over the display by the
system.
The system is designed to detect signs
that conform to the Vienna Convention on
road signs.
Activation/Deactivation
Activation or deactivation is done in
the vehicle configuration menu.
Displays in the instrument
panel
- Speed limit signs detected by the camera. 1.Speed limit indication.
Head-up display
Driving
Page 168 of 324
166
For more information on Memorising speeds
or on the Speed Limit recognition and
recommendation , refer to the corresponding
sections.
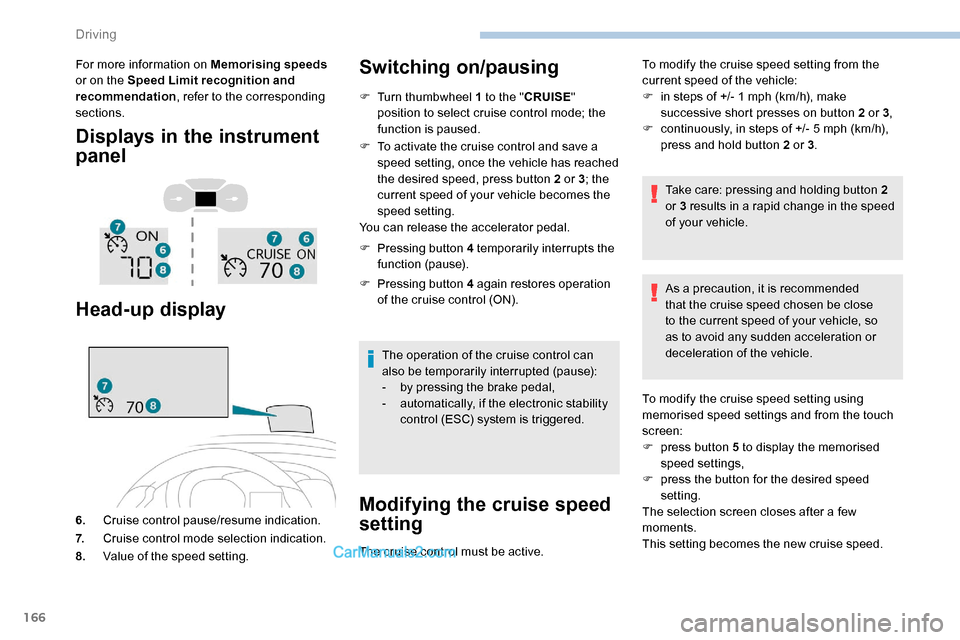
Displays in the instrument
panel
Head-up display
6. Cruise control pause/resume indication.
7. Cruise control mode selection indication.
8. Value of the speed setting.
Switching on/pausing
F Turn thumbwheel 1 to the " CRUISE"
position to select cruise control mode; the
function is paused.
F
T
o activate the cruise control and save a
speed setting, once the vehicle has reached
the desired speed, press button 2 or 3 ; the
current speed of your vehicle becomes the
speed setting.
You can release the accelerator pedal.
F
P
ressing button 4 temporarily interrupts the
function (pause).
F
P
ressing button 4 again restores operation
of the cruise control (ON).
The operation of the cruise control can
also be temporarily interrupted (pause):
-
b
y pressing the brake pedal,
-
a
utomatically, if the electronic stability
control (ESC) system is triggered.
Modifying the cruise speed
setting
The cruise control must be active. To modify the cruise speed setting from the
current speed of the vehicle:
F
i
n steps of +/- 1 mph (km/h), make
successive short presses on button 2 or 3 ,
F
c
ontinuously, in steps of +/- 5 mph (km/h),
press and hold button 2 or 3 .
Take care: pressing and holding button 2
or 3 results in a rapid change in the speed
of your vehicle.
As a precaution, it is recommended
that the cruise speed chosen be close
to the current speed of your vehicle, so
as to avoid any sudden acceleration or
deceleration of the vehicle.
To modify the cruise speed setting using
memorised speed settings and from the touch
screen:
F
p
ress button 5 to display the memorised
speed settings,
F
p
ress the button for the desired speed
setting.
The selection screen closes after a few
moments.
This setting becomes the new cruise speed.
Driving
Page 171 of 324
169
F Press 3 to increase or 2 to decrease the
speed setting (steps of 5 mph (km/h) if held
pressed).
Pressing and holding button 2 or 3
results
in a rapid change in the speed of the
vehicle.
Pausing/resuming cruise control
F Press 4 or press the brake pedal . It is also
possible to press the clutch pedal to pause
cruise control.
F
Press 4 to restart cruise control.
Cruise control may have been paused
automatically:
-
w
hen an inter-vehicle distance threshold
is reached,
-
w
hen the distance between your vehicle
and the one in front becomes too short,
-
w
hen the speed of your vehicle becomes
too low or the speed of the vehicle in front
becomes too low,
-
b
y triggering of the ESC system. When the driver attempts to reactivate
cruise control which was paused, the
message "Activation not possible,
conditions unsuitable" is briefly displayed
if reactivation is not possible (safety
conditions not met).
Use the Speed Limit recognition
and recommendation function
or the road sign memorisation to
modify the speed setting
F Press
5 on the instrument panel or touch
screen to accept the speed suggested by
the function, then press again to confirm.
To prevent any sudden acceleration or
deceleration of the vehicle, select a speed
setting fairly close to the current speed of
your vehicle.
Changing the inter-vehicle
distance
F Press 6 to display the distance setting
thresholds ("Distant", "Normal", "Close"),
then press again to select a threshold.
After a few seconds, the option is accepted and
will be memorised when the ignition is switched
of f.
Temporarily exceeding the speed
setting
F Press the accelerator pedal. Distance monitoring and cruise control are
deactivated as long as you continue to
accelerate. The speed flashes in the
instrument panel.
Deactivating the system
F Turn the thumbwheel 1 upwards to position 0 (OFF ).
6
Driving
Page 183 of 324

181
As soon as reverse gear is engaged with the
engine running, this system displays views of
your vehicle’s close surroundings on the touch
screen using a camera located at the rear of
the vehicle.
The screen is divided into two parts: on the
left, a contextual view; on the right, a view from
above the vehicle in its close surroundings.Different contextual views can be displayed in
the left-hand part:
-
s
tandard view,
-
1
80° view,
-
z
oom view.
AUTO mode is activated by default.
In this mode, the system chooses the best view
to display (standard or zoom) according to the
information transmitted by the parking sensors.
You can change the type of view at any time
during a manoeuvre.
The state of the function is not saved when the
ignition is switched off.
Principle of operation
An image from above your vehicle in its close
surroundings is reconstructed (represented
between the blue brackets) in real time and as
the manoeuvre progresses.
This representation facilitates the alignment of
your vehicle when parking and allows obstacles
close to the vehicle to be seen.
This image is automatically deleted if the
vehicle remains stationary for too long.
The parking sensors supplement the
information on the view from above the vehicle.
The display disappears above
approximately 6 mph (10
km/h).
The system is automatically deactivated
about 7 seconds after coming out of
reverse or on opening a door or the boot.
Activation
Activation is automatic on engaging reverse at
a speed lower than 6 mph (10 km/h).
Using the rear camera, the vehicle's
surroundings are recorded during manoeuvres
at low speed.
6
Driving
Page 184 of 324
182
When the sub-menu is displayed, select one of
the four views: You can choose the display mode at any time
by pressing on this area."Standard view".
"180° view".
"Zoom view".
"AUTO m o de".
The function will be deactivated:
-
I
f a trailer is attached or a bicycle
carrier is fitted on a towing device
(vehicle fitted with a towing device
installed in line with the manufacturer's
recommendations).
-
A
bove about 6 mph (10 km/h).
-
O
n opening the tailgate.
-
W
hen shifting out of reverse (the image
remains displayed for 7 seconds).
-
B
y pressing the red cross or the white
arrow in the top left-hand corner of the
touch screen.
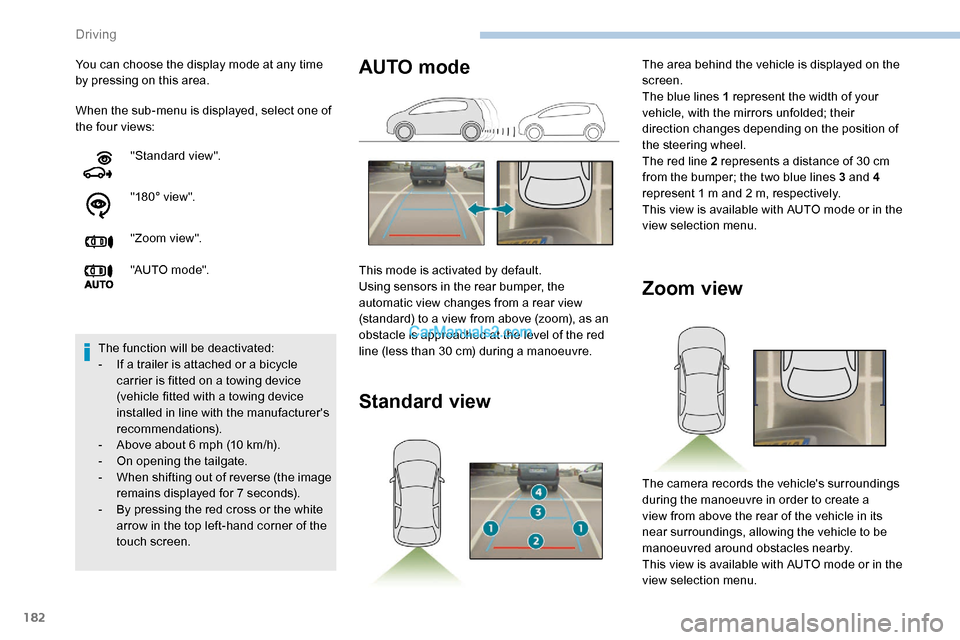
Zoom view
The camera records the vehicle's surroundings
during the manoeuvre in order to create a
view from above the rear of the vehicle in its
near surroundings, allowing the vehicle to be
manoeuvred around obstacles nearby.
This view is available with AUTO mode or in the
view selection menu.
AUTO mode
This mode is activated by default.
Using sensors in the rear bumper, the
automatic view changes from a rear view
(standard) to a view from above (zoom), as an
obstacle is approached at the level of the red
line (less than 30 cm) during a manoeuvre.
Standard view
The area behind the vehicle is displayed on the
screen.
The blue lines 1 represent the width of your
vehicle, with the mirrors unfolded; their
direction changes depending on the position of
the steering wheel.
The red line 2 represents a distance of 30 cm
from the bumper; the two blue lines 3 and 4
represent 1 m and 2 m, respectively.
This view is available with AUTO mode or in the
view selection menu.
Driving
Page 197 of 324
195
Particle filter (Diesel)
or The start of saturation of the particle
filter is signalled by the temporary
illumination of this warning lamp,
accompanied by a message warning
of the risk of the filter clogging up.
If the warning lamp stays on, this indicates
a low Diesel additive level.
For more information on Checking levels ,
refer to the corresponding section.
Following prolonged operation of the
vehicle at very low speed or at idle,
you may, in exceptional circumstances,
notice the emission of water vapour at the
exhaust on acceleration. This does not
affect the behaviour of the vehicle or the
environment. New vehicle
The first particle filter regeneration
operations may be accompanied by a
"burning" smell, which is per fectly normal.
Manual gearbox
The gearbox does not require any
maintenance (no oil change).
Automatic gearbox
The gearbox does not require any
maintenance (no oil change).
Electronic gearbox
The gearbox does not require any
maintenance (no oil change).
Brake pads
Brake wear depends on the style
of driving, particularly in the case
of vehicles used in town, over short
distances. It may be necessary to
have the condition of the brakes
checked, even between vehicle
services.Unless there is a leak in the circuit, a drop in
the brake fluid level indicates that the brake
pads are worn.
As soon as the traffic conditions permit,
regenerate the filter by driving at a speed of at
least 37 mph (60
km/h) until the warning lamp
goes off. After washing the vehicle, dampness, or
in wintry conditions, ice can form on the
brake discs and pads: braking efficiency
may be reduced. Make light brake
applications to dry and defrost the brakes.
Brake disc/drum wear
For any information on checking
brake disc/drum wear, contact a
PEUGEOT dealer or a qualified
workshop.
Parking brake
If excessive travel or a loss of
effectiveness of this system is
noticed, the parking brake must
be adjusted, even between two
services.
This system must be checked by a PEUGEOT
dealer or a qualified workshop.
7
Practical information
Page 207 of 324

205
F Turn selector A to the "Inflation" position.
F
U
ncoil the white pipe G fully.
F
C
onnect the white pipe to the
valve of the repaired wheel.
F
C
onnect the compressor's electrical plug to
the vehicle's 12 V socket again.
F
S
tart the vehicle and leave the engine
running.
As soon as possible, go to a PEUGEOT
dealer or a qualified workshop.
You must inform the technician that this kit
was used. After inspection, the technician
will tell you whether the tyre can be
repaired or if it must be replaced.
F
A
djust the pressure using the compressor
(to inflate: switch B in position " I"; to deflate:
switch B
in position " O" and press button
C),
in accordance with the vehicle's tyre
pressure label, located on the driver’s door
aperture.
A significant loss of pressure indicates that
the puncture has not been fully plugged;
contact a PEUGEOT dealer or a qualified
workshop for assistance.
F
R
emove the kit and stow it. F
D rive at reduced speed (50 mph
(80
km/h) max.) limiting the distance
travelled to approximately 125
miles
(2 0 0
k m).
It is also possible to use the compressor,
without injecting sealant, to check and, if
necessary, adjust the tyre pressures.
If after 7
minutes this pressure is not
reached, this indicates that the tyre is not
repairable; contact a PEUGEOT dealer or
a qualified workshop for assistance.
Do not drive more than 125 miles (200 km)
with a repaired tyre; contact a PEUGEOT
dealer or a qualified workshop to change
the tyre.
Should the pressure of one or more tyres
be adjusted, it is necessary to reinitialise
the under-inflation detection system.
For more information on Tyre under-
inflation detection , refer to the
corresponding section.Removing the pipe and
cartridge
F Turn the pipe assembly 2 to the left until it comes into contact with the unit.
F
D
isconnect the connector 1 from the
cartridge by turning it a quarter turn anti-
clockwise.
F
P
ull the pipe assembly 2 out slightly, then
disconnect the connector 3 from the air
intake pipe by turning it a quarter turn anti-
clockwise.
8
In the event of a breakdown