2019 Peugeot Expert Can let
[x] Cancel search: Can letPage 175 of 324

173
Level 2 (red colour): v isual and
audible alert, signalling that a
collision is imminent.
The message " Brake!" is displayed.
Where the speed of your vehicle is too
high approaching another vehicle, the first
level of alert may not be displayed: the
level 2 alert may be displayed directly.
Important: the level
1 alert is never
displayed for a stationary obstacle or
when the " Close" trigger threshold has
been selected.
Modifying the alert trigger
threshold
This threshold determines how you wish
to be warned of the presence of a moving
or stationary vehicle in front of you, or a
pedestrian present in your traffic lane.
The current threshold can be
modified in the vehicle configuration
menu using the audio system or the
touch screen.
You can select one of three pre-defined
thresholds:
-
"Distant ",
-
"Normal ", -
"
Close ".
The last threshold selected is memorised when
the ignition is switched off.
Intelligent emergency
braking assistance
If the driver brakes, but not sufficiently to avoid
a collision, this system will supplement the
braking, within the limits of the laws of physics.
This assistance will only be provided if you
press the brake pedal.
Active Safety Brake
Operation
The system operates under the following
conditions:
-
T
he vehicle's speed does not exceed
37 mph (60 km/h) when a pedestrian is
detected.
-
T
he vehicle's speed does not exceed 50
mph (80 km/h) when a stationary vehicle is
detected.
-
T
he vehicle's speed is between 3 mph
and 53
mph (5 km/h and 85 km/h) when a
moving vehicle is detected.
This warning lamp flashes (for about
10
seconds) once the function is
acting on the vehicle's brakes.
With an automatic gearbox, in the event of
automatic emergency braking until the vehicle
comes to a complete stop, keep the brake
pedal pressed down to prevent the vehicle from
starting off again.
With a manual gearbox, in the event of
automatic emergency braking until the vehicle
comes to a complete stop, the engine may stall. This function, also called automatic emergency
braking, inter venes following the alerts if the
driver does not react quickly enough and does
not operate the vehicle's brakes.
It aims to reduce the speed of impact or avoid a
frontal collision by your vehicle where the driver
fails to react.
6
Driving
Page 176 of 324

174
The driver can maintain control of the
vehicle at any time by sharply turning
the steering wheel and/or pressing the
accelerator pedal.
Operation of the function may be felt by
slight vibration in the brake pedal.
If the vehicle comes to a complete stop,
the automatic braking is maintained for 1
to 2 seconds.
Deactivation/Activation
By default, the system is automatically
activated at every engine start.This system can be deactivated
or activated via the vehicle
configuration menu.
Deactivation of the system is
signalled by the illumination of this
indicator lamp, accompanied by the
display of a message.
Malfunction
In the event of a fault with the system,
you are alerted by the continuous
illumination of this warning lamp,
accompanied by the display of a
message and an audible signal.
If these warning lamps come
on after the engine has been
switched off and restarted, contact
a PEUGEOT dealer or a qualified
workshop to have the system
checked.
Lane departure warning
system
Refer to the General recommendations on
the use of driving and manoeuvring aids .
System that uses a camera to recognise
continuous or broken lines on traffic lanes and
triggers an alert if the vehicle wanders off line.
If the direction indicator is not activated at a
speed of over 50 mph (80
km/h) and there is a
risk of one of these lines on the ground being
crossed, the system triggers the alert.
Detection - Alert
You are alerted by the flashing of this
warning lamp in the instrument panel,
accompanied by an audible signal.
No warning is transmitted while the
direction indicator is active and for
approximately 20 seconds after the
direction indicator is switched off.
Activation / Deactivation
With/without audio system
This system is particularly useful on motor ways
and main roads.
F
T
o activate or deactivate the system, press
this button.
The indicator lamp is illuminated when the
system is activated .
With touch screen
Activation or deactivation is done in
the vehicle configuration menu.
Driving
Page 183 of 324

181
As soon as reverse gear is engaged with the
engine running, this system displays views of
your vehicle’s close surroundings on the touch
screen using a camera located at the rear of
the vehicle.
The screen is divided into two parts: on the
left, a contextual view; on the right, a view from
above the vehicle in its close surroundings.Different contextual views can be displayed in
the left-hand part:
-
s
tandard view,
-
1
80° view,
-
z
oom view.
AUTO mode is activated by default.
In this mode, the system chooses the best view
to display (standard or zoom) according to the
information transmitted by the parking sensors.
You can change the type of view at any time
during a manoeuvre.
The state of the function is not saved when the
ignition is switched off.
Principle of operation
An image from above your vehicle in its close
surroundings is reconstructed (represented
between the blue brackets) in real time and as
the manoeuvre progresses.
This representation facilitates the alignment of
your vehicle when parking and allows obstacles
close to the vehicle to be seen.
This image is automatically deleted if the
vehicle remains stationary for too long.
The parking sensors supplement the
information on the view from above the vehicle.
The display disappears above
approximately 6 mph (10
km/h).
The system is automatically deactivated
about 7 seconds after coming out of
reverse or on opening a door or the boot.
Activation
Activation is automatic on engaging reverse at
a speed lower than 6 mph (10 km/h).
Using the rear camera, the vehicle's
surroundings are recorded during manoeuvres
at low speed.
6
Driving
Page 191 of 324
189
Energy economy mode
System which manages the duration of use of
certain functions to conser ve a sufficient level
of charge in the battery.
After switching off the engine and for a
maximum cumulative period of around 40
minutes, you can continue to use functions
such as the audio and telematics system,
the wipers, the dipped beam headlamps, the
courtesy lamps, etc.
Switching to this mode
A message appears in the instrument panel
screen indicating that the vehicle has switched
to economy mode and the active functions are
put on standby.If a telephone call is being made at this
time, it will be maintained for around
10
minutes with the Bluetooth hands-free
system of your audio system.
Exiting the mode
These functions will be automatically
reactivated the next time the vehicle is used.
In order to restore the use of these functions
immediately, start the engine and let it run:
-
f
or less than 10 minutes, to use the
equipment for approximately 5 minutes, A flat battery prevents the engine from
starting.
For more information on the 12 V batter y
,
refer to the corresponding section.
Load reduction mode
System which manages the use of certain
functions according to the level of charge
remaining in the battery.
When the vehicle is being driven, the load
reduction function temporarily deactivates
certain functions, such as the air conditioning
and the heated rear screen.
The deactivated functions are reactivated
automatically as soon as conditions permit. -
f
or more than 10 minutes, to use the
equipment for approximately 30 minutes.
Let the engine run for the duration specified to
ensure that the battery charge is sufficient.
Do not repeatedly and continuously restart the
engine in order to charge the battery.
Roof bars/Roof rack
As a safety measure and to avoid
damaging the roof, it is essential to use
the roof bars and racks approved for the
vehicle.
Obser ve the instructions on fitting and use
contained in the guide supplied with the
roof bars and racks.
Recommendations
Distribute the load uniformly, taking care
to avoid overloading one of the sides.
Arrange the heaviest part of the load as
close as possible to the roof.
Secure the load securely.
Drive gently: the vehicle will be more
susceptible to the effects of side winds
and its stability may be affected.
Regularly check the security and tight
fastening of the roof bars, at least before
each trip.
Remove the roof bars once they are no
longer needed.
7
Practical information
Page 199 of 324
197
Once the AdBlue® tank is empty, a system
r
equired by regulations prevents starting
of the engine.
If the SCR system is faulty, the level of
emissions from the vehicle will no longer
meet the Euro 6 standard: the vehicle
becomes polluting.
In the event of a confirmed fault with the
SCR system, you must go to a PEUGEOT
dealer or a qualified workshop as soon
as possible: after travelling a distance
of 685
miles (1,100 km), a system will be
triggered automatically to prevent engine
starting.
In either case, a range indicator gives the
distance that can be travelled before the
vehicle is immobilised.
Freezing of the AdBlue
®
AdBlue® freezes at temperatures below
around -11°C.
The SCR system includes a heater for the
AdBlue
® tank, allowing you to continue
driving in very cold conditions.
Supply of AdBlue®
It is recommended that the AdBlue® be topped
up as soon as the first alert is issued indicating
that the reser ve level has been reached.
In order to ensure that the SCR system
operates correctly:
-
U
se only AdBlue
® fluid that meets the
ISO 22241 standard.
-
N
ever transfer AdBlue
® to another
container: it would lose its purity.
-
N
ever dilute AdBlue
® with water.
AdBlue
® can be obtained from a PEUGEOT
dealer or a qualified workshop.
You can also visit a ser vice station
equipped with AdBlue
® pumps specially
designed for passenger vehicles.
Never top up from an AdBlue
® dispenser
reserved for heavy goods vehicles.
Recommendations on
storage
AdBlue® freezes at about -11 °C and
d
eteriorates above +25 °C. Containers should
be stored in a cool area and protected from
direct sunlight.
Under these conditions, the fluid can be kept
for at least a year.
If the fluid has frozen, it can be used once it has
completely thawed out at room temperature.
Never store AdBlue
® containers in your
vehicle.
Precautions for use
AdBlue® is a urea-based solution. This liquid
is non-flammable, colourless and odourless
(when kept in a cool place).
In the event of contact with the skin, wash the
affected area with soap and running water. In
the event of contact with the eyes, immediately
rinse the eyes with large amounts of water
or with an eye wash solution for at least 15
minutes. If you feel a persistent burning
sensation or irritation, get medical attention.
If swallowed, immediately wash out the mouth
with clean water and then drink plenty of water.
7
Practical information
Page 222 of 324
220
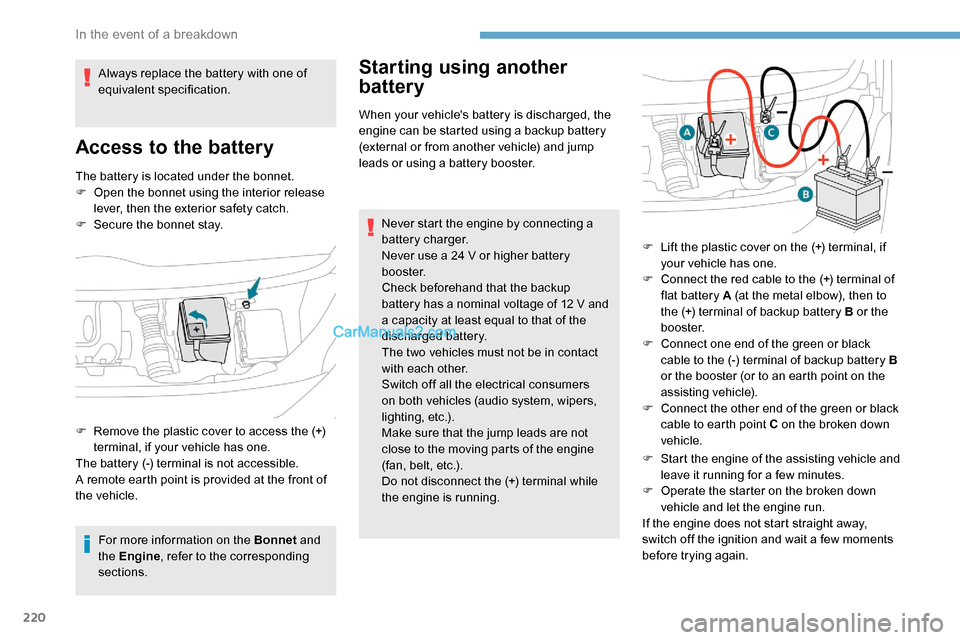
The battery is located under the bonnet.
F O pen the bonnet using the interior release
lever, then the exterior safety catch.
F
S
ecure the bonnet stay.
For more information on the Bonnet and
the Engine , refer to the corresponding
sections.
Starting using another
battery
When your vehicle's battery is discharged, the
engine can be started using a backup battery
(external or from another vehicle) and jump
leads or using a battery booster.
Never start the engine by connecting a
battery charger.
Never use a 24 V or higher battery
b o o s t e r.
Check beforehand that the backup
battery has a nominal voltage of 12 V and
a capacity at least equal to that of the
discharged battery.
The two vehicles must not be in contact
with each other.
Switch off all the electrical consumers
on both vehicles (audio system, wipers,
lighting, etc.).
Make sure that the jump leads are not
close to the moving parts of the engine
(fan, belt, etc.).
Do not disconnect the (+) terminal while
the engine is running.
Always replace the battery with one of
equivalent specification.
Access to the battery
F Remove the plastic cover to access the (+)
terminal, if your vehicle has one.
The battery (-) terminal is not accessible.
A remote earth point is provided at the front of
the vehicle. F
L
ift the plastic cover on the (+) terminal, if
your vehicle has one.
F
C
onnect the red cable to the (+) terminal of
flat battery A (at the metal elbow), then to
the (+) terminal of backup battery B or the
b o o s t e r.
F
C
onnect one end of the green or black
cable to the (-) terminal of backup battery B
or the booster (or to an earth point on the
assisting vehicle).
F
C
onnect the other end of the green or black
cable to earth point C on the broken down
vehicle.
F
S
tart the engine of the assisting vehicle and
leave it running for a few minutes.
F
O
perate the starter on the broken down
vehicle and let the engine run.
If the engine does not start straight away,
switch off the ignition and wait a few moments
before trying again.
In the event of a breakdown
Page 245 of 324
11
Procedure from the telephone
Select the name of the system in the
list of devices detected.
Procedure from the system
Press the MENU button.
Select " Connections ".
Confirm with OK.
Select " Search for a device ".
Confirm with OK.
A window is displayed with a search in progress
message.
In the list of devices detected, select a
telephone to pair. Only one telephone can be
paired at a time.
Completing the pairing
To complete the pairing, whichever
procedure is used (from the telephone or
from the system), ensure that the code
is the same in the system and in the
telephone.
If pairing fails, the number of attempts is not
restricted.
A message appears in the screen confirming
the pairing.
Information and advice
The " Telephone " menu gives access to the
following functions in particular: " Directory", if
your telephone equipment is fully compatible,
" Call log ", "View paired devices ".
Depending on the type of telephone, you may
be asked to accept or confirm access by the
system to each of these functions.
Go to the Brand's website for more
information (compatibility, more help, etc.).
Manage connections
The telephone connection automatically
includes hands free operation and audio
streaming.
The ability of the system to connect to just
one profile depends on the telephone.
Both profiles may connect by default. Press the MENU button.
Select " Connections ".
Confirm with OK.
Select " Connections
management " and confirm. The list
of paired devices is displayed.
Confirm with OK.
Indicates that a device is connected.
A number indicates the profile of the
connection with the system:
-
1 f
or media or 1 for telephone.
-
2 f
or media and telephone.
.
Bluetooth® audio system
Page 248 of 324
14
To modify the contacts saved in the
system, press MENU then select
" Telephone " and confirm.
Select " Directory management "
and confirm.
Yo u c a n :
-
"Consult an entr y ",
-
"Delete an entry ",
-
"Delete all entries ".
The system accesses the
telephone's contacts directory,
depending on its compatibility, and
while it is connected via Bluetooth.
With certain telephones connected
by Bluetooth you can send a contact
to the directory of the audio system.
Contacts imported in this way are
saved in a permanent directory
visible to all, whatever the telephone
connected.
The menu for the directory is not
accessible if it is empty.
Voice recognition
This function allows you to use your
smartphone's voice recognition via the system. To start voice recognition, depending on the
type of steering mounted controls:
Make a long press on the end of the lighting
control stalk.
OR
Press this button.
Voice recognition requires the use of a
compatible smartphone first connected to
the vehicle by Bluetooth.
Frequently asked
questions
The following information groups together the
answers to the most frequently asked questions
concerning your audio system.
Bluetooth® audio system