2019 Peugeot 508 gearbox
[x] Cancel search: gearboxPage 194 of 320

192
The direction of the manoeuvre is indicated by
these symbols:
The central arrow is green whilst the vehicle
is moving, or white to indicate the next
manoeuvring direction.Throughout the whole manoeuvre,
indicated by a green " AUTO" symbol, the
driver must hold the selector button down. Manoeuvre completed or
abandoned (white arrows indicate
that the driver must take back
control of their vehicle).
For wards.
Reverse.
During the manoeuvring stages, the
steering wheel rotates rapidly: do not hold
the steering wheel nor place your hands
between the spokes of the steering wheel.
Watch out for anything likely to block the
manoeuvre (loose and bulky clothing,
scar ves, ties, etc.) – risk of injury!
It is the driver's responsibility to monitor
the state of the traffic continuously,
especially vehicles coming towards you.
The driver should check that no object or
person might hinder the advance of the
vehicle.
In some circumstances, the sensors may
not detect small obstacles located in their
blind spots.
The images from the camera(s) displayed
on the touch screen may be distorted by
the relief.
In the presence of areas in shade, or in
conditions of bright sunlight or inadequate
lighting, the image may be darkened and
with lower contrast.
The driver must check the sides of the
vehicle, using the mirrors.
If the vehicle slows down significantly, the
brake lamps may come on. The manoeuvre can be interrupted temporarily
at any time, either automatically by the system
if an obstacle is detected, or by driver action.
If the driver sees a hazard risk, they can also
permanently interrupt the manoeuvre.
To suspend the manoeuvre, the driver can:
-
r
elease the function control button,
-
p
ress the brake pedal,
-
r
esume control of the steering,
or
-
c
hange the status of the gearbox (except
changing to P ).
Suspending the manoeuvre leads to the
immediate immobilisation of the vehicle.
It is confirmed by the display of
this symbol accompanied by the
message " Manoeuvre suspended ".
Driving
Page 195 of 320

193
- Resuming the manoeuvre, after resolving the suspension conditions:
•
r
elease all controls (brake pedal, function
control button, steering wheel, etc.)
•
p
ress the function control button again.
-
P
ermanent interruption after suspending
the manoeuvre:
•
p
ress the brake pedal and engage a gear. -
s udden appearance in the field of the
manoeuvre of an obstacle not detected
by the system before the manoeuvre was
started, with the obstacle remaining for
more than 30 seconds,
-
a
fter ten manoeuvres to enter or exit a
parallel parking space and after seven
manoeuvres to enter a bay parking space,
-
s
ystem malfunction during the manoeuvre.
Abandoning the manoeuvre immediately
triggers the vehicle’s brakes and automatically
deactivates the function. This symbol is displayed on the
touch screen, accompanied by the
message " Manoeuvre abandoned ".
A message encourages the driver to take back
control of their vehicle. The function is deactivated after
a few seconds, this indicator lamp
goes off and the initial display is
resumed.
The system automatically engages mode P of
the gearbox after 4 seconds.
The manoeuvre is abandoned in the following
situations:
-
n
o action from the driver during the 30
seconds following the manoeuvre being
suspended,
-
v
oluntary application of the parking brake,
-
enga
gement of gearbox mode P by the
driver,
-
u
nfastening of the driver's seat belt,
-
o
pening of a door or the boot,
-
a
ctivation of the direction indicator lamps on
the opposite side to that of the manoeuvre,
-
i
n certain cases, when a wheel of the
vehicle hits a pavement or a low obstacle,
-
t
riggering of the anti-slip regulation (traction
control) on a slippery road sur face,
-
s
talling of the engine,End of the manoeuvre
to enter or exit a parking
space
The vehicle stops as soon as the manoeuvre is
completed. This symbol is displayed on the
touch screen, accompanied by the
message " Manoeuvre completed ".
The function is deactivated after
a few seconds, this indicator lamp
goes off and the initial display is
resumed.
-
I
f entering a parking space, the driver may
be required to complete the manoeuvre.
The gearbox changes to P 4 seconds after
completion of the manoeuvre.
-
I
n the case of a parking space exit
manoeuvre, the gearbox changes to N .
With a message and symbols, the driver
is encouraged to resume control of their
vehicle: take hold of the steering wheel,
engage mode D or R of the gearbox and
accelerate when traffic conditions allow.
After a delay of 30 seconds with no action
from the driver, the gearbox automatically
changes to mode P .
6
Driving
Page 211 of 320

209
Manual gearbox
The gearbox does not require any
maintenance (no oil change).
Automatic gearbox
The gearbox does not require any
maintenance (no oil change).
Brake pads
Brake wear depends on the style
of driving, particularly in the case
of vehicles used in town, over short
distances. It may be necessary to
have the condition of the brakes
checked, even between vehicle
services.
Unless there is a leak in the circuit, a drop in
the brake fluid level indicates that the brake
pads are worn.
Brake disc/drum wear
For any information on checking
brake disc wear, contact a
PEUGEOT dealer or a qualified
workshop.
Electric parking brake
This system does not require any
specific check. However, in the
event of a problem, have the system
checked by a PEUGEOT dealer or a
qualified workshop.
For more information on the Electric
parking brake , refer to the corresponding
section.
Wheels and tyres
The pressure must be checked on
all tyres, including the spare wheel,
when the tyres are "cold", at least
once a month and before a long
j o u r n ey. Driving with worn or damaged tyres reduces
braking efficiency and control of the vehicle's
steering. Regular inspections of the condition
of tyres (tread and sides) and rims are
recommended as well as making sure that
valves are fitted.
Using different size wheels and tyres from
those specified can affect the lifetime of tyres,
wheel rotation, ground clearance and the
speedometer reading and have an adverse
effect on road holding.
Fitting different tyres on the front and rear axles
can cause the ESC to mistime.
Only use products recommended by
PEUGEOT or products of equivalent
quality and specification.
In order to optimise the operation of
components as important as those in the
braking system, PEUGEOT selects and
offers very specific products.
After washing the vehicle, dampness, or
in wintry conditions, ice can form on the
brake discs and pads: braking efficiency
may be reduced. Make light brake
applications to dry and defrost the brakes.
The pressures given on the tyre pressure label
are valid for "cold" tyres. If you have driven for
more than 10 minutes or more than 6 miles (10
kilometres) at more than 31 mph (50 km/h),
0.3 bar (30 kPa) should be added to the values
given on the label.
Under-inflation increases fuel consumption.
Non-compliant tyre pressure causes premature
wear on tyres and has an adverse effect on the
vehicle's road holding – Risk of an accident!
7
Practical information
Page 223 of 320

221
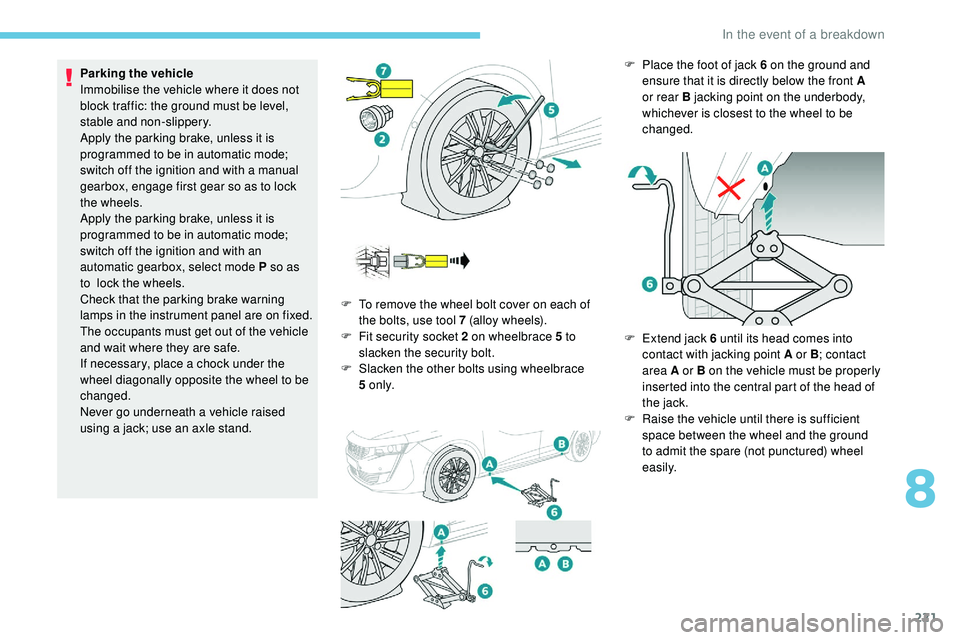
Parking the vehicle
Immobilise the vehicle where it does not
block traffic: the ground must be level,
stable and non-slippery.
Apply the parking brake, unless it is
programmed to be in automatic mode;
switch off the ignition and with a manual
gearbox, engage first gear so as to lock
the wheels.
Apply the parking brake, unless it is
programmed to be in automatic mode;
switch off the ignition and with an
automatic gearbox, select mode P so as
to lock the wheels.
Check that the parking brake warning
lamps in the instrument panel are on fixed.
The occupants must get out of the vehicle
and wait where they are safe.
If necessary, place a chock under the
wheel diagonally opposite the wheel to be
changed.
Never go underneath a vehicle raised
using a jack; use an axle stand. F
T
o remove the wheel bolt cover on each of
the bolts, use tool 7 (alloy wheels).
F
F
it security socket 2 on wheelbrace 5 to
slacken the security bolt.
F
S
lacken the other bolts using wheelbrace
5
o n l y.F
P lace the foot of jack 6 on the ground and
ensure that it is directly below the front A
or rear B jacking point on the underbody,
whichever is closest to the wheel to be
changed.
F
E
xtend jack 6 until its head comes into
contact with jacking point A or B ; contact
area A or B on the vehicle must be properly
inserted into the central part of the head of
the jack.
F
Ra
ise the vehicle until there is sufficient
space between the wheel and the ground
to admit the spare (not punctured) wheel
easily.
8
In the event of a breakdown
Page 236 of 320

234
F Start the engine of the vehicle with the good battery and leave it running for a few
minutes.
F
O
perate the starter on the broken down
vehicle and let the engine run.
If the engine does not start straight away,
switch off the ignition and wait a few moments
before trying again.
F
W
ait for it to return to idle.
F
D
isconnect the jump lead cables in reverse
order .
F
R
efit the plastic cover to the (+) terminal,
if
your vehicle has one.
F
A
llow the engine to run for at least
30
minutes, by driving or with the vehicle
stationary, so that the battery reaches an
adequate state of charge.
If your vehicle has an automatic gearbox,
never try to start the engine by pushing
the vehicle.
Charging the battery using
a battery charger
For optimum ser vice life of the battery, it is
essential to maintain an adequate state of
charge.
In some circumstances it may be necessary to
charge the battery:
-
i
f you only use your vehicle for short
journeys,
-
i
f the vehicle is to be taken off the road for
several weeks.
Contact a PEUGEOT dealer or a qualified
workshop.
If you wish to charge your vehicle's battery
yourself, use only a charger compatible
with lead-acid batteries with a nominal
voltage of 12 V.
Follow the instructions provided by the
manufacturer of the charger.
Never reverse polarities.
It is not necessary to disconnect the
battery.
F
S
witch off the ignition.
F
S
witch off all electrical consumers (audio
system, lighting, wipers, etc.).
F
C
onnect the red cable to the positive
terminal (+) of flat battery A (at the metal
elbow) then to the positive terminal (+) of
slave battery B or the booster.
F
C
onnect one end of the green or black
cable to the negative terminal (-) of slave
battery B or the booster (or the earth point
on the other vehicle).
F
C
onnect the other end of the green or black
cable to earth point C on the broken down
vehicle.
F
S
witch off charger B before connecting the
cables to the battery, so as to avoid any
dangerous sparks.
F
E
nsure that the charger cables are in good
condition.
F
R
aise the plastic cover, if your vehicle has
one, on the (+) terminal.
F
C
onnect the cables of the charger B as
follows:
-
t
he positive (+) red cable to the (+)
terminal of battery A ,
-
t
he negative (-) black cable to earth point
C on the vehicle.
F
A
t the end of the charging operation, switch
off charger B before disconnecting the
cables from battery A .
In the event of a breakdown
Page 238 of 320

236
Referring to the corresponding section, you
must yourself reinitialise certain systems,
such
as:
-
t
he electronic key,
-
t
he sunroof and its electric blind,
-
t
he electric windows,
-
t
he date and time,
-
t
he preset radio stations.The Stop & Start system may not be
operational during the trip following the
next engine start.
In this case, the system will only be
available again after a continuous
period of immobilisation of the vehicle,
a period which depends on the exterior
temperature and the state of charge of the
battery (up to about 8 hours).
Towing the vehicle
Procedure for having your vehicle towed or
for towing another vehicle using a removable
towing device.
Access to the tools
The towing eye is stored in a toolbox, under the
boot floor.
For more information on the Tool kit , refer to
the corresponding section.
Towing your vehicle
Hatchback
SW F
O
n the front bumper, unclip the cover by
pressing at the bottom.
F
R
elease the cover to the right and then
downwards.
F
S
crew the towing eye in fully.
F
I
nstall the towbar.F
P
ut the gearbox into neutral.
Failure to obser ve this instruction could
result in damage to certain components
(braking, transmission, etc.) and the
absence of braking assistance the next
time the engine is started.
In the event of a breakdown
Page 239 of 320

237
Automatic gearbox: never tow the vehicle
with the front wheels on the ground with
the engine off.
F
U
nlock the steering and release the parking
brake.
F
S
witch on the hazard warning lamps on
both vehicles.
F
M
ove off gently and drive slowly over a
short distance only.
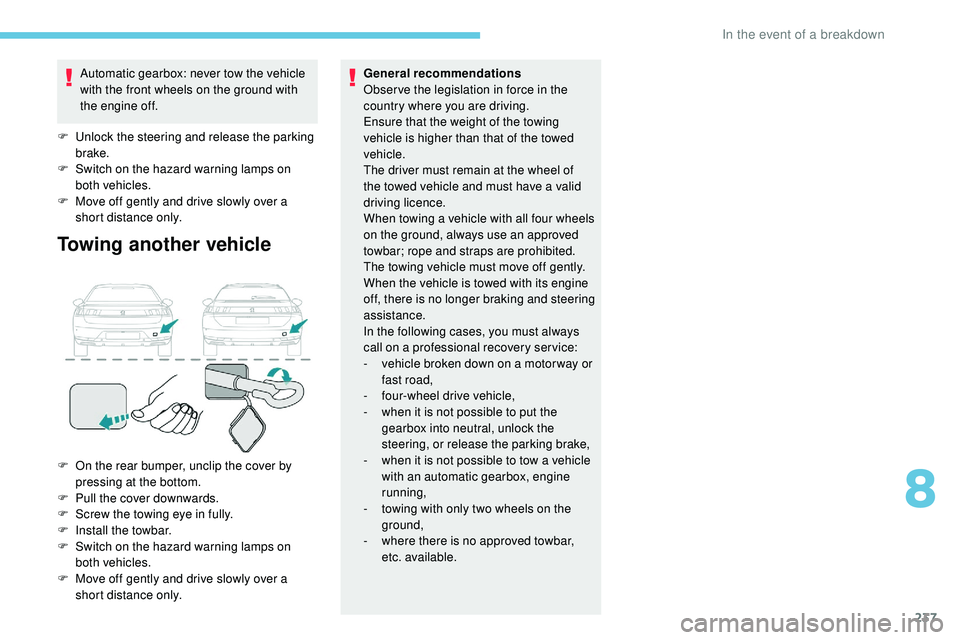
Towing another vehicle
F On the rear bumper, unclip the cover by pressing at the bottom.
F
P
ull the cover downwards.
F
S
crew the towing eye in fully.
F
I
nstall the towbar.
F
S
witch on the hazard warning lamps on
both vehicles.
F
M
ove off gently and drive slowly over a
short distance only. General recommendations
Obser ve the legislation in force in the
country where you are driving.
Ensure that the weight of the towing
vehicle is higher than that of the towed
vehicle.
The driver must remain at the wheel of
the towed vehicle and must have a valid
driving licence.
When towing a vehicle with all four wheels
on the ground, always use an approved
towbar; rope and straps are prohibited.
The towing vehicle must move off gently.
When the vehicle is towed with its engine
off, there is no longer braking and steering
assistance.
In the following cases, you must always
call on a professional recovery ser vice:
-
v
ehicle broken down on a motor way or
fast road,
-
f
our-wheel drive vehicle,
-
w
hen it is not possible to put the
gearbox into neutral, unlock the
steering, or release the parking brake,
- w hen it is not possible to tow a vehicle
with an automatic gearbox, engine
running,
-
t
owing with only two wheels on the
ground,
-
w
here there is no approved towbar,
etc. available.
8
In the event of a breakdown
Page 241 of 320

239
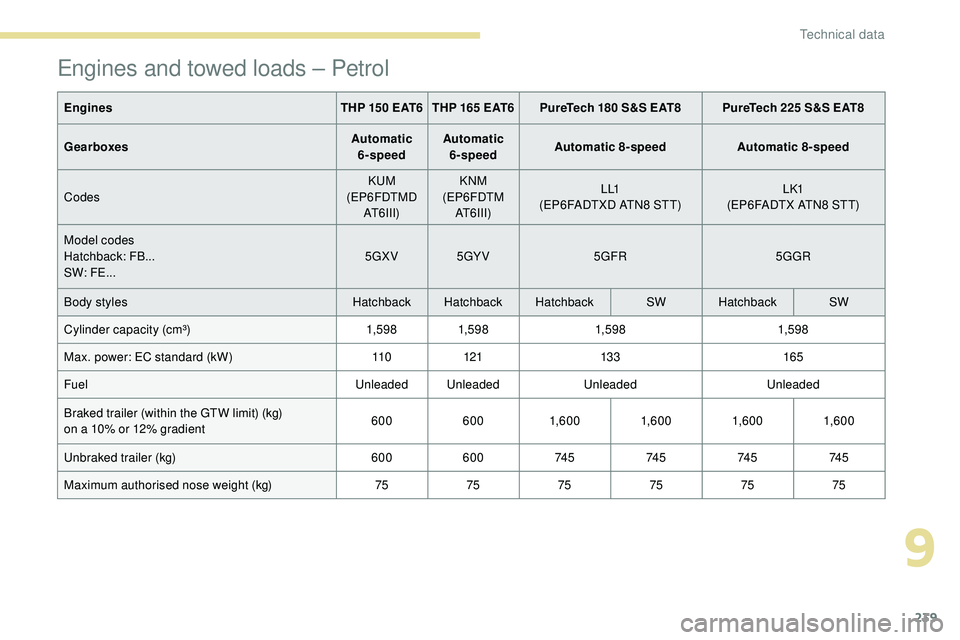
Engines and towed loads – Petrol
EnginesTHP 150 EAT6 THP 165 EAT6PureTech 180 S&S EAT8 PureTech 225 S&S EAT8
Gearboxes Automatic
6-speed Automatic
6-speed Automatic 8-speed
Automatic 8-speed
Codes KUM
(EP6FDTMD AT6III) KNM
(EP6FDTM AT6III) L L1
(EP6FADTXD ATN8 STT) L K1
(EP6FADTX ATN8 STT)
Model codes
Hatchback: FB...
SW: FE... 5GXV
5GY V 5GFR 5GGR
Body styles Hatchback Hatchback Hatchback SWHatchback SW
Cylinder capacity (cm³) 1,59 81,59 8 1,59 8 1,59 8
Max. power: EC standard (kW) 11 0121 13 3 165
Fuel Unleaded UnleadedUnleadedUnleaded
Braked trailer (within the GTW limit) (kg)
on a 10% or 12% gradient 600
6001,6 0 0 1,6 0 01,6 0 01,6 0 0
Unbraked trailer (kg) 600600 74 574 574 574 5
Maximum authorised nose weight (kg) 757575757575
9
Technical data