2019 Peugeot 508 light
[x] Cancel search: lightPage 97 of 320

95
The screenwash jets are integrated in the
tips of each arm.
Additional jets are installed below the
midpoint of each arm.
The screenwash fluid is sprayed along the
length of the wiper blade. This improves
visibility and reduces the consumption of
screenwash fluid.
In some cases, depending on the contents
or colour of the fluid and on the exterior
brightness, the liquid spray may be hardly
noticeable.
To avoid damaging the wiper blades,
do not operate the screenwash if the
screenwash reservoir is empty.
Only operate the screenwash if there
is no risk of the fluid freezing on the
windscreen and hindering visibility. Always
use a screenwash fluid suitable for low
temperatures during the winter period.
Never top up with water.
Rear wiper (SW)
To select the rear wiper: turn the ring to place
the desired symbol against the marking.Of f.
Intermittent wipe.
Wash-wipe.
Rear screenwash
Termination of the screenwash is followed by a
final wiping cycle.
F
T
urn and hold the ring all the way towards
the dashboard.
The screenwash and the wiper operate for as
long as the ring remains turned.
Termination of the screenwash is followed by a
final wiping cycle.
Reverse gear
When reverse gear is engaged, the rear wiper
will come into operation automatically if the
front windscreen wipers are operating. The function is activated or
deactivated in the Driving/Vehicle
menu of the touch screen.
This function is activated by default.
In the event of snow or hard frost or if a
bicycle carrier is fitted to a towing system,
deactivate the automatic rear wiper via the
touch screen’s Driving/Vehicle menu.
Special position of the
windscreen wipers
This position is used for cleaning or
replacement of the wiper blades. It can also
be useful, in winter (ice, snow), to release the
wiper blades from the windscreen.
To maintain the effectiveness of the wiper
blades, it is advisable to:
-
h
andle them with care,
-
c
lean them regularly using soapy
water,
-
a
void using them to retain cardboard
on the windscreen,
-
r
eplace them at the first signs of wear.
4
Lighting and visibility
Page 98 of 320

96
Before removing a front wiper
blade
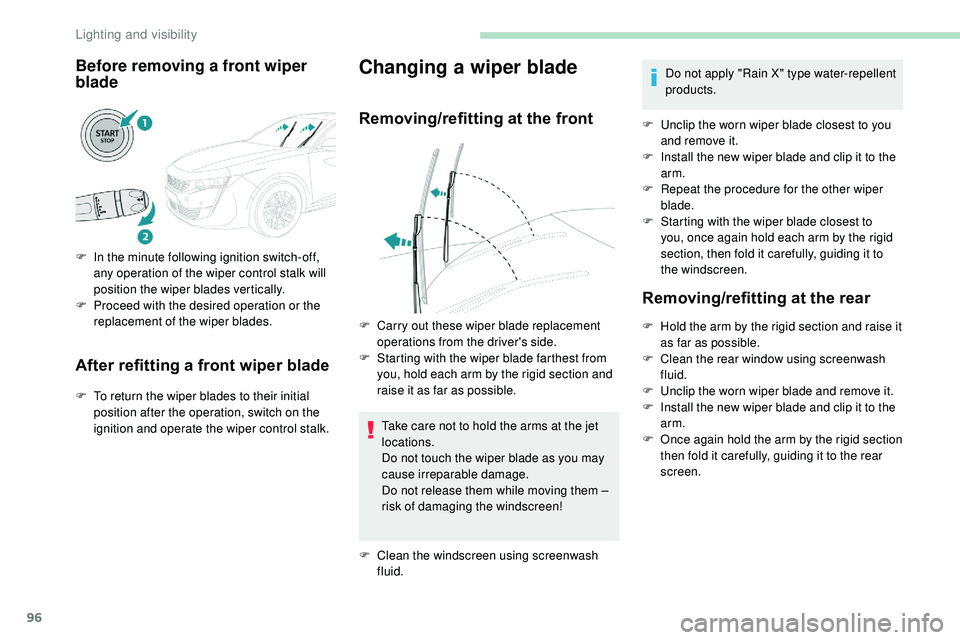
F In the minute following ignition switch-off, any operation of the wiper control stalk will
position the wiper blades vertically.
F
P
roceed with the desired operation or the
replacement of the wiper blades.
After refitting a front wiper blade
F To return the wiper blades to their initial position after the operation, switch on the
ignition and operate the wiper control stalk.
Changing a wiper blade
Removing/refitting at the front
Take care not to hold the arms at the jet
locations.
Do not touch the wiper blade as you may
cause irreparable damage.
Do not release them while moving them –
risk of damaging the windscreen!
F
Cl
ean the windscreen using screenwash
fluid. Do not apply "Rain X" type water-repellent
products.
F
U
nclip the worn wiper blade closest to you
and remove it.
F
I
nstall the new wiper blade and clip it to the
arm.
F
R
epeat the procedure for the other wiper
blade.
F
S
tarting with the wiper blade closest to
you, once again hold each arm by the rigid
section, then fold it carefully, guiding it to
the windscreen.
Removing/refitting at the rear
F Hold the arm by the rigid section and raise it as far as possible.
F
C
lean the rear window using screenwash
fluid.
F
U
nclip the worn wiper blade and remove it.
F
I
nstall the new wiper blade and clip it to the
arm.
F
O
nce again hold the arm by the rigid section
then fold it carefully, guiding it to the rear
screen.
F
C
arry out these wiper blade replacement
operations from the driver's side.
F
S
tarting with the wiper blade farthest from
you, hold each arm by the rigid section and
raise it as far as possible.
Lighting and visibility
Page 99 of 320

97
Automatic windscreen
wipers
In AUTO mode, the windscreen wipers operate
automatically, adapting to the intensity of the
rainfall without any action on the part of the
driver.
Detection of rainfall is by means of a sensor at
the top centre of the windscreen, behind the
rear view mirror.
Switching on
F Give a short downwards push to the control stalk.
A wiping cycle confirms that the instruction has
been accepted.
This indicator lamp comes on in the
instrument panel, accompanied by a
message.
Switching off
F Give the control stalk a further brief push downwards or place the control stalk in
another position ( Int, 1 or 2 ).
This indicator lamp goes off in the
instrument panel, accompanied by a
message.
The automatic windscreen wipers must be
reactivated by pushing the control stalk
downwards, if the ignition has been off for
more than one minute.
Malfunction
If a fault occurs with the automatic rain
sensitive wipers, the wipers will operate in
intermittent mode.
Have them checked by a PEUGEOT dealer or a
qualified workshop.
Do not cover the rain sensor, linked with
the sunshine sensor and located at the top
centre of the windscreen.
Switch off the automatic rain sensitive wipers
when using an automatic car wash.
In winter, it is advisable to wait until the
windscreen is completely clear of ice before
activating the automatic rain sensitive wipers.
4
Lighting and visibility
Page 101 of 320

99
Automatic operation of
hazard warning lamps
When braking in an emergency, depending on
the force of deceleration, the hazard warning
lamps come on automatically. They switch off
automatically when you next accelerate.
It is also possible to switch them off by pressing
the button.
Horn
F Press the central part of the multifunction steering wheel.
Emergency or
assistance
call
Peugeot Connect SOS** According to the geographic coverage
of "Peugeot Connect SOS", "Peugeot
Connect Assistance" and the official national
language chosen by the owner of the vehicle.
The list of countries covered and PEUGEOT
CONNECT services is available from dealers
or on the website for your country.
In an emergency, press this
button for more than 2 seconds.
The flashing LED and the voice
message confirm that the call
has been made to the "Peugeot
Connect SOS" ser vice*.
Pressing this button again immediately cancels
the request; the LED goes off.
The LED remains on (without flashing) when
communication is established.
It goes off at the end of the call. *
I
n accordance with the general conditions
of use for the ser vice available from dealers
and subject to technological and technical
limitations.
"Peugeot Connect SOS" immediately locates
your vehicle and contacts you in your own
language**, and – if necessary – requests that
relevant emergency services be dispatched**.
In countries where the ser vice is not available,
or when the locating ser vice has been
expressly declined, the call is sent directly If an impact is detected by the airbag
control unit, an emergency call is made
automatically and independently of the
deployment of any airbags.
Operation of the system
When the ignition is switched on, the indicator
lamp comes on for 3 seconds indicating that the
system is operating correctly.
If the indicator lamp lights up continuously red:
there is a system fault.
If the indicator lamp flashes red: replace the
back-up battery.
In either case, emergency and assistance calls
may not function.
Contact a qualified repairer as soon as possible. to the emergency services (112) without the
vehicle location.
5
Safety
Page 103 of 320

101
Anti-lock braking system
(ABS) and electronic brake
force distribution (EBFD)
The fixed illumination of this warning
lamp signals that there is a fault with
the ABS.
Emergency braking assistance
(EBA)
In an emergency, this system enables you to
reach the optimum braking pressure more
quickly and therefore reduce the stopping
distance.
It is triggered in relation to the speed at which
the brake pedal is pressed. This is felt by a
reduction in the resistance of the pedal and an
increase in braking efficiency.
Anti-slip regulation (ASR)
This system optimises traction in order to
avoid wheel slip by acting on the brakes of
the driving wheels and on the engine. It also
improves the directional stability of the vehicle
on acceleration.
Dynamic stability control (DSC)
If there is a difference between the path
followed by the vehicle and that required by the
driver, this system monitors each wheel and
automatically acts on the brake of one or more
wheels and on the engine to return the vehicle
to the required path, within the limits of the laws
of physics.
Trailer stability assist (TSA)
This system allows control of the vehicle to be
retained when towing a trailer, so as to avoid
the risk of snaking.The vehicle retains conventional braking. Drive
carefully at moderate speed.
Contact a PEUGEOT dealer or a qualified
workshop as soon as possible.
Illumination of this warning lamp,
linked with the STOP and ABS
warning lamps, accompanied by
the display of a message and an
audible signal, signals that there is a
fault with the electronic brake force
distribution (EBFD).
You must stop as soon as it is safe to do so.
Call on a PEUGEOT dealer or a qualified
workshop.
Normal operation of the ABS may make
itself felt by slight vibrations of the brake
pedal.
When braking in an emergency, press
very firmly and maintain this pressure. When changing wheels (tyres and rims),
ensure that these are approved for your
vehicle.
After an impact, have these systems
checked by a PEUGEOT dealer or a
qualified workshop.
Anti-slip regulation (ASR)/
Dynamic stability control
(DSC)
Operation
These systems are activated automatically
every time the vehicle is started.
They come into operation in the event of a
problem with grip or trajectory.
This is indicated by flashing of this
warning lamp in the instrument panel.
Deactivation
In exceptional conditions (starting a vehicle
which is bogged down, stuck in snow, on soft
ground, etc.), it may be advisable to deactivate
the ASR system, so that the wheels can turn
freely and regain grip.
Reactivate the system when grip conditions
allow.
5
Safety
Page 105 of 320

103
Operating fault
Should a fault occur with the system,
this warning lamp comes on in the
instrument panel, accompanied by
the display of a message and an
audible signal.
If you continue to tow a trailer, reduce your
speed and drive carefully!
Contact a PEUGEOT dealer or a qualified
workshop to have the system checked.
The trailer stability assist system offers
increased safety in normal driving,
provided that the recommendations on
towing a trailer are obser ved. It should not
encourage the driver to take risks, such
as towing a trailer in adverse operating
conditions (overloading, failure to obser ve
the trailer nose weight, worn or under-
inflated tyres, faulty braking system, etc.)
or drive at too high a speed.
In certain cases, snaking of the trailer
may not be detected by the ESC system,
particularly with a light trailer.
When driving on slippery or poor sur faces,
the system may not be able to prevent
sudden snaking of the trailer.
Seat belts
Front seat belts
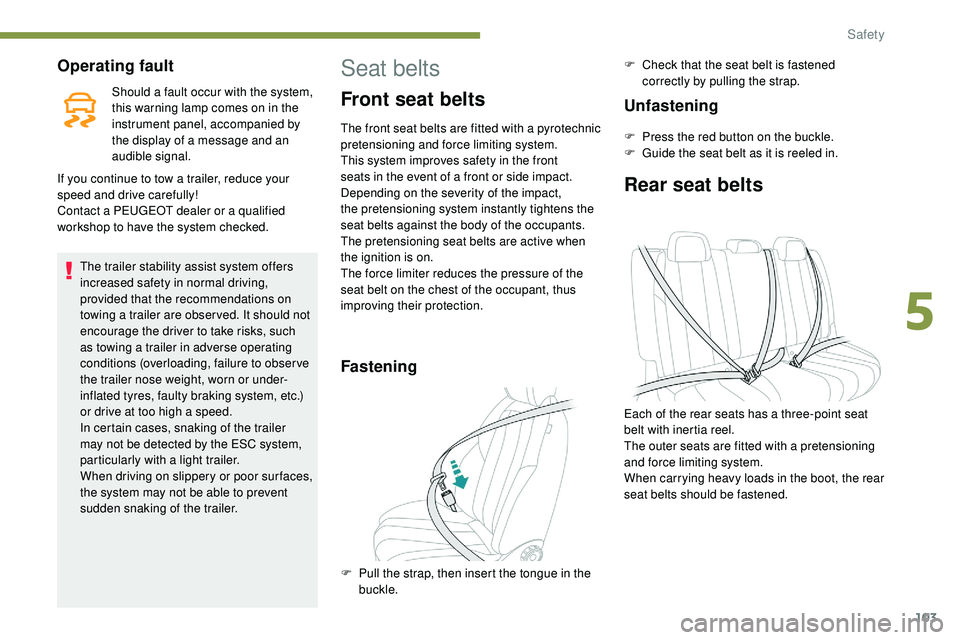
The front seat belts are fitted with a pyrotechnic
pretensioning and force limiting system.
This system improves safety in the front
seats in the event of a front or side impact.
Depending on the severity of the impact,
the
pretensioning system instantly tightens the
seat belts against the body of the occupants.
The pretensioning seat belts are active when
the ignition is on.
The force limiter reduces the pressure of the
seat belt on the chest of the occupant, thus
improving their protection.
Fastening
F Pull the strap, then insert the tongue in the buckle.
Unfastening
F Press the red button on the buckle.
F G uide the seat belt as it is reeled in.
Rear seat belts
F Check that the seat belt is fastened correctly by pulling the strap.
Each of the rear seats has a three-point seat
belt with inertia reel.
The outer seats are fitted with a pretensioning
and force limiting system.
When carrying heavy loads in the boot, the rear
seat belts should be fastened.
5
Safety
Page 106 of 320

104
Fastening
F Pull the strap, then insert the tongue in the buckle.
F
C
heck that the seat belt is fastened
correctly by pulling the strap.
Unfastening
F Press the red button on the buckle.
F G uide the seat belt as it is reeled in.
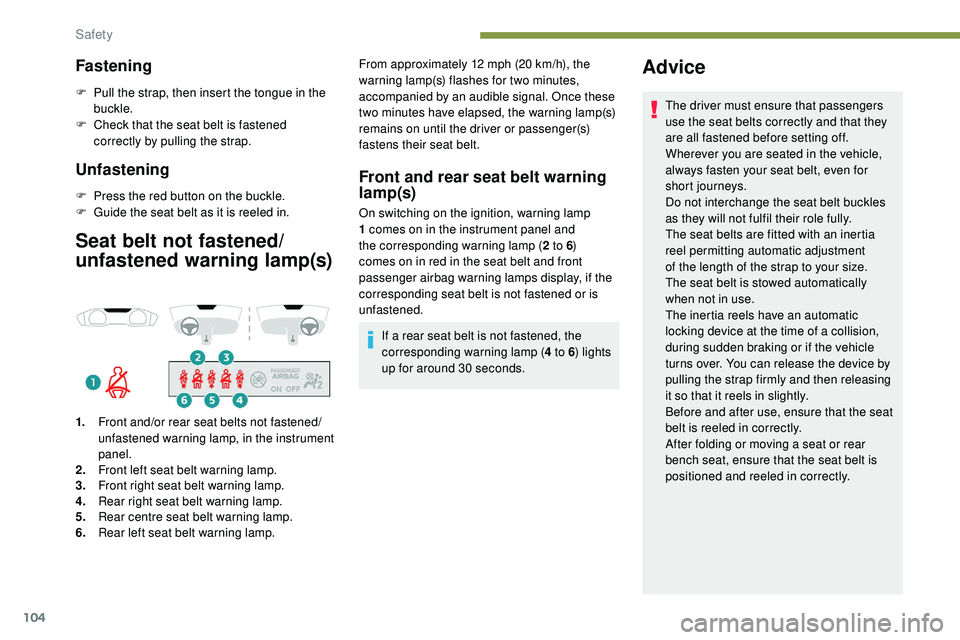
Seat belt not fastened/
unfastened warning lamp(s)
1.Front and/or rear seat belts not fastened/
unfastened warning lamp, in the instrument
panel.
2. Front left seat belt warning lamp.
3. Front right seat belt warning lamp.
4. Rear right seat belt warning lamp.
5. Rear centre seat belt warning lamp.
6. Rear left seat belt warning lamp. From approximately 12 mph (20
km/h), the
warning lamp(s) flashes for two minutes,
accompanied by an audible signal. Once these
two minutes have elapsed, the warning lamp(s)
remains on until the driver or passenger(s)
fastens their seat belt.
Front and rear seat belt warning
lamp(s)
On switching on the ignition, warning lamp
1 comes on in the instrument panel and
the corresponding warning lamp ( 2 to 6)
comes on in red in the seat belt and front
passenger airbag warning lamps display, if the
corresponding seat belt is not fastened or is
unfastened.
If a rear seat belt is not fastened, the
corresponding warning lamp ( 4 to 6) lights
up for around 30 seconds.
Advice
The driver must ensure that passengers
use the seat belts correctly and that they
are all fastened before setting off.
Wherever you are seated in the vehicle,
always fasten your seat belt, even for
short journeys.
Do not interchange the seat belt buckles
as they will not fulfil their role fully.
The seat belts are fitted with an inertia
reel permitting automatic adjustment
of the length of the strap to your size.
The
seat belt is stowed automatically
when not in use.
The inertia reels have an automatic
locking device at the time of a collision,
during sudden braking or if the vehicle
turns over. You can release the device by
pulling the strap firmly and then releasing
it so that it reels in slightly.
Before and after use, ensure that the seat
belt is reeled in correctly.
After folding or moving a seat or rear
bench seat, ensure that the seat belt is
positioned and reeled in correctly.
Safety
Page 107 of 320

105
Installation
The lower part of the strap must be
positioned as low as possible on the
pelvis.
The upper part must be positioned in the
hollow of the shoulder.
In order to be effective, a seat belt must:
-
b
e tightened as close to the body as
possible,
-
b
e pulled in front of you with a smooth
movement, checking that it does not
twist,
-
b
e used to restrain only one person,
-
n
ot show any signs of cuts or fraying,
-
n
ot be converted or modified to avoid
affecting its performance.
Recommendations for children
Use a suitable child seat if the passenger
is less than 12 years old or shorter than
one and a half metres.
Never use the same seat belt to secure
more than one child.
Never allow a child to travel on your lap.
For more information on Child seats , refer
to the corresponding section. Maintenance
In accordance with current safety
regulations, for all repairs on your
vehicle's seat belts, go to a qualified
workshop with the skills and equipment
needed, which a PEUGEOT dealer is able
to provide.
Have your seat belts checked regularly
by a PEUGEOT dealer or a qualified
workshop, particularly if the straps show
signs of damage.
Clean the seat belt straps with soapy
water or a textile cleaning product, sold
by
PEUGEOT dealers.
In the event of an impact
Depending on the nature and
seriousness of the impact, the pyrotechnic
pretensioner may be deployed before and
independently of the airbags. Deployment of
the pretensioners is accompanied by a slight
discharge of harmless smoke and a noise,
due to the activation of the pyrotechnic
cartridge incorporated in the system.
In all cases, the airbag warning lamp
comes
on.
Following an impact, have the seat belts
system checked and, if necessary, replaced,
by a PEUGEOT dealer or a qualified
workshop.
Airbags
General information
System designed to contribute towards
improving the safety of the occupants of the
front seats and the rear side seats in the event
of serious collisions. The airbags supplement
the action of the seat belts fitted with force
limiters for the front seats and the rear side
seats.
If a collision occurs, the electronic detectors
record and analyse the front and side impacts
sustained in the impact detection zones:
-
i
n the event of violent impact, the airbags
deploy instantly and help better protect
the occupants of the vehicle; immediately
after the impact, the airbags deflate rapidly
in order not to hinder the visibility or the
possible exit of the occupants,
-
i
n the case of a minor or rear impact or
in certain rollover conditions, the airbags
may not be deployed; the seat belt
alone contributes towards ensuring your
protection in these situations.
The airbags do not operate when the
ignition is switched off.
This equipment will only deploy once. If a
second impact occurs (during the same or
a subsequent accident), the airbag will not
be deployed again.
5
Safety