2019 Peugeot 508 window
[x] Cancel search: windowPage 98 of 320

96
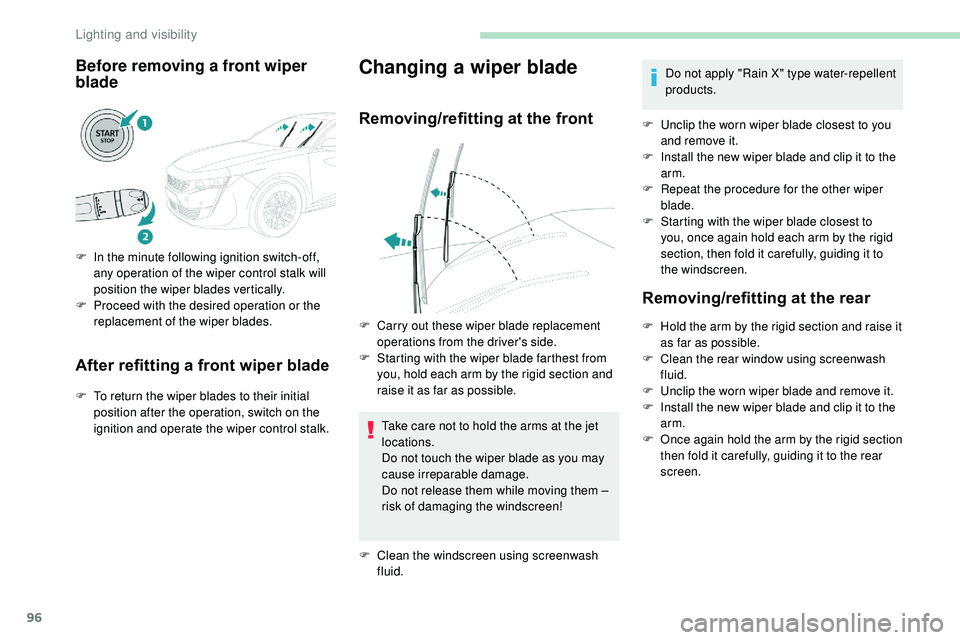
Before removing a front wiper
blade
F In the minute following ignition switch-off, any operation of the wiper control stalk will
position the wiper blades vertically.
F
P
roceed with the desired operation or the
replacement of the wiper blades.
After refitting a front wiper blade
F To return the wiper blades to their initial position after the operation, switch on the
ignition and operate the wiper control stalk.
Changing a wiper blade
Removing/refitting at the front
Take care not to hold the arms at the jet
locations.
Do not touch the wiper blade as you may
cause irreparable damage.
Do not release them while moving them –
risk of damaging the windscreen!
F
Cl
ean the windscreen using screenwash
fluid. Do not apply "Rain X" type water-repellent
products.
F
U
nclip the worn wiper blade closest to you
and remove it.
F
I
nstall the new wiper blade and clip it to the
arm.
F
R
epeat the procedure for the other wiper
blade.
F
S
tarting with the wiper blade closest to
you, once again hold each arm by the rigid
section, then fold it carefully, guiding it to
the windscreen.
Removing/refitting at the rear
F Hold the arm by the rigid section and raise it as far as possible.
F
C
lean the rear window using screenwash
fluid.
F
U
nclip the worn wiper blade and remove it.
F
I
nstall the new wiper blade and clip it to the
arm.
F
O
nce again hold the arm by the rigid section
then fold it carefully, guiding it to the rear
screen.
F
C
arry out these wiper blade replacement
operations from the driver's side.
F
S
tarting with the wiper blade farthest from
you, hold each arm by the rigid section and
raise it as far as possible.
Lighting and visibility
Page 109 of 320

107
To assure the safety of your child, the front
passenger airbag must be deactivated
when you install a "rear ward facing" child
seat on the front passenger seat.
Otherwise, the child risks being seriously
injured or killed if the airbag is deployed.
Reactivating the front passenger
airbag
When you remove the child seat, with the
ignition off, turn the switch to the ON position
to reactivate the front airbag and so assure the
safety of your front passenger in the event of
an impact.
When the ignition is switched on,
this warning lamp comes on in the
seat belt warning lamps display
screen for approximately one minute
to signal that the front airbag is
activated.
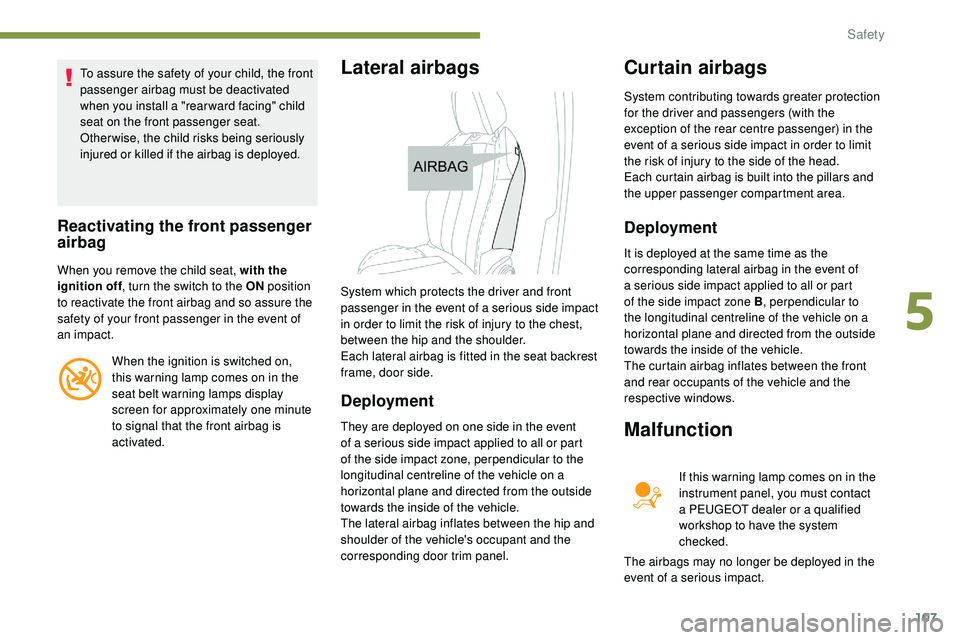
Lateral airbags
Deployment
They are deployed on one side in the event
of a serious side impact applied to all or part
of the side impact zone, perpendicular to the
longitudinal centreline of the vehicle on a
horizontal plane and directed from the outside
towards the inside of the vehicle.
The lateral airbag inflates between the hip and
shoulder of the vehicle's occupant and the
corresponding door trim panel.
Curtain airbags
System contributing towards greater protection
for the driver and passengers (with the
exception of the rear centre passenger) in the
event of a serious side impact in order to limit
the risk of injury to the side of the head.
Each curtain airbag is built into the pillars and
the upper passenger compartment area.
Deployment
It is deployed at the same time as the
corresponding lateral airbag in the event of
a serious side impact applied to all or part
of the side impact zone B , perpendicular to
the longitudinal centreline of the vehicle on a
horizontal plane and directed from the outside
towards the inside of the vehicle.
The curtain airbag inflates between the front
and rear occupants of the vehicle and the
respective windows.
Malfunction
System which protects the driver and front
passenger in the event of a serious side impact
in order to limit the risk of injury to the chest,
between the hip and the shoulder.
Each lateral airbag is fitted in the seat backrest
frame, door side.
If this warning lamp comes on in the
instrument panel, you must contact
a PEUGEOT dealer or a qualified
workshop to have the system
checked.
The airbags may no longer be deployed in the
event of a serious impact.
5
Safety
Page 113 of 320

111
Children at the rear
At rear seating positions, always leave
sufficient space between the front seat
and:
-
a "
rear ward facing" child seat,
-
t
he child's feet for a child seat fitted
"forward facing".
To do this, move the front seat for wards
and, if necessary, straighten its backrest.
For optimal installation of the "forward
facing" child seat, verify that its backrest is
as close as possible to the backrest of the
vehicle seat, if possible in contact with it.
Children at the front
The legislation on carrying children on the
front passenger seat is specific to each
country. Refer to the legislation in force in
the country in which you are driving.
Deactivate the front passenger airbag
when a "rear ward facing" child seat is
installed on the front passenger seats.
Other wise, there is a risk of serious or
fatal injury to the child if the airbag is
deployed. Installing a booster seat (height adjuster)
The chest part of the seat belt must be
positioned on the child's shoulder without
touching the neck.
Ensure that the lap part of the seat belt
passes correctly over the child's thighs.
We recommend using a booster seat with
a backrest, equipped with a belt guide at
shoulder level.
Additional protections
To prevent accidental opening of the doors
and rear windows, use the child lock.
Take care not to open the rear windows by
more than one third.
To protect young children from the rays
of the sun, fit side blinds on the rear
windows.
As a safety precaution, do not leave:
-
a c
hild or children alone and
unattended in a vehicle,
-
a c
hild or an animal in a vehicle
which is exposed to the sun, with the
windows closed,
-
t
he keys within reach of children inside
the vehicle.Child seat at the rear
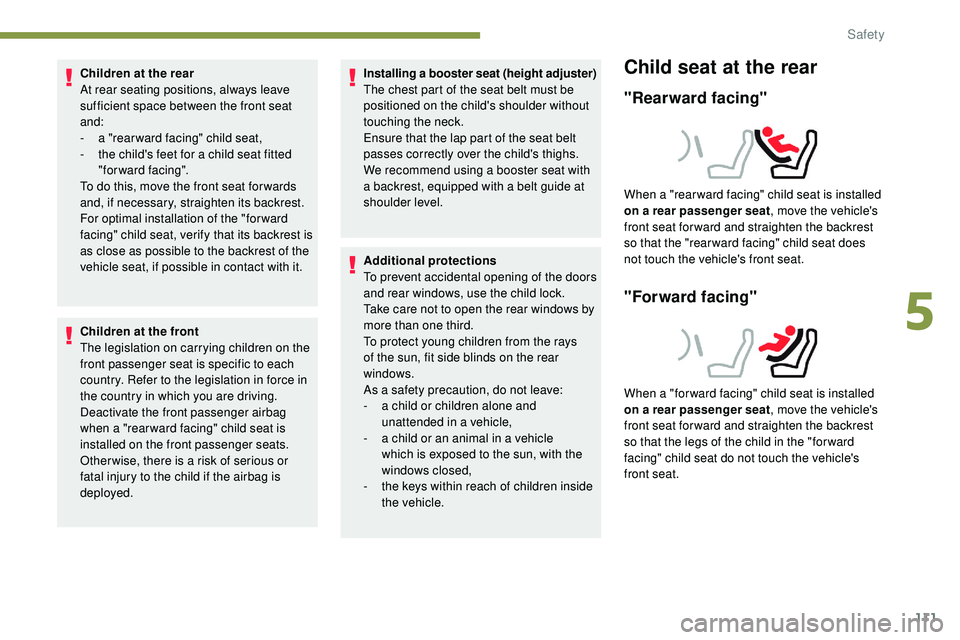
"Rearward facing"
When a "rear ward facing" child seat is installed
on a rear passenger seat , move the vehicle's
front seat for ward and straighten the backrest
so that the "rear ward facing" child seat does
not touch the vehicle's front seat.
"Forward facing"
When a "for ward facing" child seat is installed
on a rear passenger seat , move the vehicle's
front seat for ward and straighten the backrest
so that the legs of the child in the "for ward
facing" child seat do not touch the vehicle's
front seat.
5
Safety
Page 125 of 320

123
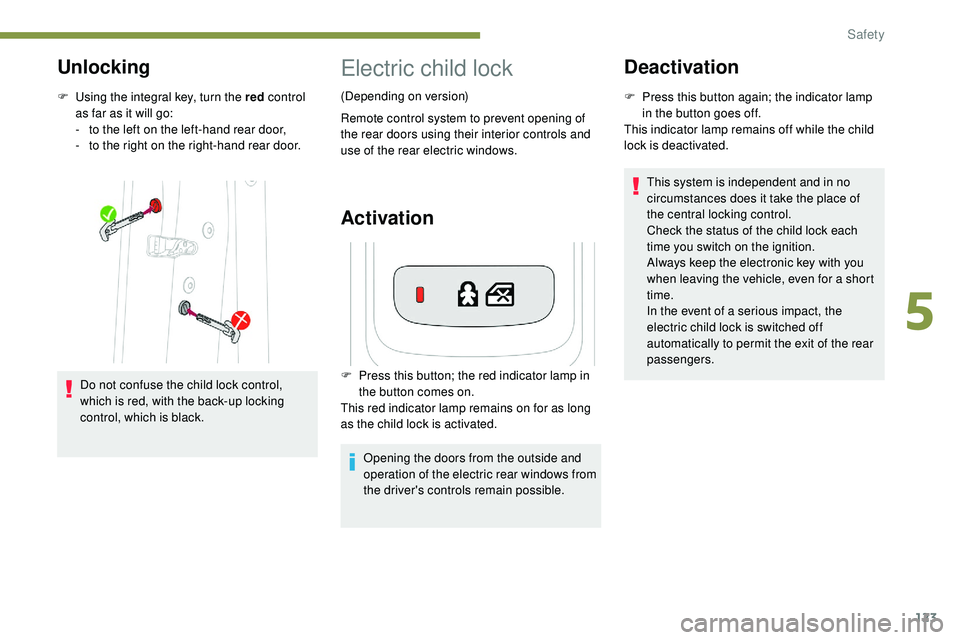
Unlocking
F Using the integral key, turn the red control
as far as it will go:
-
t
o the left on the left-hand rear door,
-
t
o the right on the right-hand rear door.
Do not confuse the child lock control,
which is red, with the back-up locking
control, which is black.
Electric child lock
(Depending on version)
Remote control system to prevent opening of
the rear doors using their interior controls and
use of the rear electric windows.
Activation
F Press this button; the red indicator lamp in the button comes on.
This red indicator lamp remains on for as long
as the child lock is activated.
Opening the doors from the outside and
operation of the electric rear windows from
the driver's controls remain possible.
Deactivation
F Press this button again; the indicator lamp in the button goes off.
This indicator lamp remains off while the child
lock is deactivated.
This system is independent and in no
circumstances does it take the place of
the central locking control.
Check the status of the child lock each
time you switch on the ignition.
Always keep the electronic key with you
when leaving the vehicle, even for a short
time.
In the event of a serious impact, the
electric child lock is switched off
automatically to permit the exit of the rear
passengers.
5
Safety
Page 179 of 320

177
This function is a manoeuvring aid which
cannot, in any circumstances, replace the
need for vigilance on the part of the driver.
The driver must remain attentive and stay
in control of their vehicle.
They must always check the vehicle’s
surroundings before undertaking a
manoeuvre.
During the entire manoeuvre, the driver
must ensure that the space remains clear.
Rear parking sensors
The system is switched on by engaging reverse
g e a r.
This is confirmed by an audible signal.
The system is switched off when you come out
of reverse gear.
Audible assistance
The proximity information is given by an
intermittent audible signal, the frequency of which
increases as the vehicle approaches the obstacle.
When the distance between the vehicle and
the obstacle becomes less than about thirty
centimetres, the sound signal becomes
continuous.
The sound emitted by the speaker (right or
left) indicates the side on which the obstacle is
located.
Adjusting the audible signalIn versions equipped with
PEUGEOT Connect Radio,
pressing this button opens the
audible signal volume adjustment
window. (white: more distant obstacles, orange: close
obstacles, red: very close obstacles).
When the obstacle is very close, the "Danger"
symbol is displayed on the screen.
Front parking sensors
In addition to the rear parking sensors, the
front parking sensors are triggered when an
obstacle is detected in front and the speed of
the vehicle is still below 6 mph (10 km/h).
The front parking sensors are interrupted if
the vehicle stops for more than three seconds
in for ward gear, if an obstacle is no longer
detected or when the speed of the vehicle
exceeds 6 mph (10 km/h).
The sound emitted by the speaker (front or
rear) locates the obstacle in relation to the
vehicle – in the vehicle trajectory, in front
or behind.
Side parking sensors
Visual assistance
The function signals the presence of obstacles
both within the sensor detection zone and in
the vehicle path defined by the orientation of
the steering wheel. It supplements the audible assistance, without
taking account of the vehicle's trajectory, by
displaying bars on the screen that represent the
distance between the obstacle and the vehicle
6
Driving
Page 232 of 320

230
Box 2Fuse N° Rating (A) Functions
F2 10 AHeated door mirrors.
F3 40 AFront one-touch windows.
F4 15 ADriver’s door control panel, memorisation of electric seats.
F5 40 ARear one-touch windows.
F6 15 A12 V socket in boot.
F7 30 AHeated seats.
F10 20 ATrailer inter face unit.
F12 25 AHi-Fi amplifier.
In the event of a breakdown
Page 237 of 320

235
Never try to charge a frozen battery – risk
of explosion!
If the battery has frozen, have it checked
by a PEUGEOT dealer or by a qualified
workshop who will check that the internal
components have not been damaged and
that the container has not cracked, which
would mean a risk of toxic and corrosive
acid leaking.
Some functions, including Stop & Start,
are not available if the battery is not
sufficiently charged.
Disconnecting the battery
In order to maintain an adequate state of charge
for starting the engine, it is recommended that
the battery be disconnected if the vehicle is
taken out of ser vice for a long period.
Quick-release terminal clamp
Disconnecting the (+) terminalReconnecting the (+) terminal
Do not force the lever as locking will not
be possible if the clamp is not positioned
correctly; start the procedure again.
Following reconnection
After reconnecting the battery, turn on the
ignition and wait 1 minute before starting
the engine, in order to enable the electronic
systems to initialise.
If this label is present, it is essential to
use only a 12 V charger to avoid causing
irreversible damage to the electrical
components related to the Stop & Start
system.
F
Ra
ise the lever A fully to release the
clamp
B .
F
R
emove the clamp B by lifting it off.
Before disconnecting the battery:
F
c
lose all openings (doors, tailgate,
windows,
sunroof),
F
s
witch off all electrical consumers
(audio
system, wipers, lighting, etc.),
F
s
witch off the ignition and wait for four
minutes.
At the battery, it is only necessary to
disconnect the (+) terminal.
F
Ra
ise the lever A fully.
F
R
efit the open clamp B on the (+)
terminal.
F
P
ush the clamp B fully down.
F
L
ower the lever A to lock the clamp B
.
However, if minor problems persist following
this operation, contact a PEUGEOT dealer or a
qualified workshop.
8
In the event of a breakdown
Page 238 of 320

236
Referring to the corresponding section, you
must yourself reinitialise certain systems,
such
as:
-
t
he electronic key,
-
t
he sunroof and its electric blind,
-
t
he electric windows,
-
t
he date and time,
-
t
he preset radio stations.The Stop & Start system may not be
operational during the trip following the
next engine start.
In this case, the system will only be
available again after a continuous
period of immobilisation of the vehicle,
a period which depends on the exterior
temperature and the state of charge of the
battery (up to about 8 hours).
Towing the vehicle
Procedure for having your vehicle towed or
for towing another vehicle using a removable
towing device.
Access to the tools
The towing eye is stored in a toolbox, under the
boot floor.
For more information on the Tool kit , refer to
the corresponding section.
Towing your vehicle
Hatchback
SW F
O
n the front bumper, unclip the cover by
pressing at the bottom.
F
R
elease the cover to the right and then
downwards.
F
S
crew the towing eye in fully.
F
I
nstall the towbar.F
P
ut the gearbox into neutral.
Failure to obser ve this instruction could
result in damage to certain components
(braking, transmission, etc.) and the
absence of braking assistance the next
time the engine is started.
In the event of a breakdown