2019 Peugeot 508 ESP
[x] Cancel search: ESPPage 83 of 320

81
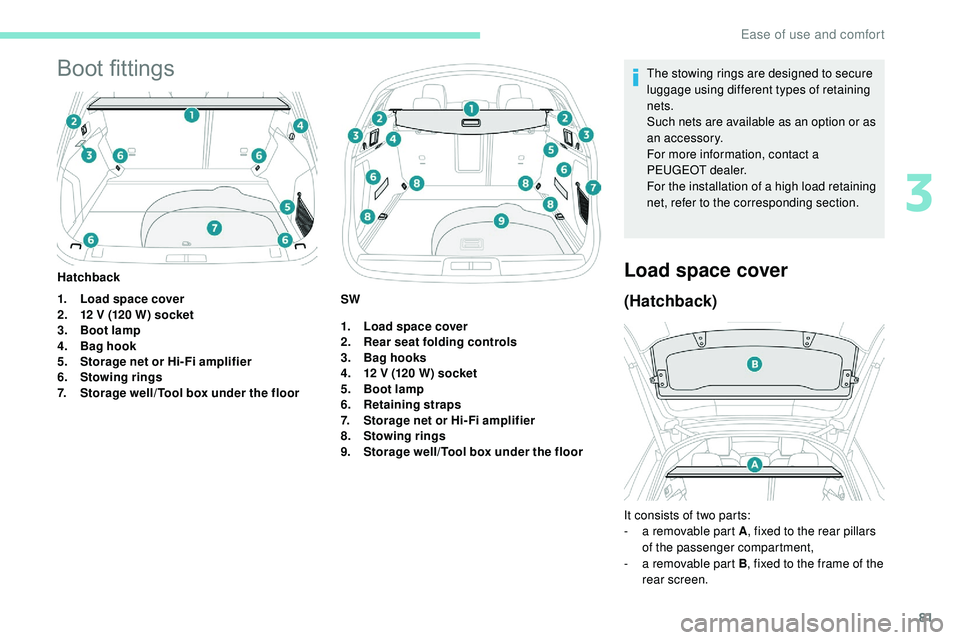
Boot fittings
1.Load space cover
2. 12 V (120 W) socket
3. Boot lamp
4. Bag hook
5. Storage net or Hi- Fi amplifier
6. Stowing rings
7. Storage well/Tool box under the floor
Hatchback
1.Load space cover
2. Rear seat folding controls
3. Bag hooks
4. 12 V (120 W) socket
5. Boot lamp
6. Retaining straps
7. Storage net or Hi- Fi amplifier
8. Stowing rings
9. Storage well/Tool box under the floor The stowing rings are designed to secure
luggage using different types of retaining
nets.
Such nets are available as an option or as
an accessory.
For more information, contact a
PEUGEOT dealer.
For the installation of a high load retaining
net, refer to the corresponding section.
Load space cover
(Hatchback)
It consists of two parts:
-
a r emovable part A , fixed to the rear pillars
of the passenger compartment,
-
a r
emovable part B , fixed to the frame of the
rear screen.
SW
3
Ease of use and comfort
Page 85 of 320

83
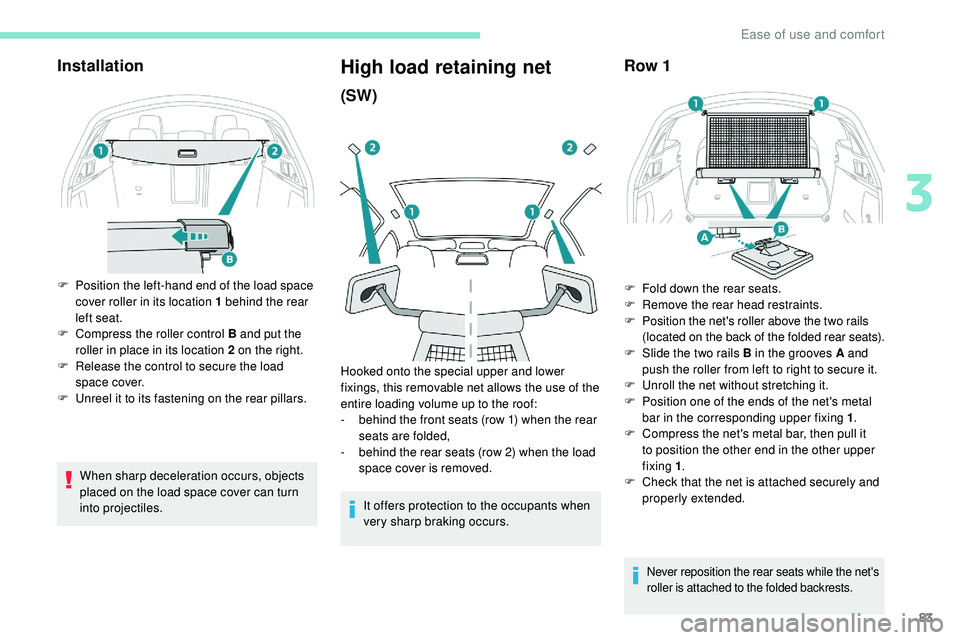
Installation
F Position the left-hand end of the load space cover roller in its location 1 behind the rear
left seat.
F
C
ompress the roller control B and put the
roller in place in its location 2 on the right.
F
R
elease the control to secure the load
space cover.
F
U
nreel it to its fastening on the rear pillars.
High load retaining net
(SW)
It offers protection to the occupants when
very sharp braking occurs.
Row 1
F Fold down the rear seats.
F R emove the rear head restraints.
F
P
osition the net's roller above the two rails
(located on the back of the folded rear seats).
F
S
lide the two rails B in the grooves A and
push the roller from left to right to secure it.
F
U
nroll the net without stretching it.
F
P
osition one of the ends of the net's metal
bar in the corresponding upper fixing 1 .
F
C
ompress the net's metal bar, then pull it
to position the other end in the other upper
fixing 1 .
F
C
heck that the net is attached securely and
properly extended.
Hooked onto the special upper and lower
fixings, this removable net allows the use of the
entire loading volume up to the roof:
-
b
ehind the front seats (row 1) when the rear
seats are folded,
-
b
ehind the rear seats (row 2) when the load
space cover is removed.
When sharp deceleration occurs, objects
placed on the load space cover can turn
into projectiles.
Never reposition the rear seats while the net's
roller is attached to the folded backrests.
3
Ease of use and comfort
Page 86 of 320

84
Row 2
F Reel in then remove the load space cover.
F F old down the rear seats.
F
P
osition the left-hand end of the net’s
roller in the side support 3 by reaching
from the left-hand side of the passenger
compartment.
F
P
osition the right-hand end of the net’s
roller in the side support 4 by reaching
from the right-hand side of the passenger
compartment.
F
P
ress each side to lock in the roller; the red
indicators must not be visible.
F
U
nroll the net from the boot.
F
P
osition one of the ends of the net's metal
bar in the corresponding upper fixing 2 .
F
C
ompress the net's metal bar, then pull it
to position the other end in the other upper
fixing 2 .
12 V accessory socket
F To connect a 12 V accessory (max. power:
120 W), remove the cap and connect an
appropriate adaptor.
F
S
witch on the ignition.
The connection of an electrical device
not approved by PEUGEOT, such as a
USB charger, may adversely affect the
operation of vehicle electrical systems,
causing faults such as poor radio
reception or inter ference with displays in
the screens.
Stowing rings
Hatchback To move one of the movable rings:
F
W
hile pressing the button, slide the ring into
its track.
F
O
nce in the desired position, release the
button to lock it.
F
C
heck that the net is attached securely and
properly extended.
F
S
traighten the rear seats and lock them in
place.
SW
The boot has four stowing rings to secure
luggage using different types of retaining nets.
For the SW, two of the rings are fixed and the
other two are movable in tracks.
For more information on the various nets,
contact a PEUGEOT dealer.
Ease of use and comfort
Page 88 of 320

86
Exterior lighting control
stalk
Main lighting
Turn the ring to align the desired symbol with
the marking.Automatic illumination of headlamps/
daytime running lamps.
Sidelamps only.
Dipped or main beam headlamps.
" Highway function "
On versions fitted with "Full LED"
technology headlamps, the range of the
dipped beam headlamps is automatically
increased once the speed of the vehicle is
above 68 mph (110 km/h). "
Peugeot Adaptive LED technology "
On versions with 3D LED rear lamps,
brightness is adjusted automatically for
optimum visibility at all times, both at day
and night.
Headlamp dipping
In " AUTO " and sidelamps modes, the driver
can switch on the main beam headlamps
temporarily ("headlamp flash") by pulling and
releasing the lighting control stalk.
Displays
Illumination of the corresponding indicator
lamp in the instrument panel confirms that the
lighting selected is on.
A fault with a lamp is signalled by the
permanent illumination of this warning
lamp, accompanied by the display of a
message and an audible signal.
Rear foglamps
Rear foglamps must not be used in clear
or rainy weather, at day or night. In these
situations, the power of their beams may
dazzle other drivers. They must be used
only in fog or falling snow.
In these weather conditions, it is your
responsibility to switch on the foglamps
and dipped beam headlamps manually as
the sunshine sensor may detect sufficient
light.
Switch off the foglamps when they are no
longer necessary.
The foglamps operate with dipped or
main beam headlamps on.
F
T
o switch them on, turn the ring for wards.
When the lighting is switched off automatically
(" AUTO " position), the foglamps and the dipped
beam headlamps will remain on.
F
T
o switch them off, turn the ring backwards.
Pull the stalk to switch between dipped and
main beam headlamps.
Lighting and visibility
Page 90 of 320

88
Parking lamps
Vehicle side marking by illumination of the
sidelamps on the traffic side only.
F
D
epending on version, within one minute
of switching off the ignition, operate the
lighting control stalk up or down depending
on the traffic side (for example, when
parking on the right, push the lighting
control stalk downwards; the left-hand
sidelamps come on).
This is confirmed by an audible signal and
illumination of the corresponding direction
indicator lamp in the instrument panel.
To switch off the parking lamps, return the
lighting control stalk to the central position.
Headlamp adjustment
Manual adjustment of
halogen headlamps
To avoid causing a nuisance to other road
users, the height of the halogen headlamps
should be adjusted according to the load in the
vehicle.
0 Driver only or driver + front passenger.
1 5 people.
2 5 people + loads in the boot.
3 Driver + loads in the boot.
4 5 6 Not used.
The initial setting is position " 0".
Automatic adjustment of
"Full LED" technology
headlamps
If a fault occurs, this warning lamp
comes on in the instrument panel,
accompanied by a message and an
audible signal.
This system automatically adjusts the height
of the beams from this type of headlamp,
according to the load in the vehicle, to avoid
causing a nuisance to other road users.
The system then places the headlamp beams
in the lowest position.
Have the system checked by a PEUGEOT
dealer or a qualified workshop.
Do not touch the "Full LED" technology
headlamps. Risk of electrocution!
Lighting and visibility
Page 92 of 320

90
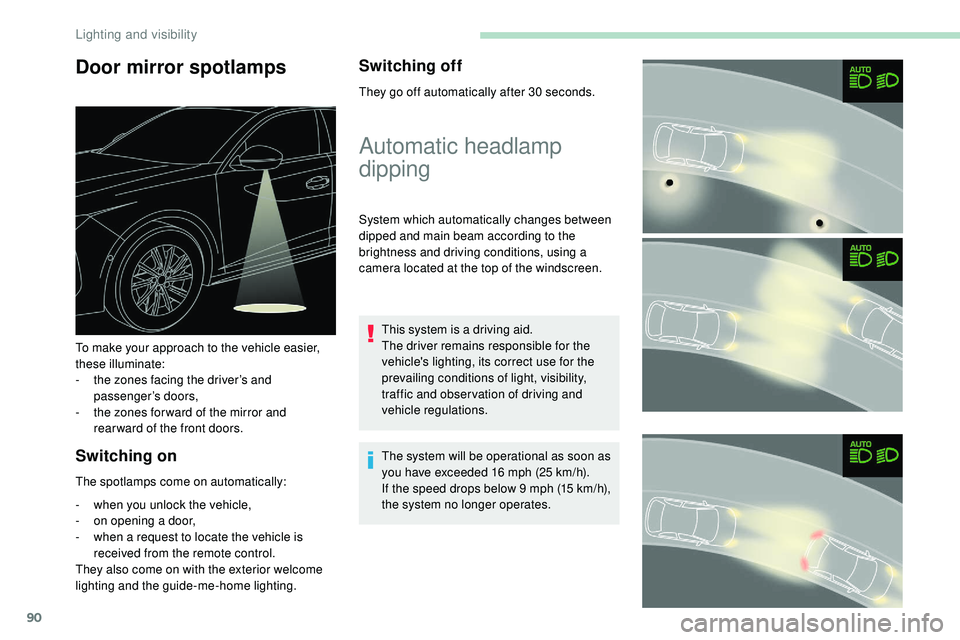
Door mirror spotlamps
Switching on
The spotlamps come on automatically:
-
w
hen you unlock the vehicle,
-
o
n opening a door,
-
w
hen a request to locate the vehicle is
received from the remote control.
They also come on with the exterior welcome
lighting and the guide-me-home lighting.
Switching off
They go off automatically after 30 seconds.
To make your approach to the vehicle easier,
these illuminate:
-
t
he zones facing the driver’s and
passenger’s doors,
-
t
he zones for ward of the mirror and
rear ward of the front doors.
Automatic headlamp
dipping
System which automatically changes between
dipped and main beam according to the
brightness and driving conditions, using a
camera located at the top of the windscreen.
This system is a driving aid.
The driver remains responsible for the
vehicle's lighting, its correct use for the
prevailing conditions of light, visibility,
traffic and obser vation of driving and
vehicle regulations.
The system will be operational as soon as
you have exceeded 16 mph (25
km/h).
If the speed drops below 9 mph (15
km/h),
the system no longer operates.
Lighting and visibility
Page 95 of 320

93
Animals less than 0.50 m tall are not detected.
T he instrument panel must be in "Night Vision"
display mode for the infrared camera image to
be displayed constantly.
The constant display disappears upon
switching off the ignition or if the conditions are
not met.
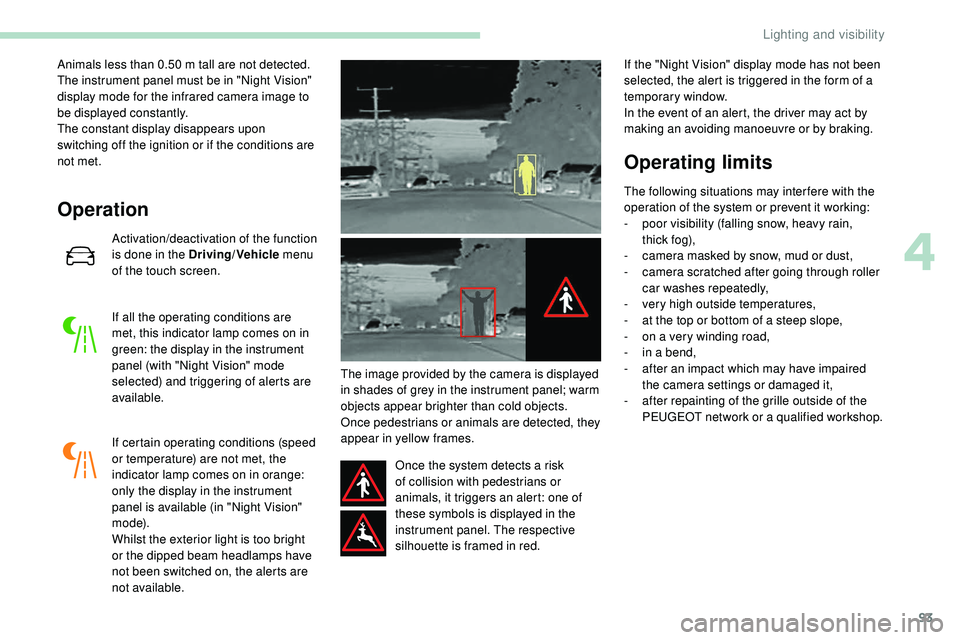
Operation
Activation/deactivation of the function
is done in the Driving/Vehicle menu
of the touch screen.
If all the operating conditions are
met, this indicator lamp comes on in
green: the display in the instrument
panel (with "Night Vision" mode
selected) and triggering of alerts are
available.
If certain operating conditions (speed
or temperature) are not met, the
indicator lamp comes on in orange:
only the display in the instrument
panel is available (in "Night Vision"
m o d e).
Whilst the exterior light is too bright
or the dipped beam headlamps have
not been switched on, the alerts are
not available. The image provided by the camera is displayed
in shades of grey in the instrument panel; warm
objects appear brighter than cold objects.
Once pedestrians or animals are detected, they
appear in yellow frames.
Once the system detects a risk
of collision with pedestrians or
animals, it triggers an alert: one of
these symbols is displayed in the
instrument panel. The respective
silhouette is framed in red. If the "Night Vision" display mode has not been
selected, the alert is triggered in the form of a
temporary window.
In the event of an alert, the driver may act by
making an avoiding manoeuvre or by braking.
Operating limits
The following situations may inter fere with the
operation of the system or prevent it working:
-
p
oor visibility (falling snow, heavy rain,
t hi c k
fo g),
-
c
amera masked by snow, mud or dust,
-
c
amera scratched after going through roller
car washes repeatedly,
-
v
ery high outside temperatures,
-
a
t the top or bottom of a steep slope,
-
o
n a very winding road,
-
i
n a bend,
-
a
fter an impact which may have impaired
the camera settings or damaged it,
-
a
fter repainting of the grille outside of the
PEUGEOT network or a qualified workshop.
4
Lighting and visibility
Page 100 of 320

98
General safety
recommendations
Labels are affixed in different locations on
your vehicle. They include safety warnings
and vehicle identification information. Do
not remove them: they are an integral part
of your vehicle.
For any work on your vehicle, use a
qualified workshop that has the technical
information, skills and equipment required,
all of which a PEUGEOT dealer is able to
provide.
Depending on country regulations, some
safety equipment may be compulsory:
high visibility safety vests, warning
triangles, breathalysers, spare bulbs,
spare fuses, fire extinguisher, first aid kit,
mud flaps at the rear of the vehicle, etc.We draw your attention to the following
points:
-
T
he fitting of electrical equipment
or accessories not approved by
PEUGEOT may cause excessive
current consumption and faults and
failures with the electrical system of
your vehicle. Contact a PEUGEOT
dealer for information on the range of
recommended accessories.
-
A
s a safety measure, access to
the diagnostic socket, used for the
vehicle's electronic systems, is
reser ved strictly for PEUGEOT dealers
or qualified workshops, equipped
with the special tools required (risk
of malfunctions of the vehicle's
electronic systems that could cause
breakdowns or serious accidents).
The manufacturer cannot be held
responsible if this advice is not
followed.
-
A
ny modification or adaptation not
intended or authorised by PEUGEOT
or carried out without meeting the
technical requirements defined
by the manufacturer will result in
the suspension of the legal and
contractual
warranties.Installation of accessory radio
communication transmitters
Before installing a radio communication
transmitter, you must contact a PEUGEOT
dealer for the specifications of compatible
transmitters (frequency, maximum power,
aerial position, specific installation
requirements), in line with the Vehicle
Electromagnetic Compatibility Directive
(2004/104/EC).
Hazard warning lamps
F When you press this red button, all four
direction indicators flash.
They can operate with the ignition off.
Safety