2019 Peugeot 508 belt
[x] Cancel search: beltPage 118 of 320
116
Recommended child seats
Range of recommended child seats which are
secured using a three-point seat belt.
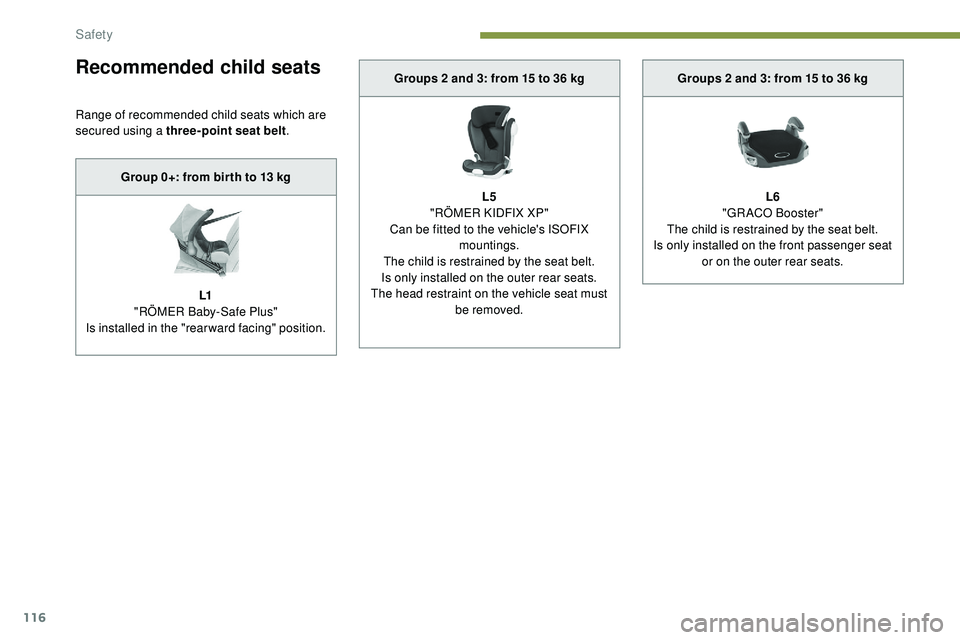
Group 0+: from bir th to 13 kg
L1
"RÖMER Baby-Safe Plus"
Is installed in the "rearward facing" position. Groups 2 and 3: from 15 to 36 kg
L5
"RÖMER KIDFIX XP"
Can be fitted to the vehicle's ISOFIX mountings.
The child is restrained by the seat belt.
Is only installed on the outer rear seats.
The head restraint on the vehicle seat must be removed. Groups 2 and 3: from 15 to 36 kg
L6
"GRACO Booster"
The child is restrained by the seat belt.
Is only installed on the front passenger seat or on the outer rear seats.
Safety
Page 119 of 320

117
Locations for child seats secured using the seat belt
In accordance with European regulations, this table indicates the options for installing universally approved child seats secured using the seat belt (a)
according to the weight of the child and the seating position in the vehicle.Weight of the child/indicative age
Seat position Under 13
kg
(groups 0 ( b) and
0 +)
Up to about 1 year From 9 to 18 kg
(g r o u p 1)
From about
1 to 3 years From 15 to 25 kg
(group 2)
From about
3 to 6 years From 22 to 36 kg
(group 3)
From about
6 to 10 years
Row 1 (c) Passenger seat
with height
adjustment
(d)With front
passenger airbag deactivated: "OFF" U
UUU
With front
passenger airbag activated:"ON" X
UF UFUF
Row 2 Outer rear
seats
(e) U
UUU
Centre rear seat
(f )
(g) U
UUU
5
Safety
Page 120 of 320

118
U:seat suitable for installing a child
seat secured using the seat belt and
universally approved for "rearward
facing" and/or "forward facing" use.
UF: seat suitable for installing a child seat
secured using the seat belt and universally
approved for "forward facing" use.
X: seat not suitable for installing a child
seat of the weight group indicated.
(a) Universal child seat: child seat that can
be installed in all vehicles using the
seat belt.
(b) Group 0: from birth to 10
kg. Carrycots
and "car" infant carriers cannot be
installed on the front passenger seat.
(c) Refer to the current legislation in your
country before installing your child in
this seat.
(d) Adjust the passenger seat to the
maximum height position.
(e) When installing a child seat on a rear
seat in a "rear ward facing" or "for ward
facing" position, move the front seat
for ward then straighten the backrest to
allow enough room for the child seat
and the child's legs.
(f ) A child seat with a support leg must
never be installed on this seat.
(g) Before installing the child seat on the
centre seat, store the right-hand outer
buckle in the space provided in the seat
cushion."ISOFIX" mountings
The seats, shown below, are fitted with ISOFIX
compliant mountings:
The mountings comprise three rings for each seat:
This arrangement reduces forward tipping of
the child seat in the event of a front impact.
The ISOFIX mounting system ensures fast,
reliable and safe fitting of the child seat in your
vehicle.
ISOFIX child seats are fitted with two latches
which are secured on the two rings A .
Some seats also have an upper strap which is
attached to ring B .
-
t
wo rings A , located between the vehicle's
seat backrest and cushion, indicated by a
marking, Front seat
Rear seats
-
a r
ing B
, located behind the seat and
identified by a marking, referred to as the
TOP TETHER , for fixing the upper strap.
Safety
Page 121 of 320

119
The incorrect installation of a child seat
in a vehicle compromises the child's
protection in the event of an accident.
Strictly obser ve the fitting instructions
provided with the child seat.
For information on the possibilities for
installing ISOFIX child seats in your
vehicle, refer to the summary table.
Recommended ISOFIX child seats
Also consult the user guide from the child
seat’s manufacturer to find out how to
install and remove the seat.
To secure the child seat to the TOP TETHER
:
F
r
emove and stow the head restraint before
installing the child seat on the seat (refit it
once the child seat has been removed),
F
p
ass the upper strap of the child seat behind
the seat backrest, centring it between the
apertures for the head restraint rods,
F
a
ttach the hook of the upper strap to ring B ,
F
t
ighten the upper strap. When fitting an ISOFIX child seat to the
left-hand rear seat of the bench seat,
before fitting the seat, first move the
centre rear seat belt towards the middle
of the vehicle, so as to avoid the seat
interfering with the operation of the seat
belt. "RÖMER Baby- Safe Plus and
its
ISOFIX base"
(size category: E )
Group 0+: from bir th to 13 kg
Installed "rearward facing" using an ISOFIX base which is attached to rings A .
Is only installed on the front passenger seat or on the outer rear seats.
The base has a support leg, height-
adjustable, which rests on the vehicle's floor. This child seat can also be secured with
a
seat belt. In this case, only the seat body
is
used and attached to the vehicle seat using
the three-point seat belt. RÖMER Duo Plus ISOFIX
(size category: B1 )
Group 1: from 9 to 18kg
Is installed only in the "forward facing" position. Is attached to the rings A and the upper ring
B,
referred to as the TOP TETHER, using
an
upper strap.
Is only installed on the front passenger seat or
on the outer rear seats. The vehicle's seat head restraint must be removed.
3 seat body angles: sitting, reclining and
lying
down.
This child seat can also be used on seats not
equipped with ISOFIX mountings. In this case, it
must be secured to the vehicle's seat using
the three-point seat belt. Adjust the position of the vehicle's front seat so that the child's feet are not touching the backrest.
5
Safety
Page 141 of 320

139
A time counter calculates the time spent in
STOP mode during the journey. It is reset to
zero every time the ignition is switched on with
the "START/STOP " button.
For your comfort, during parking
manoeuvres, STOP mode is not available
for a few seconds after coming out of
reverse gear or turning the steering wheel.
The Stop & Start does not affect the
operation of vehicle systems, such as
braking, etc.
Special cases: STOP mode not
available
STOP mode is not activated when:
- t he vehicle is on a steep slope
(rising
or
falling),
-
t
he driver's door is open,
-
t
he driver's seat belt is not fastened,
-
t
he vehicle has not exceeded 6 mph
(10
km/h) since the last engine start,
-
t
his is necessary to maintain a comfortable
In this case, this indicator lamp flashes
for a few seconds, then goes off.
Going into engine START mode
This indicator lamp goes off and the
engine restarts automatically:
-
w
ith a manual gearbox , when you fully
depress the clutch pedal,
-
w
ith an automatic gearbox:
•
g
ear selector in mode D or M , when you
release the brake pedal,
•
o
r gear selector in mode N and brake
pedal released, when you place the gear
selector in mode D or M ,
•
o
r when you engage reverse.
Special cases: START mode
activated automatically
As a safety measure or to maintain comfort
levels in the vehicle, START mode is activated
automatically when:
-
y
ou open the driver's door,
-
y
ou unfasten the driver's seat belt,
-
w
ith a manual gearbox, the vehicle speed
exceeds 2.5 mph (4
km/h),
-
w
ith an automatic gearbox in mode N , the
vehicle speed exceeds 0.6 mph (1
km/h),
-
w
ith an automatic gearbox in mode D ,
release the brake pedal,
-
s
ome special conditions (battery charge,
engine temperature, braking assistance,
air conditioning setting, etc.) make this
necessary to ensure control of a system or
the vehicle.
In this case, this indicator lamp flashes
for a few seconds, then goes off.
Deactivation/Reactivation
In certain cases, such as the need to maintain
a comfortable temperature in the passenger
compartment, it may be useful to deactivate the
Stop & Start system.
This operation is perfectly normal.
This operation is perfectly normal.
•
a
t a speed below 12 mph (20
km/h)
for BlueHDi versions, or below 1 mph
(1
km/h) for the PureTech 180 and 225
versions, when you brake hard with the
gear selector in mode D ,
•
w
ith the vehicle stationary, when you
place the gear selector in position N .temperature in the passenger compartment,
-
d
emisting is active,
-
t
he exterior temperature is below 0°C or
above +35°C,
-
s
ome temporary conditions (battery charge,
engine temperature, braking assistance,
altitude, etc.) make this necessary to ensure
control of a system.
6
Driving
Page 168 of 320
,
-
I
ntelligent emergency braking assistance,
-
A
ctive Safety Brake")
166
This system is a driving aid that includes three
functions:
-
D
istance Alert (alert if there is a risk of
collision),
-
I
ntelligent emergency braking assistance,
-
A
ctive Safety Brake (automatic emergency
b r ak ing).
The vehicle has a multifunctional camera
located at the top of the windscreen, and,
depending on the version, a radar located in
the front bumper. This system is designed to assist the
driver and improve road safety.
It is the driver's responsibility to
continuously monitor the state of the
traffic, observing the driving regulations.
This system does not replace the need for
vigilance on the part of the driver. As soon as the system detects a potential
obstacle, it prepares the braking circuit in
case automatic braking is needed. This
may cause a slight noise and a slight
sensation of deceleration.
Deactivation/Activation
By default, the system is automatically
activated at every engine start.
This system can be deactivated
or activated via the touch screen’s
Driving/Vehicle menu.
Deactivation of the system is
signalled by the illumination of this
indicator lamp, accompanied by the
display of a message.
Operating conditions and
limits
The ESC system must not be faulty.
The ASR must not be deactivated.
All passenger seat belts must be fastened.
Driving at a steady speed on roads with few
bends is required. The following situations may interfere with
the operation of the system or prevent it
from working:
-
p
oor visibility (inadequate street
lighting, falling snow, heavy rain, dense
f o g , e t c .),
-
d
azzle (headlamps of an oncoming
vehicle, low sun, reflections on a damp
road, leaving a tunnel, alternating
shade and light, etc.),
-
c
amera or radar obstructed (mud, frost,
snow, condensation, etc.).
On versions with camera alone, this
message indicates to you that the camera
is obstructed: " Driving aids camera:
Visibility limited, see user guide".
In these situations, detection performance
may be reduced.
Clean the windscreen regularly,
particularly the area in front of the camera.
The internal sur face of the windscreen can
also become misted around the camera.
In humid and cold weather, demist the
windscreen regularly.
Do not allow snow to accumulate on the
bonnet or roof of the vehicle as this could
conceal the detection camera.
Clean the front bumper, especially around
the radar, removing mud, snow, etc.
Driving
Page 171 of 320

169
Malfunction
In the event of a fault with the system,
you are alerted by the continuous
illumination of this warning lamp,
accompanied by the display of a
message and an audible signal.
Fatigue detection system
Take a break as soon as you feel tired or at
least every two hours.
The function comprises the "Driver Attention
Warning" system combined with the "Driver
Attention Alert".These systems cannot in any circumstances
replace the need for vigilance on the part of
the driver who must remain in control of their
decisions. In no case can these systems
keep the driver awake or prevent them from
falling asleep at the wheel.
It is the driver’s responsibility to stop if they
feel tired.
Activation/Deactivation
These functions are activated and
deactivated in the Driving /Vehicle
menu of the touch screen.
The state of the system is memorised when the
ignition is switched off.
Driver Attention Warning
The system triggers an alert once it
detects that the driver has not taken
a break after two hours of driving at
a speed above 40 mph (65
km/h).
This alert is issued via the display of a
message encouraging you to take a break,
accompanied by an audible signal.
If the driver does not follow this advice, the
alert is repeated hourly until the vehicle is
stopped.
The system resets itself if one of the following
conditions is met:
-
e
ngine running, the vehicle has been
stationary for more than 15 minutes,
-
t
he ignition has been switched off for a few
minutes,
-
t
he driver's seat belt is unfastened and their
door is open. As soon as the speed of the vehicle drops
below 40 mph (65
km/h), the system goes
into standby.
The driving time is counted again once the
speed is above 40 mph (65 km/h).
Driver Attention Alert
This system is particularly suited to fast roads
(speed higher than 40 mph (65
km/h)).
Using a camera placed at the top
of the windscreen, the system
assesses the driver's level of
vigilance by identifying variations
in trajectory compared to the lane
markings.
If these warning lamps come on after
the engine has been switched off
and restarted, contact a PEUGEOT
dealer or a qualified workshop to
have the system checked.
6
Driving
Page 188 of 320

186
7
5
Visiopark 1 or Visiopark 2 and the parking
sensors are automatically activated to help
you monitor the close surrounding area of your
vehicle during the manoeuvre.
During the manoeuvre
The system takes over the vehicle's steering. It
gives instructions on the manoeuvring direction
when starting the entry and exit parallel parking
manoeuvres and for all entry manoeuvres for
bay parking.
There instructions are displayed as a symbol
accompanied by a message:
The manoeuvring status is indicated by these
symbols:The maximum speed limit indications during
the manoeuvres are signalled by these
symbols:
" Reverse "
" Advance "
Manoeuvre in progress (green).
Manoeuvre cancelled or finished
(red) (the arrows indicate that the
driver must take back control of the
vehicle). 5 mph or 7
km/h, for parking space
e nt r y.
3 mph or 5 km/h, for parking space
exit.
During a manoeuvre, the steering wheel
turns quickly: do not hold the steering
wheel, do not place your hand between
the spokes of the steering wheel. Watch
out for anything likely to block the
manoeuvre (loose and bulky clothing,
scar ves, ties, etc.) – Risks of injury!
It is the driver's responsibility to monitor
the state of the traffic continuously,
especially vehicles coming towards you.
The driver should check that no object
or person can hinder the advance of the
vehicle.
The images from the camera(s) displayed
on the touch screen may be distorted by
the relief.
In the presence of areas in shade, or in
conditions of bright sunlight or inadequate
lighting, the image may be darkened and
with lower contrast. The manoeuvre can be interrupted definitively
at any time, either by the driver or by the
system automatically.
By the driver's action:
-
t
aking over control of the steering,
-
a
ctivating the direction indicator lamps on
the opposite side to that of the manoeuvre,
- u nfastening the driver's seat belt,
-
s
witching off the ignition.
Interruption by the system:
-
e
xceeding the speed limit: 5 mph or 7 km/h
during the parking space entry manoeuvres
and 3 mph or 5 km/h during the parking
space exit manoeuvres,
-
t
riggering of the anti-slip regulation on a
slippery road,
-
o
pening of a door or the boot,
-
s
talling of the engine,
-
s
ystem malfunction,
-
a
fter 10 manoeuvres to enter or exit
a parallel parking space and after 7
manoeuvres to enter a parking bay.
Interrupting the manoeuvre automatically
deactivates the function.
Driving