Page 281 of 372

8 Do-it-yourself
Maintenance precautions.......................8-2
Engine compartment check locations ...........8-3
Engine cooling system ..........................8-4
Checking engine coolant level ................8-5
Changing engine coolant .....................8-5
Engine oil ........................................8-6
Checking engine oil level .....................8-6
Changing engine oil ..........................8-7
Changing engine oil filter .....................8-8
Continuously Variable Transmission (CVT)
fluid (if so equipped) .............................8-9
Brake and clutch (if so equipped) fluid ...........8-9
Brake fluid ................................... 8-10
Clutch (if so equipped) fluid ..................8-10
Windshield-washer fluid ........................8-10
Windshield-washer fluid reservoir ............8-10
Battery......................................... 8-12
Jump starting ............................... 8-13
Variable voltage control system
(if so equipped) ................................. 8-14
Drive belt ....................................... 8-14
Spark plugs .................................... 8-15Replacing spark plugs
....................... 8-15
Air cleaner ...................................... 8-16
Windshield wiper blades ........................8-16
Cleaning .................................... 8-16
Replacing ................................... 8-17
Brakes.......................................... 8-18
Fuses ........................................... 8-18
Engine compartment ....................... 8-19
Passenger compartment ....................8-20
Battery replacement ........................... 8-21
Key fob (if so equipped) ......................8-22
NISSAN Intelligent Key® (if so equipped) ......8-23
Lights .......................................... 8-25
Headlights ................................... 8-25
Fog lights (if so equipped) ...................8-26
Exterior and interior lights ...................8-27
Wheels and tires ................................ 8-31
Tire pressure ................................ 8-31
Tir e
labeling ................................. 8-34
Types of tires ................................ 8-37
Tire chains .................................. 8-38
Changing wheels and tires ..................8-39
Page 288 of 372

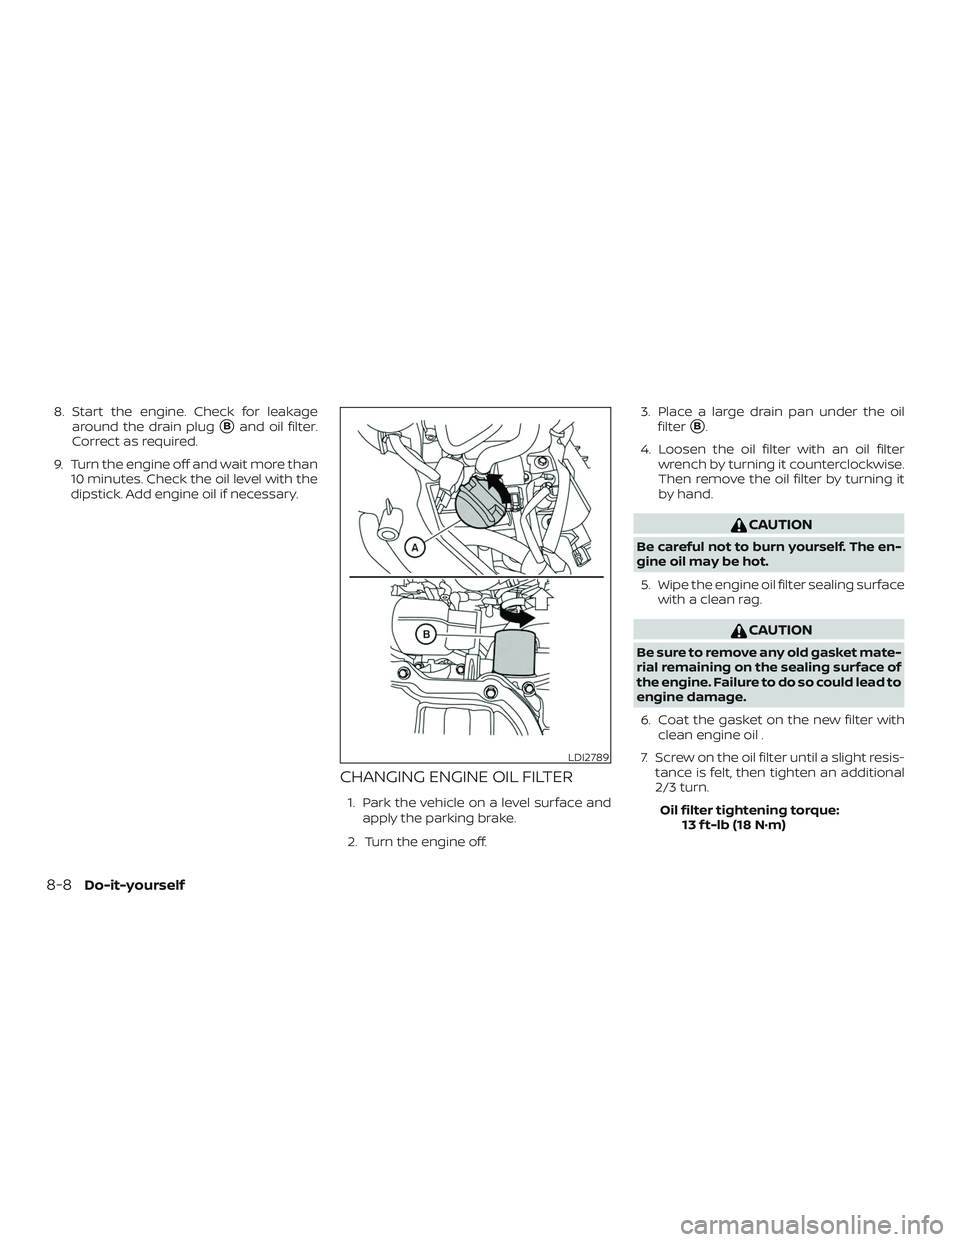
8. Start the engine. Check for leakagearound the drain plug
�Band oil filter.
Correct as required.
9. Turn the engine off and wait more than 10 minutes. Check the oil level with the
dipstick. Add engine oil if necessary.
CHANGING ENGINE OIL FILTER
1. Park the vehicle on a level surface and
apply the parking brake.
2. Turn the engine off. 3. Place a large drain pan under the oil
filter
�B.
4. Loosen the oil filter with an oil filter wrench by turning it counterclockwise.
Then remove the oil filter by turning it
by hand.
CAUTION
Be careful not to burn yourself. The en-
gine oil may be hot.
5. Wipe the engine oil filter sealing surface with a clean rag.
CAUTION
Be sure to remove any old gasket mate-
rial remaining on the sealing surface of
the engine. Failure to do so could lead to
engine damage.
6. Coat the gasket on the new filter with clean engine oil .
7. Screw on the oil filter until a slight resis- tance is felt, then tighten an additional
2/3 turn.
Oil filter tightening torque: 13 f t-lb (18 N·m)
LDI2789
8-8Do-it-yourself
Page 290 of 372

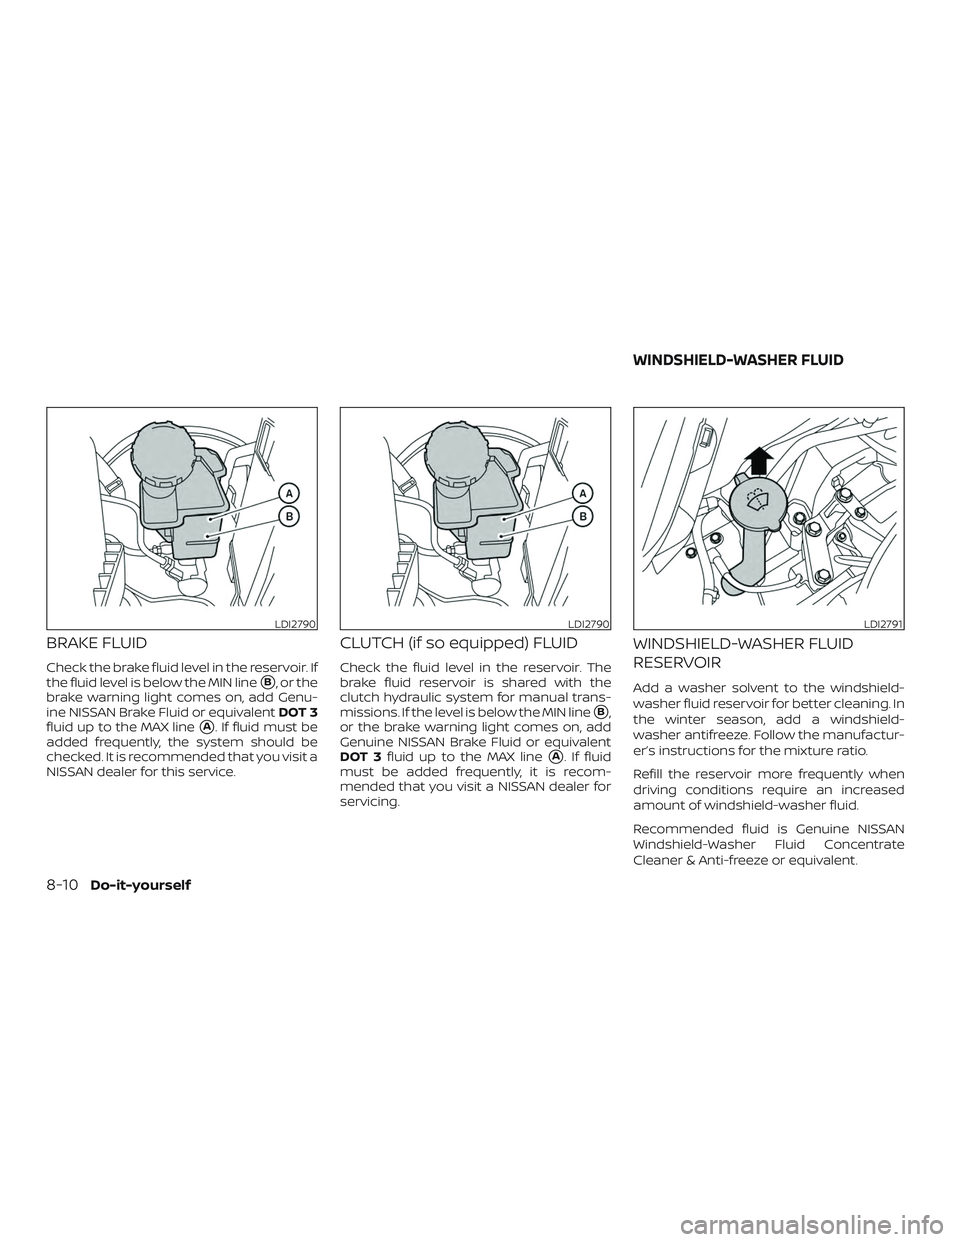
BRAKE FLUID
Check the brake fluid level in the reservoir. If
the fluid level is below the MIN line
�B, or the
brake warning light comes on, add Genu-
ine NISSAN Brake Fluid or equivalent DOT 3
fluid up to the MAX line
�A. If fluid must be
added frequently, the system should be
checked. It is recommended that you visit a
NISSAN dealer for this service.
CLUTCH (if so equipped) FLUID
Check the fluid level in the reservoir. The
brake fluid reservoir is shared with the
clutch hydraulic system for manual trans-
missions. If the level is below the MIN line
�B,
or the brake warning light comes on, add
Genuine NISSAN Brake Fluid or equivalent
DOT 3 fluid up to the MAX line
�A. If fluid
must be added frequently, it is recom-
mended that you visit a NISSAN dealer for
servicing.
WINDSHIELD-WASHER FLUID
RESERVOIR
Add a washer solvent to the windshield-
washer fluid reservoir for better cleaning. In
the winter season, add a windshield-
washer antifreeze. Follow the manufactur-
er’s instructions for the mixture ratio.
Refill the reservoir more frequently when
driving conditions require an increased
amount of windshield-washer fluid.
Recommended fluid is Genuine NISSAN
Windshield-Washer Fluid Concentrate
Cleaner & Anti-freeze or equivalent.
LDI2790LDI2790LDI2791
WINDSHIELD-WASHER FLUID
8-10Do-it-yourself
Page 298 of 372

If the brakes do not operate properly, have
the brakes checked. It is recommended
that you visit a NISSAN dealer for this ser-
vice.
Self-adjusting brakes
Your vehicle is equipped with self-adjusting
brakes.
The front disc-type brakes self-adjust ev-
ery time the brake pedal is applied. The rear
drum-type brakes self-adjust every time
the parking brake is applied.
WARNING
Have your brake system checked if the
brakes pedal height does not return to
normal. It is recommended that you
visit a NISSAN dealer for this service.
Brake pad wear indicators
The disc brake pads on your vehicle have
audible wear indicators. When a brake pad
requires replacement, a high pitched
scraping or screeching sound will be heard
when the vehicle is in motion. The noise will
be heard whether or not the brake pedal is
depressed. Have the brakes checked as
soon as possible if the wear indicator
sound is heard.Under some driving or climate conditions,
occasional brake squeak, squeal or other
noise may be heard. Occasional brake
noise during light to moderate stops is nor-
mal and does not affect the function or
performance of the brake system.
Proper brake inspection intervals should
be followed.
For additional information re-
garding brake inspections, refer to the ap-
propriate maintenance schedule informa-
tion in the "Maintenance and schedules"
section of this manual.
If any electrical equipment does not oper-
ate, check for an open fuse.
Fuses are used in the passenger compart-
ment. Spare fuses are provided and can be
found in the passenger compartment fuse
box.
When installing a fuse make sure the fuse is
installed in the fuse box securely.
LDI2385
BRAKES FUSES
8-18Do-it-yourself
Page 300 of 372
PASSENGER COMPARTMENT
WARNING
Never use a fuse of higher or lower am-
perage rating than that specified on the
fuse box cover. This could damage the
electrical system or electronic control
units or cause a fire.
If any electrical equipment does not oper-
ate, check for an open fuse. NOTE:
The fuse box is located on the driver’s
side of the instrument panel.
1. Be sure the ignition switch and the headlight switch are OFF.
2. Remove the fuse box cover
�Awith a
suitable tool. Use a cloth to avoid dam-
aging the trim.
3. Locate the fuse that needs to be re- placed.
4. Remove the fuse with the fuse puller
�B. 5. If the fuse is open
�C, replace it with an
equivalent good fuse
�D.
6. Push the fuse box cover to install.
If a new fuse also opens, have the electrical
system checked and repaired. It is recom-
mended that you visit a NISSAN dealer for
this service.
NOTE:
Your vehicle may not be equipped with
all fuses listed on the fuse label.
LDI2712LDI2713
8-20Do-it-yourself
Page 301 of 372
Extended storage switch
If any electrical equipment does not oper-
ate, remove the extended storage switch
and check for an open fuse.
NOTE:
The extended storage switch is used for
long term vehicle storage. Even if the ex-
tended storage switch is broken it is not
necessary to replace it. Replace only the
open fuse in the switch with a new fuse.
How to replace the extended storage
switch:1. To remove the extended storage
switch, be sure the ignition switch is in
the OFF or LOCK position.
2. Be sure the headlight switch is in the OFF position.
3. Remove the fuse box cover.
4. Pinch the locking tabs
�Aand�Bfound
on each side of the storage switch.
5. Pull the storage switch straight out from the fuse box
�C.
CAUTION
Be careful not to allow children to swal-
low the battery or removed parts.
LDI2747
BATTERY REPLACEMENT
Do-it-yourself8-21
Page 305 of 372

HEADLIGHTS
For additional information on headlight
bulb replacement, refer to the instructions
outlined in this section.
Replacing the halogen headlight
bulb
The headlight is a semi-sealed beam type
which uses a replaceable headlight (halo-
gen) bulb. They can be replaced from insidethe engine compartment without remov-
ing the headlight assembly.
CAUTION
∙ High-pressure halogen gas is sealed
inside the bulb. The bulb may break if
the glass envelope is scratched or the
bulb is dropped.
∙ Aiming should not be necessary af ter replacing the H4 bulb. When aiming
adjustment is necessary, it is recom-
mended that you visit a NISSAN dealer
for this service.
∙ Do not leave the headlight assembly open without a bulb installed for a
long period of time. Dust, moisture,
smoke, etc. entering the headlight
body may affect bulb performance.
Remove the bulb from the headlight
assembly just before a replacement
bulb is installed.
∙ Only touch the base when handling the bulb. Never touch the glass enve-
lope. Touching the glass could signifi-
cantly affect bulb life and/or head-
light performance.
∙ Use the same number and wattage as shown in the chart.
JVM0002X
LIGHTS
Do-it-yourself8-25
Page 306 of 372

1. Disconnect the battery negative cable.
2. Disconnect the electrical connector
�A
from the rear end of the bulb.
3. Pull off the rubber cap
�B.
4. Push and turn the retaining pin
�Cto
loosen it.
5. Remove the headlight bulb. Do not shake or rotate the bulb when remov-
ing it.
6. Install the new bulb in the reverse order of removal.
Fog may temporarily form inside the lens
of the exterior lights in the rain or in a car
wash. A temperature difference between
the inside and the outside of the lens
causes the fog. This is not a malfunction. If
large drops of water collect inside the lens,
it is recommended that you visit a NISSAN
dealer for servicing.
FOG LIGHTS (if so equipped)
For additional information on fog light bulb
replacement, refer to the instructions out-
lined in this section.
Replacing the fog light bulb
If fog light bulb replacement is required, it is
recommended that you visit a NISSAN
dealer for this service.
CAUTION
∙ High pressure halogen gas is sealed inside the halogen bulb. The bulb may
break if the glass envelope is
scratched or the bulb is dropped.
∙ When handling the bulb, do not touch the glass envelope.
∙ Use the same number and wattage as originally installed as shown in the
chart.
∙ Do not leave the bulb out of the fog light for a long period of time as dust,
moisture and smoke may enter the
fog light body and affect the perfor-
mance of the fog light.
8-26Do-it-yourself