2019 NISSAN ROGUE SPORT Push button ignition switch
[x] Cancel search: Push button ignition switchPage 15 of 500
16. Push-button ignition switch (model withIntelligent Key system) (P.5-14)
17. Ignition switch (model without Intelligent Key system) (P.5-12)
18. Parking brake (Switch type) (P.5-27)
19. Automatic brake hold switch* (P.5-29)
*: if so equipped
**: See the separate NissanConnect® Own- er’s Manual (if so equipped).
Illustrated table of contents0-7
Page 83 of 500
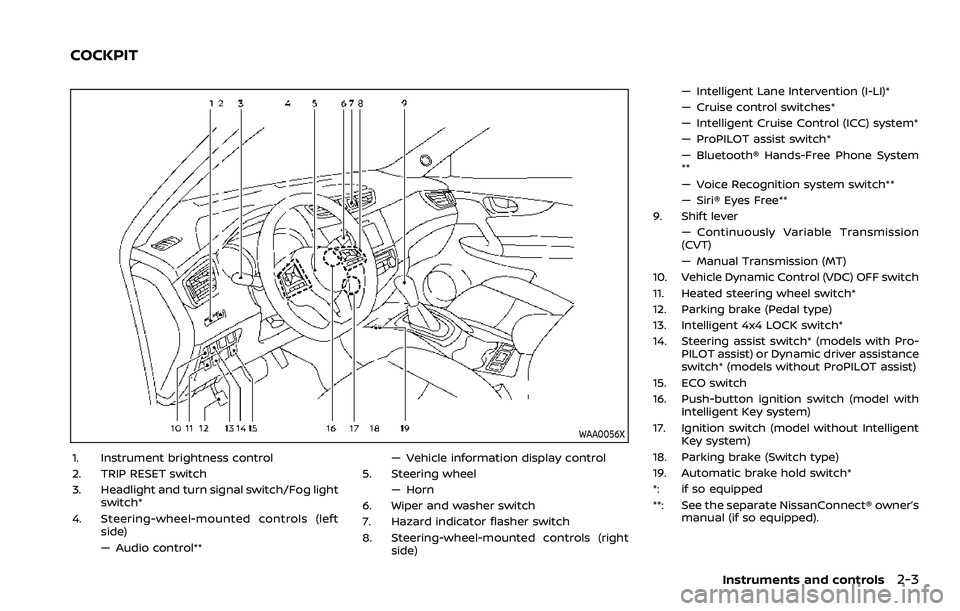
WAA0056X
1. Instrument brightness control
2. TRIP RESET switch
3. Headlight and turn signal switch/Fog lightswitch*
4. Steering-wheel-mounted controls (left side)
— Audio control** — Vehicle information display control
5. Steering wheel — Horn
6. Wiper and washer switch
7. Hazard indicator flasher switch
8. Steering-wheel-mounted controls (right side) — Intelligent Lane Intervention (I-LI)*
— Cruise control switches*
— Intelligent Cruise Control (ICC) system*
— ProPILOT assist switch*
— Bluetooth® Hands-Free Phone System
**
— Voice Recognition system switch**
— Siri® Eyes Free**
9. Shift lever — Continuously Variable Transmission
(CVT)
— Manual Transmission (MT)
10. Vehicle Dynamic Control (VDC) OFF switch
11. Heated steering wheel switch*
12. Parking brake (Pedal type)
13. Intelligent 4x4 LOCK switch*
14. Steering assist switch* (models with Pro- PILOT assist) or Dynamic driver assistance
switch* (models without ProPILOT assist)
15. ECO switch
16. Push-button ignition switch (model with Intelligent Key system)
17. Ignition switch (model without Intelligent Key system)
18. Parking brake (Switch type)
19. Automatic brake hold switch*
*: if so equipped
**: See the separate NissanConnect® owner’s manual (if so equipped).
Instruments and controls2-3
COCKPIT
Page 104 of 500
2-24Instruments and controls
“Lighting” menu, select “Light Sensitiv-
ity”. Use thebuttonsand the OKto select the required sensitivity.
The following options are available:
— Turn on earliest
— Turn on earlier
— Turn on standard
— Turn on later
. Light Off Delay (if so equipped)
The duration of the automatic head-
lights can be changed from 0 to 180
seconds. From the “Lighting” menu,
select “Light Off Delay”. Use the OK
to change the duration.
Turn indicator:
The “3 Flash Pass” overtaking feature can
be set to be ON or OFF. From the “Turn
indicator” menu, select “3 Flash Pass”. Use
the OK
to turn this feature ON or OFF.
Locking:
There are the following options in the
“Locking” menu:
. I–Key Door Lock (if so equipped)
When this item is turned on, the
request switch on the door is acti-
vated. From the “Locking” menu, select
“I-Key Door Lock”. Use the OK
to
activate or deactivate this function. .
Selective Unlock
When this item is turned on, and the
door handle request switch on the
driver’s or front passenger’s side door
is pushed, only the corresponding
door is unlocked. All the doors can
be unlocked if the door handle re-
quest switch is pushed again within 1
minute. When this item is turned to off,
all the doors will be unlocked when
the door handle request switch is
pushed once. From the “Locking”
menu, select “Selective Unlock”. Use
the OK
to activate or deactivate this
function.
. Auto Door Unlock
The “Auto Door Unlock” feature allows
the customer to customize the auto
door unlock options.
— Ignition OFF
— Shift to Park (for Continuously Vari-
able Transmission (CVT) models)
— Off
. Answer Bk. Horn (if so equipped)
When the answer back horn is on, the
horn will chirp and the hazard indica-
tors will flash twice when locking the
vehicle with the Intelligent Key or
remote keyless entry function. Wipers:
.
Speed Dependent
The “Speed Dependent” feature can be
activated or deactivated. From the
“Wipers” menu, select “Speed Depen-
dent”. Use the OK
to turn this
feature ON or OFF.
. Reverse Link
The “Reverse Link” wiper feature can
be set to be ON or OFF. From the
“Wipers” menu, select “Reverse Link”.
Use the OK
to turn this feature ON
or OFF.
. Drip wipe
The “Drip wipe” feature can be set to
be ON or OFF. From the “Wipers” menu,
select “Drip wipe”. Use the OK
to turn
this feature ON or OFF.
Rear Door Alert:
. Horn & Alert
When selected, the alert is displayed
and the horn sounds.
. Alert Only
When selected, only the alert is dis-
played.
. OFF
When selected, no alert or horn will be
active.
For additional information, refer to “Rear
door alert” (P.2-58).
Page 119 of 500
TRIP COMPUTER
1. Safety Shield (if so equipped)
The safety shield mode shows the oper-
ating condition for the following systems.
.Lane Departure Warning (LDW) (if so
equipped)
. Intelligent Lane Intervention (I-LI) (if so
equipped)
. Blind Spot Warning (BSW)
. Automatic Emergency Braking (AEB) (if
so equipped)
. Automatic Emergency Braking (AEB)
with pedestrian detection system (if
so equipped)
For more details, see “Lane Departure
Warning (LDW)” (P.5-35), “Intelligent Lane
Intervention (I-LI)” (P.5-40), “Blind Spot
Warning (BSW)” (P.5-46), “Automatic Emer-
gency Braking (AEB)” (P.5-115) or “Auto-
matic Emergency Braking (AEB) with
pedestrian detection system” (P.5-122).
2. Average speed 1 and 2 (MPH or
km/h)
The average speed 1 mode shows the
average vehicle speed since the last reset.
The average speed 2 mode shows the
average vehicle speed since the time the
ignition switch was turned ON. The aver-
age speed 2 is automatically reset each
time the ignition is placed in the OFF position.
Resetting is done by pushing the OK
button. When the OKbutton is pushed,
the following menu items are displayed.
. Cancel
— Return to the previous screen with-
out resetting.
. Average Speed
— Reset the average speed.
. All
— Reset all items of “Average Speed”,
“Elapsed time and trip odometer”
and “Fuel economy.”
Once the “Average speed 1” is displayed,
you can use
buttons to switch
between the “Average speed 1” and “Aver-
age speed 2.”
The display is updated every 30 seconds.
The first 30 seconds after a reset, the
display shows “——”.
3. Elapsed time and trip odometer 1
and 2 (mile or km)
Elapsed time:
The elapsed time mode 1 shows the time
since the last reset. The elapsed time 2
mode shows the time since the ignition
switch was turned ON. (The trip odometer
is also reset at the same time.)
Trip odometer:
The trip odometer 1 mode shows the total
distance the vehicle has been driven since
the last reset. The trip odometer 2 mode
shows the total distance the vehicle has
been driven since the time the ignition
switch was placed in the ON position. (The
elapsed time is also reset at the same
time.)
The elapsed time and trip odometer 2 is
automatically reset each time the ignition
is placed in the OFF position.
Resetting is done by pushing the OK
button. When the OKbutton is pushed,
the following menu items are displayed.
. Cancel
— Return to the previous screen with-
out resetting.
. Distance
— Reset the elapsed time and trip
odometer.
Instruments and controls2-39
Page 120 of 500
2-40Instruments and controls
.All
— Reset all items of “Average Speed”,
“Elapsed time and trip odometer”
and “Fuel economy.”
Once the “Elapsed time and trip odometer
1” is displayed, you can use
buttons
to switch between the “Elapsed time and
trip odometer 1” and “Elapsed time and
trip odometer 2.”
4-5. Fuel economy/ECO pedal
guide
Current fuel consumption:
The current fuel consumption mode
shows the current fuel consumption.
Average fuel consumption:
The average fuel consumption 1 mode
shows the average fuel consumption
since the last reset. The average fuel
consumption 2 mode shows the average
fuel consumption since the time the
ignition switch was placed in the ON
position. The average fuel consumption
2 is automatically reset each time the
ignition is placed in the OFF position.
Resetting is done by pushing the OK
button. When the OKbutton is pushed,
the following menu items are displayed.
. Cancel — Return to the previous screen with-
out resetting.
. Fuel Economy
— Reset the fuel economy.
. All
— Reset all items of “Average Speed”,
“Elapsed time and trip odometer”
and “Fuel economy”.
Once the “Fuel economy 1” is displayed,
you can use
buttons to switch
between the “Fuel economy 1” and “Fuel
economy 2”.
The display is updated every 30 seconds.
For about the first 1/3 mile (500 m) after a
reset, the display shows “——”.
6. Audio
The audio mode shows the status of
audio information.
7. Navigation (if so equipped)
When the route guidance is set in the
navigation system, this item shows the
navigation route information.
8. Compass (if so equipped)
This display indicates the heading direc-
tion of the vehicle.
9. Intelligent 4x4 torque distribution
display (if so equipped)
When the Intelligent 4x4 torque distribu-
tion display is selected, you can view the
distribution ratio of the transmission
torque to the front and rear wheels
during driving.
10. Chassis control
When Intelligent Trace Control, Intelligent
Engine Brake (Continuously Variable
Transmission (CVT) models) or Active Ride
Control system is operated, it shows the
operating condition. It also shows oper-
ating condition of Hill Start Assist. The
operating condition of the automatic
brake hold system (if so equipped) is also
shown. See “Intelligent Trace Control”
(P.5-149), “Intelligent Engine Brake (Con-
tinuously Variable Transmission (CVT)
models)” (P.5-150), “Active Ride Control”
(P.5-151), “Hill Start Assist system” (P.5-152)
or “Automatic brake hold” (P.5-29) for
more details.
11. Tire Pressures
The tire pressure mode shows the pres-
sure of all four tires while the vehicle is
driven.
When the Tire Pressure Low — Add Air
warning appears, the display can be
switched to the tire pressure mode by
Page 123 of 500
pre-armed. The vehicle security sys-
tem will automatically shift into the
armed phase. The security light begins
to flash once every three seconds. If
during the pre-armed phase one of
the following occurs, the system will
not arm:
.Any door is unlocked with the keyfob (if so equipped), the Intelligent
Key (if so equipped), mechanical
key, or door request switch.
.Ignition switch is placed in the ONposition.
Even when the driver and/or passen-
gers are in the vehicle, the system will
activate with all the doors, hood (if so
equipped) and liftgate locked with the
ignition switch placed in the LOCK posi-
tion. When placing the ignition switch in
the ON position, the system will be
released.
Vehicle security system activation
The vehicle security system will give the
following alarm:
. The headlights blink and the horn
sounds intermittently.
. The alarm automatically turns off
after approximately 50 seconds. How-
ever, the alarm reactivates if the
vehicle is tampered with again. The alarm is activated by:
.
opening any doors, the hood (if so
equipped) or liftgate without using the
key or Intelligent Key (even if the door
is unlocked by releasing the door
inside lock knob).
How to stop an activated alarm
The alarm stops only by unlocking a door
or the liftgate with the mechanical key,
pressing the UNLOCK
button on the
key fob (if so equipped) or the Intelligent
Key (if so equipped), or pushing the
request switch (if so equipped) on the
driver’s or passenger’s door in range of
the door handle.
NISSAN VEHICLE IMMOBILIZER SYS-
TEM
The NISSAN Vehicle Immobilizer System
will not allow the engine to start without
the use of the registered key.
If the engine fails to start using the
registered key, it may be due to inter-
ference caused by another registered key,
an automated toll road device or auto-
mated payment device on the key ring.
Restart the engine using the following
procedures:
1. Leave the ignition switch in the ON
position for approximately 5 seconds. 2. Place the ignition switch in the OFF or
LOCK position and wait approximately
10 seconds.
3. Repeat step 1 and 2 again.
4. Restart the engine while holding the device (which may have caused the
interference) separate from the regis-
tered key.
If this procedure allows the engine to
start, NISSAN recommends placing the
registered key on a separate key ring
to avoid interference from other de-
vices.
Statement related to section 15 of FCC
rules for NISSAN Vehicle Immobilizer
System (CONT ASSY-BCM. ANT ASSY-
IMMOBILISER)
FCC Notice:
For USA:
This device complies with Part 15 of the
FCC Rules. Operation is subject to the
following two conditions: (1) This device
may not cause harmful interference,
and (2) this device must accept any
interference received, including inter-
ference that may cause undesired op-
eration.
Note: Changes or modifications not
expressly approved by the party re-
sponsible for compliance could void
the user’s authority to operate the
Instruments and controls2-43
Page 154 of 500
2-74Instruments and controls
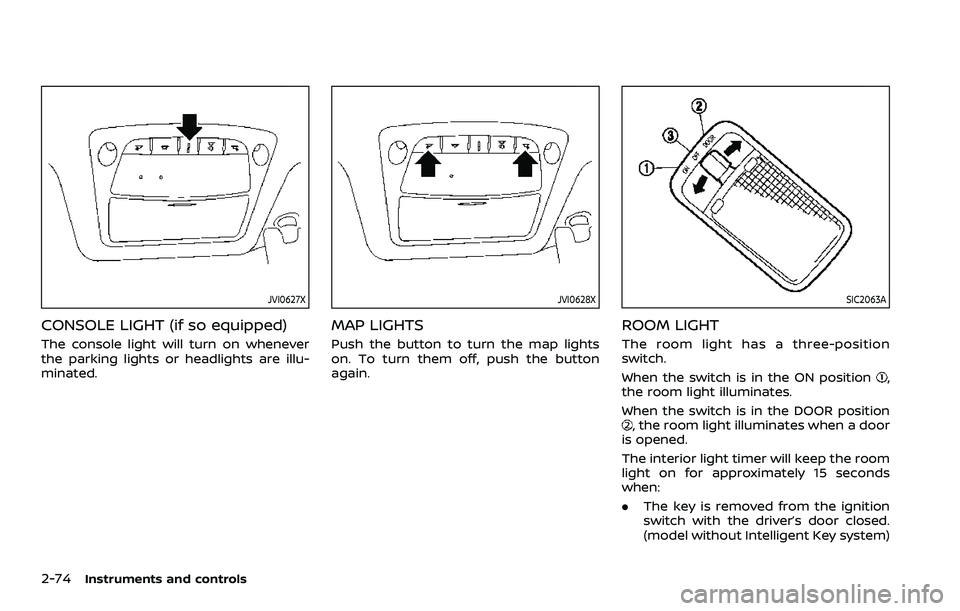
JVI0627X
CONSOLE LIGHT (if so equipped)
The console light will turn on whenever
the parking lights or headlights are illu-
minated.
JVI0628X
MAP LIGHTS
Push the button to turn the map lights
on. To turn them off, push the button
again.
SIC2063A
ROOM LIGHT
The room light has a three-position
switch.
When the switch is in the ON position
,
the room light illuminates.
When the switch is in the DOOR position
, the room light illuminates when a door
is opened.
The interior light timer will keep the room
light on for approximately 15 seconds
when:
. The key is removed from the ignition
switch with the driver’s door closed.
(model without Intelligent Key system)
Page 168 of 500
3-8Pre-driving checks and adjustments
It is possible to lock/unlock all doors
(including the liftgate), and activate the
panic alarm by using the key fob from
outside the vehicle.
Before locking the doors, make sure the
key is not left in the vehicle.
The key fob can operate at a distance of
approximately 33 ft (10 m) from the
vehicle. (The effective distance depends
upon the conditions around the vehicle.)
As many as 4 key fobs can be used with
one vehicle. For information concerning
the purchase and use of additional key
fobs, contact a NISSAN dealer.
The key fob will not function:
.When the key fob is not within the
operational range.
. When the doors are open or not
closed securely.
. When the key is in the ignition switch.
. When the battery is discharged.
WARNING
The remote keyless entry key fob
transmits radio waves when the
buttons are pushed. The FAA advises
that the radio waves may affect
aircraft navigation and communica-
tion systems. Do not operate the key fob while on an airplane. Make sure
the buttons are not operated unin-
tentionally when the unit is stored
during a flight.
CAUTION
The following conditions or occur-
rences will damage the key fob.
.
Do not allow the key fob to
become wet.
. Do not drop the key fob.
. Do not strike the key fob sharply
against another object.
. If the outside temperature is be-
low 14°F (-10°C) degrees, the bat-
tery of key fob may not function
properly.
. Do not place the key fob for an
extended period in an area where
temperatures exceed 140°F
(60°C).
If a key fob is lost or stolen, NISSAN
recommends erasing the ID code of
that key fob. This will prevent the key
fob from unauthorized use to unlock
the vehicle. For information regard-
ing the erasing procedure, it is re-
commended that you visit a NISSAN dealer.
For information regarding the replace-
ment of a battery, see “Key fob battery
replacement” (P.8-21).
REMOTE KEYLESS ENTRY SYSTEM
(if so equipped)