2019 NISSAN ROGUE SPORT Push button ignition switch
[x] Cancel search: Push button ignition switchPage 169 of 500
JVP0308X
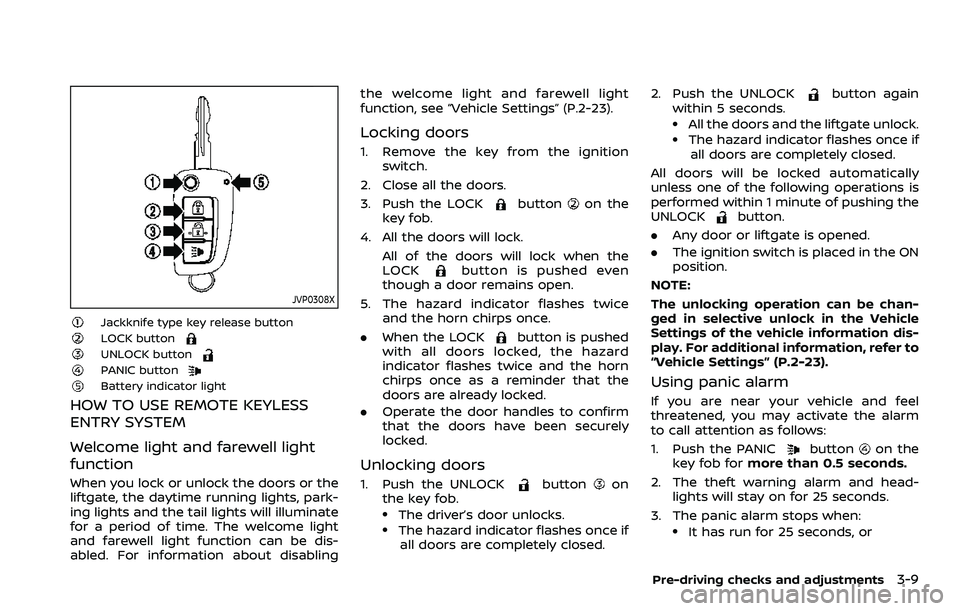
Jackknife type key release buttonLOCK buttonUNLOCK buttonPANIC buttonBattery indicator light
HOW TO USE REMOTE KEYLESS
ENTRY SYSTEM
Welcome light and farewell light
function
When you lock or unlock the doors or the
liftgate, the daytime running lights, park-
ing lights and the tail lights will illuminate
for a period of time. The welcome light
and farewell light function can be dis-
abled. For information about disablingthe welcome light and farewell light
function, see “Vehicle Settings” (P.2-23).
Locking doors
1. Remove the key from the ignition
switch.
2. Close all the doors.
3. Push the LOCK
buttonon the
key fob.
4. All the doors will lock. All of the doors will lock when the
LOCK
button is pushed even
though a door remains open.
5. The hazard indicator flashes twice and the horn chirps once.
. When the LOCK
button is pushed
with all doors locked, the hazard
indicator flashes twice and the horn
chirps once as a reminder that the
doors are already locked.
. Operate the door handles to confirm
that the doors have been securely
locked.
Unlocking doors
1. Push the UNLOCKbuttonon
the key fob.
.The driver’s door unlocks..The hazard indicator flashes once if
all doors are completely closed. 2. Push the UNLOCK
button again
within 5 seconds.
.All the doors and the liftgate unlock..The hazard indicator flashes once if all doors are completely closed.
All doors will be locked automatically
unless one of the following operations is
performed within 1 minute of pushing the
UNLOCK
button.
. Any door or liftgate is opened.
. The ignition switch is placed in the ON
position.
NOTE:
The unlocking operation can be chan-
ged in selective unlock in the Vehicle
Settings of the vehicle information dis-
play. For additional information, refer to
“Vehicle Settings” (P.2-23).
Using panic alarm
If you are near your vehicle and feel
threatened, you may activate the alarm
to call attention as follows:
1. Push the PANIC
buttonon the
key fob for more than 0.5 seconds.
2. The theft warning alarm and head- lights will stay on for 25 seconds.
3. The panic alarm stops when:
.It has run for 25 seconds, or
Pre-driving checks and adjustments3-9
Page 176 of 500
3-16Pre-driving checks and adjustments
.Pushing the ignition switch.
During this 1-minute time period, if the
UNLOCK
button on the Intelligent Key
is pushed, all doors will be locked auto-
matically after another 1 minute.
NOTE:
The unlocking operation can be chan-
ged in selective unlock in the Vehicle
Settings of the vehicle information dis-
play. For additional information, see
“Vehicle Settings” (P.2-23).
Opening liftgate
1. Carry the Intelligent Key.
2. Push the liftgate opener switch
.
3. The liftgate will unlock.
BATTERY SAVER SYSTEM
When all the following conditions are met
for a period of time, the battery saver
system will cut off the power supply to
prevent battery discharge.
. The ignition switch is in the ON posi-
tion. (See “Push-button ignition switch
positions” (P.5-16).)
. All doors are closed, and
. The shift lever is in the P (Park)
position (CVT model) or N (Neutral)
position (MT model).
WARNING LIGHTS AND AUDIBLE RE-
MINDERS
To help prevent the vehicle from moving
unexpectedly by erroneous operation of
the Intelligent Key listed on the following
chart or to help prevent the vehicle from
being stolen, chime or beep sounds inside
and outside the vehicle and the warning
display appears on the vehicle informa-
tion display.
When a chime or beep sounds or the
warning display appears, be sure to check
the vehicle and Intelligent Key.
See “Troubleshooting guide” (P.3-17) and
“Vehicle information display” (P.2-19).
Page 177 of 500
TROUBLESHOOTING GUIDE
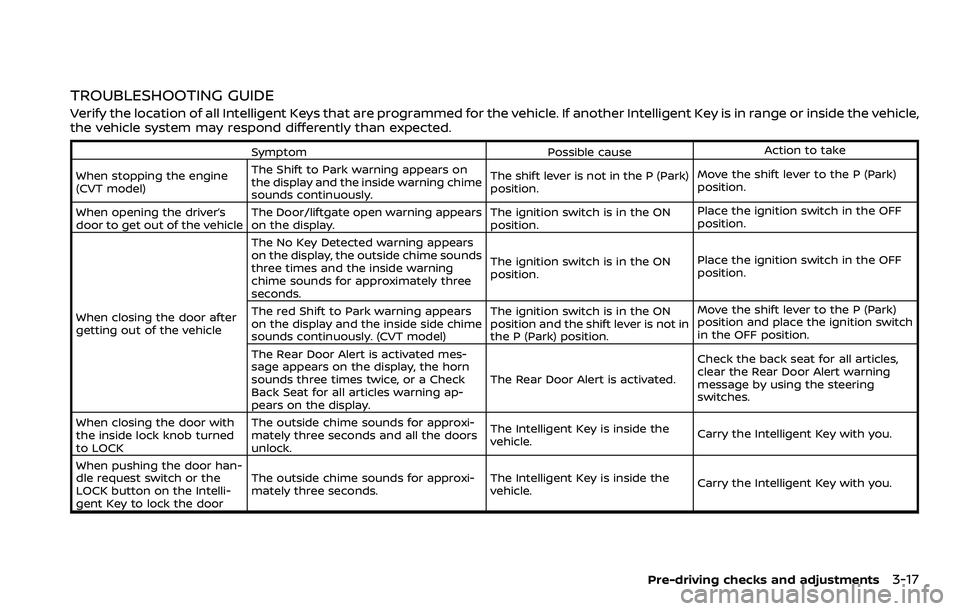
Verify the location of all Intelligent Keys that are programmed for the vehicle. If another Intelligent Key is in range or inside the vehicle,
the vehicle system may respond differently than expected.
SymptomPossible causeAction to take
When stopping the engine
(CVT model) The Shift to Park warning appears on
the display and the inside warning chime
sounds continuously. The shift lever is not in the P (Park)
position.
Move the shift lever to the P (Park)
position.
When opening the driver’s
door to get out of the vehicle The Door/liftgate open warning appears
on the display. The ignition switch is in the ON
position.Place the ignition switch in the OFF
position.
When closing the door after
getting out of the vehicle The No Key Detected warning appears
on the display, the outside chime sounds
three times and the inside warning
chime sounds for approximately three
seconds.
The ignition switch is in the ON
position.
Place the ignition switch in the OFF
position.
The red Shift to Park warning appears
on the display and the inside side chime
sounds continuously. (CVT model) The ignition switch is in the ON
position and the shift lever is not in
the P (Park) position.Move the shift lever to the P (Park)
position and place the ignition switch
in the OFF position.
The Rear Door Alert is activated mes-
sage appears on the display, the horn
sounds three times twice, or a Check
Back Seat for all articles warning ap-
pears on the display. The Rear Door Alert is activated.
Check the back seat for all articles,
clear the Rear Door Alert warning
message by using the steering
switches.
When closing the door with
the inside lock knob turned
to LOCK The outside chime sounds for approxi-
mately three seconds and all the doors
unlock.
The Intelligent Key is inside the
vehicle.
Carry the Intelligent Key with you.
When pushing the door han-
dle request switch or the
LOCK button on the Intelli-
gent Key to lock the door The outside chime sounds for approxi-
mately three seconds.
The Intelligent Key is inside the
vehicle.
Carry the Intelligent Key with you.
Pre-driving checks and adjustments3-17
Page 180 of 500
3-20Pre-driving checks and adjustments
JVP0541X
Type A
JVP0542XType B
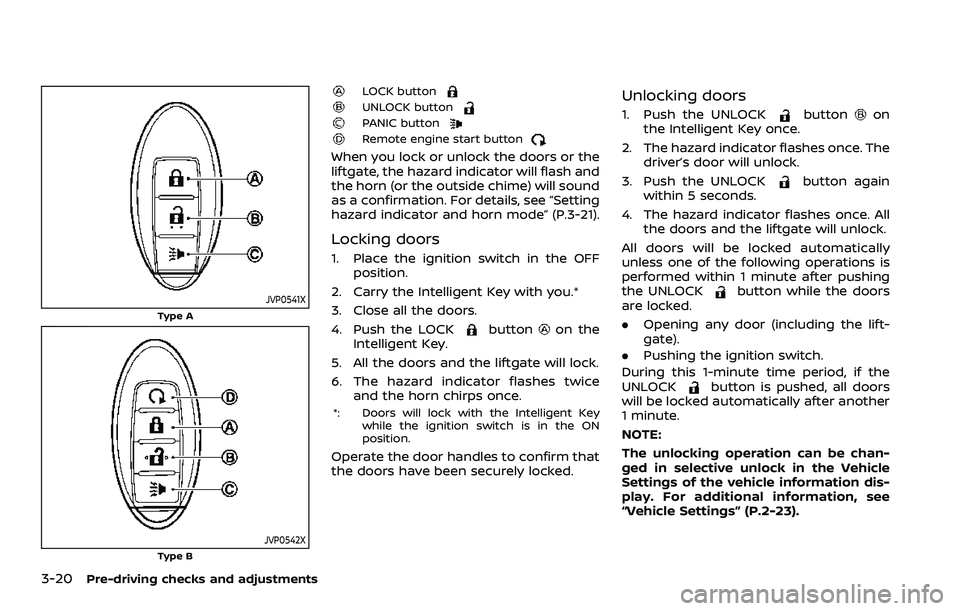
LOCK buttonUNLOCK buttonPANIC buttonRemote engine start button
When you lock or unlock the doors or the
liftgate, the hazard indicator will flash and
the horn (or the outside chime) will sound
as a confirmation. For details, see “Setting
hazard indicator and horn mode” (P.3-21).
Locking doors
1. Place the ignition switch in the OFFposition.
2. Carry the Intelligent Key with you.*
3. Close all the doors.
4. Push the LOCK
buttonon the
Intelligent Key.
5. All the doors and the liftgate will lock.
6. The hazard indicator flashes twice and the horn chirps once.
*: Doors will lock with the Intelligent Key
while the ignition switch is in the ON
position.
Operate the door handles to confirm that
the doors have been securely locked.
Unlocking doors
1. Push the UNLOCKbuttonon
the Intelligent Key once.
2. The hazard indicator flashes once. The driver’s door will unlock.
3. Push the UNLOCK
button again
within 5 seconds.
4. The hazard indicator flashes once. All the doors and the liftgate will unlock.
All doors will be locked automatically
unless one of the following operations is
performed within 1 minute after pushing
the UNLOCK
button while the doors
are locked.
. Opening any door (including the lift-
gate).
. Pushing the ignition switch.
During this 1-minute time period, if the
UNLOCK
button is pushed, all doors
will be locked automatically after another
1 minute.
NOTE:
The unlocking operation can be chan-
ged in selective unlock in the Vehicle
Settings of the vehicle information dis-
play. For additional information, see
“Vehicle Settings” (P.2-23).
Page 183 of 500
WARNING
To avoid risk of injury or death, do
not use the remote engine start
function when the vehicle is in an
enclosed area such as a garage.
JVP0446X
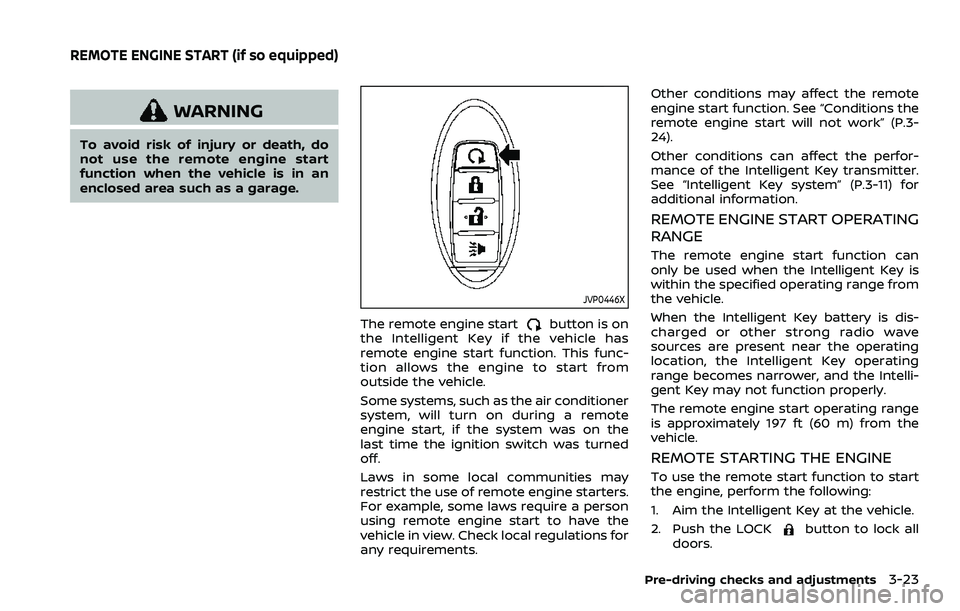
The remote engine startbutton is on
the Intelligent Key if the vehicle has
remote engine start function. This func-
tion allows the engine to start from
outside the vehicle.
Some systems, such as the air conditioner
system, will turn on during a remote
engine start, if the system was on the
last time the ignition switch was turned
off.
Laws in some local communities may
restrict the use of remote engine starters.
For example, some laws require a person
using remote engine start to have the
vehicle in view. Check local regulations for
any requirements. Other conditions may affect the remote
engine start function. See “Conditions the
remote engine start will not work” (P.3-
24).
Other conditions can affect the perfor-
mance of the Intelligent Key transmitter.
See “Intelligent Key system” (P.3-11) for
additional information.
REMOTE ENGINE START OPERATING
RANGE
The remote engine start function can
only be used when the Intelligent Key is
within the specified operating range from
the vehicle.
When the Intelligent Key battery is dis-
charged or other strong radio wave
sources are present near the operating
location, the Intelligent Key operating
range becomes narrower, and the Intelli-
gent Key may not function properly.
The remote engine start operating range
is approximately 197 ft (60 m) from the
vehicle.
REMOTE STARTING THE ENGINE
To use the remote start function to start
the engine, perform the following:
1. Aim the Intelligent Key at the vehicle.
2. Push the LOCK
button to lock all
doors.
Pre-driving checks and adjustments3-23
REMOTE ENGINE START (if so equipped)
Page 184 of 500
3-24Pre-driving checks and adjustments
3. Within 5 seconds push and hold theremote engine startbutton until
the turn signal lights flash and the tail
lights illuminate. If the vehicle is not
within view, push and hold the remote
engine start
button for at least 2
seconds.
The following events will occur when the
engine starts:
. The front parking lights will turn on
and remain on as long as the engine is
running.
. The doors will be locked and the air
conditioner system may turn on.
. The engine will continue to run for
about 10 minutes. Repeat the steps to
extend the time for an additional 10
minutes. See “Extending engine run
time” (P.3-24).
Depress and hold the brake pedal, then
place the ignition switch in the ON posi-
tion before driving. For further instruc-
tions, see “Driving the vehicle” (P.5-20).
EXTENDING ENGINE RUN TIME
The remote engine start function can be
extended one time by performing the
steps listed in “Remote starting the en-
gine” (P.3-23). Run time will be calculated
as follows:
. The first 10 minute run time will start
when the remote engine start func- tion is performed.
. The second 10 minutes will start im-
mediately when the remote engine
start function is performed. For exam-
ple, if the engine has been running for
5 minutes, and 10 minutes are added,
the engine will run for a total of 15
minutes.
. Extending engine run time will count
towards the two remote engine start
limit.
A maximum of two remote engine starts,
or a single start with an extension, are
allowed between ignition cycles.
The ignition switch must be cycled to the
ON position and then back to the OFF
position before the remote engine start
procedure can be used again.
CANCELING A REMOTE ENGINE
START
To cancel a remote engine start, perform
one of the following:
. Aim the Intelligent Key at the vehicle
and push and hold the remote engine
start
button until the front park-
ing lights turn off.
. Turn on the hazard indicator flashers.
. Cycle the ignition switch ON and then
OFF. .
The extended engine run time has
expired.
. The first 10 minute timer has expired.
. The engine hood has been opened.
. The shift lever is moved out of the P
(Park) position.
. The theft alarm sounds due to illegal
entry into the vehicle.
. The ignition switch is pushed without
an Intelligent Key in the vehicle.
. The ignition switch is pushed with an
Intelligent Key in the vehicle but the
brake pedal is not depressed.
CONDITIONS THE REMOTE ENGINE
START WILL NOT WORK
The remote engine start will not operate
if any of the following conditions are
present:
.The ignition switch is placed in the ON
position.
. The hood is not securely closed.
. The hazard indicator flashers are on.
. The engine is still running. The engine
must be completely stopped. Wait at
least 6 seconds if the engine goes
from running to off. This is not applic-
able when extending engine run time.
. The remote engine start
button is
not pushed and held for at least 2
seconds.
Page 205 of 500
CAUTION
Do not scratch the lens when clean-
ing dirt or snow from the front of the
camera.
The Intelligent Around View® Monitor
system is designed as an aid to the driver
in situations such as slot parking or
parallel parking.
The monitor displays various views of the
position of the vehicle in a split screen
format. Not all views are available at all
times.
Available views:
. Front view
The view to the front of the vehicle.
. Rear view
The view to the rear of the vehicle.
. Bird’s-eye view
The views to the vehicle from above.
. Front-side view
The view around and ahead of the
front passenger’s side wheel.
WAE0059X
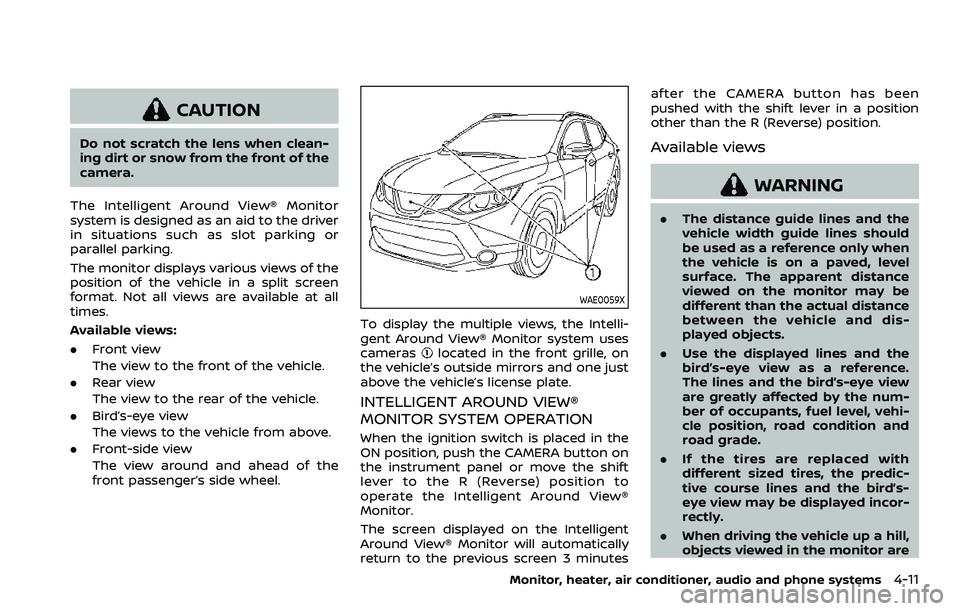
To display the multiple views, the Intelli-
gent Around View® Monitor system uses
cameras
located in the front grille, on
the vehicle’s outside mirrors and one just
above the vehicle’s license plate.
INTELLIGENT AROUND VIEW®
MONITOR SYSTEM OPERATION
When the ignition switch is placed in the
ON position, push the CAMERA button on
the instrument panel or move the shift
lever to the R (Reverse) position to
operate the Intelligent Around View®
Monitor.
The screen displayed on the Intelligent
Around View® Monitor will automatically
return to the previous screen 3 minutes after the CAMERA button has been
pushed with the shift lever in a position
other than the R (Reverse) position.
Available views
WARNING
.
The distance guide lines and the
vehicle width guide lines should
be used as a reference only when
the vehicle is on a paved, level
surface. The apparent distance
viewed on the monitor may be
different than the actual distance
between the vehicle and dis-
played objects.
. Use the displayed lines and the
bird’s-eye view as a reference.
The lines and the bird’s-eye view
are greatly affected by the num-
ber of occupants, fuel level, vehi-
cle position, road condition and
road grade.
. If the tires are replaced with
different sized tires, the predic-
tive course lines and the bird’s-
eye view may be displayed incor-
rectly.
. When driving the vehicle up a hill,
objects viewed in the monitor are
Monitor, heater, air conditioner, audio and phone systems4-11
Page 211 of 500
SAA1898
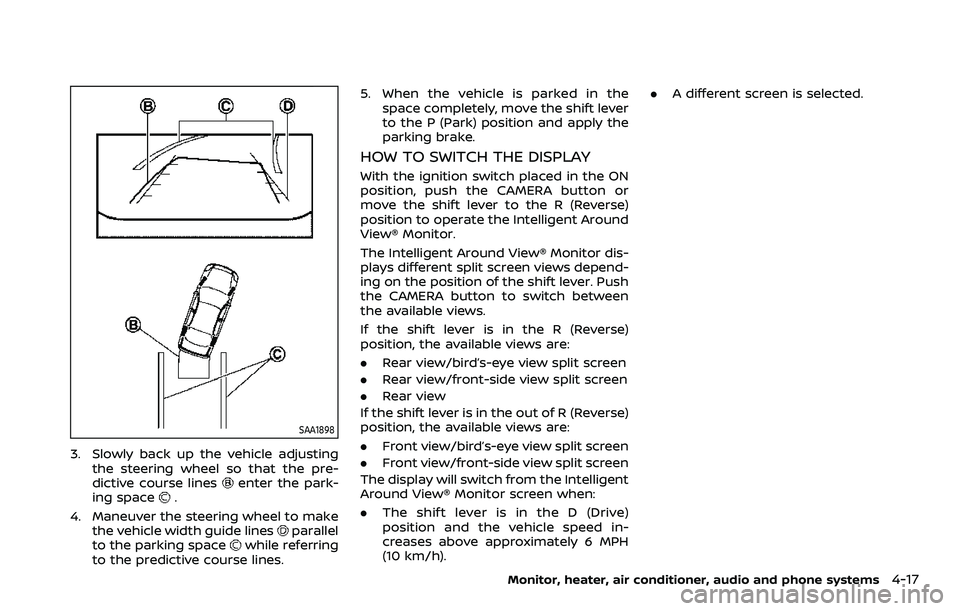
3. Slowly back up the vehicle adjustingthe steering wheel so that the pre-
dictive course lines
enter the park-
ing space.
4. Maneuver the steering wheel to make the vehicle width guide lines
parallel
to the parking spacewhile referring
to the predictive course lines. 5. When the vehicle is parked in the
space completely, move the shift lever
to the P (Park) position and apply the
parking brake.
HOW TO SWITCH THE DISPLAY
With the ignition switch placed in the ON
position, push the CAMERA button or
move the shift lever to the R (Reverse)
position to operate the Intelligent Around
View® Monitor.
The Intelligent Around View® Monitor dis-
plays different split screen views depend-
ing on the position of the shift lever. Push
the CAMERA button to switch between
the available views.
If the shift lever is in the R (Reverse)
position, the available views are:
.Rear view/bird’s-eye view split screen
. Rear view/front-side view split screen
. Rear view
If the shift lever is in the out of R (Reverse)
position, the available views are:
. Front view/bird’s-eye view split screen
. Front view/front-side view split screen
The display will switch from the Intelligent
Around View® Monitor screen when:
. The shift lever is in the D (Drive)
position and the vehicle speed in-
creases above approximately 6 MPH
(10 km/h). .
A different screen is selected.
Monitor, heater, air conditioner, audio and phone systems4-17