2019 NISSAN ROGUE SPORT ignition
[x] Cancel search: ignitionPage 197 of 500
WARNING
.Failure to follow the warnings
and instructions for proper use
of the RearView Monitor could
result in serious injury or death.
. RearView Monitor is a conveni-
ence feature and is not a sub-
stitute for proper backing. Always
turn and look out the windows,
and check mirrors to be sure that
it is safe to move before operat-
ing the vehicle. Always back up
slowly.
. The system is designed as an aid
to the driver in showing large
stationary objects directly behind
the vehicle, to help avoid dama-
ging the vehicle.
. The distance guide line and the
vehicle width line should be used
as a reference only when the
vehicle is on a level paved sur-
face. The distance viewed on the
monitor is for reference only and
may be different than the actual
distance between the vehicle and
displayed objects.
CAUTION
Do not scratch the camera lens when
cleaning dirt or snow from the front
of the camera.
The RearView Monitor system automati-
cally shows a rear view of the vehicle
when the shift lever is placed in the R
(Reverse) position.
The radio can still be heard while the
RearView Monitor is active.
JVH1585X
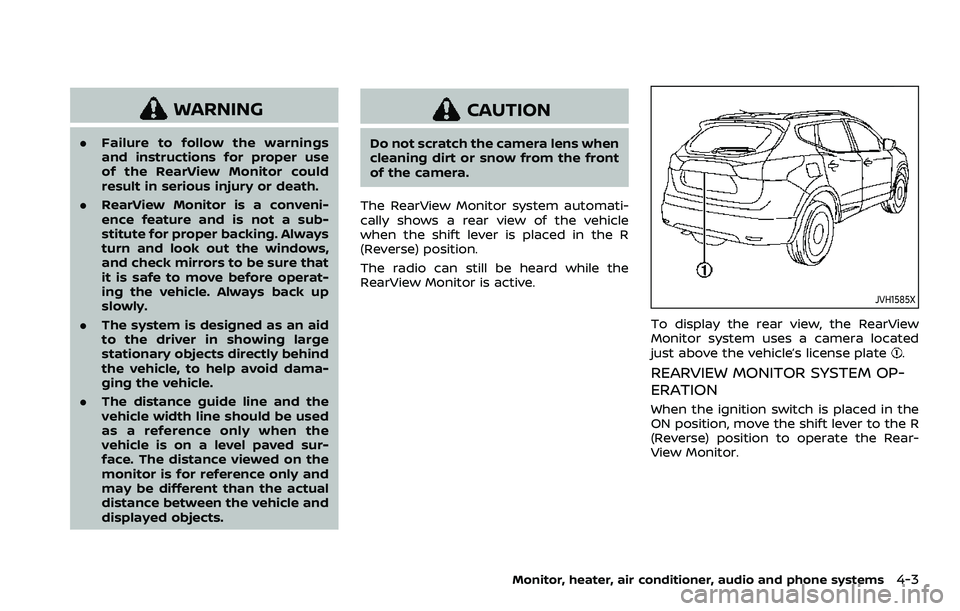
To display the rear view, the RearView
Monitor system uses a camera located
just above the vehicle’s license plate
.
REARVIEW MONITOR SYSTEM OP-
ERATION
When the ignition switch is placed in the
ON position, move the shift lever to the R
(Reverse) position to operate the Rear-
View Monitor.
Monitor, heater, air conditioner, audio and phone systems4-3
Page 200 of 500
4-6Monitor, heater, air conditioner, audio and phone systems
positionif the object projects over the
actual backing up course.
HOW TO PARK WITH PREDICTIVE
COURSE LINES
WARNING
. If the tires are replaced with
different sized tires, the predic-
tive course lines may be dis-
played incorrectly.
. On a snow-covered or slippery
road, there may be a difference
between the predictive course
line and the actual course line.
. If the battery is disconnected or
becomes discharged, the predic-
tive course lines may be dis-
played incorrectly. If this occurs,
please perform the following pro-
cedures:
— Turn the steering wheel from
lock to lock while the engine is
running.
— Drive the vehicle on a straight road for more than 5 minutes.
. When the steering wheel is
turned with the ignition switch in
the ON position, the predictive
course lines may be displayed incorrectly.
SAA1897
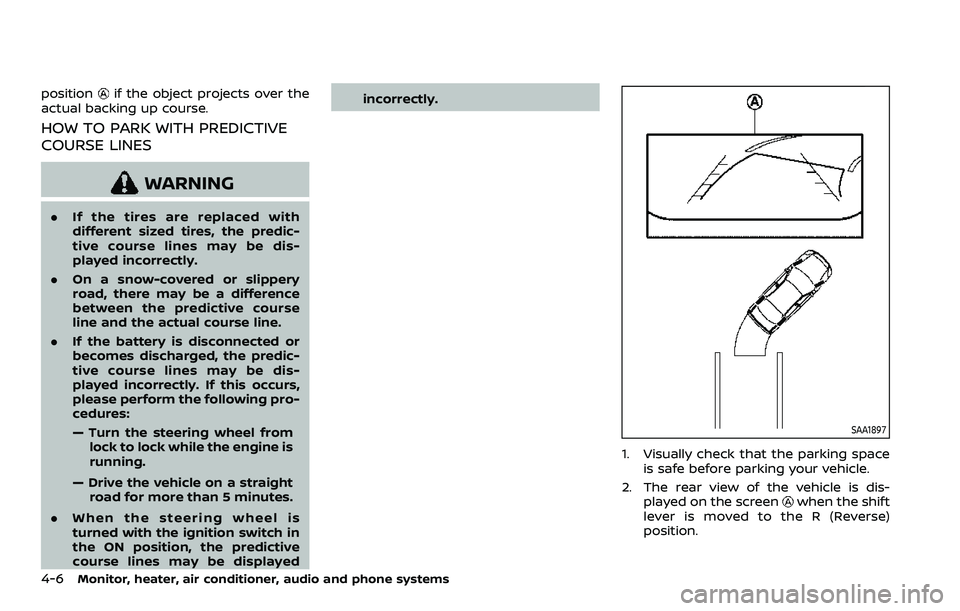
1. Visually check that the parking space
is safe before parking your vehicle.
2. The rear view of the vehicle is dis- played on the screen
when the shift
lever is moved to the R (Reverse)
position.
Page 205 of 500
CAUTION
Do not scratch the lens when clean-
ing dirt or snow from the front of the
camera.
The Intelligent Around View® Monitor
system is designed as an aid to the driver
in situations such as slot parking or
parallel parking.
The monitor displays various views of the
position of the vehicle in a split screen
format. Not all views are available at all
times.
Available views:
. Front view
The view to the front of the vehicle.
. Rear view
The view to the rear of the vehicle.
. Bird’s-eye view
The views to the vehicle from above.
. Front-side view
The view around and ahead of the
front passenger’s side wheel.
WAE0059X
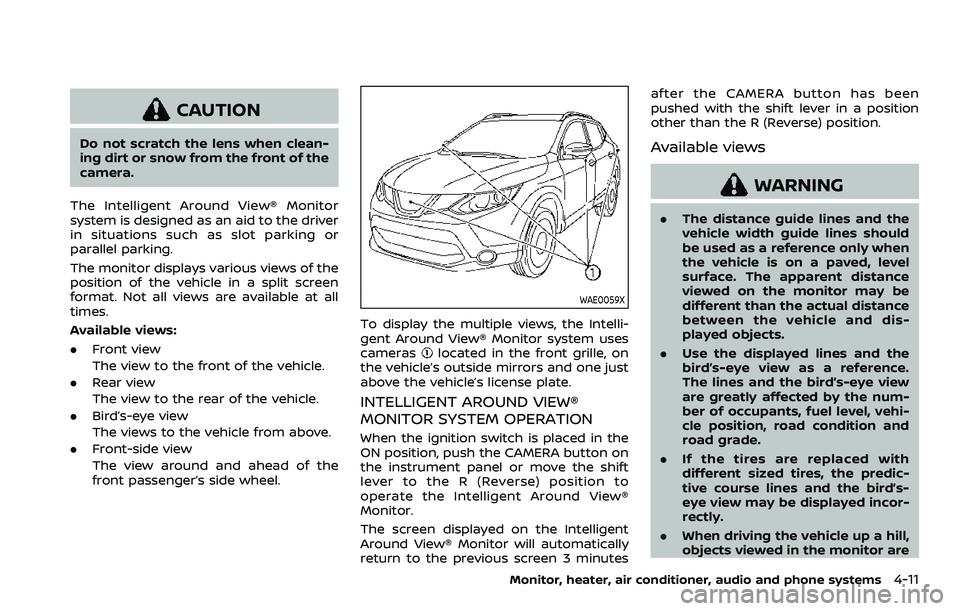
To display the multiple views, the Intelli-
gent Around View® Monitor system uses
cameras
located in the front grille, on
the vehicle’s outside mirrors and one just
above the vehicle’s license plate.
INTELLIGENT AROUND VIEW®
MONITOR SYSTEM OPERATION
When the ignition switch is placed in the
ON position, push the CAMERA button on
the instrument panel or move the shift
lever to the R (Reverse) position to
operate the Intelligent Around View®
Monitor.
The screen displayed on the Intelligent
Around View® Monitor will automatically
return to the previous screen 3 minutes after the CAMERA button has been
pushed with the shift lever in a position
other than the R (Reverse) position.
Available views
WARNING
.
The distance guide lines and the
vehicle width guide lines should
be used as a reference only when
the vehicle is on a paved, level
surface. The apparent distance
viewed on the monitor may be
different than the actual distance
between the vehicle and dis-
played objects.
. Use the displayed lines and the
bird’s-eye view as a reference.
The lines and the bird’s-eye view
are greatly affected by the num-
ber of occupants, fuel level, vehi-
cle position, road condition and
road grade.
. If the tires are replaced with
different sized tires, the predic-
tive course lines and the bird’s-
eye view may be displayed incor-
rectly.
. When driving the vehicle up a hill,
objects viewed in the monitor are
Monitor, heater, air conditioner, audio and phone systems4-11
Page 207 of 500
NOTE:
.When the monitor displays the front
view and the steering wheel turns
about 90 degrees or less from the
straight ahead position, both the
right and left predictive course lines
are displayed. When the steering
wheel turns about 90 degrees or
more, the predictive course line is
displayed only on the opposite side
of the turn.
JVH1037X
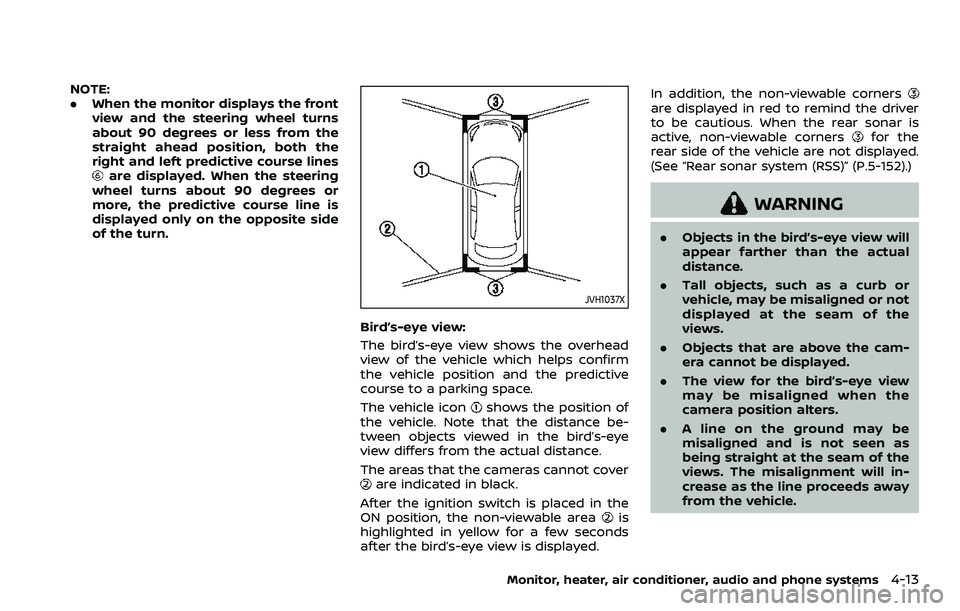
Bird’s-eye view:
The bird’s-eye view shows the overhead
view of the vehicle which helps confirm
the vehicle position and the predictive
course to a parking space.
The vehicle icon
shows the position of
the vehicle. Note that the distance be-
tween objects viewed in the bird’s-eye
view differs from the actual distance.
The areas that the cameras cannot cover
are indicated in black.
After the ignition switch is placed in the
ON position, the non-viewable area
is
highlighted in yellow for a few seconds
after the bird’s-eye view is displayed. In addition, the non-viewable corners
are displayed in red to remind the driver
to be cautious. When the rear sonar is
active, non-viewable corners
for the
rear side of the vehicle are not displayed.
(See “Rear sonar system (RSS)” (P.5-152).)
WARNING
. Objects in the bird’s-eye view will
appear farther than the actual
distance.
. Tall objects, such as a curb or
vehicle, may be misaligned or not
displayed at the seam of the
views.
. Objects that are above the cam-
era cannot be displayed.
. The view for the bird’s-eye view
may be misaligned when the
camera position alters.
. A line on the ground may be
misaligned and is not seen as
being straight at the seam of the
views. The misalignment will in-
crease as the line proceeds away
from the vehicle.
Monitor, heater, air conditioner, audio and phone systems4-13
Page 210 of 500
4-16Monitor, heater, air conditioner, audio and phone systems
positionif the object projects over the
actual moving course.
HOW TO PARK WITH PREDICTIVE
COURSE LINES
WARNING
. If the tires are replaced with
different sized tires, the predic-
tive course lines may be dis-
played incorrectly.
. On a snow-covered or slippery
road, there may be a difference
between the predictive course
line and the actual course line.
. If the battery is disconnected or
becomes discharged, the predic-
tive course lines may be dis-
played incorrectly. If this occurs,
please perform the following pro-
cedures:
— Turn the steering wheel from
lock to lock while the engine is
running.
— Drive the vehicle on a straight road for more than 5 minutes.
. When the steering wheel is
turned with the ignition switch in
the ON position, the predictive
course lines may be displayed incorrectly.
SAA1897
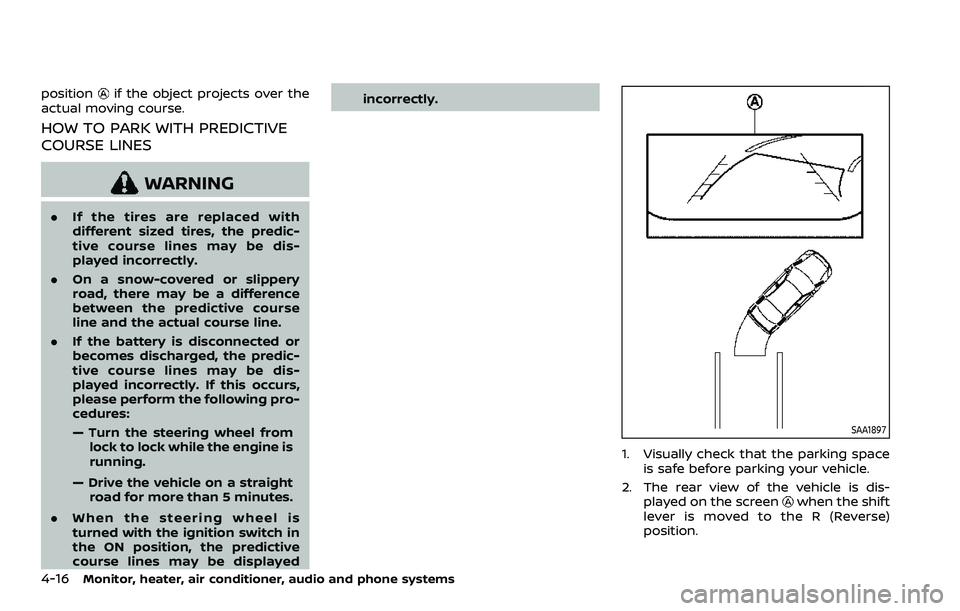
1. Visually check that the parking space
is safe before parking your vehicle.
2. The rear view of the vehicle is dis- played on the screen
when the shift
lever is moved to the R (Reverse)
position.
Page 211 of 500
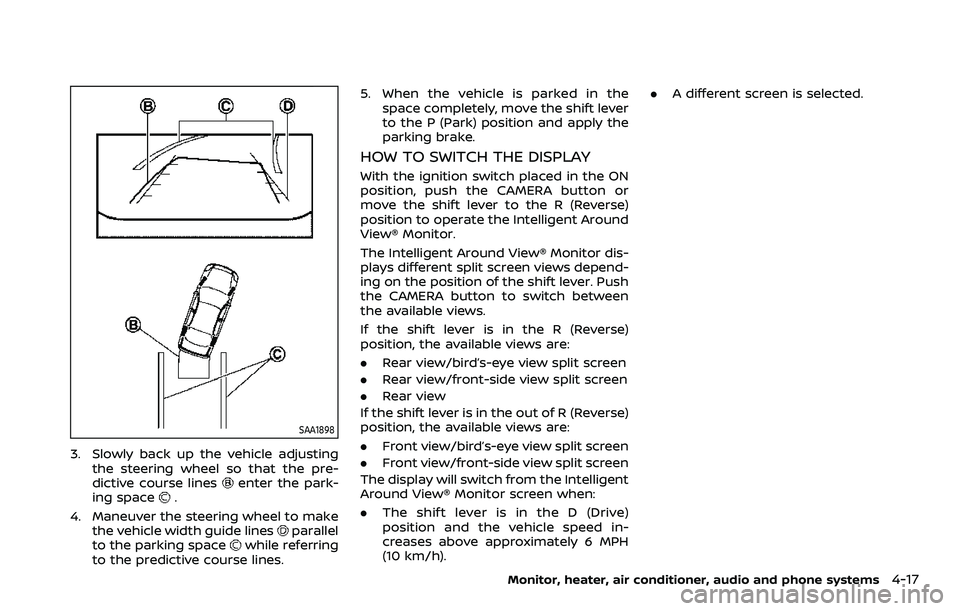
SAA1898
3. Slowly back up the vehicle adjustingthe steering wheel so that the pre-
dictive course lines
enter the park-
ing space.
4. Maneuver the steering wheel to make the vehicle width guide lines
parallel
to the parking spacewhile referring
to the predictive course lines. 5. When the vehicle is parked in the
space completely, move the shift lever
to the P (Park) position and apply the
parking brake.
HOW TO SWITCH THE DISPLAY
With the ignition switch placed in the ON
position, push the CAMERA button or
move the shift lever to the R (Reverse)
position to operate the Intelligent Around
View® Monitor.
The Intelligent Around View® Monitor dis-
plays different split screen views depend-
ing on the position of the shift lever. Push
the CAMERA button to switch between
the available views.
If the shift lever is in the R (Reverse)
position, the available views are:
.Rear view/bird’s-eye view split screen
. Rear view/front-side view split screen
. Rear view
If the shift lever is in the out of R (Reverse)
position, the available views are:
. Front view/bird’s-eye view split screen
. Front view/front-side view split screen
The display will switch from the Intelligent
Around View® Monitor screen when:
. The shift lever is in the D (Drive)
position and the vehicle speed in-
creases above approximately 6 MPH
(10 km/h). .
A different screen is selected.
Monitor, heater, air conditioner, audio and phone systems4-17
Page 220 of 500
4-26Monitor, heater, air conditioner, audio and phone systems
WARNING
.The heater and air conditioner
operate only when the engine is
running.
. Never leave children or adults
who would normally require the
support of others alone in the
vehicle. Pets should not be left
alone either. They could unknow-
ingly activate switches or con-
trols and inadvertently become
involved in a serious accident
and injure themselves. On hot,
sunny days, temperatures in a
closed vehicle could quickly be-
come high enough to cause se-
vere or possibly fatal injuries to
people or animals.
. Do not use the recirculation mode
for long periods as it may cause
the interior air to become stale
and the windows to fog up.
. Do not adjust the heating and air
conditioning controls while driv-
ing so that full attention may be
given to vehicle operation.
The heater and air conditioner operate
when the engine is running. The air blower will operate even if the engine is
turned off and the ignition switch is
placed in the ON position.
NOTE:
.
Odors from inside and outside the
vehicle can build up in the air condi-
tioner unit. Odor can enter the pas-
senger compartment through the
ventilators.
. When parking, set the heater and air
conditioner controls to turn off air
recirculation to allow fresh air into
the passenger compartment. This
should help reduce odors inside the
vehicle.
HEATER AND AIR CONDITIONER
Page 226 of 500
4-32Monitor, heater, air conditioner, audio and phone systems
Air intake control:
.Push the air recirculation
button
to recirculate interior air inside the
vehicle. The indicator light on the
button will come on.
The air recirculation cannot be acti-
vated when the air conditioner is in
the front defrosting mode.
. Push the outside air circulation
button to draw outside air into the
passenger compartment. The indica-
tor light on the button will come on.
. To control the air intake automatically,
push and hold either the air recircula-
tion
button or the outside air
circulationbutton (whichever but-
ton with the indicator light illumi-
nated). The indicator lights (both air
recirculation
and outside air cir-
culationbuttons) will flash twice,
and then the air intake will switch to
automatic control. When the auto-
matic control is set, the system auto-
matically alternates between the
outside air circulation and the air
recirculation modes. (The indicator
light of the active mode will turn on.)
NOTE:
Even if the system is manually set to the
air recirculation mode, when both out-
side temperature and coolant tempera-
ture are low, the system may automatically switch to the outside air
circulation mode.
To turn the system off:
To turn off the heater and air conditioner,
push the ON·OFF button.
Push the ON·OFF button again, the sys-
tem will turn on in the mode which was
used immediately before the system was
turned off.
Remote engine start logic (if so
equipped)
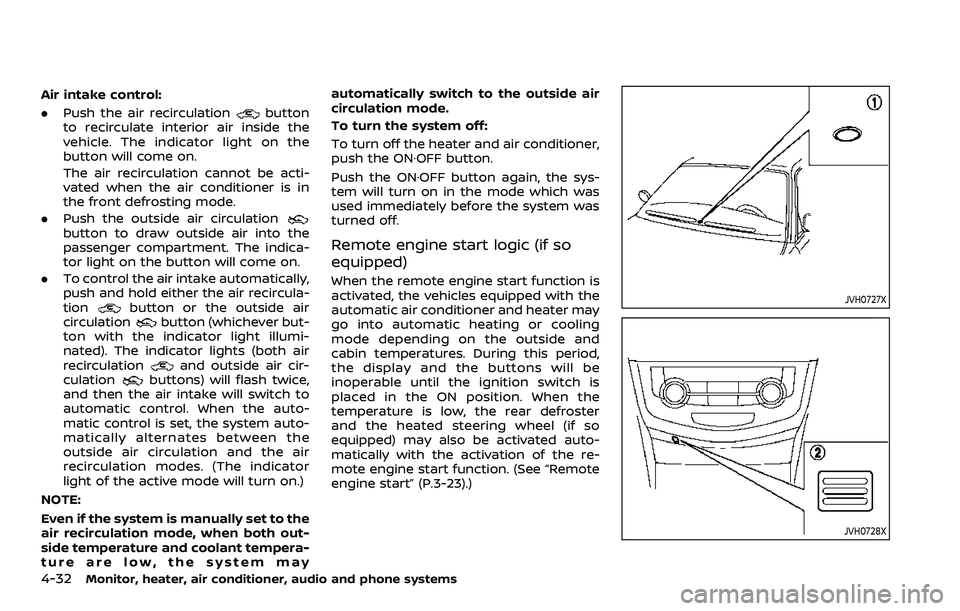
When the remote engine start function is
activated, the vehicles equipped with the
automatic air conditioner and heater may
go into automatic heating or cooling
mode depending on the outside and
cabin temperatures. During this period,
the display and the buttons will be
inoperable until the ignition switch is
placed in the ON position. When the
temperature is low, the rear defroster
and the heated steering wheel (if so
equipped) may also be activated auto-
matically with the activation of the re-
mote engine start function. (See “Remote
engine start” (P.3-23).)
JVH0727X
JVH0728X