2019 NISSAN ROGUE SPORT ignition
[x] Cancel search: ignitionPage 267 of 500
— When a sudden change inbrightness occurs. (For exam-
ple, when the vehicle enters or
exits a tunnel or under a
bridge.)
SYSTEM TEMPORARILY UNAVAIL-
ABLE
Condition A:
If the vehicle is parked in direct sunlight
under high temperature conditions (over
approximately 104°F (40°C)) and then
started, the LDW system may be deacti-
vated automatically, the LDW indicator
will flash and the following message will
appear in the vehicle information display.
- “Unavailable: High Cabin Temperature”
When the interior temperature is reduced,
the LDW system will resume operating
automatically and the LDW indicator will
stop flashing.
Condition B:
The warning function of the LDW system
is not designed to work under the follow-
ing conditions:
. When you operate the lane change
signal and change traveling lanes in
the direction of the signal. (The LDW
system will become operable again
approximately 2 seconds after the lane change signal is turned off.)
. When the vehicle speed lowers to less
than approximately 37 MPH (60 km/h).
Action to take:
After the above conditions have finished
and the necessary operating conditions
are satisfied, the LDW system will resume.
SYSTEM MALFUNCTION
If the LDW system malfunctions, it will
cancel automatically and “Malfunction”
will appear in the vehicle information
display. If “Malfunction” appears in the
vehicle information display, pull off the
road to a safe location and stop the
vehicle. Place the ignition switch in the
OFF position and restart the engine. If
“Malfunction” continues to appear in the
vehicle information display, have the
system checked. It is recommended that
you visit a NISSAN dealer for this service.
JVS1079X
SYSTEM MAINTENANCE
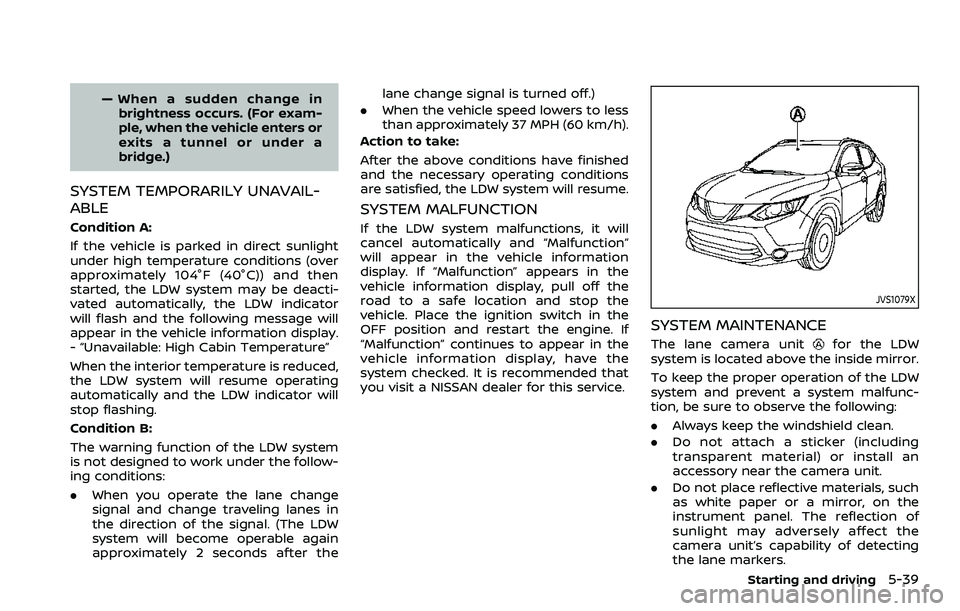
The lane camera unitfor the LDW
system is located above the inside mirror.
To keep the proper operation of the LDW
system and prevent a system malfunc-
tion, be sure to observe the following:
. Always keep the windshield clean.
. Do not attach a sticker (including
transparent material) or install an
accessory near the camera unit.
. Do not place reflective materials, such
as white paper or a mirror, on the
instrument panel. The reflection of
sunlight may adversely affect the
camera unit’s capability of detecting
the lane markers.
Starting and driving5-39
Page 276 of 500
5-48Starting and driving
WAF0079X
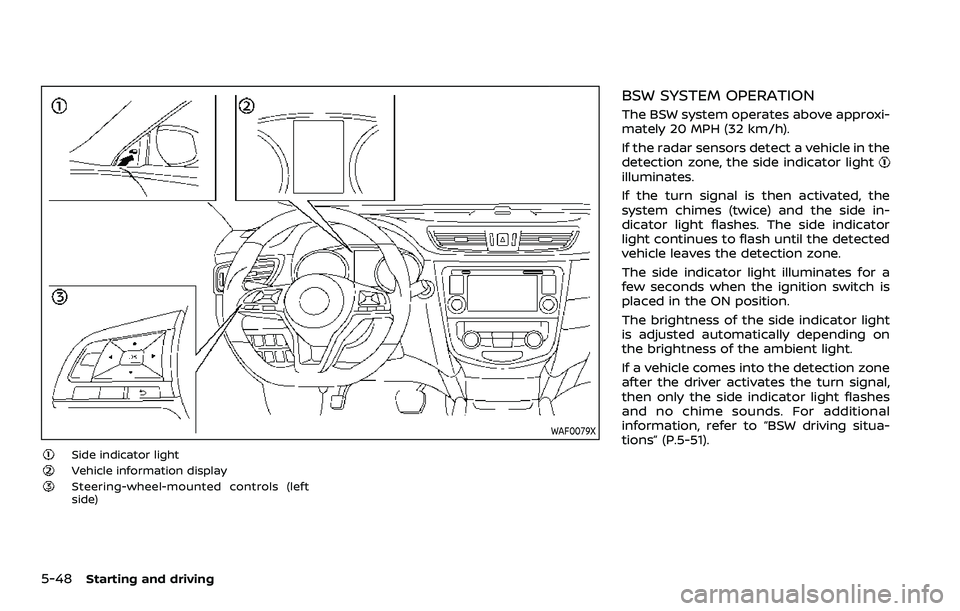
Side indicator lightVehicle information displaySteering-wheel-mounted controls (left
side)
BSW SYSTEM OPERATION
The BSW system operates above approxi-
mately 20 MPH (32 km/h).
If the radar sensors detect a vehicle in the
detection zone, the side indicator light
illuminates.
If the turn signal is then activated, the
system chimes (twice) and the side in-
dicator light flashes. The side indicator
light continues to flash until the detected
vehicle leaves the detection zone.
The side indicator light illuminates for a
few seconds when the ignition switch is
placed in the ON position.
The brightness of the side indicator light
is adjusted automatically depending on
the brightness of the ambient light.
If a vehicle comes into the detection zone
after the driver activates the turn signal,
then only the side indicator light flashes
and no chime sounds. For additional
information, refer to “BSW driving situa-
tions” (P.5-51).
Page 312 of 500
5-84Starting and driving
will turn the system completely off.
When the ignition switch is placed in the
OFF position, the system is also automa-
tically turned off.
To use the ICC system again, quickly push
and release the CRUISE ON/OFF switch
(vehicle-to-vehicle distance control
mode) or push and hold it (conventional
cruise control mode) again to turn it on.
CAUTION
To avoid accidentally engaging
cruise control, make sure to turn
the CRUISE ON/OFF switch off when
not using the ICC system.WAF0153X
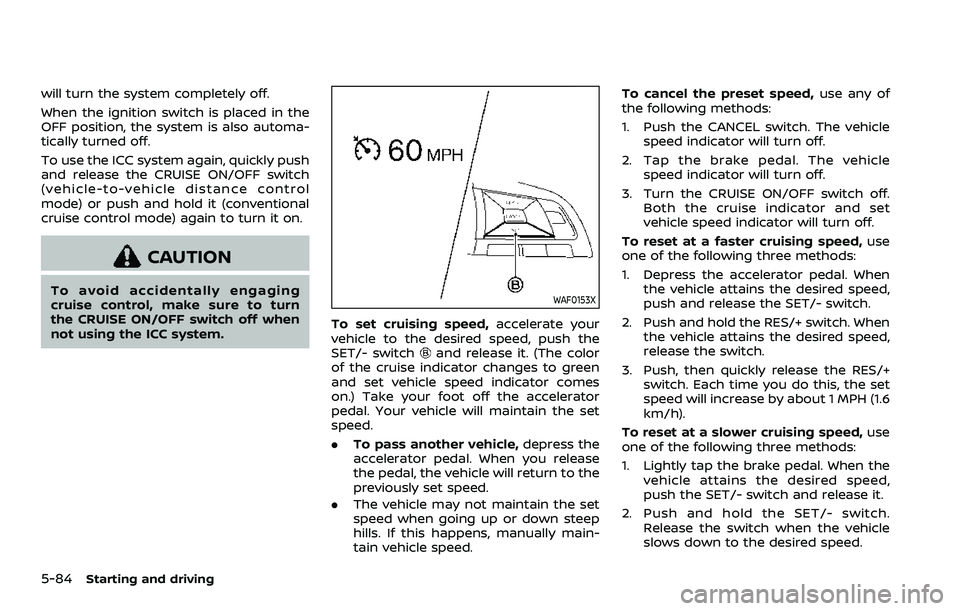
To set cruising speed,accelerate your
vehicle to the desired speed, push the
SET/- switch
and release it. (The color
of the cruise indicator changes to green
and set vehicle speed indicator comes
on.) Take your foot off the accelerator
pedal. Your vehicle will maintain the set
speed.
. To pass another vehicle, depress the
accelerator pedal. When you release
the pedal, the vehicle will return to the
previously set speed.
. The vehicle may not maintain the set
speed when going up or down steep
hills. If this happens, manually main-
tain vehicle speed. To cancel the preset speed,
use any of
the following methods:
1. Push the CANCEL switch. The vehicle speed indicator will turn off.
2. Tap the brake pedal. The vehicle speed indicator will turn off.
3. Turn the CRUISE ON/OFF switch off. Both the cruise indicator and set
vehicle speed indicator will turn off.
To reset at a faster cruising speed, use
one of the following three methods:
1. Depress the accelerator pedal. When the vehicle attains the desired speed,
push and release the SET/- switch.
2. Push and hold the RES/+ switch. When the vehicle attains the desired speed,
release the switch.
3. Push, then quickly release the RES/+ switch. Each time you do this, the set
speed will increase by about 1 MPH (1.6
km/h).
To reset at a slower cruising speed, use
one of the following three methods:
1. Lightly tap the brake pedal. When the
vehicle attains the desired speed,
push the SET/- switch and release it.
2. Push and hold the SET/- switch. Release the switch when the vehicle
slows down to the desired speed.
Page 324 of 500
5-96Starting and driving
WAF0055X
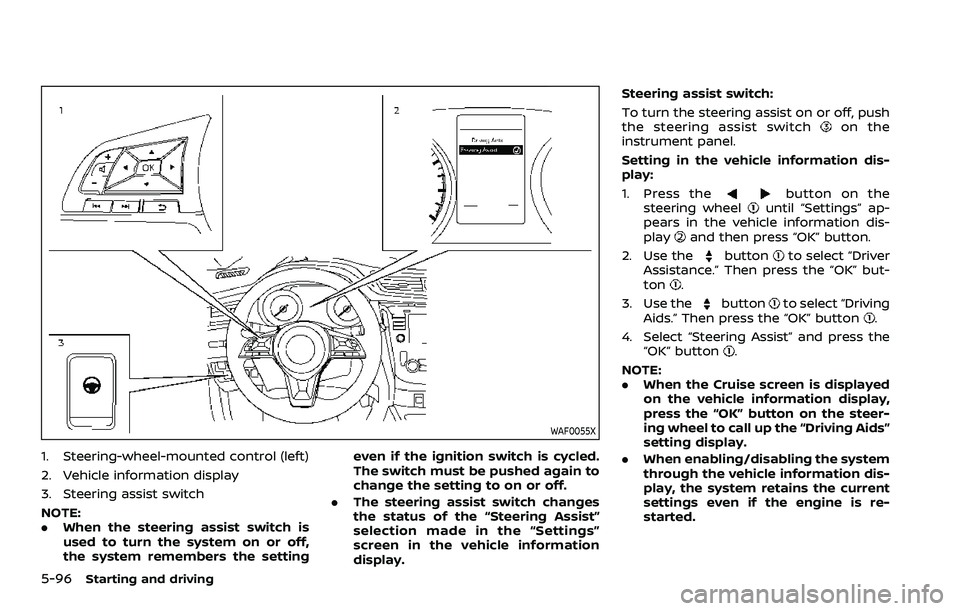
1. Steering-wheel-mounted control (left)
2. Vehicle information display
3. Steering assist switch
NOTE:
.When the steering assist switch is
used to turn the system on or off,
the system remembers the setting even if the ignition switch is cycled.
The switch must be pushed again to
change the setting to on or off.
. The steering assist switch changes
the status of the “Steering Assist”
selection made in the “Settings”
screen in the vehicle information
display. Steering assist switch:
To turn the steering assist on or off, push
the steering assist switch
on the
instrument panel.
Setting in the vehicle information dis-
play:
1. Press the
button on the
steering wheeluntil “Settings” ap-
pears in the vehicle information dis-
play
and then press “OK” button.
2. Use the
buttonto select “Driver
Assistance.” Then press the “OK” but-
ton
.
3. Use the
buttonto select “Driving
Aids.” Then press the “OK” button.
4. Select “Steering Assist” and press the “OK” button
.
NOTE:
. When the Cruise screen is displayed
on the vehicle information display,
press the “OK” button on the steer-
ing wheel to call up the “Driving Aids”
setting display.
. When enabling/disabling the system
through the vehicle information dis-
play, the system retains the current
settings even if the engine is re-
started.
Page 342 of 500
5-114Starting and driving
will turn the system completely off. When
the ignition switch is placed in the OFF
position, the system is also automatically
turned off.
To use the ICC system again, quickly push
and release the ProPILOT assist switch
(vehicle-to-vehicle distance control
mode) or push and hold it (conventional
cruise control mode) again to turn it on.
WARNING
To avoid accidentally engaging
cruise control, make sure to turn
the ProPILOT assist switch off when
not using the ICC system.WAF0066X
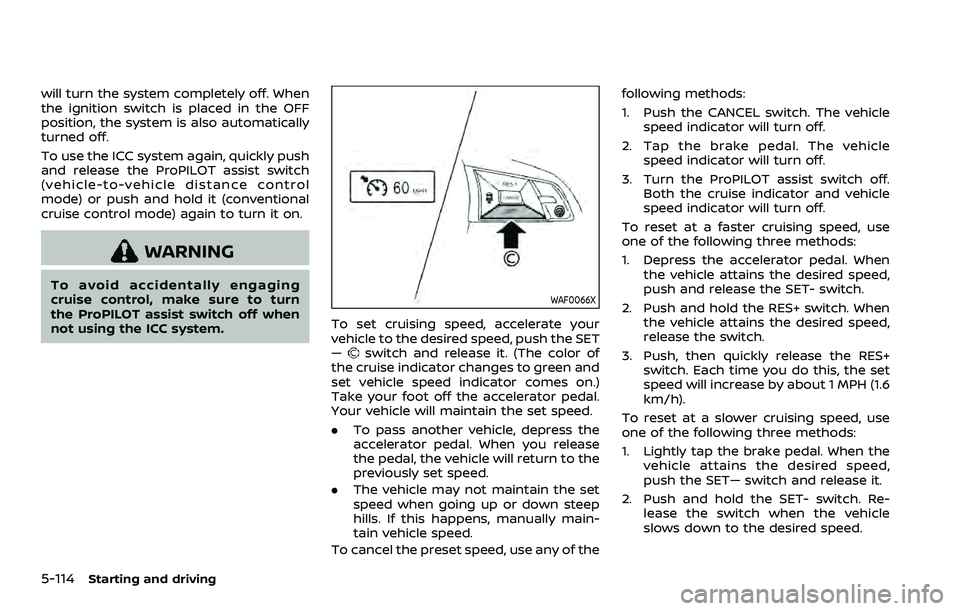
To set cruising speed, accelerate your
vehicle to the desired speed, push the SET
—
switch and release it. (The color of
the cruise indicator changes to green and
set vehicle speed indicator comes on.)
Take your foot off the accelerator pedal.
Your vehicle will maintain the set speed.
. To pass another vehicle, depress the
accelerator pedal. When you release
the pedal, the vehicle will return to the
previously set speed.
. The vehicle may not maintain the set
speed when going up or down steep
hills. If this happens, manually main-
tain vehicle speed.
To cancel the preset speed, use any of the following methods:
1. Push the CANCEL switch. The vehicle
speed indicator will turn off.
2. Tap the brake pedal. The vehicle speed indicator will turn off.
3. Turn the ProPILOT assist switch off. Both the cruise indicator and vehicle
speed indicator will turn off.
To reset at a faster cruising speed, use
one of the following three methods:
1. Depress the accelerator pedal. When the vehicle attains the desired speed,
push and release the SET- switch.
2. Push and hold the RES+ switch. When the vehicle attains the desired speed,
release the switch.
3. Push, then quickly release the RES+ switch. Each time you do this, the set
speed will increase by about 1 MPH (1.6
km/h).
To reset at a slower cruising speed, use
one of the following three methods:
1. Lightly tap the brake pedal. When the vehicle attains the desired speed,
push the SET— switch and release it.
2. Push and hold the SET- switch. Re- lease the switch when the vehicle
slows down to the desired speed.
Page 370 of 500
5-142Starting and driving
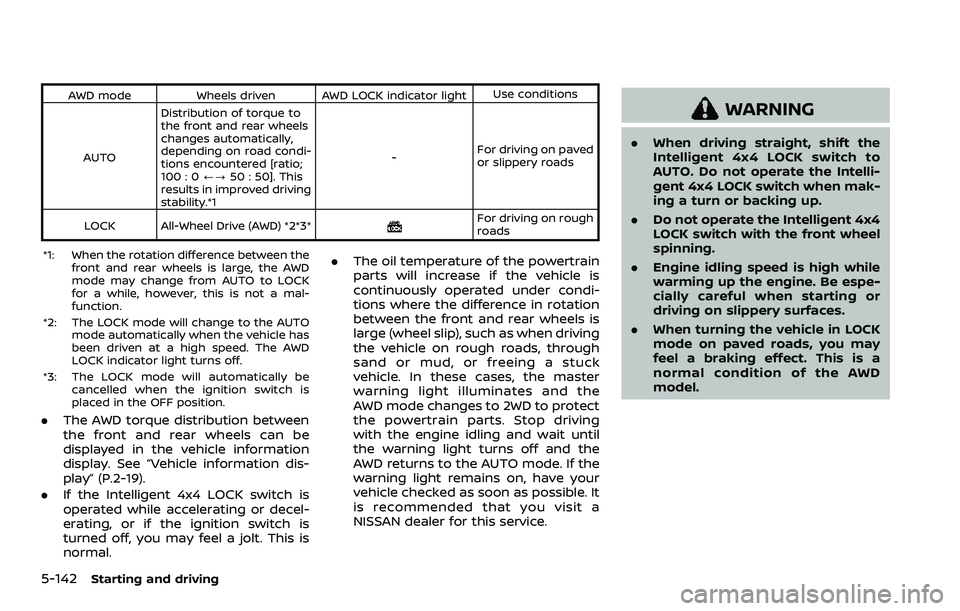
AWD modeWheels driven AWD LOCK indicator light Use conditions
AUTO Distribution of torque to
the front and rear wheels
changes automatically,
depending on road condi-
tions encountered [ratio;
100 : 0
/?50 : 50]. This
results in improved driving
stability.*1 -
For driving on paved
or slippery roads
LOCK All-Wheel Drive (AWD) *2*3*
For driving on rough
roads
*1: When the rotation difference between the front and rear wheels is large, the AWD
mode may change from AUTO to LOCK
for a while, however, this is not a mal-
function.
*2: The LOCK mode will change to the AUTO mode automatically when the vehicle has
been driven at a high speed. The AWD
LOCK indicator light turns off.
*3: The LOCK mode will automatically be cancelled when the ignition switch is
placed in the OFF position.
.The AWD torque distribution between
the front and rear wheels can be
displayed in the vehicle information
display. See “Vehicle information dis-
play” (P.2-19).
. If the Intelligent 4x4 LOCK switch is
operated while accelerating or decel-
erating, or if the ignition switch is
turned off, you may feel a jolt. This is
normal. .
The oil temperature of the powertrain
parts will increase if the vehicle is
continuously operated under condi-
tions where the difference in rotation
between the front and rear wheels is
large (wheel slip), such as when driving
the vehicle on rough roads, through
sand or mud, or freeing a stuck
vehicle. In these cases, the master
warning light illuminates and the
AWD mode changes to 2WD to protect
the powertrain parts. Stop driving
with the engine idling and wait until
the warning light turns off and the
AWD returns to the AUTO mode. If the
warning light remains on, have your
vehicle checked as soon as possible. It
is recommended that you visit a
NISSAN dealer for this service.
WARNING
.When driving straight, shift the
Intelligent 4x4 LOCK switch to
AUTO. Do not operate the Intelli-
gent 4x4 LOCK switch when mak-
ing a turn or backing up.
. Do not operate the Intelligent 4x4
LOCK switch with the front wheel
spinning.
. Engine idling speed is high while
warming up the engine. Be espe-
cially careful when starting or
driving on slippery surfaces.
. When turning the vehicle in LOCK
mode on paved roads, you may
feel a braking effect. This is a
normal condition of the AWD
model.
Page 372 of 500
5-144Starting and driving
curb..HEADED UPHILL WITH CURB:
Turn the wheels away from the
curb and move the vehicle back
until the curb side wheel gently
touches the curb.
.HEADED UPHILL OR DOWNHILL, NOCURB:
Turn the wheels toward the side of
the road so the vehicle will move
away from the center of the road if
it moves.
4. Models with Intelligent Key system:
Place the ignition switch in the OFF
position.
Models without Intelligent Key sys-
tem:
Place the ignition switch in the LOCK
position and remove the key.
WARNING
.If the engine is not running or is
turned off while driving, the
power assist for the steering will
not work. Steering will be harder
to operate.
. When the electric power steering
warning light illuminates with the
engine running, the power assist
for the steering will cease opera-
tion. You will still have control of
the vehicle but the steering will
be harder to operate.
The electric power steering is designed to
provide power assist while driving to
operate the steering wheel with light
force.
When the steering wheel is operated
repeatedly or continuously while parking
or driving at a very low speed, the power
assist for the steering wheel will be
reduced. This is to prevent overheating
of the electric power steering and protect
it from getting damaged. While the power
assist is reduced, steering wheel opera-
tion will become heavy. When the tem-
perature of the electric power steering
goes down, the power assist level will
return to normal. Avoid repeating such steering wheel operations that could
cause the electric power steering to over-
heat.
You may hear a noise when the steering
wheel is operated quickly. However, this is
not a malfunction.
If the electric power steering warning
light
illuminates while the engine is
running, it may indicate the electric
power steering is not functioning prop-
erly and may need servicing. Have the
electric power steering checked. It is
recommended that you visit a NISSAN
dealer for this service. (See “Electric power
steering warning light” (P.2-12).)
When the electric power steering warning
light illuminates with the engine running,
the power assist for the steering will
cease operation. You will still have control
of the vehicle. However, greater steering
effort is needed, especially in sharp turns
and at low speeds.
The mode of the Power Steering can be
changed to:
. NORMAL
. SPORT
For more information, see “Vehicle infor-
mation display” (P.2-19).
ELECTRIC POWER STEERING
Page 375 of 500
tion, it switches the ABS off and illumi-
nates the ABS warning light on the
instrument panel. The brake system then
operates normally, but without anti-lock
assistance.
If the ABS warning light illuminates during
the self-test or while driving, have the
vehicle checked. It is recommended you
visit a NISSAN dealer for this service.
Normal operation
The ABS operates at speeds above 3 to 6
MPH (5 to 10 km/h). The speed varies
according to road conditions.
When the ABS senses that one or more
wheels are close to locking up, the
actuator rapidly applies and releases
hydraulic pressure. This action is similar
to pumping the brakes very quickly. You
may feel a pulsation in the brake pedal
and hear a noise from under the hood or
feel a vibration from the actuator when it
is operating. This is normal and indicates
that the ABS is operating properly. How-
ever, the pulsation may indicate that road
conditions are hazardous and extra care
is required while driving.The Vehicle Dynamic Control (VDC) sys-
tem uses various sensors to monitor
driver inputs and vehicle motion. Under
certain driving conditions, the VDC sys-
tem helps to perform the following func-
tions.
.
Controls brake pressure to reduce
wheel slip on one slipping drive wheel
so power is transferred to a non
slipping drive wheel on the same axle.
. Controls brake pressure and engine
output to reduce drive wheel slip
based on vehicle speed (traction con-
trol function).
. Controls brake pressure at individual
wheels and engine output to help the
driver maintain control of the vehicle
in the following conditions:
— understeer (vehicle tends to not
follow the steered path despite
increased steering input)
— oversteer (vehicle tends to spin due to certain road or driving condi-
tions).
The VDC system can help the driver to
maintain control of the vehicle, but it
cannot prevent loss of vehicle control in
all driving situations.
When the VDC system operates, the VDC
warning light
in the instrument panel
flashes so note the following: .
The road may be slippery or the
system may determine some action
is required to help keep the vehicle on
the steered path.
. You may feel a pulsation in the brake
pedal and hear a noise or vibration
from under the hood. This is normal
and indicates that the VDC system is
working properly.
. Adjust your speed and driving to the
road conditions.
If a malfunction occurs in the system, the
VDC warning light
illuminates in the
instrument panel. The VDC system auto-
matically turns off.
The VDC OFF switch is used to turn off the
VDC system. The VDC off indicator
illuminates to indicate the VDC system is
off. When the VDC switch is used to turn
off the system, the VDC system still
operates to prevent one drive wheel from
slipping by transferring power to a non
slipping drive wheel. The VDC warning
light
flashes if this occurs. All other
VDC functions are off, and the VDC
warning light
will not flash. The VDC
system is automatically reset to on when
the ignition switch is placed in the off
position then back to the on position.
See “Vehicle Dynamic Control (VDC) warn-
ing light” (P.2-16) and “Vehicle Dynamic
Control (VDC) off indicator light” (P.2-18).
Starting and driving5-147
VEHICLE DYNAMIC CONTROL (VDC) SYSTEM