Page 19 of 372
or
Anti-lock Braking
System (ABS)
warning light2-10
or
Brake warning
light2-10
Charge warning
light2-11
Door open warn-
ing light2-11
Engine oil pres-
sure warning light2-11
High temperature
warning light (red)2-11
Warning
lightName Page
Low fuel warning
light2-11
Low tire pressure
warning light2-12
Low windshield-
washer fluid
warning light (if so
equipped)2-13
Power steering
warning light2-13
Seat belt warning
light and chime2-14
Supplemental air
bag warning light2-14
Indicator
lightName Page
Continuously
Variable Trans-
mission (CVT) po-
sition indicator
light2-15
Cruise main
switch indicator
light (if so
equipped)2-15
Front passenger
air bag status
light2-15
High beam indi-
cator light (blue)2-15
Malfunction Indi-
cator Light (MIL)2-15
Overdrive OFF
indicator light2-16
WARNING AND INDICATOR LIGHTS
Illustrated table of contents0-9
Page 81 of 372

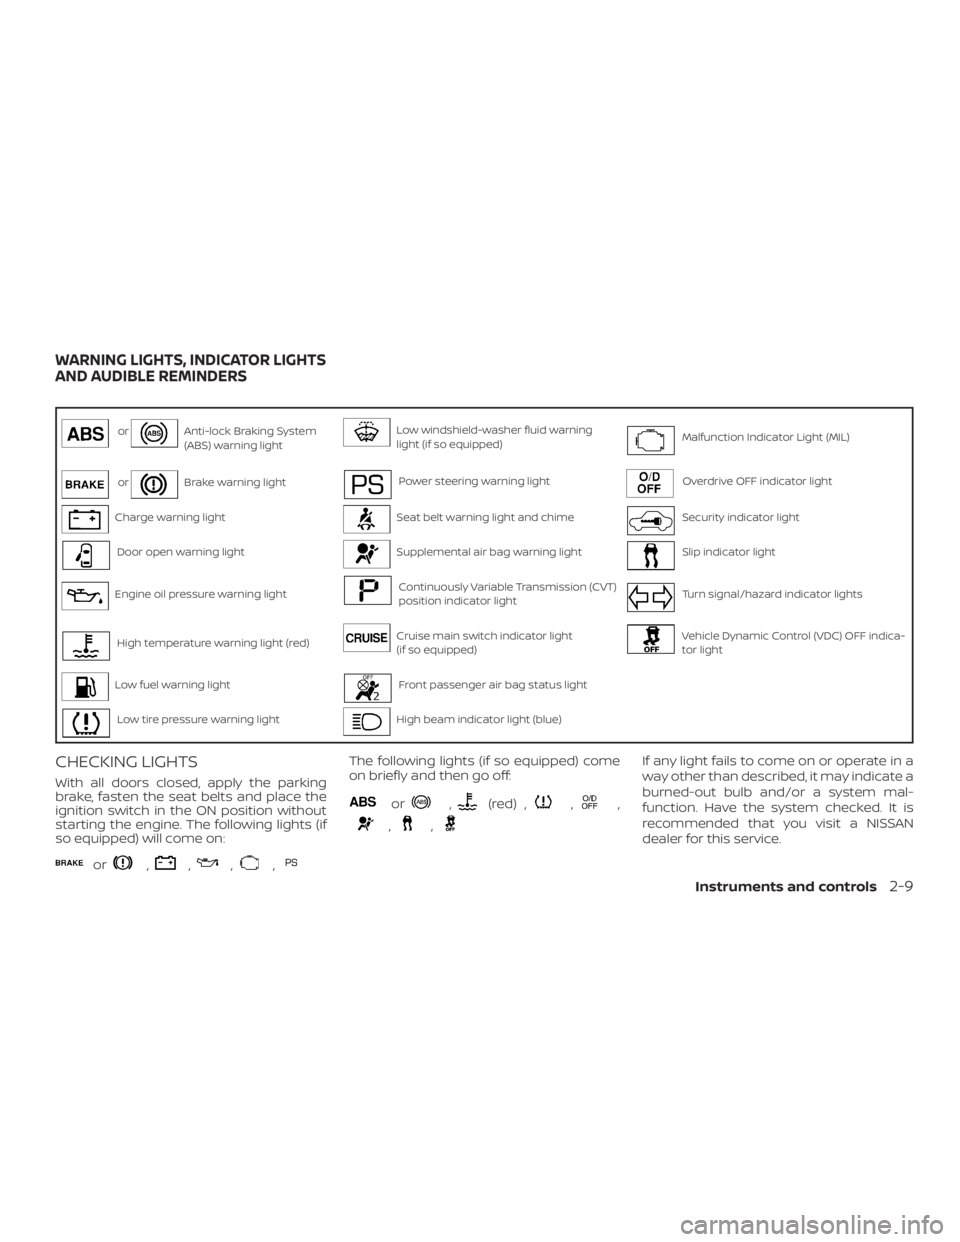
Anti-lock Braking System
(ABS) warning lightLow windshield-washer fluid warning
light (if so equipped)Malfunction Indicator Light (MIL)
orBrake warning lightPower steering warning lightOverdrive OFF indicator light
Charge warning lightSeat belt warning light and chimeSecurity indicator light
Door open warning lightSupplemental air bag warning lightSlip indicator light
Engine oil pressure warning lightContinuously Variable Transmission (CVT)
position indicator lightTurn signal/hazard indicator lights
High temperature warning light (red)Cruise main switch indicator light
(if so equipped)Vehicle Dynamic Control (VDC) OFF indica-
tor light
Low fuel warning lightFront passenger air bag status light
Low tire pressure warning lightHigh beam indicator light (blue)
CHECKING LIGHTS
With all doors closed, apply the parking
brake, fasten the seat belts and place the
ignition switch in the ON position without
starting the engine. The following lights (if
so equipped) will come on:
or,,,,
The following lights (if so equipped) come
on briefly and then go off:
or,(red) ,,,
,,
If any light fails to come on or operate in a
way other than described, it may indicate a
burned-out bulb and/or a system mal-
function. Have the system checked. It is
recommended that you visit a NISSAN
dealer for this service.
WARNING LIGHTS, INDICATOR LIGHTS
AND AUDIBLE REMINDERS
Instruments and controls2-9
Page 83 of 372
Charge warning light
If this light comes on while the engine is
running, it may indicate the charging sys-
tem is not functioning properly. Turn the
engine off and check the generator belt. If
the belt is loose, broken, missing, or if the
light remains on, have the system checked.
It is recommended that you visit a NISSAN
dealer for this service.
Engine oil pressure
warning light
This light warns of low engine oil pressure. If
the light flickers or comes on during nor-
mal driving, pull off the road in a safe area,
stop the engineimmediatelyand call a
NISSAN dealer or other authorized repair
shop.
The engine oil pressure warning light is
not designed to indicate a low oil level.
Use the dipstick to check the oil level. For
additional information, refer to “Engine oil”
in the “Do-it-yourself ” section of this
manual.
Page 230 of 372
CAUTION
Running the engine with the engine oil
pressure warning light on could cause
serious damage to the engine almost
immediately. Such damage is not cov-
ered by warranty. Turn off the engine as
soon as it is safe to do so.
CONTINUOUSLY VARIABLE
TRANSMISSION (CVT)
CAUTION
To avoid possible damage to your ve-
hicle, when stopping the vehicle on an
uphill grade, do not hold the vehicle by
depressing the accelerator pedal. The
foot brake should be used for this
purpose.
The CVT in your vehicle is electronically
controlled to produce maximum power
and smooth operation.
The recommended operating procedures
for this transmission are shown on the fol-
lowing pages. Follow these procedures for
maximum vehicle performance and driv-
ing enjoyment.
NOTE:
Engine power may be automatically re-
duced to protect the CVT if the engine
speed increases quickly when driving on
slippery roads or while being tested on
some dynamometers.
5-12Starting and driving
Page 280 of 372
CAUTION
� Do not work under the hood while the
engine is hot. Turn the engine off and
wait until it cools down.
� Avoid contact with used engine oil
and coolant. Improperly disposed en-
gine oil, engine coolant and/or other
vehicle fluids can damage the envi-
ronment. Always conform to local
regulations for disposal of vehicle
fluid.
� Never leave the engine or the Con-
tinuously Variable Transmission (CVT)
related component harness connec-
tor disconnected while the ignition
switch is in the ON position.
� Never connect or disconnect the bat-
tery or any transistorized component
while the ignition switch is in the ON
position.
� DO NOT power wash any interior por-
tion of this vehicle to help minimize
liquid intrusion and potential elec-
tronic component damage.
This “Do-it-yourself ” section gives instruc-
tions regarding only those items which are
relatively easy for an owner to perform.
MAINTENANCE PRECAUTIONS
8-2Do-it-yourself
Page 285 of 372
CAUTION
Oil level should be checked regularly.
Operating the engine with an insuffi-
cient amount of oil can damage the en-
gine, and such damage is not covered
by warranty.
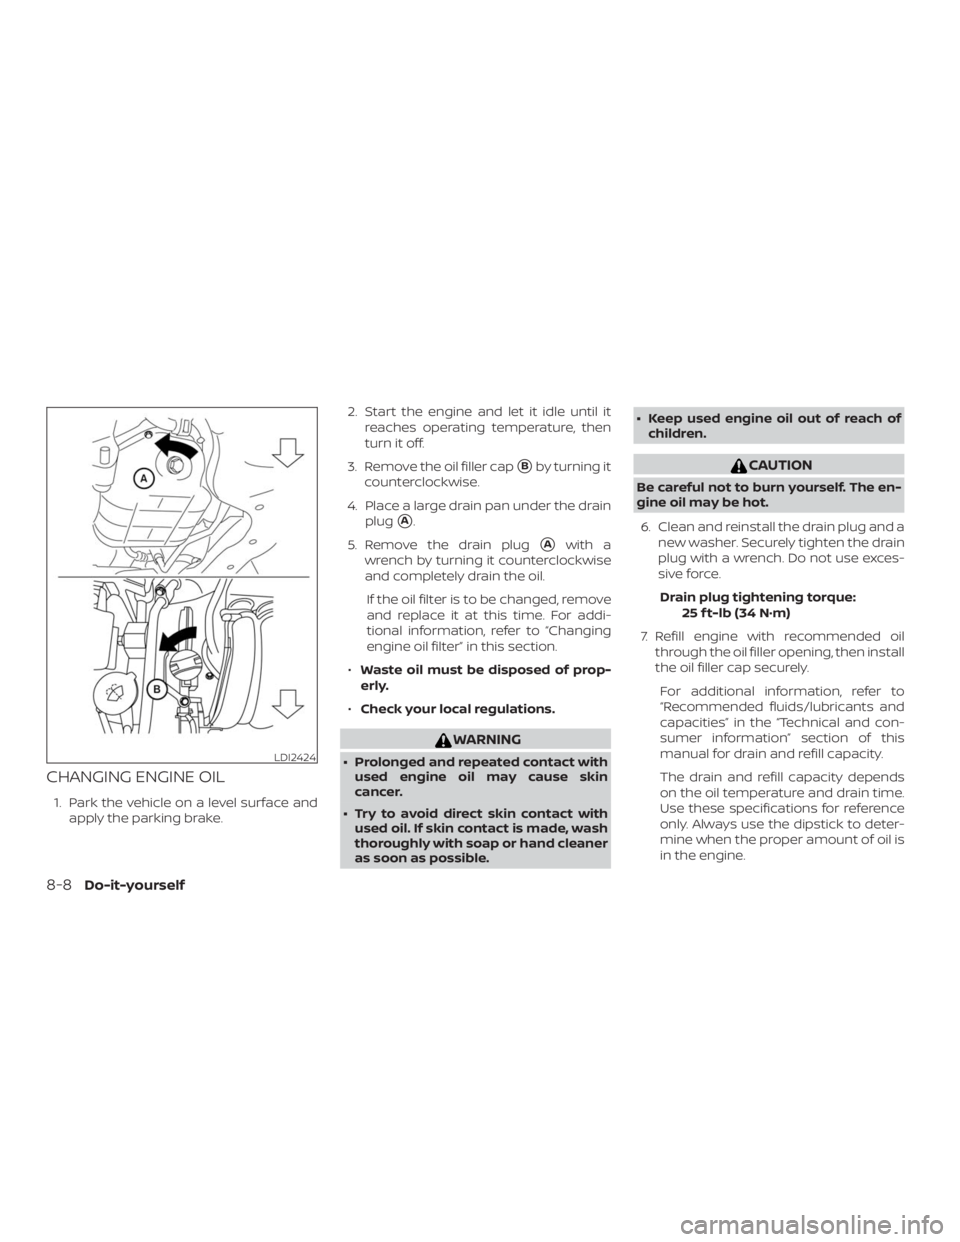
Make sure to follow the engine oil changing
intervals in the “Maintenance and sched-
ules” section of this manual. Operating un-
der the following conditions may require
more frequent oil change:
∙ Repeated short distance driving
∙ Driving in dusty conditions
∙ Stop and go commuting
LDI2203LDI0371
ENGINE OIL
Do-it-yourself8-7
Page 286 of 372

WARNING
� Prolonged and repeated contact with
used engine oil may cause skin
cancer.
� Try to avoid direct skin contact with
used oil. If skin contact is made, wash
thoroughly with soap or hand cleaner
as soon as possible.� Keep used engine oil out of reach of
children.
CAUTION
Be careful not to burn yourself. The en-
gine oil may be hot.
6. Clean and reinstall the drain plug and a
new washer. Securely tighten the drain
plug with a wrench. Do not use exces-
sive force.
Drain plug tightening torque:
25 f t-lb (34 N·m)
7. Refill engine with recommended oil
through the oil filler opening, then install
the oil filler cap securely.
For additional information, refer to
“Recommended fluids/lubricants and
capacities” in the “Technical and con-
sumer information” section of this
manual for drain and refill capacity.
The drain and refill capacity depends
on the oil temperature and drain time.
Use these specifications for reference
only. Always use the dipstick to deter-
mine when the proper amount of oil is
in the engine.
LDI2424
8-8Do-it-yourself
Page 330 of 372
MAINTENANCE OPERATION
Perform at number of miles, kilometers or
months, whichever comes first.miles x 1,000
(km x 1,000)
MonthsMAINTENANCE INTERVAL
5
(8)
610
(16)
1215
(24)
1820
(32)
2425
(40)
3030
(48)
3635
(56)
4240
(64)
4845
(72)
5450
(80)
6055
(88)
6660
(96)
72
Drive belts See NOTE (1) I* I* I*
Air cleaner filter See NOTE (2) R R
EVAP vapor linesI* I* I*
Fuel linesI* I* I*
Fuel filter See NOTE (3)
Engine coolant* See NOTE (4)(5)
Engine oilRRRRRRRRRRRR
Engine oil filterRRRRRRRRRRRR
Spark plugs See NOTE (6) Replace every 105,000 miles (168,000 km)
Intake and exhaust valve clearances* See NOTE (7)
STANDARD MAINTENANCE
9-8Maintenance and schedules