2019 NISSAN LEAF navigation system
[x] Cancel search: navigation systemPage 314 of 610

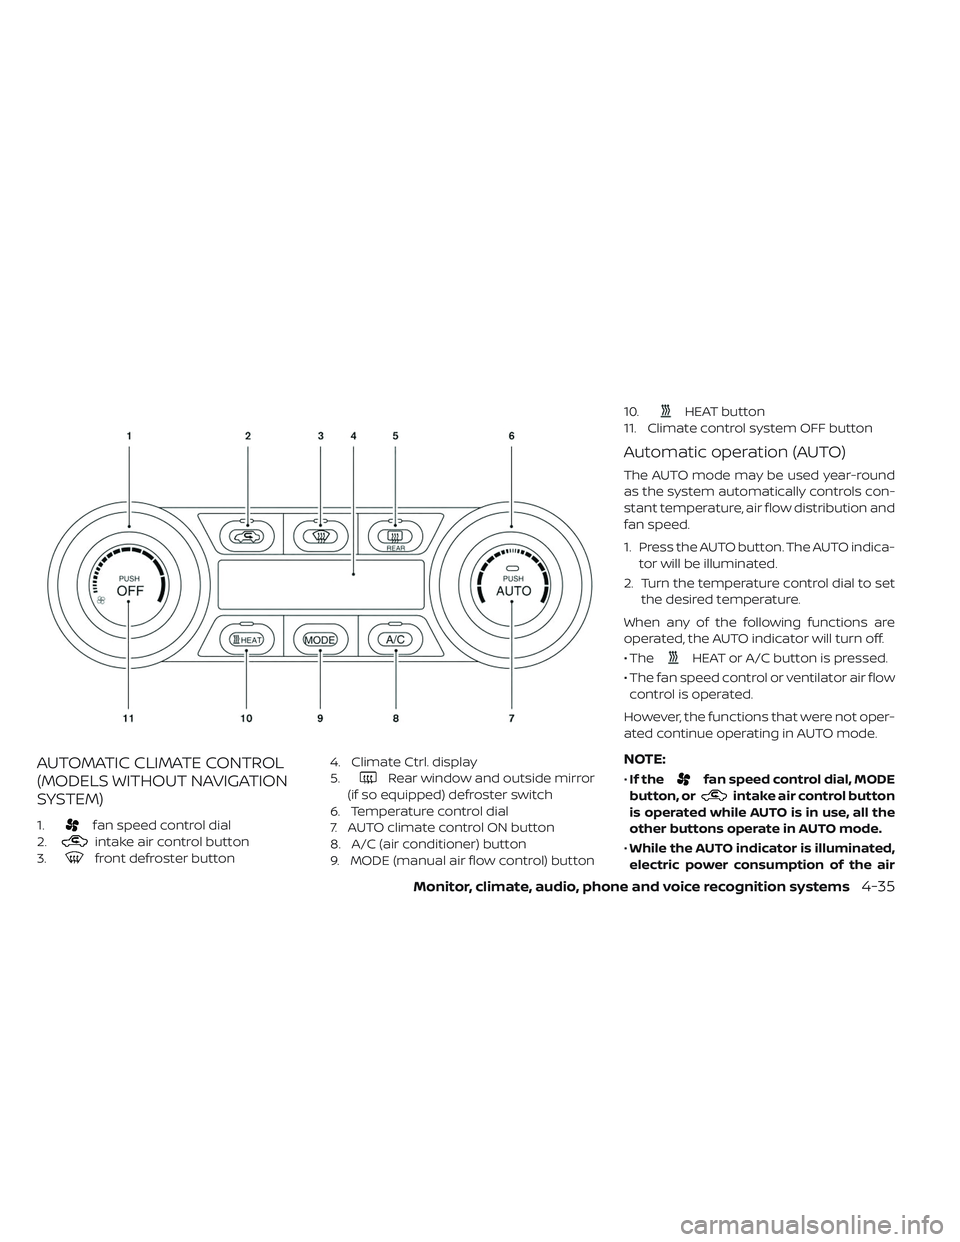
AUTOMATIC CLIMATE CONTROL
(MODELS WITHOUT NAVIGATION
SYSTEM)
1.fan speed control dial
2.
intake air control button
3.
front defroster button 4. Climate Ctrl. display
5.
Rear window and outside mirror
(if so equipped) defroster switch
6. Temperature control dial
7. AUTO climate control ON button
8. A/C (air conditioner) button
9. MODE (manual air flow control) button 10.
HEAT button
11. Climate control system OFF button
Automatic operation (AUTO)
The AUTO mode may be used year-round
as the system automatically controls con-
stant temperature, air flow distribution and
fan speed.
1. Press the AUTO button. The AUTO indica- tor will be illuminated.
2. Turn the temperature control dial to set the desired temperature.
When any of the following functions are
operated, the AUTO indicator will turn off.
• The
HEAT or A/C button is pressed.
• The fan speed control or ventilator air flow control is operated.
However, the functions that were not oper-
ated continue operating in AUTO mode.
NOTE:
• If thefan speed control dial, MODE
button, or
intake air control button
is operated while AUTO is in use, all the
other buttons operate in AUTO mode.
• While the AUTO indicator is illuminated,
electric power consumption of the air
Monitor, climate, audio, phone and voice recognition systems4-35
Page 317 of 610

To set the automatic control mode, press
and hold the
intake air control button.
The indicator light will blink twice and the
inside/outside circulation will then be con-
trolled automatically. When in automatic
mode, the indicator light will come on when
inside air recirculation is active.
Rear window and outside mirror (if so
equipped) defroster switch:
For additional information, refer to “Rear
window and outside mirror (if so equipped)
defroster switch” in the “Instruments and
controls” section of this manual
To turn the system off
To turn off the climate control, press the
Climate control system OFF button. The
same operating mode (Heater or A/C) that
was active when the system is turned off is
active when system is turned back on.
AUTOMATIC CLIMATE CONTROL
(MODELS WITH NAVIGATION
SYSTEM)
1. Temperature control button
2.
HEAT button
3. Climate Ctrl. Timer indicator 4.
front defroster button
5.
fan speed control button
6.
Rear window and outside mirror
(if so equipped) defroster switch
7.
intake air control button
8. Climate control system ON·OFF button
9. AUTO climate control ON button
4-38Monitor, climate, audio, phone and voice recognition systems
Page 319 of 610

Dehumidified heating:
1. Press the A/C button to illuminate theA/C indicator light.
2. Press the
HEAT button to illuminate
the HEAT indicator light
NOTE:
Electric power consumption of climate
control increases while A/C button indi-
cator and
HEAT button indicator si-
multaneously illuminate. As a result, the
driving range may be decreased.
Heating (A/C off ):
1. Press the
HEAT button to illuminate
the HEAT indicator light.
2. Press the A/C button to turn off the A/C indicator light.
• Do not set temperature lower than the outside air temperature. Doing so may
prevent the temperature from being con-
trolled properly.
• If the windows fog up, use dehumidified heating instead of the A/C off heating. Ventilation:
Press the
HEAT button and A/C but-
ton if the indicator lights are on so that
both indicator lights turn off.
NOTE:
• The ventilation mode requires a lower
power consumption, so cruising dis-
tance will increase.
• In ventilation mode, temperature is not
indicated on the navigation monitor or
on the air conditioner display.
Dehumidified defrosting/defogging:
Press the
front defroster button (the
indicator light will illuminate).
• To remove moisture or fog on the front window quickly, set the temperature to
the high temperature and the fan speed
to their maximum level.
• Af ter the windshield is cleared, press the
front defroster button again (the in-
dicator light will turn off ).
• When the
front defroster button is
pressed, the air conditioner and heater will
automatically turn on to defog the wind-
shield. The outside air recirculation mode will be selected to improve the defogging
performance.
Fan speed control:
Press the
fan speed control button to
manually control the fan speed.
Press the AUTO button to change the fan
speed to the automatic mode.
Air flow control:
Press the MODE button to change the air
flow mode.
— Air flows from the center and side
ventilators.
—Air flows from the center and side
ventilators and foot outlets.
—Air flows mainly from the foot
outlets.
—Air flows from the defroster out-
lets and foot outlets.
—Air flows from the defroster
vents.
Temperature control:
Press the temperature control buttons to
set the desired temperature.
4-40Monitor, climate, audio, phone and voice recognition systems
Page 321 of 610

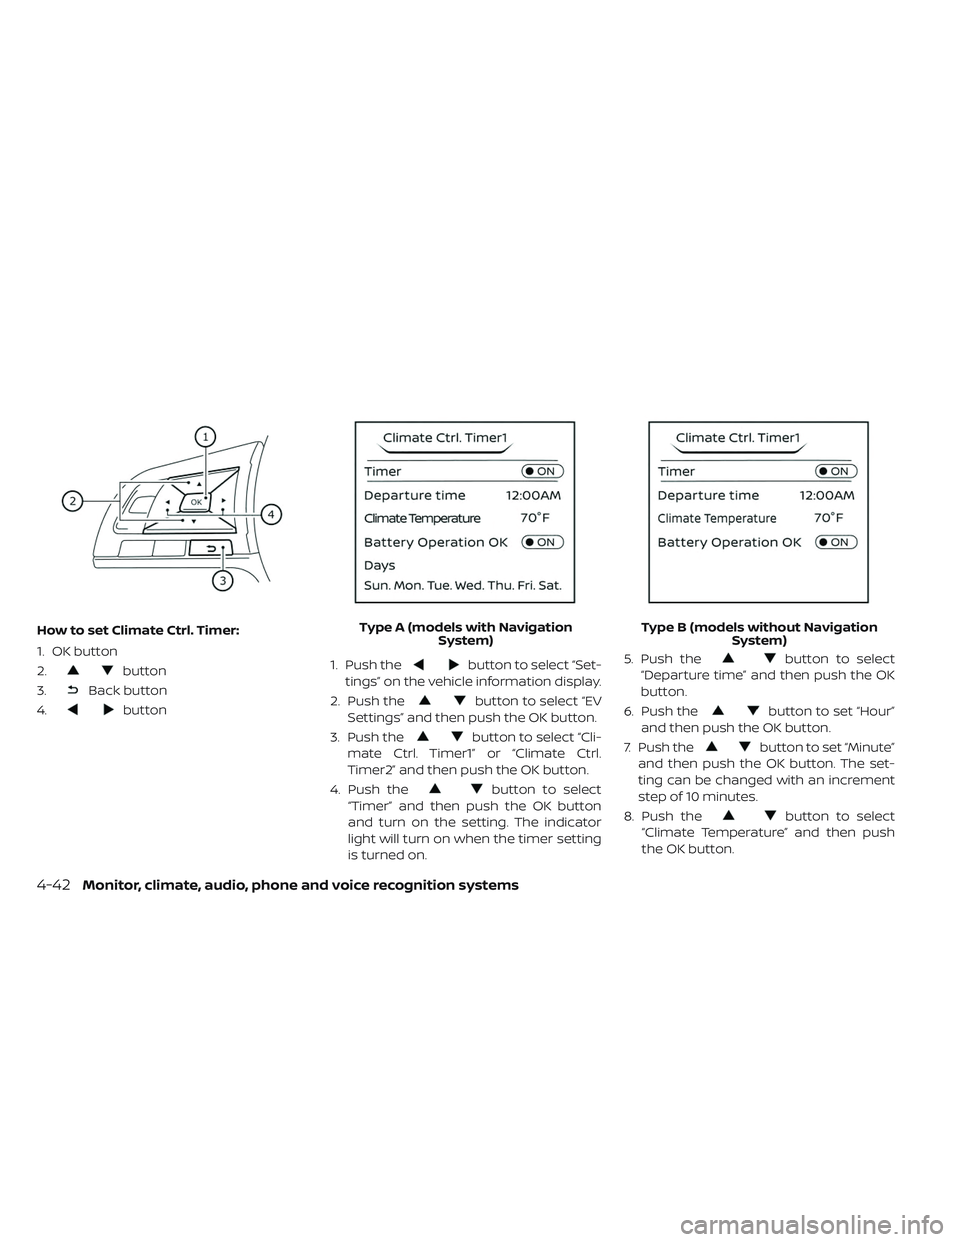
How to set Climate Ctrl. Timer:
1. OK button
2.
button
3.
Back button
4.
button 1. Push the
button to select “Set-
tings” on the vehicle information display.
2. Push the
button to select “EV
Settings” and then push the OK button.
3. Push the
button to select “Cli-
mate Ctrl. Timer1” or “Climate Ctrl.
Timer2” and then push the OK button.
4. Push the
button to select
“Timer” and then push the OK button
and turn on the setting. The indicator
light will turn on when the timer setting
is turned on. 5. Push the
button to select
“Departure time” and then push the OK
button.
6. Push the
button to set “Hour”
and then push the OK button.
7. Push the
button to set “Minute”
and then push the OK button. The set-
ting can be changed with an increment
step of 10 minutes.
8. Push the
button to select
“Climate Temperature” and then push
the OK button.
Type A (models with Navigation
System) Type B (models without Navigation
System)
4-42Monitor, climate, audio, phone and voice recognition systems
Page 322 of 610

9. Push thebutton to set Climate
Temperature and then push the OK
button.
10. * Push the
button to select
"Days" and then push the OK button.
The current day of the week is dis-
played with an underline.
Push the
button to select the
days of the week you wish to activate
the Climate Control system and then
push the OK button. The indicator light
of the selected button will turn on.
11. * Af ter setting the day of the week, push the Back button and return to the pre-
vious screen.
The set day of the week is lit in white.
12. Af ter the setting is complete, place the power switch in the OFF position, and
then connect the charge connector to
the vehicle.
* models with Navigation System Info:
The Climate Ctrl. Timer does not activate if
the charge connector is not connected to
the vehicle. When the “Battery Operation
OK” is turned on and the charging connec-
tor is not connected to the vehicle, the Cli-
mate Ctrl. Timer will activate for 15 minutes.
When the outside temperature is high, the
interior temperature may not reach the set
temperature within the 15 minutes.
Turn "Battery Operation OK" to OFF when it
is not necessary to operate air condition-
ing timer in order to prevent Li-ion battery
from discharging.
For models without Navigation System, the
Climate Ctrl. Timer operates repeatedly ev-
ery day once it is turned on.
Operating tips for using Climate
Ctrl. Timer
• The Climate Ctrl. Timer will only start when
the power switch is in the LOCK/OFF or
ACC position.
• To turn off the Climate Ctrl. Timer function, turn off the “Climate Ctrl. Timer1” and
"Climate Ctrl. Timer2" setting in the video
information display using the
button on the steering wheel. The start
and stop time settings will not be deleted
even if the Climate Ctrl. Timer function is
turned off.
• While the Climate Ctrl. Timer is operating, the Climate Ctrl. Timer indicator and the
charging status indicator lights flash. If the
Climate Ctrl. Timer is set to activate, the
Climate Ctrl. Timer indicator illuminates.*
• If the Climate Ctrl. Timer starts operating while the vehicle is being charged, the
time required for charging will be longer.
• Operating the Climate Ctrl. Timer or re- mote climate control in an environment
where the temperature is low may de-
crease the rate of battery charge.
• Timer setting can also be changed while Climate Ctrl. Timer is operated. When the
power position is switched to OFF, the air
conditioner starts or enters waiting mode
depending on the new timer settings.
• When the difference in temperature be- tween the air conditioner setting tem-
perature and the temperature outside the
vehicle is large, the temperature inside the
vehicle may not be maintained at the set-
ting temperature.
Monitor, climate, audio, phone and voice recognition systems4-43
Page 323 of 610

• The charging status indicator lights illumi-nate in a specific pattern when the Li-ion
battery warmer operates. The charging
status indicator lights use the same pat-
tern to indicate 12–volt battery charging,
Climate Ctrl. Timer operation or Remote
Climate Control operation. The charging
status indicator lights do not change if the
Li-ion battery warmer operates at the
same time as the above features.
•
The temperature in the passenger com-
partment may not be comfortable if enter-
ing the vehicle too soon before or too long
af ter the scheduled time of departure.
• Air conditioning is limited to the capacity of the electric power when the charge
connector is connected. Therefore, the
temperature may not reach the set tem-
perature due to limitations in air condi-
tioning performance, if ambient tempera-
ture is excessively high or low, or if the
charge connector is connected to a 120–
volt plug outlet.
• The Climate Ctrl. Timer operates the cli- mate control function so that a comfort-
able temperature is provided in the pas-
senger compartment at the scheduled time of departure. The climate control is
set to stop at the scheduled time of
departure.
• Depending on the facilities of charging station, there may be time when it is not
available for charging. Confirm the avail-
ability of the charging facility before set-
ting the Climate Ctrl. Timer. Be sure that
the power switch of the charger is turned
on when setting the Climate Ctrl. Timer.
• When the power switch is turned OFF af- ter changing the setting, the new setting
will be applied.
*models with Navigation SystemRemote climate control
This vehicle incorporates a communica-
tion device that is called a TCU (Telematics
Control Unit). The communication connec-
tion between this unit and Nissan Data
Center allows for various remote function
services.
Even when away from the vehicle, climate
control can be started by accessing the
Web Owner Portal using a cellular phone or
a personal computer. When operation is started, or at the set
start time, the Nissan Data Center ac-
cesses the vehicle. When the vehicle re-
ceives a command for remote operation,
the climate control immediately turns ON
and operates for the specified period of
time. Confirmation of the ON/OFF of the
climate control operation can be checked
by accessing the Web Owner Portal, or by
e-mail.
Completing registration for the
NissanConnect® EV and Services is neces-
sary before using the service. For additional
information, refer to the NissanConnect®
Manual (for Leaf ).WARNING
• Radio waves could adversely affect electric medical equipment. For ad-
ditional information, refer to your
electric medical equipment manu-
facturer for the possible effect on
pacemakers before using the re-
mote climate control.
4-44Monitor, climate, audio, phone and voice recognition systems
Page 347 of 610

When installing a CB, ham radio or car
phone in your vehicle, be sure to observe
the following precautions; otherwise, the
new equipment may adversely affect the
EV control system and other electronic
parts.
WARNING
• A cellular phone should not be used for any purpose while driving so full
attention may be given to vehicle
operation. Some jurisdictions pro-
hibit the use of cellular phones while
driving.
• If you must make a call while your vehicle is in motion, the hands free
cellular phone operational mode is
highly recommended. Exercise ex-
treme caution at all times so full at-
tention may be given to vehicle op-
eration.
• If you are unable to devote full at- tention to vehicle operation while
talking on the phone, pull off the
road to a safe location and stop your
vehicle.
CAUTION
• Keep the antenna as far away as possible from the electronic control
modules.
• Keep the antenna wire more than 8 in (20 cm) away from the electronic
control system harnesses. Do not
route the antenna wire next to any
harness.
• Adjust the antenna standing-wave ratio as recommended by the manu-
facturer.
• Connect the ground wire from the CB radio chassis to the body.
• For additional information, it is rec- ommended that you visit a NISSAN
certified LEAF dealer.
WARNING
• Use a phone af ter stopping your ve- hicle in a safe location. If you have to
use a phone while driving, exercise
extreme caution at all times so full
attention may be given to vehicle
operation.
• If you are unable to devote full at- tention to vehicle operation while
talking on the phone, pull off the
road to a safe location and stop your
vehicle.
CAUTION
To avoid draining the vehicle battery,
use a phone af ter the READY to drive
indicator light is on.
CAR PHONE OR CB RADIO BLUETOOTH® HANDS-FREE PHONE
SYSTEM WITHOUT NAVIGATION
SYSTEM (FOR MODELS WITHOUT
NISSANCONNECT® SYSTEM)
4-68Monitor, climate, audio, phone and voice recognition systems
Page 513 of 610

The hill start assist system automatically
keeps the brakes applied to help prevent
the vehicle from rolling backwards in the
time it takes the driver to release the brake
pedal and apply the accelerator when the
vehicle is stopped on a hill.
Hill start assist will operate automatically
under the following conditions:
• The shif t lever is placed in the D (Drive), Bmode, or R (Reverse) position.
• The vehicle is stopped completely on a hill by applying the brake.
The maximum holding time is 2 seconds.
Af ter 2 seconds the vehicle will begin to roll
back and hill start assist will stop operating
completely.
Hill start assist will not operate when the
shif t lever is placed in the N (Neutral) or P
(Park) position or on a flat and level road.
CAUTION
To prevent damage to the Li-ion bat-
tery: Do not store the vehicle in tem-
peratures below -13°F (-25°C) for over
seven days. If the outside temperature
is -13°F (-25°C) or less, the Li-ion battery
may freeze and it cannot be charged or
provide power to run the vehicle. Move
the vehicle to a warm location.
NOTE:
• Connect the charger to the vehicle and
place the power switch in the OFF posi-
tion when parking the vehicle if tem-
peratures may go below -4°F (-20°C). For
models with 40 kWh battery model, this
provides external power to the Li-ion
battery warmer (if so equipped) when it
operates and does not discharge the Li-
ion battery. Vehicle driving range is re-
duced if the Li-ion battery warmer (if so
equipped) operates (Li-ion battery tem-
perature approximately -4°F (-20°C) or
colder) while driving the vehicle. You
may need to charge the Li-ion battery
sooner than in warmer temperatures. •
The Li-ion battery requires more time to
charge when the Li-ion battery warmer
(if so equipped) operates.
•
The predicted charging time displayed
on the meter and navigation system (if so
equipped) increases when the Li-ion bat-
tery warmer (if so equipped) operates.
• Vehicle range may be substantially re-
duced in extremely cold conditions (for
example under -4°F (-20°C)).
• Using the climate control system to
heat the cabin when outside tempera-
ture is below 32°F (0°C) uses more elec-
tricity and affects vehicle range more
than when using the heater when the
temperature is above 32°F (0°C).
• Climate control performance is reduced
when using the Climate Ctrl. Timer or
Remote Climate Control while the Li-ion
battery warmer (if so equipped) oper-
ates (for models with 40 kWh battery
model). Set only the charging timer [End
Time] when charging in cold weather.
The vehicle automatically determines
when to start charging to fully charge
the Li-ion battery, even if the Li-ion bat-
tery warmer operates. Charging ends
before the set end time if the Li-ion bat-
tery is fully charged.
COLD WEATHER DRIVING
5-154Starting and driving