2019 NISSAN LEAF window
[x] Cancel search: windowPage 314 of 610

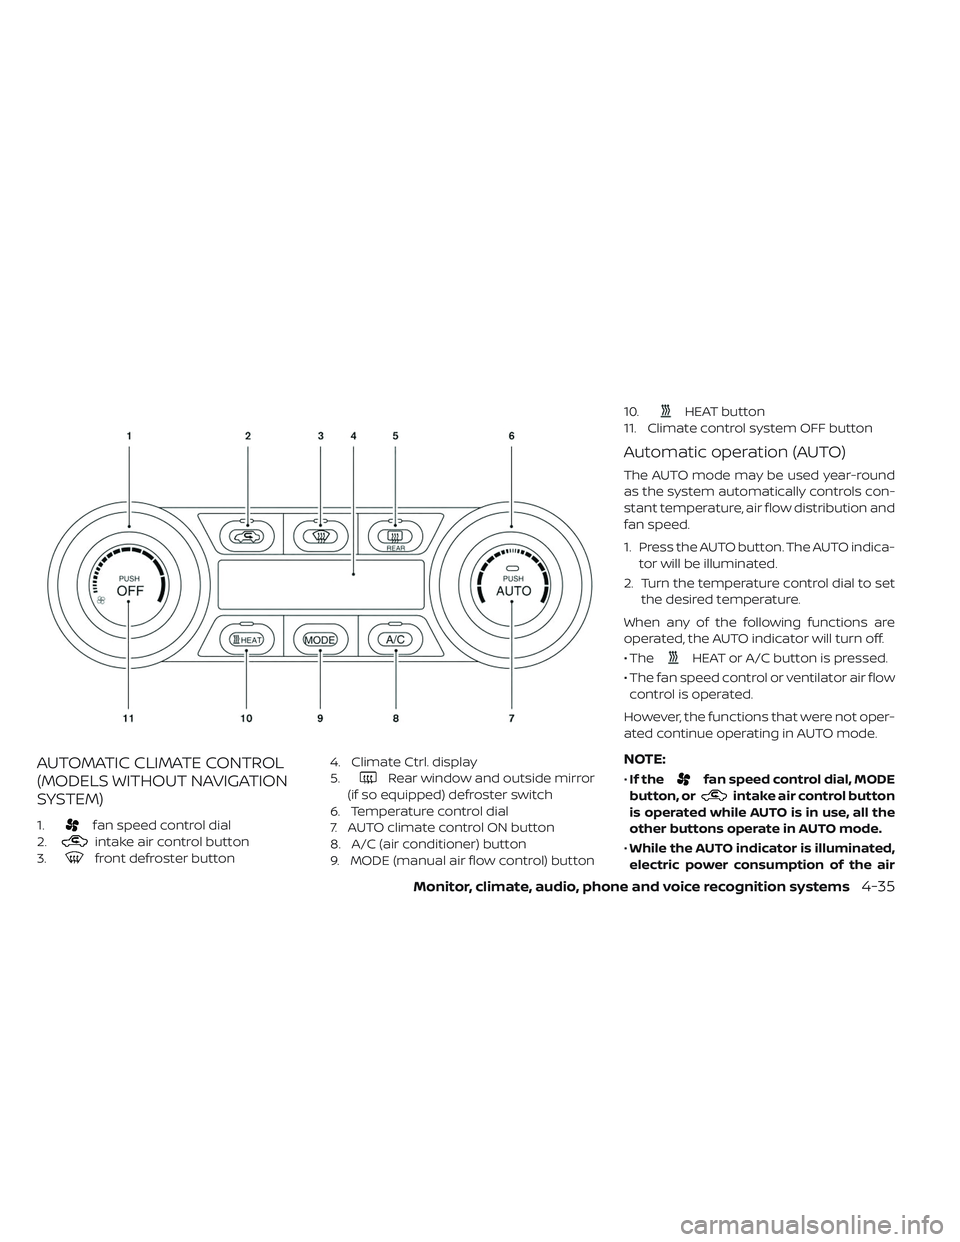
AUTOMATIC CLIMATE CONTROL
(MODELS WITHOUT NAVIGATION
SYSTEM)
1.fan speed control dial
2.
intake air control button
3.
front defroster button 4. Climate Ctrl. display
5.
Rear window and outside mirror
(if so equipped) defroster switch
6. Temperature control dial
7. AUTO climate control ON button
8. A/C (air conditioner) button
9. MODE (manual air flow control) button 10.
HEAT button
11. Climate control system OFF button
Automatic operation (AUTO)
The AUTO mode may be used year-round
as the system automatically controls con-
stant temperature, air flow distribution and
fan speed.
1. Press the AUTO button. The AUTO indica- tor will be illuminated.
2. Turn the temperature control dial to set the desired temperature.
When any of the following functions are
operated, the AUTO indicator will turn off.
• The
HEAT or A/C button is pressed.
• The fan speed control or ventilator air flow control is operated.
However, the functions that were not oper-
ated continue operating in AUTO mode.
NOTE:
• If thefan speed control dial, MODE
button, or
intake air control button
is operated while AUTO is in use, all the
other buttons operate in AUTO mode.
• While the AUTO indicator is illuminated,
electric power consumption of the air
Monitor, climate, audio, phone and voice recognition systems4-35
Page 315 of 610

conditioner can be economized com-
pared to the amount consumed while
the AUTO indicator is not illuminated.
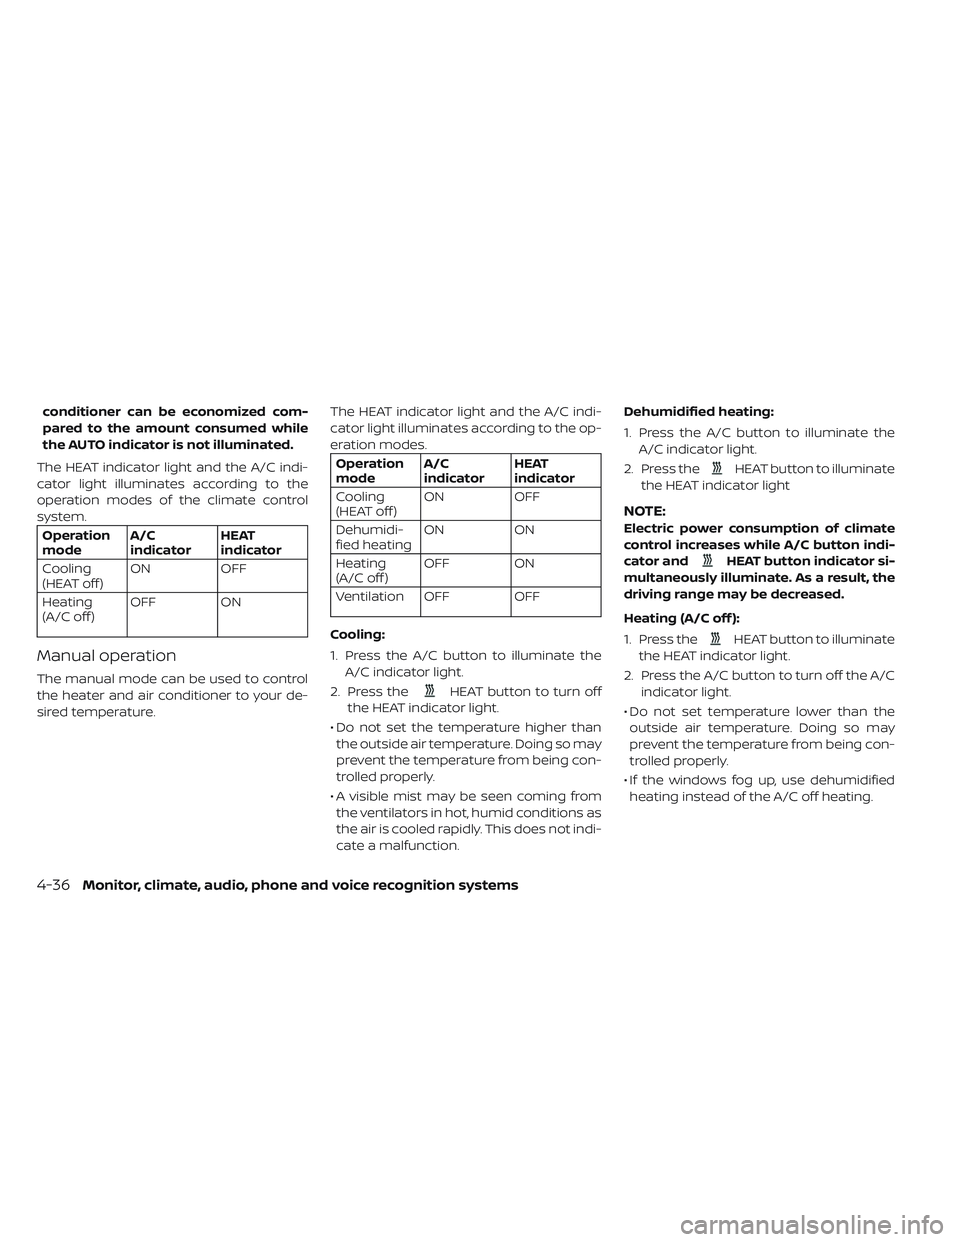
The HEAT indicator light and the A/C indi-
cator light illuminates according to the
operation modes of the climate control
system.
Operation
mode A/C
indicator HEAT
indicator
Cooling
(HEAT off ) ON
OFF
Heating
(A/C off ) OFF ON
Manual operation
The manual mode can be used to control
the heater and air conditioner to your de-
sired temperature. The HEAT indicator light and the A/C indi-
cator light illuminates according to the op-
eration modes.
Operation
mode
A/C
indicator HEAT
indicator
Cooling
(HEAT off ) ON
OFF
Dehumidi-
fied heating ON
ON
Heating
(A/C off ) OFF ON
Ventilation OFF OFF
Cooling:
1. Press the A/C button to illuminate the A/C indicator light.
2. Press the
HEAT button to turn off
the HEAT indicator light.
• Do not set the temperature higher than the outside air temperature. Doing so may
prevent the temperature from being con-
trolled properly.
• A visible mist may be seen coming from the ventilators in hot, humid conditions as
the air is cooled rapidly. This does not indi-
cate a malfunction. Dehumidified heating:
1. Press the A/C button to illuminate the
A/C indicator light.
2. Press the
HEAT button to illuminate
the HEAT indicator light
NOTE:
Electric power consumption of climate
control increases while A/C button indi-
cator and
HEAT button indicator si-
multaneously illuminate. As a result, the
driving range may be decreased.
Heating (A/C off ):
1. Press the
HEAT button to illuminate
the HEAT indicator light.
2. Press the A/C button to turn off the A/C indicator light.
• Do not set temperature lower than the outside air temperature. Doing so may
prevent the temperature from being con-
trolled properly.
• If the windows fog up, use dehumidified heating instead of the A/C off heating.
4-36Monitor, climate, audio, phone and voice recognition systems
Page 316 of 610

Ventilation:
Press the
HEAT button and A/C but-
ton if the indicator lights are on so that
both indicator lights turn off.
NOTE:
• The ventilation mode requires a lower
power consumption, so cruising dis-
tance will increase.
• In ventilation mode, temperature is not
indicated on the air conditioner display.
Dehumidified defrosting/defogging:
Press the
front defroster button (the
indicator light will illuminate).
• To remove moisture or fog on the front window quickly, set the temperature to
the high temperature and the fan speed
to their maximum level.
• Af ter the windshield is cleared, press the
front defroster button again (the in-
dicator light will turn off ).
• When the
front defroster button is
pressed, the air conditioner will automati-
cally turn on to defog the windshield.
The outside air recirculation mode will
be selected to improve the defogging
performance. Fan speed control:
Turn the
fan speed control dial to
manually control the fan speed.
Press the AUTO button to change the fan
speed to the automatic mode.
Air flow control:
Press the MODE button to change the air
flow mode.
— Air flows from the center and side
ventilators.
—Air flows from the center and side
ventilators and foot outlets.
—Air flows mainly from the foot
outlets.
—Air flows from the defroster out-
lets and foot outlets.
—
Air flows from the defroster vents.
Temperature control:
Turn the temperature control dial to set the
desired temperature. Recirculation:
Press the
intake air control button to
change the air circulation mode. When the
indicator light illuminates, the flowing air is
recirculated inside the vehicle.
When the outside temperature exceeds
70°F (21°C) the air conditioning system may
default to air recirculation mode automati-
cally to reduce overall power consumption.
To exit air recirculation mode, deselect the
air recirculation button (indicator will turn
off ) to enter fresh mode.
Fresh air:
Press the
intake air control button to
change the air circulation mode. When the
indicator light does not illuminate, the flow-
ing air is drawn from outside the vehicle.
Automatic air intake control:
In the AUTO mode, the intake air will be
controlled automatically. When the outside
temperature exceeds 70°F (21°C), the air
conditioning system may default to air re-
circulation mode automatically to reduce
overall power consumption.
Monitor, climate, audio, phone and voice recognition systems4-37
Page 317 of 610

To set the automatic control mode, press
and hold the
intake air control button.
The indicator light will blink twice and the
inside/outside circulation will then be con-
trolled automatically. When in automatic
mode, the indicator light will come on when
inside air recirculation is active.
Rear window and outside mirror (if so
equipped) defroster switch:
For additional information, refer to “Rear
window and outside mirror (if so equipped)
defroster switch” in the “Instruments and
controls” section of this manual
To turn the system off
To turn off the climate control, press the
Climate control system OFF button. The
same operating mode (Heater or A/C) that
was active when the system is turned off is
active when system is turned back on.
AUTOMATIC CLIMATE CONTROL
(MODELS WITH NAVIGATION
SYSTEM)
1. Temperature control button
2.
HEAT button
3. Climate Ctrl. Timer indicator 4.
front defroster button
5.
fan speed control button
6.
Rear window and outside mirror
(if so equipped) defroster switch
7.
intake air control button
8. Climate control system ON·OFF button
9. AUTO climate control ON button
4-38Monitor, climate, audio, phone and voice recognition systems
Page 319 of 610

Dehumidified heating:
1. Press the A/C button to illuminate theA/C indicator light.
2. Press the
HEAT button to illuminate
the HEAT indicator light
NOTE:
Electric power consumption of climate
control increases while A/C button indi-
cator and
HEAT button indicator si-
multaneously illuminate. As a result, the
driving range may be decreased.
Heating (A/C off ):
1. Press the
HEAT button to illuminate
the HEAT indicator light.
2. Press the A/C button to turn off the A/C indicator light.
• Do not set temperature lower than the outside air temperature. Doing so may
prevent the temperature from being con-
trolled properly.
• If the windows fog up, use dehumidified heating instead of the A/C off heating. Ventilation:
Press the
HEAT button and A/C but-
ton if the indicator lights are on so that
both indicator lights turn off.
NOTE:
• The ventilation mode requires a lower
power consumption, so cruising dis-
tance will increase.
• In ventilation mode, temperature is not
indicated on the navigation monitor or
on the air conditioner display.
Dehumidified defrosting/defogging:
Press the
front defroster button (the
indicator light will illuminate).
• To remove moisture or fog on the front window quickly, set the temperature to
the high temperature and the fan speed
to their maximum level.
• Af ter the windshield is cleared, press the
front defroster button again (the in-
dicator light will turn off ).
• When the
front defroster button is
pressed, the air conditioner and heater will
automatically turn on to defog the wind-
shield. The outside air recirculation mode will be selected to improve the defogging
performance.
Fan speed control:
Press the
fan speed control button to
manually control the fan speed.
Press the AUTO button to change the fan
speed to the automatic mode.
Air flow control:
Press the MODE button to change the air
flow mode.
— Air flows from the center and side
ventilators.
—Air flows from the center and side
ventilators and foot outlets.
—Air flows mainly from the foot
outlets.
—Air flows from the defroster out-
lets and foot outlets.
—Air flows from the defroster
vents.
Temperature control:
Press the temperature control buttons to
set the desired temperature.
4-40Monitor, climate, audio, phone and voice recognition systems
Page 320 of 610

Air recirculation:
Press the
intake air control button to
change the air circulation mode. When the
indicator light illuminates, the flowing air is
recirculated inside the vehicle.
When the outside temperature exceeds
70°F (21°C) the air conditioning system may
default to air recirculation mode automati-
cally to reduce overall power consumption.
To exit air recirculation mode, deselect the
air recirculation button (indicator will turn
off ) to enter fresh mode.
Outside air circulation:
Press the
intake air control button to
change the air circulation mode. When the
indicator light does not illuminate, the flow-
ing air is drawn from outside the vehicle.
Automatic air intake control:
In the AUTO mode, the intake air will be
controlled automatically. When the outside
temperature exceeds 70°F (21°C), the air
conditioning system may default to air re-
circulation mode automatically to reduce
overall power consumption. To set the automatic control mode, press
and hold the
intake air control button.
The indicator light will blink twice and the
inside/outside circulation will then be con-
trolled automatically. When in automatic
mode, the indicator light will come on when
inside air recirculation is active.
Rear window and outside mirror (if so
equipped) defroster switch:
For additional information, refer to “Rear
window and outside mirror (if so equipped)
defroster switch” in the “Instruments and
controls” section of this manual
To turn the system off
To turn off the climate control, press the
Climate control system ON·OFF button.
The same operating mode (Heater or A/C)
that was active when the system is turned
off is active when system is turned back on.
CLIMATE CTRL. TIMER
This function pre-heats or pre-cools the
passenger compartment of the vehicle to
the temperature before driving. This helps
reduce power consumption from the Li-ion
battery.
The Climate Ctrl. Timer operates the air con-
ditioner using power from the charger or the
Li-ion battery. While the charging connector
is connected to the vehicle, electric power
from the Li-ion battery is not used.
The Climate Ctrl. Timer function allows two
timer settings.
Once the Climate Ctrl. Timer is set, it will
complete air conditioning by the time that
is set. It is not necessary to set the Climate
Ctrl. Timer every day.
WARNING
Even if the Climate Ctrl. Timer is set, the
temperature in the passenger com-
partment may become high or low if
the system automatically stops. Do not
leave children or adults who would
normally require the support of others
alone in your vehicle. Pets should not
be lef t alone either. On hot, sunny days,
temperatures in a closed vehicle could
quickly become high enough to cause
severe or possibly fatal injuries to
people or animals. Also on cold days,
temperature in a vehicle could become
low enough to cause severe or pos-
sible fatal injuries to people or animals.
Monitor, climate, audio, phone and voice recognition systems4-41
Page 328 of 610

•CDs that are in poor condition or are
dirty, scratched or covered with finger-
prints may not work properly.
•
The following CDs may not work properly.
– Copy Control Compact Discs (CCCD)
– Recordable Compact Discs (CD-R)
– Rewritable Compact Discs (CD-RW)
•
Do not use the following CDs as they may
cause the CD player to malfunction:
– 3.1 in (8 cm) discs with an adapter
– CDs that are not round
– CDs with a paper label
– CDs that are warped, scratched, or
have abnormal edges
• This audio system can only play prere-
corded CDs. It has no capability to re-
cord or burn CDs.
• If the CD cannot be played, one of the
following messages will be displayed.
CHECK DISC:
• Confirm that the CD is inserted correctly
(the label side is facing up, etc.).
•
Confirm that the CD is not bent or warped
and it is free of scratches.
PRESS EJECT:
This is an error due to excessive tem-
perature inside the player. Remove the
CD by pressing the EJECT button. Af ter a
short time, reinsert the CD. The CD can be
played when the temperature of the
player returns to normal.
UNPLAYABLE:
The file is unplayable in this audio system
(only MP3 or WMA (if so equipped) CD).
Compressed audio files
(MP3/WMA)
Terms
• MP3 — MP3 is short for Moving Pictures Experts Group Audio Layer 3. MP3 is the
most well-known compressed digital au-
dio file format. This format allows for near
“CD quality” sound, but at a fraction of the
size of normal audio files. MP3 conversion
of an audio track from CD-ROM can re-
duce the file size by approximately a
10:1 ratio with virtually no perceptible loss
in quality. MP3 compression removes the
redundant and irrelevant parts of a sound
signal that the human ear doesn’t hear. • WMA — Windows Media Audio (WMA)* is a
compressed audio format created by Mi-
crosof t as an alternative to MP3. The WMA
codec offers greater file compression
than the MP3 codec, enabling storage of
more digital audio tracks in the same
amount of space when compared to
MP3s at the same level of quality.
• Bit rate — Bit rate denotes the number of bits per second used by a digital music file.
The size and quality of a compressed digi-
tal audio file is determined by the bit rate
used when encoding the file.
• Sampling frequency — Sampling fre- quency is the rate at which the samples of
a signal are converted from analog to digi-
tal (A/D conversion) per second.
• Multisession — Multisession is one of the methods for writing data to media. Writing
data once to the media is called a single
session, and writing more than once is
called a multisession.
• ID3/WMA Tag — The ID3/WMA tag is the part of the encoded MP3 or WMA file that
contains information about the digital
music file such as song title, artist, encod-
ing bit rate, track time duration, etc. ID3 tag
information is displayed on the Artist/
song title line on the display.
Monitor, climate, audio, phone and voice recognition systems4-49
Page 329 of 610

* Windows® and Windows Media® are reg-
istered trademarks and trademarks in the
United States of America and other coun-
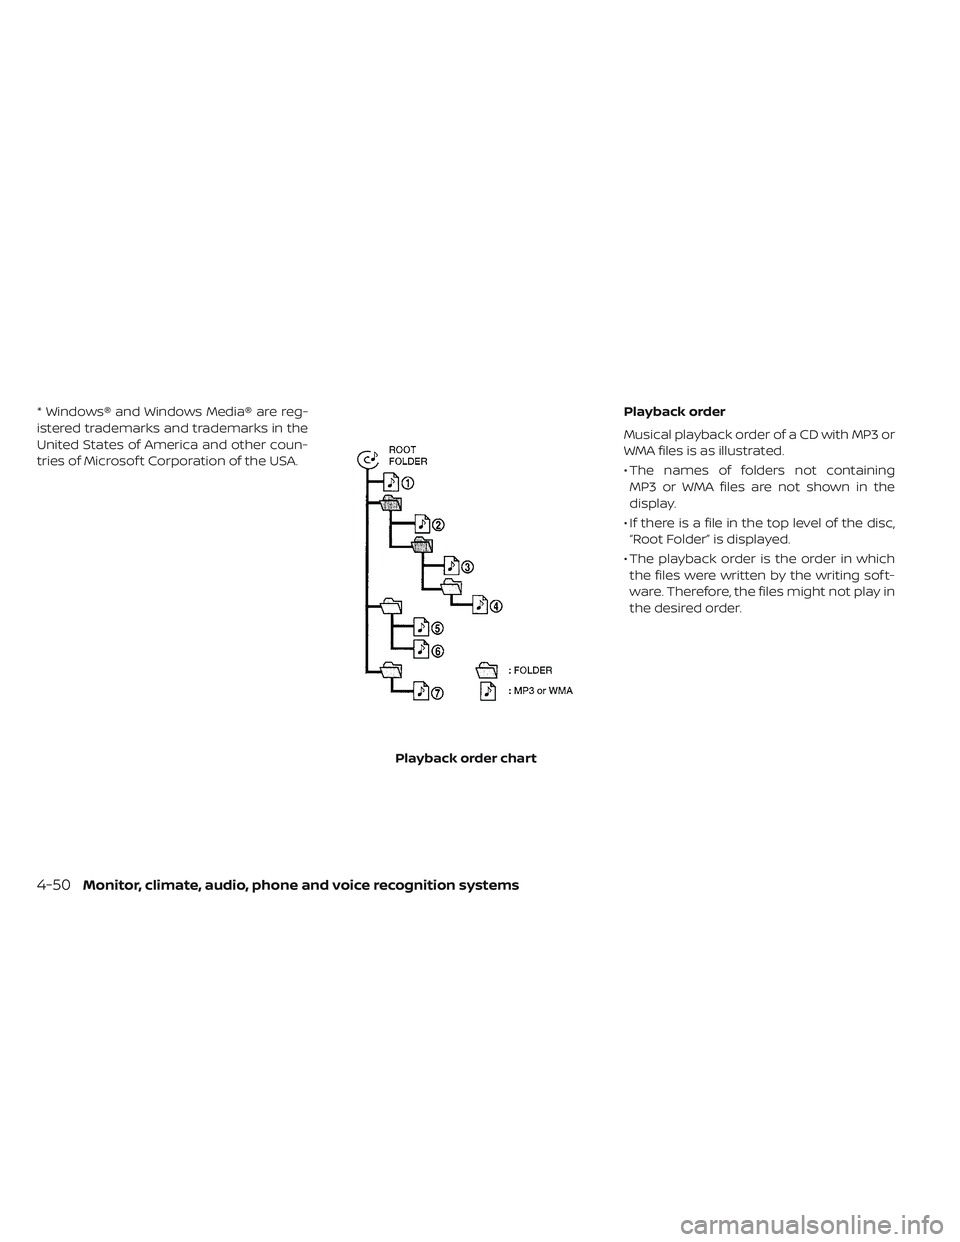
tries of Microsof t Corporation of the USA.Playback order
Musical playback order of a CD with MP3 or
WMA files is as illustrated.
• The names of folders not containing
MP3 or WMA files are not shown in the
display.
• If there is a file in the top level of the disc, “Root Folder” is displayed.
• The playback order is the order in which the files were written by the writing sof t-
ware. Therefore, the files might not play in
the desired order.
Playback order chart
4-50Monitor, climate, audio, phone and voice recognition systems