2019 NISSAN LEAF tow
[x] Cancel search: towPage 524 of 610

using the emergency tire puncture re-
pair kit:
• Securely tighten the compressorhose to the tire valve. Failure to do so
can cause the sealant to spray into
the air and get into your eyes or on
the skin.
• Do not stand directly beside the dam- aged tire while it is being inflated be-
cause of the risk of the rupture. If
there are any cracks or bumps, turn
the compressor off immediately.
If the tire pressure does not increase to
26 psi (180 kPa) within 10 minutes, the
tire may be seriously damaged and the
tire cannot be repaired with this tire
repair kit. It is recommended that you
visit a NISSAN certified LEAF dealer.
7. When the tire pressure is at the specified amount, turn the air compressor off. If
the tire cannot be inflated to the speci-
fied amount, the air compressor can be
turned off at the minimum of 26 psi
(180 kPa). Remove the power plug from
the power outlet and quickly remove the
hose from the tire valve. Attach the pro-
tective cap and valve cap. Properly stow the emergency tire puncture repair kit in
the cargo area.
CAUTION
To avoid serious personal injury when
stowing the emergency tire puncture
repair kit:
• Keep the sealant bottle screwed into the compressor. Failure to do so can
cause the sealant to spray into the air
and get into your eyes or on the skin.
8. Immediately drive the vehicle for 10 min- utes or 2 miles (3 km) at a speed below
50 mph (80 km/h).
9. Af ter driving, make sure that the air compressor switch is in the OFF posi-
tion, then screw the hose securely onto
the tire valve. Check the tire pressure
with the pressure gauge. Temporary re-
pair is completed if the tire pressure
does not drop. Make sure the pressure is adjusted to
the pressure that is specified on the Tire
and Loading Information label before
driving.
10. If the tire pressure drops, repeat the steps from 5 to 9. If the pressure drops
again or under 19 psi (130 kPa), the tire
cannot be repaired with this tire re-
pair kit. If the tire cannot be repaired,
the driver should not drive on it any
further. The car should be towed to the
nearest dealership.
The sealant bottle and hose cannot be
reused to repair another punctured tire.
It is recommended that you visit a
NISSAN certified LEAF dealer to pur-
chase replacements.
Af ter repairing tire:
It is recommended that you visit a NISSAN
certified LEAF dealer for tire repair/
replacement as soon as possible.
In case of emergency6-9
Page 529 of 610

Do not attempt to start the system by
pushing the vehicle.
CAUTION
An EV cannot be push-started or tow-
started. Attempting to do so may
cause traction motor damage. When towing your vehicle, all State (Provin-
cial in Canada) and local regulations for
towing must be followed.
Incorrect towing equipment could dam-
age your vehicle. Towing instructions are
available from a NISSAN certified LEAF
dealer. Local service operators are familiar
with the applicable laws and procedures
for towing. To assure proper towing and to
prevent accidental damage to your vehicle,
NISSAN recommends that you have a ser-
vice operator tow your vehicle. It is advis-
able to have the service operator carefully
read the following precautions.
WARNING
• Never ride in a vehicle that is being towed.
• Never get under your vehicle af ter it has been lif ted by a tow truck.
CAUTION
• When towing, make sure that the ax- les, steering system and power train
are in working condition. If any unit
is damaged, dollies must be used.
• Always attach safety chains before towing.
For additional information about towing
your vehicle behind a Recreational Vehicle
(RV), refer to “Flat towing” in the “Technical
and consumer information” section of this
manual.
PUSH STARTING TOWING YOUR VEHICLE
6-14In case of emergency
Page 530 of 610

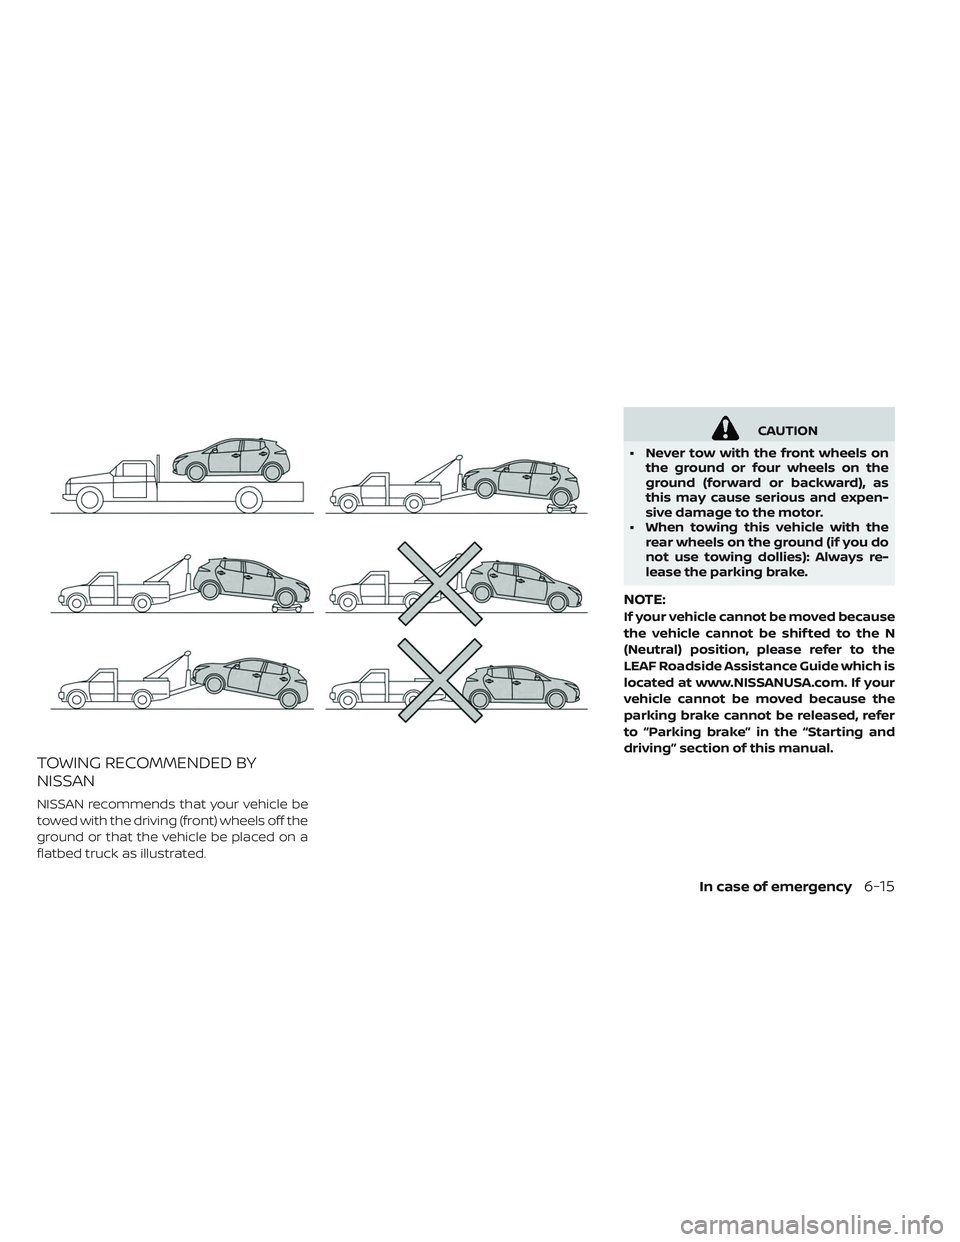
TOWING RECOMMENDED BY
NISSAN
NISSAN recommends that your vehicle be
towed with the driving (front) wheels off the
ground or that the vehicle be placed on a
flatbed truck as illustrated.
CAUTION
• Never tow with the front wheels on the ground or four wheels on the
ground (forward or backward), as
this may cause serious and expen-
sive damage to the motor.
• When towing this vehicle with the rear wheels on the ground (if you do
not use towing dollies): Always re-
lease the parking brake.
NOTE:
If your vehicle cannot be moved because
the vehicle cannot be shif ted to the N
(Neutral) position, please refer to the
LEAF Roadside Assistance Guide which is
located at www.NISSANUSA.com. If your
vehicle cannot be moved because the
parking brake cannot be released, refer
to “Parking brake” in the “Starting and
driving” section of this manual.
In case of emergency6-15
Page 531 of 610

VEHICLE RECOVERY (FREEING A
STUCK VEHICLE)
WARNING
To avoid vehicle damage, serious per-
sonal injury or death when recovering
a stuck vehicle:
• Contact a professional towing ser- vice to recover the vehicle if you
have any questions regarding the
recovery procedure.
• Tow chains or cables must be at- tached only to main structural
members of the vehicle.
• Do not use the vehicle tie-downs to tow or free a stuck vehicle.
• Only use devices specifically de- signed for vehicle recovery and fol-
low the manufacturer’s instructions.
• Always pull the recovery device straight out from the front of the ve-
hicle. Never pull at an angle.
• Route recovery devices so they do not touch any part of the vehicle ex-
cept the attachment point. If your vehicle is stuck in sand, snow, mud,
etc., use a tow strap or other device de-
signed specifically for vehicle recovery. Al-
ways follow the manufacturer’s instruc-
tions for the recovery device.Rocking a stuck vehicle
If the vehicle is stuck in sand, snow, mud,
etc., try to free it by following the procedure
below.
1. Turn off the Vehicle Dynamic Control
(VDC) system.
2. Make sure the area in front and behind the vehicle is clear of obstructions.
3. Turn the steering wheel lef t and right to clear an area around the front tires.
4. Slowly rock the vehicle forward and backward.
• Shif t back and forth between the R (Re- verse) and D (Drive) positions.
• Apply the accelerator as little as pos- sible to maintain the rocking motion.
• Release the accelerator pedal before shif ting between R (Reverse) and D
(Drive).
• Do not spin the tires above 35 mph (55 km/h). 5. If the vehicle cannot be freed af ter a few
tries, contact a professional towing ser-
vice to remove the vehicle.
6-16In case of emergency
Page 535 of 610

CHROME PARTS
Clean chrome parts regularly with a non-
abrasive chrome polish to maintain the fin-
ish.
TIRE DRESSING
NISSAN does not recommend the use of
tire dressings. Tire manufacturers apply a
coating to the tires to help reduce discolor-
ation of the rubber. If a tire dressing is ap-
plied to the tires, it may react with the coat-
ing and form a compound. This compound
may come off the tire while driving and
stain the vehicle paint.
If you choose to use a tire dressing, take the
following precautions:
• Use a water-based tire dressing. The coat-ing on the tire dissolves more easily with
an oil-based tire dressing.
• Apply a light coat of tire dressing to help prevent it from entering the tire tread/
grooves (where it would be difficult to
remove). • Wipe off excess tire dressing using a dry
towel. Make sure the tire dressing is
completely removed from the tire
tread/grooves.
•
Allow the tire dressing to dry as recom-
mended by the tire dressing manufacturer.
Occasionally remove loose dust from the
interior trim, plastic parts and seats using
a vacuum cleaner or sof t bristled brush.
Wipe the vinyl and leather surfaces (if so
equipped) with a clean, sof t cloth damp-
ened in mild soap solution, then wipe clean
with a dry sof t cloth.
Regular care and cleaning is required in
order to maintain the appearance of the
leather (if so equipped).
Before using any fabric protector, read the
manufacturer’s recommendations. Some
fabric protectors contain chemicals that
may stain or bleach the seat material.
Use a cloth dampened only with water to
clean the meter and gauge lens.
WARNING
Do not use water or acidic cleaners (hot
steam cleaners) on the seat. This can
damage the seat or occupant classifi-
cation sensor (weight sensor). This can
also affect the operation of the air bag
system and result in serious personal
injury.
CLEANING INTERIOR
7-4Appearance and care
Page 579 of 610

• The TPMS sensor may be damaged ifit is not handled correctly. Be careful
when handling the TPMS sensor.
• When replacing the TPMS sensor, the ID registration may be required.
It is recommended that you visit a
NISSAN certified LEAF dealer for ID
registration.
• Do not use a valve stem cap that is not specified by NISSAN. The valve
stem cap may become stuck.
• Be sure that the valve stem caps are correctly fitted. Otherwise the valve
may be clogged up with dirt and
cause a malfunction or loss of pres-
sure.
• Do not install a damaged or de- formed wheel or tire even if it has
been repaired. Such wheels or tires
could have structural damage and
could fail without warning.
• The use of retread tire is not recom- mended.
• For additional information regard- ing tires, refer to “Important Tire
Safety Information” (US) or “Tire
Safety Information” (Canada) in the
Warranty Information Booklet.Wheel balance
Unbalanced wheels may affect vehicle
handling and tire life. Even with regular use,
wheels can get out of balance. Therefore,
they should be balanced as required.
Wheel balance service should be per-
formed with the wheels off the vehicle.
Spin balancing the wheels on the vehicle
could lead to mechanical damage.
For additional information regarding tires,
refer to “Important Tire Safety Information”
(US) or “Tire Safety Information” (Canada) in
the Warranty Information Booklet.
Care of wheels
For additional information on care of wheels,
refer to “Cleaning exterior” in the “Appear-
ance and care” section of this manual.
EMERGENCY TIRE PUNCTURE
REPAIR KIT
The emergency tire puncture repair kit
(Emergency Tire Sealant) is supplied with
the vehicle instead of a spare tire. It can be
used to temporarily repair minor tire punc-
tures. If possible, have the vehicle towed to a fa-
cility that can repair or replace the flat tire.
Using the emergency tire puncture repair
kit may cause a malfunction of the tire
pressure sensor and cause the low tire
pressure warning light to illuminate.
For additional information, refer to “Flat tire”
in the “In case of emergency” section of this
manual.
8-40Maintenance and do-it yourself
Page 580 of 610

9 Technical and consumer information
Recommended fluids/lubricants and
capacities.......................... .9-2
Air conditioning system refrigerant and
lubricant recommendations ............9-3
Specifications ........................9-4
Charging system ................... .9-4
Motor .......................... .9-5
Wheels and tires ................... .9-5
Dimensions and weights ...............9-6
When traveling or registering in another
country ........................... .9-7
Vehicle identification ................... .9-7
Vehicle Identification Number (VIN) plate . . . .9-7
Vehicle identification number
(chassis number) ................... .9-7
Traction motor serial number ...........9-8
F.M.V.S.S./C.M.V.S.S Certification label .......9-8
Emission control information label ........9-8
Tire and Loading Information label ........9-9
Air conditioner specification label .........9-9
Installing front license plate ...............9-9
Vehicle loading information ..............9-10 Terms
.......................... .9-10
Vehicle load capacity ................ .9-10
Loading tips .......................9-12
Measurement of weights ..............9-12
Towing a trailer .......................9-13
Flat towing .........................9-13
Uniform tire quality grading ..............9-13
Treadwear........................9-13
Traction AA, A, B and C ................9-14
Temperature A, B and C ...............9-14
Reporting safety defects ................9-14
Telematics overview (models with Navigation
System) .......................... .9-15
Telematic Control Unit Gen2K .............9-17
Event Data Recorders (EDR) ..............9-19
Additional Data Recording (on vehicles
equipped with optional ProPILOT Assist) . . . .9-20
Owner's Manual/Service Manual order
information .........................9-20
Char ging
information ................. .9-21
Cold tire pressures ................... .9-23
Page 589 of 610

WARNING
•
It is extremely dangerous to ride
in the cargo area inside the ve-
hicle. In a collision, people riding
in these areas are more likely to
be seriously injured or killed.
•Do not allow people to ride in
any area of your vehicle that is
not equipped with seats and
seat belts.
•Be sure everyone in your ve-
hicle is in a seat and using a
seat belt properly.
TERMS
It is important to familiarize yourself
with the following terms before
loading your vehicle:
• Curb Weight (actual weight of your vehicle) - vehicle weight including:
standard and optional equipment,
fluids and emergency tools. This
weight does not
include passengers
and cargo.
• GVW (Gross Vehicle Weight) - curb weight plus the combined weight
of passengers and cargo.
•
GVWR (Gross Vehicle Weight Rating) -
maximum total combined weight of
the unloaded vehicle, passengers,
luggage, hitch, trailer tongue load
and any other optional equipment.
• GAWR (Gross Axle Weight Rating) - maximum weight (load) limit speci-
fied for the front or rear axle.
•This information is located on the
F.M.V.S.S./C.M.V.S.S. label.
•
GCWR (Gross Combined Weight
Rating) - The maximum total weight
rating of the vehicle, passengers,
cargo, and trailer.
• Vehicle Capacity Weight, Load limit, Total load capacity - maximum to-
tal weight limit specified of the load
(passengers and cargo) for the ve-
hicle. This is the maximum com-
bined weight of occupants and
cargo that can be loaded into the vehicle. If the vehicle is used to tow
a trailer, the trailer tongue weight
must be included as part of the
cargo load. This information is lo-
cated on the Tire and Loading Infor-
mation label.
•
Cargo capacity - permissible weight
of cargo, the subtracted weight of
occupants from the load limit.
VEHICLE LOAD CAPACITY
Do not exceed the load limit of your
vehicle shown as “The combined
weight of occupants and cargo” on
the Tire and Loading Information
label. Do not exceed the number
of occupants shown as “Seating
Capacity” on the Tire and Loading
Information label.
To get “the combined weight of occu-
pants and cargo”, add the weight of all
occupants, then add the total lug-
gage weight. Examples are shown in
the following illustration.
VEHICLE LOADING INFORMATION
9-10Technical and consumer information