Always evenly distribute the cargo on the
tubular roof rack.The maximum total
load is 125 lbs. (56 kg) evenly distributed.
Be careful that your vehicle does not ex-
ceed the Gross Vehicle Weight Rating
(GVWR) or the Gross Axle Weight Ratings
(GAWR front and rear). The GVWR and GAWR
are located on the F.M.V.S.S. label (located
on the driver’s side door jamb pillar). For
additional information, refer to “Vehicle
loading information” in the “Technical and
consumer information” section of this
manual.
The front crossbar can be adjusted or re-
moved. Use the TORX® driver provided in
the tool kit to loosen both crossbar adjust-
ing screws.
To adjust:
1. Loosen the adjusting screws with the TORX® driver
�1by turning counter-
clockwise
�A.
2. When the clamp is loosened, move the crossbar so the cargo can be posi-
tioned on the crossbar
�B.
3. Tighten the crossbar adjusting screws with the TORX® driver by turning clock-
wise.
4. Secure the cargo with rope. 5. Always check the tightness of the
crossbar adjusting screws.
To remove: 1. Loosen the adjusting screws with the TORX® driver
�1by turning counter-
clockwise
�A.
2. Rotate the clamps
�C.
3. Remove the crossbar.
4. Reverse to install.
5. Always check the tightness of the crossbar adjusting screws.
If you hear wind noise coming from the roof
rack while driving, adjust the roof rack
crossbar to the neutral position.
MANUAL WINDOWS (if so
equipped)
The side windows can be opened or closed
by turning the hand crank on each door.
POWER WINDOWS (if so equipped)
∙ Do not start or run the engine whilevehicle is on the jack. It may cause the
vehicle to move. This is especially true
for vehicles with limited slip
differentials.
∙ Do not allow passengers to stay in the vehicle while it is on the jack.
∙ Never run the engine with a wheel(s) off the ground. It may cause the ve-
hicle to move.
Always refer to the illustration for the cor-
rect placement and jack-up points for your
specific vehicle model and jack type.
Carefully read the caution label attached
to the jack body and the following in-
structions. 1. Loosen each wheel nut 1 or 2 turns by
turning counterclockwise with the
wheel nut wrench. Do not remove the
wheel nuts until the tire is off the
ground.
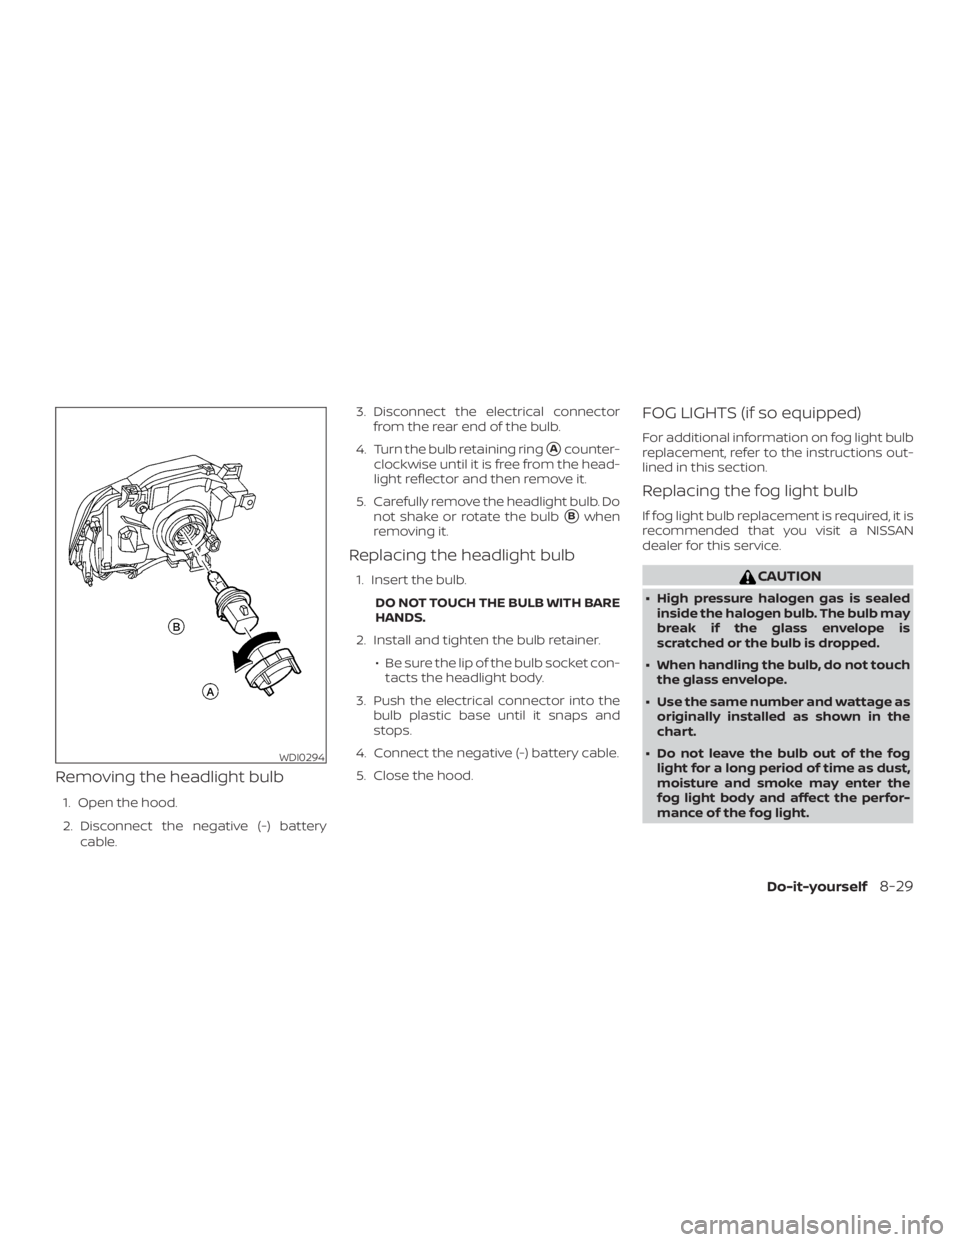
Removing the headlight bulb
1. Open the hood.
2. Disconnect the negative (-) batterycable. 3. Disconnect the electrical connector
from the rear end of the bulb.
4. Turn the bulb retaining ring
�Acounter-
clockwise until it is free from the head-
light reflector and then remove it.
5. Carefully remove the headlight bulb. Do not shake or rotate the bulb
�Bwhen
removing it.
Replacing the headlight bulb
1. Insert the bulb.
DO NOT TOUCH THE BULB WITH BARE
HANDS.
2. Install and tighten the bulb retainer. ∙ Be sure the lip of the bulb socket con-tacts the headlight body.
3. Push the electrical connector into the bulb plastic base until it snaps and
stops.
4. Connect the negative (-) battery cable.
5. Close the hood.
FOG LIGHTS (if so equipped)
For additional information on fog light bulb
replacement, refer to the instructions out-
lined in this section.
Replacing the fog light bulb
If fog light bulb replacement is required, it is
recommended that you visit a NISSAN
dealer for this service.
Brakes......................8-22
Brake system..................5-35
Break-in schedule ...............5-24
Brightness/contrast button ......4-9,4-15
Brightness control Instrument panel .............2-32
Bulb check/instrument panel ........2-15
Bulb replacement ...............8-30
C
Capacities and recommended fuel/
lubricants....................10-2
Cargolampswitch..............2-33
Cargo
(See vehicle loading information) .....10-19
Car phone or CB radio ............4-83
CDcareandcleaning.............4-74
CD player (See audio system) ........4-56
Childrestraints........1-25, 1-26, 1-28, 1-30 LATCH (Lower Anchors and Tethers for
CHildren)System..............1-30
Precautions on child
restraints.........1-28, 1-40, 1-56, 1-68
Top tether strap anchor point
locations...................1-33
Child restraint with top tether strap . . . .1-33
Child safety rear door lock ..........3-6
Chimes, audible reminders .........2-24
Cleaningexteriorandinterior......7-2,7-4
Clock set/adjustment ..........4-7,4-13
Clock setting (models with Navigation
System) .....................4-13
Clutch Clutchfluid.................8-14 Clutch interlock (clutch start) switch . . .2-38
C.M.V.S.S. certification label
.........10-16
Cold weather driving .............5-43
Compact disc (CD) player ..........4-56
Compass .....................2-11
Compass and outside temperature
display......................2-10
Compass display ................2-11
Connect phone ................4-76
Console box ..................2-45
Control panel buttons ..........4-4,4-10
Back button .................4-13
Brightness/contrast button ....4-9,4-15
Enterbutton..............4-4,4-10
Settingbutton.............4-7,4-13
Withnavigationsystem.......4-10,4-11
Controls Audio controls (steering wheel) .....4-74
Heater and air conditioner
controls................4-23,4-35
Coolant Capacities and recommended
fuel/lubricants...............10-2
Changing engine coolant .........8-6
Checking engine coolant level ......8-6
Engine coolant temperature gauge . .2-6
Corrosionprotection..............7-8
Cruisecontrol .................5-22
Cupholders ..................2-46
Curtain side-impact and rollover air
bag........................1-87
D
Daytime Running Lights (DRL) system . . .2-31 Defroster switch
Rear window and outside mirror
defrosterswitch..............2-28
Rearwindowdefrosterswitch.....2-28
Dimensions and weights ..........10-14
Dimmer switch for instrument panel . . .2-32
Display controls
(see control panel buttons) .......4-4,4-10
Door locks ....................3-3
Door open warning light ...........2-17
Drivebelt.....................8-17
Driving Coldweatherdriving...........5-43
Driving with automatic
transmission ................5-14
Driving with manual transmission . . .5-19
Precautions when starting and
driving .....................5-2
Driving the vehicle ...............5-14
E
Economy - fuel .................5-25
Electronic locking rear differential (E-Lock)
system......................5-33
Electronic locking rear differential (E-Lock)
systemswitch.................2-37
Emission control information label ....10-17
Emission control system warranty . . . .10-44
Engine Before starting the engine ........5-13
Capacities and recommended
fuel/lubricants...............10-2
Changing engine
coolant.........8-6
Changing engine oil ............8-8
11-2
 evenly distributed.
Be careful that your vehicle does not ex-
ceed the Gross Vehicle Weight Ratin")