Page 365 of 516

For King Cab® model, lif t up the rear jump
seat and remove net to remove the first aid
kit. For additional information, refer to
“Jump Seat” in the “Safety — Seats, seat
belts and supplemental restraint system”
section of this manual.For Crew Cab model, lif t up the rear bench
seat and remove the net to remove the first
aid kit. For additional information, refer to
“Folding the rear bench seat up” in the
“Safety — Seats, seat belts and supplemen-
tal restraint system” section of this manual.
TIRE PRESSURE MONITORING
SYSTEM (TPMS)
This vehicle is equipped with TPMS. It moni-
tors tire pressure of all tires except the
spare. When the low tire pressure warning
light is lit, and the CHECK TIRE PRES (pres-
sure) warning message is displayed in the
odometer, one or more of your tires is sig-
nificantly under-inflated. If the vehicle is be-
ing driven with low tire pressure, the TPMS
will activate and warn you of it by the low
tire pressure warning light. This system will
activate only when the vehicle is driven at
speeds above 16 mph (25 km/h). For addi-
tional information, refer to “Warning lights,
indicator lights and audible reminders” in
the “Instruments and Controls” section,
and “Tire Pressure Monitoring System
(TPMS)” in the “Starting and driving” section
of this manual.
Page 366 of 516

∙ If the low tire pressure warning lightilluminates while driving, avoid sud-
den steering maneuvers or abrupt
braking, reduce vehicle speed, pull off
the road to a safe location and stop
the vehicle as soon as possible. Driv-
ing with under-inflated tires may per-
manently damage the tires and in-
crease the likelihood of tire failure.
Serious vehicle damage could occur
and may lead to an accident and could
result in serious personal injury.
Check the tire pressure for all four
tires. Adjust the tire pressure to the
recommended COLD tire pressure
shown on the Tire and Loading Infor-
mation label to turn the low tire pres-
sure warning light OFF. If the light still
illuminates while driving af ter adjust-
ing the tire pressure, a tire may be flat
or the TPMS may be malfunctioning. If
you have a flat tire, replace it with a
spare tire as soon as possible. If no tire
is flat and all tires are properly in-
flated, have the vehicle checked. It is
recommended that you visit a NISSAN
dealer for this service. ∙ When replacing a wheel without the
TPMS such as the spare tire, the TPMS
will not function and the low tire pres-
sure warning light will flash for ap-
proximately 1 minute. The light will re-
main on af ter 1 minute. Have your
tires replaced and/or TPMS system
reset as soon as possible. It is recom-
mended that you visit a NISSAN dealer
for these services.
∙ Replacing tires with those not origi- nally specified by NISSAN could affect
the proper operation of the TPMS.
∙ Do not inject any tire liquid or aerosol tire sealant into the tires, as this may
cause a malfunction of the tire pres-
sure sensors.
CHANGING A FLAT TIRE
If you have a flat tire, follow the instructions
below:
Stopping the vehicle
1. Safely move the vehicle off the road and away from traffic.
2. Turn on the hazard warning flashers. 3. Park on a level surface and apply the
parking brake. Shif t the manual trans-
mission into R (Reverse), or the auto-
matic transmission into P (Park).
4. Turn off the engine.
5. Raise the hood to warn other traffic and to signal professional road assis-
tance personnel that you need assis-
tance.
6. Have all passengers get out of the ve- hicle and stand in a safe place, away
from traffic and clear of the vehicle.
Page 373 of 516
Installing the spare tire
The spare tire is designed for emergency
use. For additional information, refer to
“Wheels and tires” in the “Do-it-yourself ”
section of this manual.1. Clean any mud or dirt from the surface between the wheel and hub.
2. Carefully put the spare tire on and tighten the wheel nuts finger tight.
3. With the wheel nut wrench, tighten wheel nuts alternately and evenly in the
sequence illustrated (
�1,�2,�3,�4,�5,�6)
until they are tight. 4. Lower the vehicle slowly until the tire
touches the ground. Then, with the
wheel nut wrench, tighten the wheel
nuts securely in the sequence illus-
trated (
�1,�2,�3,�4,�5,�6). Lower the
vehicle completely .
Page 374 of 516
∙ The spare tire is designed for emer-gency use. For additional information,
refer to “Wheels and tires” in the “Do-
it-yourself ” section of this manual. To start your engine with a booster battery,
the instructions and precautions below
must be followed.
Page 386 of 516

∙ Rinse the wheel to completely removethe cleaner within 15 minutes af ter
the cleaner is applied.
CHROME PARTS
Clean all chrome parts regularly with a
non-abrasive chrome polish to maintain
the finish.
TIRE DRESSINGS
NISSAN does not recommend the use of
tire dressings. Tire manufacturers apply a
coating to the tires to help reduce discolor-
ation of the rubber. If a tire dressing is ap-
plied to the tires, it may react with the coat-
ing and form a compound. This compound
may come off the tire while driving and
stain the vehicle paint.
If you choose to use a tire dressing, take the
following precautions:
∙ Use a water-based tire dressing. The coating on the tire dissolves more easily
than with an oil-based tire dressing.
∙ Apply a light coat of tire dressing to help prevent it from entering the tire
tread/grooves (where it would be diffi-
cult to remove). ∙ Wipe off excess tire dressing using a dry
towel. Make sure the tire dressing is
completely removed from the tire
tread/grooves.
∙ Allow the tire dressing to dry as recom- mended by the tire dressing manufac-
turer. Occasionally remove loose dust from the
interior trim, plastic parts and seats using a
vacuum cleaner or sof t bristled brush. Wipe
the vinyl and leather (if so equipped) sur-
faces with a clean, sof t cloth dampened in
mild soap solution, then wipe clean with a
dry, sof t cloth.
Regular care and cleaning is required in
order to maintain the appearance of the
leather (if so equipped).
Before using any fabric protector, read the
manufacturer’s recommendations. Some
fabric protectors contain chemicals that
may stain or bleach the seat material.
Use a cloth dampened only with water to
clean the meter and gauge lens.
Page 423 of 516

If you have a flat tire, refer to “Flat tire” in
the “In case of emergency ” section of
this manual.
TIRE PRESSURE
Tire Pressure Monitoring System
(TPMS)
This vehicle is equipped with TPMS. It
monitors tire pressure of all tires ex-
cept the spare. When the low tire
pressure warning light is lit and the
CHECK TIRE PRES (pressure) warning
message is displayed in the odom-
eter, one or more of your tires is sig-
nificantly under-inflated.
TPMS will activate only when the ve-
hicle is driven at speeds above
16 mph (25 km/h). Also, this system
may not detect a sudden drop in tire
pressure (for example, a flat tire while
driving).
For additional information, refer to
“Low tire pressure warning light” in
the “Instruments and controls” sec-
tion, “Tire Pressure Monitoring Sys-
tem (TPMS)” in the “Starting and driv-ing” section, and “Flat tire” in the “In
case of emergency” section of this
manual.
Tire inflation pressure
Check the tire pressures (including
the spare) of ten and always prior to
long distance trips. The recom-
mended tire pressure specifications
are shown on the F.M.V.S.S./C.M.V.S.S.
certification label or the Tire and
Loading Information label under the
“Cold Tire Pressure” heading. The Tire
and Loading Information label is af-
fixed to the driver side center pillar.
Tire pressures should be checked
regularly because:
∙ Most tires naturally lose air over time.
∙ Tires can lose air suddenly when driven over potholes or other ob-
jects or if the vehicle strikes a
curb while parking. The tire pressures should be
checked when the tires are cold. The
tires are considered COLD af ter the
vehicle has been parked for 3 or
more hours, or driven less than 1 mile
(1.6 km) at moderate speeds.
Incorrect tire pressure, including
under inflation, may adversely af-
fect tire life and vehicle handling.
Page 424 of 516

∙ The Gross Vehicle Weight Rating(GVWR) is located on the
F.M.V.S.S./C.M.V.S.S. certifica-
tion label. The vehicle weight
capacity is indicated on the Tire
and Loading Information label.
Do not load your vehicle beyond
this capacity. Overloading your
vehicle may result in reduced
tire life, unsafe operating condi-
tions due to premature tire fail-
ure, or unfavorable handling
characteristics and could also
lead to a serious accident. Load-
ing beyond the specified capac-
ity may also result in failure of
other vehicle components.
∙
Before taking a long trip, or
whenever you heavily load your
vehicle, use a tire pressure gauge
to ensure that the tire pressures
are at the specified level.
∙ For additional information re- garding tires, refer to “Impor-
tant Tire Safety Information”
(US) or “Tire Safety Information”
(Canada) in the Warranty Infor-
mation Booklet.
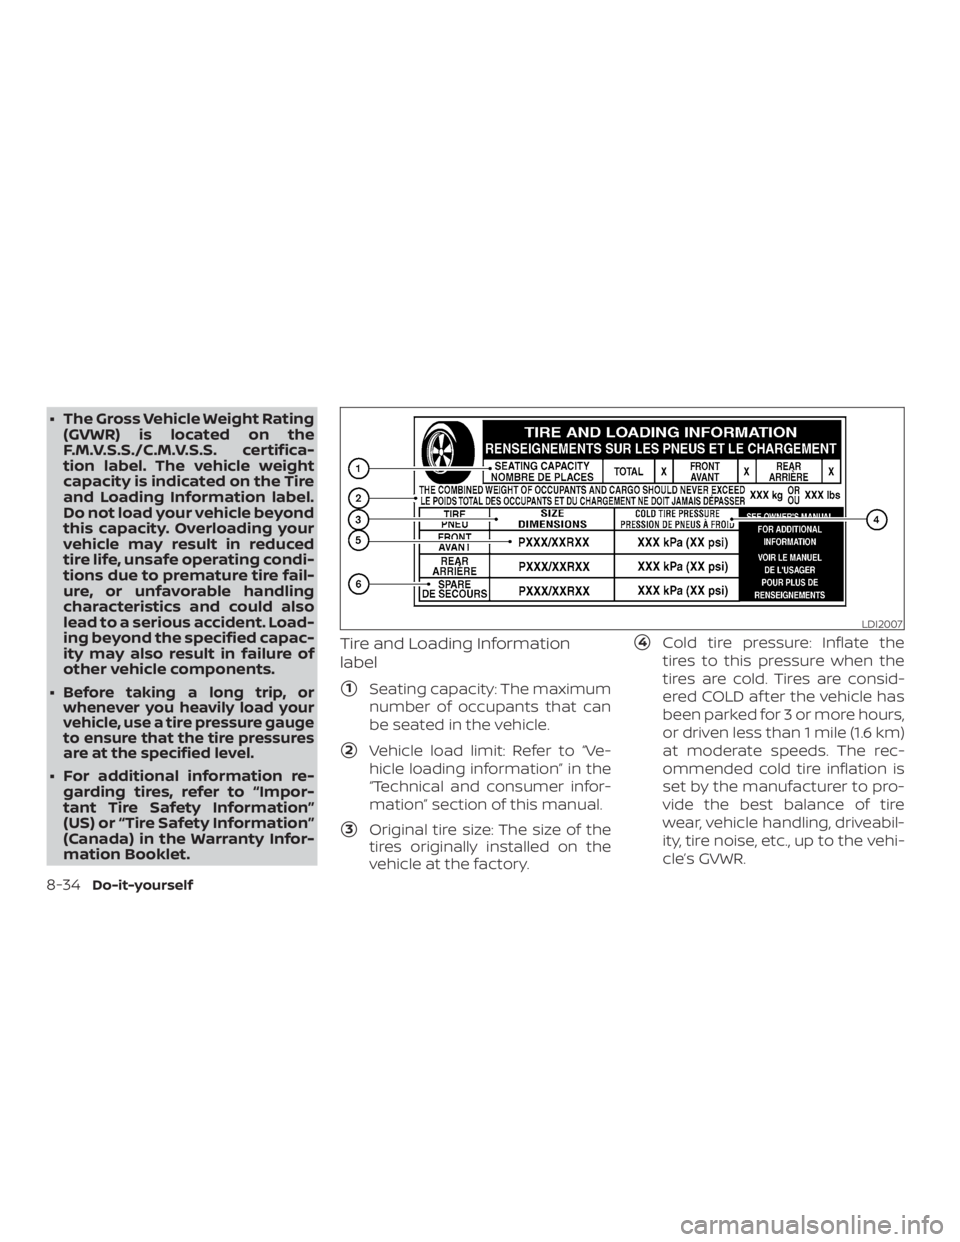
Tire and Loading Information
label
�1Seating capacity: The maximum
number of occupants that can
be seated in the vehicle.
�2Vehicle load limit: Refer to “Ve-
hicle loading information” in the
“Technical and consumer infor-
mation” section of this manual.
�3Original tire size: The size of the
tires originally installed on the
vehicle at the factory.
�4Cold tire pressure: Inflate the
tires to this pressure when the
tires are cold. Tires are consid-
ered COLD af ter the vehicle has
been parked for 3 or more hours,
or driven less than 1 mile (1.6 km)
at moderate speeds. The rec-
ommended cold tire inflation is
set by the manufacturer to pro-
vide the best balance of tire
wear, vehicle handling, driveabil-
ity, tire noise, etc., up to the vehi-
cle’s GVWR.
Page 429 of 516
�6Term of “tubeless” or “tube type”
Indicates whether the tire requires
an inner tube (“tube type”) or not
(“tubeless”).
�7The word “radial”
The word “radial” is shown if the tire
has radial structure.
�8Manufacturer or brand name
Manufacturer or brand name is
shown.
Other Tire-related Terminology
In addition to the many terms that
are defined throughout this section,
Intended Outboard Sidewall is (1) the
sidewall that contains a whitewall,
bears white lettering or bears
manufacturer, brand, and/or model
name molding that is higher or
deeper than the same molding on
the other sidewall of the tire, or (2)
the outward facing sidewall of an
asymmetrical tire that has a particu-
lar side that must always face out-
ward when mounted on a vehicle.
TYPES OF TIRES