Page 130 of 536

2-36Instruments and controls
REAR WINDOW WIPER AND WASHER
OPERATION
If the rear window wiper operation is
interrupted by snow etc., the wiper may
stop moving to protect its motor. If this
occurs, turn the wiper switch to OFF and
remove the snow etc. on and around
the wiper arms. After about 1 minute,
turn the switch ON again to operate the
wiper.
The rear window wiper and washer
operate when the ignition switch is in
the ON position.
Turn the switch clockwise from the OFF
position to operate the wiper.
Intermittent (INT) — intermittent opera-
tion (not adjustable)
Low (ON) — continuous low speed opera-
tion
Push the switch forwardto operate the
washer. Then the wiper will also operate
several times.
SIC4385
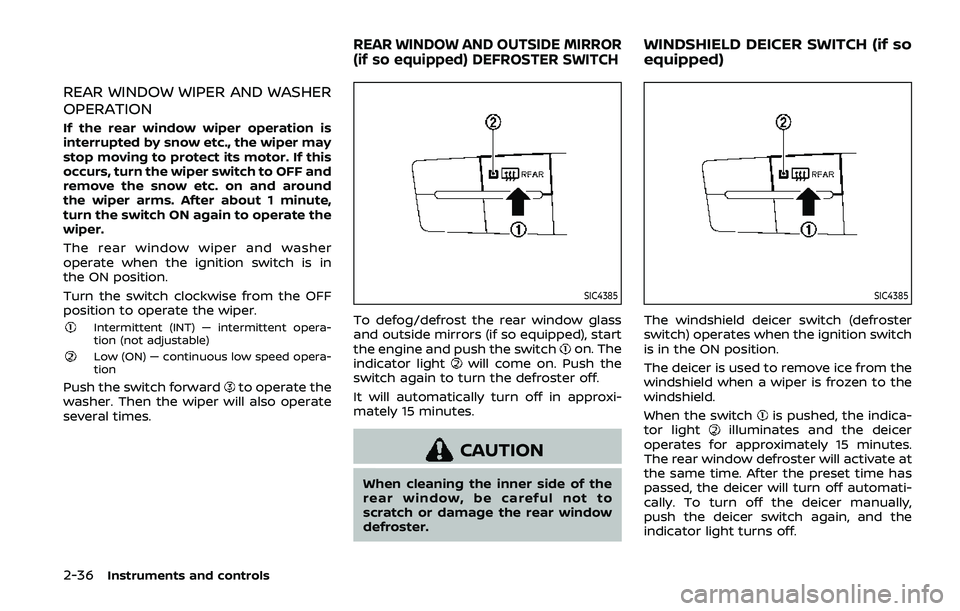
To defog/defrost the rear window glass
and outside mirrors (if so equipped), start
the engine and push the switch
on. The
indicator lightwill come on. Push the
switch again to turn the defroster off.
It will automatically turn off in approxi-
mately 15 minutes.
CAUTION
When cleaning the inner side of the
rear window, be careful not to
scratch or damage the rear window
defroster.
SIC4385
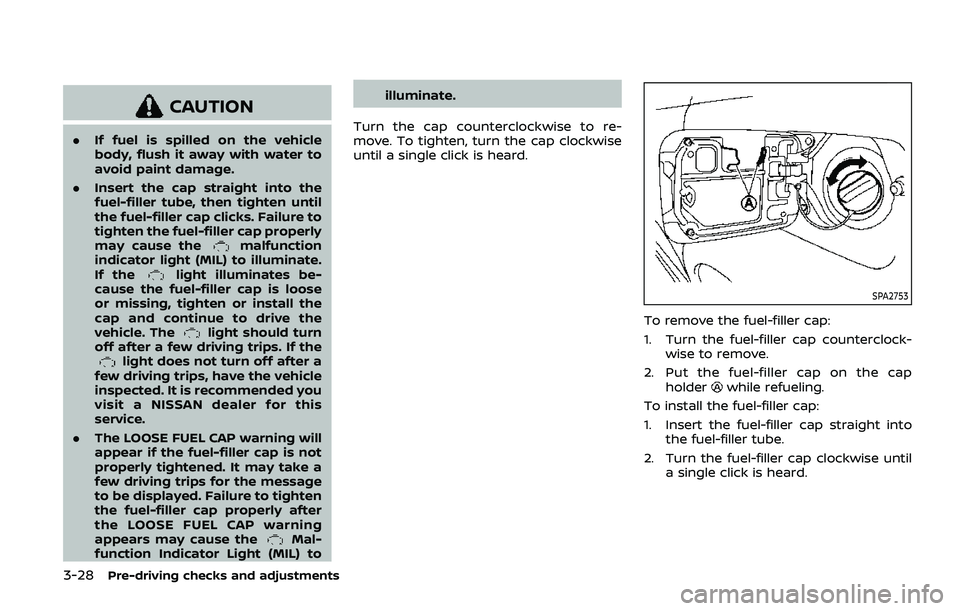
The windshield deicer switch (defroster
switch) operates when the ignition switch
is in the ON position.
The deicer is used to remove ice from the
windshield when a wiper is frozen to the
windshield.
When the switch
is pushed, the indica-
tor lightilluminates and the deicer
operates for approximately 15 minutes.
The rear window defroster will activate at
the same time. After the preset time has
passed, the deicer will turn off automati-
cally. To turn off the deicer manually,
push the deicer switch again, and the
indicator light turns off.
REAR WINDOW AND OUTSIDE MIRROR
(if so equipped) DEFROSTER SWITCHWINDSHIELD DEICER SWITCH (if so
equipped)
Page 202 of 536

3-28Pre-driving checks and adjustments
CAUTION
.If fuel is spilled on the vehicle
body, flush it away with water to
avoid paint damage.
. Insert the cap straight into the
fuel-filler tube, then tighten until
the fuel-filler cap clicks. Failure to
tighten the fuel-filler cap properly
may cause the
malfunction
indicator light (MIL) to illuminate.
If the
light illuminates be-
cause the fuel-filler cap is loose
or missing, tighten or install the
cap and continue to drive the
vehicle. The
light should turn
off after a few driving trips. If the
light does not turn off after a
few driving trips, have the vehicle
inspected. It is recommended you
visit a NISSAN dealer for this
service.
. The LOOSE FUEL CAP warning will
appear if the fuel-filler cap is not
properly tightened. It may take a
few driving trips for the message
to be displayed. Failure to tighten
the fuel-filler cap properly after
the LOOSE FUEL CAP warning
appears may cause the
Mal-
function Indicator Light (MIL) to illuminate.
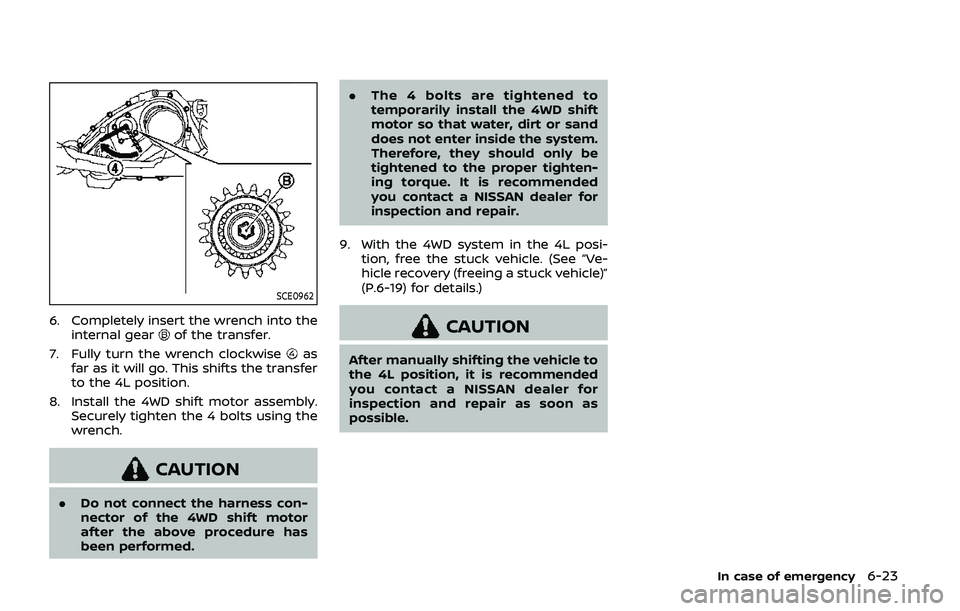
Turn the cap counterclockwise to re-
move. To tighten, turn the cap clockwise
until a single click is heard.
SPA2753
To remove the fuel-filler cap:
1. Turn the fuel-filler cap counterclock- wise to remove.
2. Put the fuel-filler cap on the cap holder
while refueling.
To install the fuel-filler cap:
1. Insert the fuel-filler cap straight into the fuel-filler tube.
2. Turn the fuel-filler cap clockwise until a single click is heard.
Page 408 of 536
6-6In case of emergency
JVE0423X
5. Securely screw to connect the T-shaped end of the jack rod and the
extension bar
as illustrated.
6. Fit the square end of the jack rod into the square hole of the wheel nut
wrench to form a handle
. 7. Locate the oval opening above the
middle of the rear bumper.
8. Place the T-shaped end of the jack rod through the opening and direct it
towards the spare wheel winch as-
sembly, located directly above the
spare wheel.
SCE0916
CAUTION
Do not insert the jack rod straight as
it is designed to be inserted at an
angle as shown.
9. Seat the T-shaped end of the jack rod into the T-shaped opening of the
spare wheel winch. Apply pressure to
keep the jack rod engaged in the
spare wheel winch and turn the jack
rod counterclockwise to lower the
spare wheel.
Page 411 of 536
SCE0876
2. Loosen each wheel nut one or twoturns by turning counterclockwise
with the wheel nut wrench. Do not
remove the wheel nuts until the tire
is off the ground.
NCE130
3. Install the assembled jack rod into the
jack as shown.
4. Carefully raise the vehicle until the clearance between the tire and
ground is achieved.
5. To lift the vehicle, securely hold the jack lever and rod with both hands
and turn the jack lever.
NOTE:
Before jacking up the vehicle, make
sure the ignition switch is placed in
the OFF position. If the vehicle is lifted
up with the engine running, the auto-
leveling suspension will become dis-
abled after 120 seconds. To reset the
auto-leveling suspension, cycle the
In case of emergency6-9
Page 425 of 536

SCE0962
6. Completely insert the wrench into theinternal gearof the transfer.
7. Fully turn the wrench clockwise
as
far as it will go. This shifts the transfer
to the 4L position.
8. Install the 4WD shift motor assembly. Securely tighten the 4 bolts using the
wrench.
CAUTION
.Do not connect the harness con-
nector of the 4WD shift motor
after the above procedure has
been performed. .
The 4 bolts are tightened to
temporarily install the 4WD shift
motor so that water, dirt or sand
does not enter inside the system.
Therefore, they should only be
tightened to the proper tighten-
ing torque. It is recommended
you contact a NISSAN dealer for
inspection and repair.
9. With the 4WD system in the 4L posi- tion, free the stuck vehicle. (See “Ve-
hicle recovery (freeing a stuck vehicle)”
(P.6-19) for details.)
CAUTION
After manually shifting the vehicle to
the 4L position, it is recommended
you contact a NISSAN dealer for
inspection and repair as soon as
possible.
In case of emergency6-23
Page 441 of 536

SDI2528
Engine oil and filter
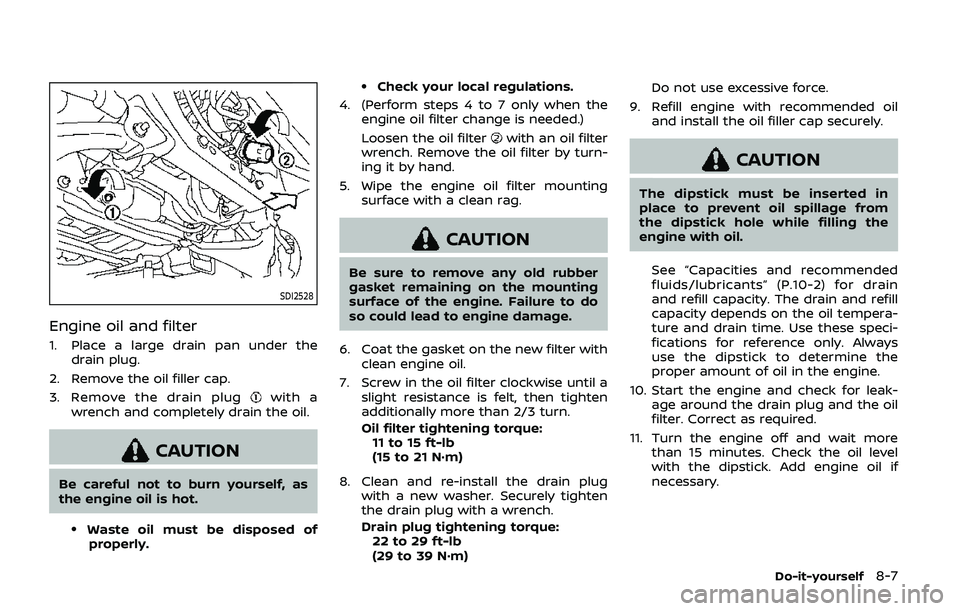
1. Place a large drain pan under thedrain plug.
2. Remove the oil filler cap.
3. Remove the drain plug
with a
wrench and completely drain the oil.
CAUTION
Be careful not to burn yourself, as
the engine oil is hot.
.Waste oil must be disposed of properly.
.Check your local regulations.
4. (Perform steps 4 to 7 only when the engine oil filter change is needed.)
Loosen the oil filter
with an oil filter
wrench. Remove the oil filter by turn-
ing it by hand.
5. Wipe the engine oil filter mounting surface with a clean rag.
CAUTION
Be sure to remove any old rubber
gasket remaining on the mounting
surface of the engine. Failure to do
so could lead to engine damage.
6. Coat the gasket on the new filter with clean engine oil.
7. Screw in the oil filter clockwise until a slight resistance is felt, then tighten
additionally more than 2/3 turn.
Oil filter tightening torque:11 to 15 ft-lb
(15 to 21 N·m)
8. Clean and re-install the drain plug with a new washer. Securely tighten
the drain plug with a wrench.
Drain plug tightening torque:22 to 29 ft-lb
(29 to 39 N·m) Do not use excessive force.
9. Refill engine with recommended oil and install the oil filler cap securely.
CAUTION
The dipstick must be inserted in
place to prevent oil spillage from
the dipstick hole while filling the
engine with oil.
See “Capacities and recommended
fluids/lubricants” (P.10-2) for drain
and refill capacity. The drain and refill
capacity depends on the oil tempera-
ture and drain time. Use these speci-
fications for reference only. Always
use the dipstick to determine the
proper amount of oil in the engine.
10. Start the engine and check for leak- age around the drain plug and the oil
filter. Correct as required.
11. Turn the engine off and wait more than 15 minutes. Check the oil level
with the dipstick. Add engine oil if
necessary.
Do-it-yourself8-7