2019 NISSAN ARMADA steering wheel
[x] Cancel search: steering wheelPage 338 of 536

5-78Starting and driving
Approach warning
If your vehicle comes closer to the vehicle
ahead due to rapid deceleration of that
vehicle or if another vehicle cuts in, the
system warns the driver with the chime
and ICC system display. Decelerate by
depressing the brake pedal to maintain a
safe vehicle distance if:
.The chime sounds.
. The vehicle ahead detection and set
distance indicator blink.
The warning chime may not sound in
some cases when there is a short dis-
tance between vehicles. Some examples
are:
. When the vehicles are traveling at the
same speed and the distance be-
tween vehicles is not changing
. When the vehicle ahead is traveling
faster and the distance between ve-
hicles is increasing
. When a vehicle cuts in near your
vehicle
The warning chime will not sound when:
. Your vehicle approaches other vehi-
cles that are parked or moving slowly.
. The accelerator pedal is depressed,
overriding the system. NOTE:
The approach warning chime may
sound and the system display may
blink when the radar sensor detects
objects on the side of the vehicle or on
the side of the road. This may cause the
ICC system to decelerate or accelerate
the vehicle. The radar sensor may de-
tect these objects when the vehicle is
driven on winding roads, narrow roads,
hilly roads or when entering or exiting a
curve. In these cases you will have to
manually control the proper distance
ahead of your vehicle.
Also, the sensor sensitivity can be af-
fected by vehicle operation (steering
maneuver or driving position in the lane)
or traffic or vehicle condition (for example,
if a vehicle is being driven with some
damage).
Automatic cancellation
A chime sounds under the following
conditions and the control is automati-
cally canceled.
.
When the vehicle ahead is not de-
tected and your vehicle is traveling
below the speed of 15 MPH (24 km/h)
. When the system judges the vehicle is
at standstill
. When the shift lever is not in the D
(Drive) or manual shift mode .
When the parking brake is applied
. When the SNOW mode switch is
pushed on.
. When the 4WD shift switch is in the 4H
or 4L position (for 4WD models)
. When the VDC system is turned off
. When ABS or VDC (including the trac-
tion control system) operates
. When distance measurement be-
comes impaired due to adhesion of
dirt or obstruction to the sensor
. When a wheel slips
. When the radar signal is temporarily
interrupted
Vehicle-to-vehicle distance control
mode limitations
WARNING
Listed below are the system limita-
tions for the ICC system. Failure to
operate the vehicle in accordance
with these system limitations could
result in serious injury or death.
.The system is primarily intended
for use on straight, dry, open
roads with light traffic. It is not
advisable to use the system in
city traffic or congested areas.
Page 354 of 536
5-94Starting and driving
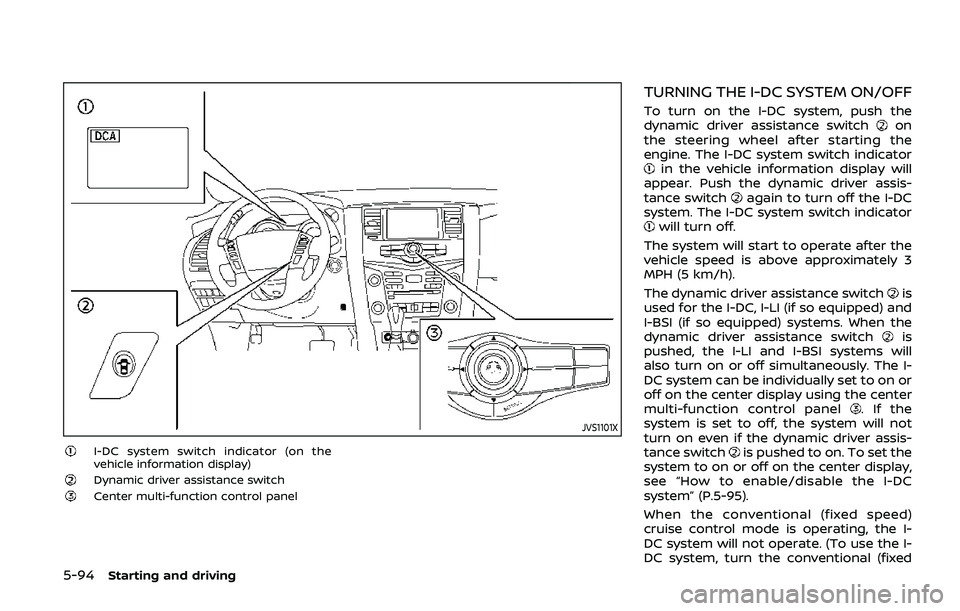
JVS1101X
I-DC system switch indicator (on the
vehicle information display)
Dynamic driver assistance switchCenter multi-function control panel
TURNING THE I-DC SYSTEM ON/OFF
To turn on the I-DC system, push the
dynamic driver assistance switchon
the steering wheel after starting the
engine. The I-DC system switch indicator
in the vehicle information display will
appear. Push the dynamic driver assis-
tance switch
again to turn off the I-DC
system. The I-DC system switch indicator
will turn off.
The system will start to operate after the
vehicle speed is above approximately 3
MPH (5 km/h).
The dynamic driver assistance switch
is
used for the I-DC, I-LI (if so equipped) and
I-BSI (if so equipped) systems. When the
dynamic driver assistance switch
is
pushed, the I-LI and I-BSI systems will
also turn on or off simultaneously. The I-
DC system can be individually set to on or
off on the center display using the center
multi-function control panel
. If the
system is set to off, the system will not
turn on even if the dynamic driver assis-
tance switch
is pushed to on. To set the
system to on or off on the center display,
see “How to enable/disable the I-DC
system” (P.5-95).
When the conventional (fixed speed)
cruise control mode is operating, the I-
DC system will not operate. (To use the I-
DC system, turn the conventional (fixed
Page 365 of 536
help the driver avoid a forward collision or
may help mitigate the consequences of a
collision should one be unavoidable.
If the driver is handling the steering
wheel, accelerating or braking, the AEB
system will function later or will not
function.
The automatic braking will cease under
the following conditions:
.When the steering wheel is turned as
far as necessary to avoid a collision.
. When the accelerator pedal is de-
pressed.
. When there is no longer a vehicle
detected ahead.
If the AEB system has stopped the vehicle,
the vehicle will remain at a standstill for
approximately 2 seconds before the
brakes are released.
Starting and driving5-105
Page 395 of 536
the Sonar settings on the center display.
(See “Sonar settings” (P.5-133).) When the
sonar indicator is off, only a tone sounds
when the sonar detect obstacles.
WARNING
If the engine is not running or is
turned off while driving, the power
assist for the steering will not work.
Steering will be harder to operate.
The power assisted steering uses a hy-
draulic pump, driven by the engine, to
assist steering.
If the engine stops or the drive belt
breaks, you will still have control of the
vehicle. However, much greater steering
effort is needed, especially in sharp turns
and at low speeds.
BRAKING PRECAUTIONS
The brake system has two separate
hydraulic circuits. If one circuit malfunc-
tions, you will still have braking ability at
two wheels.
You may feel a small click and hear a
sound when the brake pedal is fully
depressed slowly. This is not a malfunc-
tion and indicates that the brake assist
mechanism is operating properly.
Hydraulically-assisted brakes
The hydraulically-assisted brake system is
designed to use a hydraulic pump driven
electrically, to assist braking. If the engine
stops, you can stop the vehicle by de-
pressing the foot brake pedal. However,
greater foot pressure on the foot brake
pedal will be required to stop the vehicle.
The stopping distance will be longer.
Wet brakes
When the vehicle is washed or driven
through water, the brakes may get wet.
As a result, your braking distance will be
longer and the vehicle may pull to one
side during braking.
To dry brakes, drive the vehicle at a safe
speed while lightly tapping the brake
pedal to heat-up the brakes. Do this until
the brakes return to normal. Avoid driving
the vehicle at high speeds until the brakes
Starting and driving5-135
POWER STEERING BRAKE SYSTEM
Page 397 of 536

faces even with ABS. Stopping
distances may also be longer on
rough, gravel or snow covered
roads, or if you are using tire
chains. Always maintain a safe
distance from the vehicle in front
of you. Ultimately, the driver is
responsible for safety.
. Tire type and condition may also
affect braking effectiveness.
— When replacing tires, install
the specified size of tires on
all four wheels.
— When installing a spare tire, make sure that it is the proper
size and type as specified on
the Tire and Loading Informa-
tion label. See “Tire and load-
ing information label” (P.10-
12).
— For detailed information, see “Wheels and tires” (P.8-30).
The Anti-lock Braking System (ABS) con-
trols the brakes so the wheels do not lock
during hard braking or when braking on
slippery surfaces. The system detects the
rotation speed at each wheel and varies
the brake fluid pressure to prevent each
wheel from locking and sliding. By pre-
venting each wheel from locking, the system helps the driver maintain steering
control and helps to minimize swerving
and spinning on slippery surfaces.
Using the system
Depress the brake pedal and hold it down.
Depress the brake pedal with firm steady
pressure, but do not pump the brakes.
The ABS will operate to prevent the
wheels from locking up. Steer the vehicle
to avoid obstacles.
WARNING
Do not pump the brake pedal. Doing
so may result in increased stopping
distances.
Self-test feature
The ABS includes electronic sensors, elec-
tric pumps, hydraulic solenoids and a
computer. The computer has a built-in
diagnostic feature that tests the system
each time you start the engine and move
the vehicle at a low speed in forward or
reverse. When the self-test occurs, you
may hear a “clunk” noise and/or feel a
pulsation in the brake pedal. This is
normal and does not indicate a malfunc-
tion. If the computer senses a malfunc-
tion, it switches the ABS off and
illuminates the ABS warning light on the
instrument panel. The brake system then
operates normally, but without anti-lock
assistance.
If the ABS warning light illuminates during
the self-test or while driving, have the
vehicle checked. It is recommended you
visit a NISSAN dealer for this service.
Normal operation
The ABS operates at speeds above 3 to 6
MPH (5 to 10 km/h). The speed varies
according to road conditions.
When the ABS senses that one or more
wheels are close to locking up, the
actuator rapidly applies and releases
hydraulic pressure. This action is similar
to pumping the brakes very quickly. You
may feel a pulsation in the brake pedal
and hear a noise from under the hood or
feel a vibration from the actuator when it
is operating. This is normal and indicates
that the ABS is operating properly. How-
ever, the pulsation may indicate that road
conditions are hazardous and extra care
is required while driving.
Starting and driving5-137
Page 398 of 536

5-138Starting and driving
The Vehicle Dynamic Control (VDC) sys-
tem uses various sensors to monitor
driver inputs and vehicle motion. Under
certain driving conditions, the VDC sys-
tem helps to perform the following func-
tions.
.Controls brake pressure to reduce
wheel slip on one slipping drive wheel
so power is transferred to a non
slipping drive wheel on the same axle.
. Controls brake pressure and engine
output to reduce drive wheel slip
based on vehicle speed (traction con-
trol function).
. Controls brake pressure at individual
wheels and engine output to help the
driver maintain control of the vehicle
in the following conditions:
— understeer (vehicle tends to not
follow the steered path despite
increased steering input)
— oversteer (vehicle tends to spin due to certain road or driving condi-
tions).
The VDC system can help the driver to
maintain control of the vehicle, but it
cannot prevent loss of vehicle control in
all driving situations.
When the VDC system operates, the VDC
warning light
in the instrument panel
flashes so note the following: .
The road may be slippery or the
system may determine some action
is required to help keep the vehicle on
the steered path.
. You may feel a pulsation in the brake
pedal and hear a noise or vibration
from under the hood. This is normal
and indicates that the VDC system is
working properly.
. Adjust your speed and driving to the
road conditions.
If a malfunction occurs in the system, the
VDC warning light
illuminates in the
instrument panel. The VDC system auto-
matically turns off.
The VDC OFF switch is used to turn off the
VDC system. The VDC off indicator
illuminates to indicate the VDC system is
off. When the VDC switch is used to turn
off the system, the VDC system still
operates to prevent one drive wheel from
slipping by transferring power to a non
slipping drive wheel. The VDC warning
light
flashes if this occurs. All other
VDC functions are off, and the VDC
warning light
will not flash. The VDC
system is automatically reset to on when
the ignition switch is placed in the OFF
position then back to the ON position.
When the 4L position is selected with the
4WD shift switch, the VDC system is
disabled and the VDC off indicator light illuminates (for 4WD models).
See “Vehicle Dynamic Control (VDC) warn-
ing light” (P.2-17) and “Vehicle Dynamic
Control (VDC) off indicator light” (P.2-20).
The computer has a built-in diagnostic
feature that tests the system each time
you start the engine and move the vehicle
forward or in reverse at a slow speed.
When the self-test occurs, you may hear a
“clunk” noise and/or feel a pulsation in the
brake pedal. This is normal and is not an
indication of a malfunction.
WARNING
.
The VDC system is designed to
help improve driving stability but
does not prevent accidents due
to abrupt steering operation at
high speeds or by careless or
dangerous driving techniques.
Reduce vehicle speed and be
especially careful when driving
and cornering on slippery sur-
faces and always drive carefully.
. Do not modify the vehicle’s sus-
pension. If suspension parts such
as shock absorbers, struts,
springs, stabilizer bars, bushings
and wheels are not NISSAN re-
commended for your vehicle or
VEHICLE DYNAMIC CONTROL (VDC) SYSTEM
Page 401 of 536
For four-wheel drive
If you install snow tires, they must also be
the same size, brand, construction and
tread pattern on all four wheels.
SPECIAL WINTER EQUIPMENT
It is recommended that the following
items be carried in the vehicle during
winter:
.A scraper and stiff-bristled brush to
remove ice and snow from the win-
dows and wiper blades.
. A sturdy, flat board to be placed under
the jack to give it firm support.
. A shovel to dig the vehicle out of
snowdrifts.
. Extra window washer fluid to refill the
reservoir tank.
DRIVING ON SNOW OR ICE
WARNING
.Wet ice (32°F, 0°C and freezing
rain), very cold snow or ice can be
slick and very hard to drive on.
The vehicle will have much less
traction or “grip” under these
conditions. Try to avoid driving
on wet ice until the road is salted
or sanded. .
Whatever the condition, drive
with caution. Accelerate and slow
down with care. If accelerating or
downshifting too fast, the drive
wheels will lose even more trac-
tion.
. Allow more stopping distance
under these conditions. Braking
should be started sooner than on
dry pavement.
. Allow greater following distances
on slippery roads.
. Watch for slippery spots (glare
ice). These may appear on an
otherwise clear road in shaded
areas. If a patch of ice is seen
ahead, brake before reaching it.
Try not to brake while on the ice,
and avoid any sudden steering
maneuvers.
. Do not use the cruise control on
slippery roads.
. Snow can trap dangerous ex-
haust gases under your vehicle.
Keep snow clear of the exhaust
pipe and from around your vehi-
cle.
ENGINE BLOCK HEATER (if so
equipped)
Engine block heaters are used to assist in
cold temperature starting.
The engine block heater should be used
when the outside temperature is 20°F
(−7°C) or lower.
To use the engine block heater
1. Turn the engine off.
2. Open the hood and unwrap the en-
gine block heater cord.
3. Plug the engine block heater cord into a grounded 3-wire, 3-pronged exten-
sion cord.
4. Plug the extension cord into a Ground Fault Interrupt (GFI) protected,
grounded 110-volt AC (VAC) outlet.
5. The engine block heater must be plugged in for at least 2 - 4 hours,
depending on outside temperatures,
to properly warm the engine coolant.
Use an appropriate timer to turn the
engine block heater on.
6. Before starting the engine, unplug and properly store the cord to keep it
away from moving parts.
Starting and driving5-141
Page 405 of 536
To shut off the engine in an emergency
situation while driving, perform the fol-
lowing procedure:
.Rapidly push the push-button ignition
switch 3 consecutive times in less
than 1.5 seconds, or
. Push and hold the push-button igni-
tion switch for more than 2 seconds.TIRE PRESSURE MONITORING SYS-
TEM (TPMS)
This vehicle is equipped with the Tire
Pressure Monitoring System (TPMS). It
monitors tire pressure of all tires except
the spare. When the low tire pressure
warning light is lit and the CHECK TIRE
PRESSURE warning appears in the vehicle
information display, one or more of your
tires is significantly under-inflated. If the
vehicle is being driven with low tire
pressure, the TPMS will activate and warn
you of it by the low tire pressure warning
light. This system will activate only when
the vehicle is driven at speeds above 16
MPH (25 km/h). For more details, see “Low
tire pressure warning light” (P.2-15) and
“Tire Pressure Monitoring System (TPMS)”
(P.5-5).
WARNING
.If the low tire pressure warning
light illuminates or Low Pressure
information is displayed on the
monitor screen while driving,
avoid sudden steering maneu-
vers or abrupt braking, reduce
vehicle speed, pull off the road
to a safe location and stop the
vehicle as soon as possible. Driv-
ing with under-inflated tires may permanently damage the tires
and increase the likelihood of tire
failure. Serious vehicle damage
could occur and may lead to an
accident and could result in ser-
ious personal injury. Check the
tire pressure for all four tires.
Adjust the tire pressure to the
recommended COLD tire pressure
shown on the Tire and Loading
Information label to turn the low
tire pressure warning light OFF. If
the light still illuminates while
driving after adjusting the tire
pressure, a tire may be flat. If
you have a flat tire, replace it with
a spare tire as soon as possible.
. Since the spare tire is not
equipped with the TPMS, when a
spare tire is mounted or a wheel
is replaced, the TPMS will not
function and the low tire pressure
warning light will flash for ap-
proximately 1 minute. The light
will remain on after 1 minute.
Have your tires replaced and/or
TPMS system reset as soon as
possible. It is recommended you
visit a NISSAN dealer for these
services.
. Replacing tires with those not
originally specified by NISSAN
In case of emergency6-3
EMERGENCY ENGINE SHUT OFF FLAT TIRE