2019 NISSAN ARMADA window
[x] Cancel search: windowPage 212 of 536
3-38Pre-driving checks and adjustments
.The color of an object in the distance
or in the dark may be difficult to be
recognized. This is not a malfunc-
tion.
System maintenance (Intelligent Rear
View Mirror):
. Always keep the mirror and camera
area of the rear window clean.
. Clean the mirror and the camera lens
with a dry soft cloth.
. When clean the camera area of the
rear window, using a soft cloth dam-
pend with water and a few neutral
detergent. And after, the dry it up with
dry soft cloth.
. If the image on the Intelligent Rear
View Mirror display screen is still un-
clear even after cleaning the camera
area of the rear window, an oil film
may be adhering to the rear window
glass. Clean the rear window glass
with an oil film remover.
. Never use alcohol, benzine, thinner, or
any similar material to clean the
mirror or camera lens. It will cause a
discoloration, deterioration or a sys-
tem malfunction.
. Do not attach a sticker (including
transparent material) on the camera
area of the rear window.OUTSIDE MIRRORS
WARNING
.Objects viewed in the outside
mirror on the passenger side are
closer than they appear. Be care-
ful when moving to the right.
Using only this mirror could cause
an accident. Use the inside mirror
or glance over your shoulder to
properly judge distances to other
objects.
. Do not adjust the mirrors while
driving. You could lose control of
your vehicle and cause an acci-
dent.
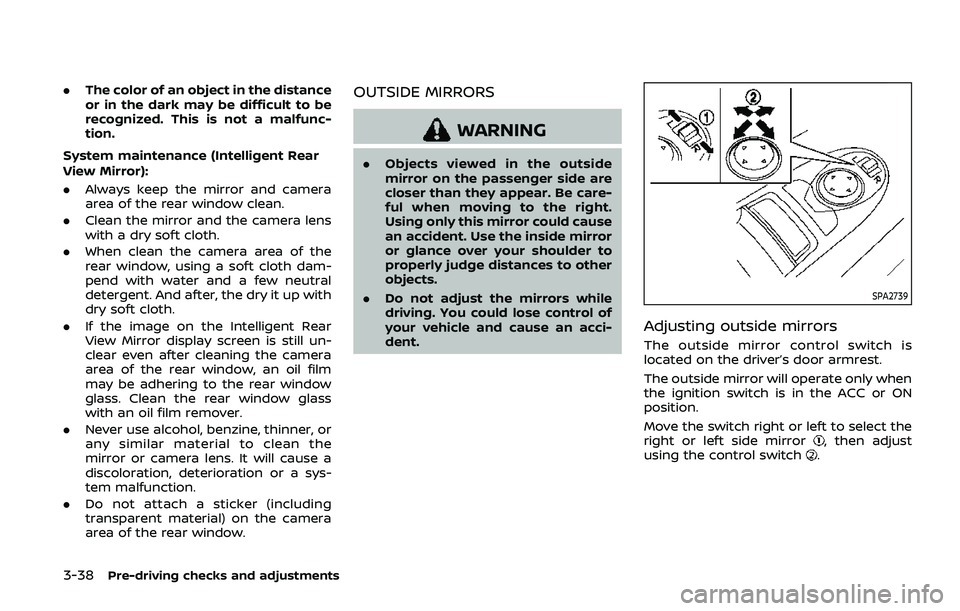
SPA2739
Adjusting outside mirrors
The outside mirror control switch is
located on the driver’s door armrest.
The outside mirror will operate only when
the ignition switch is in the ACC or ON
position.
Move the switch right or left to select the
right or left side mirror
, then adjust
using the control switch.
Page 213 of 536
Defrosting outside mirrors (if so
equipped)
The outside mirrors will be heated when
the rear window defroster switch is
operated. (See “Rear window and outside
mirror defroster switch” (P.2-36).)
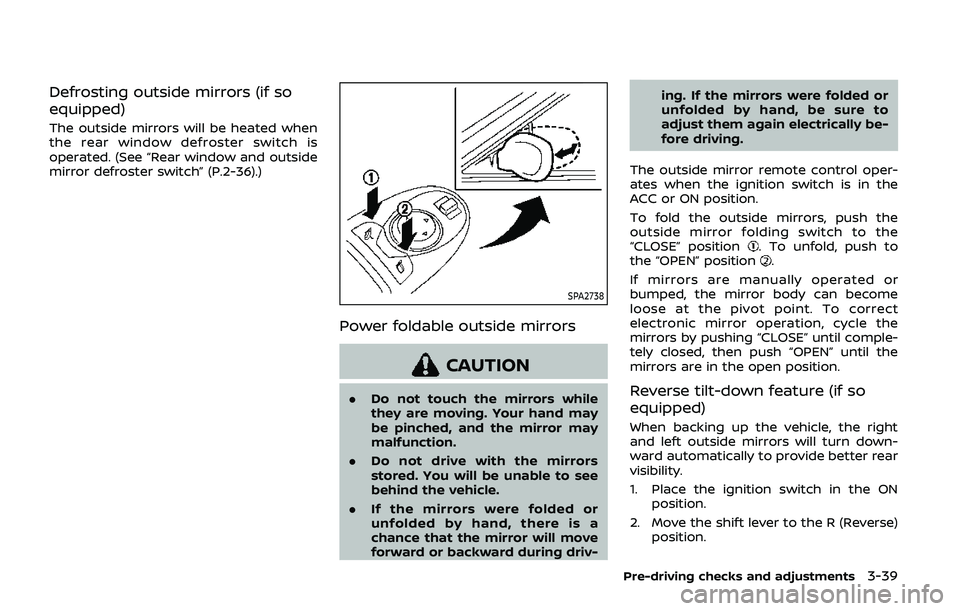
SPA2738
Power foldable outside mirrors
CAUTION
.Do not touch the mirrors while
they are moving. Your hand may
be pinched, and the mirror may
malfunction.
. Do not drive with the mirrors
stored. You will be unable to see
behind the vehicle.
. If the mirrors were folded or
unfolded by hand, there is a
chance that the mirror will move
forward or backward during driv- ing. If the mirrors were folded or
unfolded by hand, be sure to
adjust them again electrically be-
fore driving.
The outside mirror remote control oper-
ates when the ignition switch is in the
ACC or ON position.
To fold the outside mirrors, push the
outside mirror folding switch to the
“CLOSE” position
. To unfold, push to
the “OPEN” position.
If mirrors are manually operated or
bumped, the mirror body can become
loose at the pivot point. To correct
electronic mirror operation, cycle the
mirrors by pushing “CLOSE” until comple-
tely closed, then push “OPEN” until the
mirrors are in the open position.
Reverse tilt-down feature (if so
equipped)
When backing up the vehicle, the right
and left outside mirrors will turn down-
ward automatically to provide better rear
visibility.
1. Place the ignition switch in the ON position.
2. Move the shift lever to the R (Reverse) position.
Pre-driving checks and adjustments3-39
Page 217 of 536
4 Monitor, heater, air conditioner, audio,phone and voice recognition systems
NissanConnect® Owner’s Manual .................................... 4-2
Safety note ........................................................................\
................ 4-2
RearView Monitor (if so equipped) ................................. 4-3
RearView Monitor system operation ..................... 4-4
How to read the displayed lines ................................ 4-4
Difference between predictive and
actual distances ...................................................................... 4-4
How to park with predictive course lines .......... 4-6
Sonar indicator ........................................................................\
4-7
Adjusting the screen ........................................................... 4-7
Predictive course line settings .................................... 4-8
RearView Monitor system limitations .................... 4-8
System maintenance .......................................................... 4-9
Intelligent Around View Monitor (if
so equipped) ........................................................................\
.......... 4-10 Intelligent Around View Monitor
system operation ................................................................ 4-11
How to adjust the screen view ................................ 4-19
Intelligent Around View Monitor settings ....... 4-19
Intelligent Around View Monitor
system limitations .............................................................. 4-21
System maintenance ....................................................... 4-23
Camera aiding sonar function (models with
Intelligent Around View Monitor) .................................. 4-24 Sonar system operation ................................................ 4-25 Turning on and off the sonar function .......... 4-25
Sonar system limitations ........................................... 4-26
System temporarily unavailable ........................... 4-27
System maintenance .................................................... 4-27
Moving Object Detection (MOD) ................................... 4-28 MOD system operation ................................................ 4-29
Turning on and off the MOD system ............... 4-30
MOD system limitations .............................................. 4-31
System maintenance .................................................... 4-32
Ventilators ........................................................................\
.............. 4-33
Center ventilators ............................................................ 4-33
Side ventilators .................................................................. 4-33
Rear ventilators .................................................................. 4-33
Heater and air conditioner ................................................ 4-34 Automatic air conditioner ......................................... 4-35
Rear automatic air conditioning system ....... 4-38
Operating tips ..................................................................... 4-42
Linking Intelligent Key (if so equipped) ........... 4-42
In-cabin microfilter .......................................................... 4-42
Servicing air conditioner ............................................. 4-42
Antenna ........................................................................\
.................... 4-42 Window antenna ............................................................... 4-42
Satellite antenna ............................................................... 4-43
Car phone or CB radio ......................................................... 4-43
Page 219 of 536
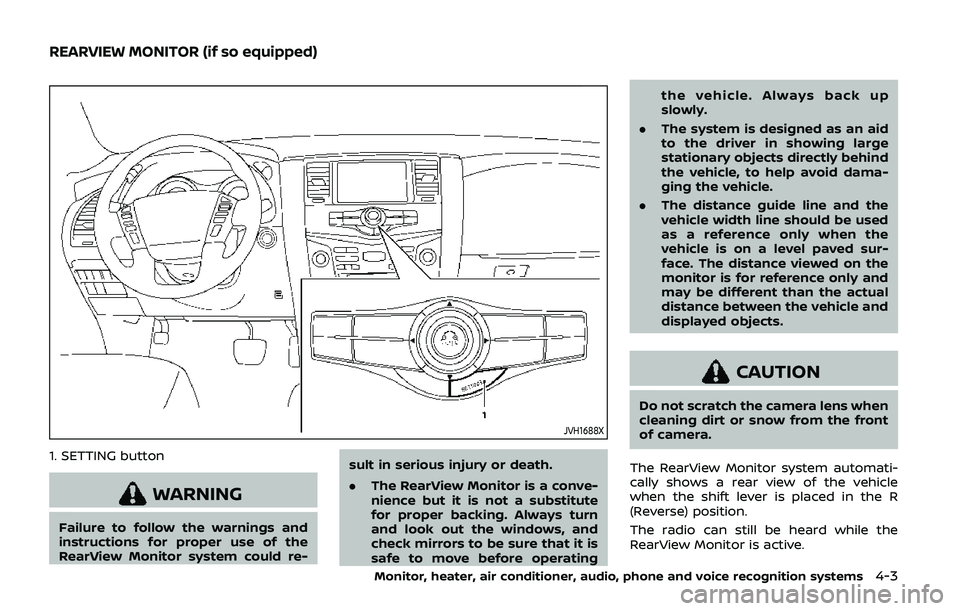
JVH1688X
1. SETTING button
WARNING
Failure to follow the warnings and
instructions for proper use of the
RearView Monitor system could re-sult in serious injury or death.
.
The RearView Monitor is a conve-
nience but it is not a substitute
for proper backing. Always turn
and look out the windows, and
check mirrors to be sure that it is
safe to move before operating the vehicle. Always back up
slowly.
. The system is designed as an aid
to the driver in showing large
stationary objects directly behind
the vehicle, to help avoid dama-
ging the vehicle.
. The distance guide line and the
vehicle width line should be used
as a reference only when the
vehicle is on a level paved sur-
face. The distance viewed on the
monitor is for reference only and
may be different than the actual
distance between the vehicle and
displayed objects.
CAUTION
Do not scratch the camera lens when
cleaning dirt or snow from the front
of camera.
The RearView Monitor system automati-
cally shows a rear view of the vehicle
when the shift lever is placed in the R
(Reverse) position.
The radio can still be heard while the
RearView Monitor is active.
Monitor, heater, air conditioner, audio, phone and voice recognition systems4-3
REARVIEW MONITOR (if so equipped)
Page 247 of 536
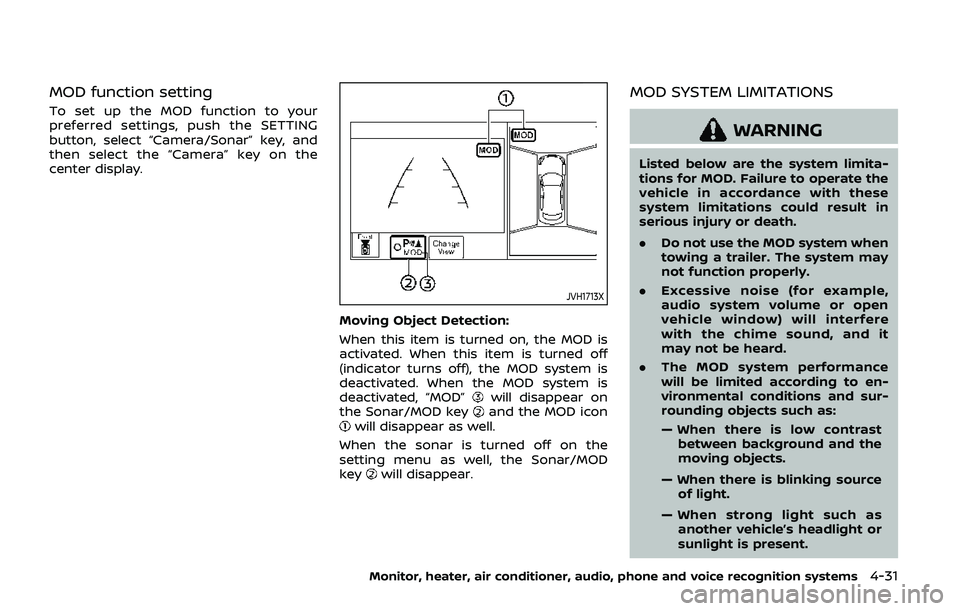
MOD function setting
To set up the MOD function to your
preferred settings, push the SETTING
button, select “Camera/Sonar” key, and
then select the “Camera” key on the
center display.
JVH1713X
Moving Object Detection:
When this item is turned on, the MOD is
activated. When this item is turned off
(indicator turns off), the MOD system is
deactivated. When the MOD system is
deactivated, “MOD”
will disappear on
the Sonar/MOD keyand the MOD iconwill disappear as well.
When the sonar is turned off on the
setting menu as well, the Sonar/MOD
key
will disappear.
MOD SYSTEM LIMITATIONS
WARNING
Listed below are the system limita-
tions for MOD. Failure to operate the
vehicle in accordance with these
system limitations could result in
serious injury or death.
. Do not use the MOD system when
towing a trailer. The system may
not function properly.
. Excessive noise (for example,
audio system volume or open
vehicle window) will interfere
with the chime sound, and it
may not be heard.
. The MOD system performance
will be limited according to en-
vironmental conditions and sur-
rounding objects such as:
— When there is low contrast
between background and the
moving objects.
— When there is blinking source of light.
— When strong light such as another vehicle’s headlight or
sunlight is present.
Monitor, heater, air conditioner, audio, phone and voice recognition systems4-31
Page 250 of 536
4-34Monitor, heater, air conditioner, audio, phone and voice recognition systems
SAA3055
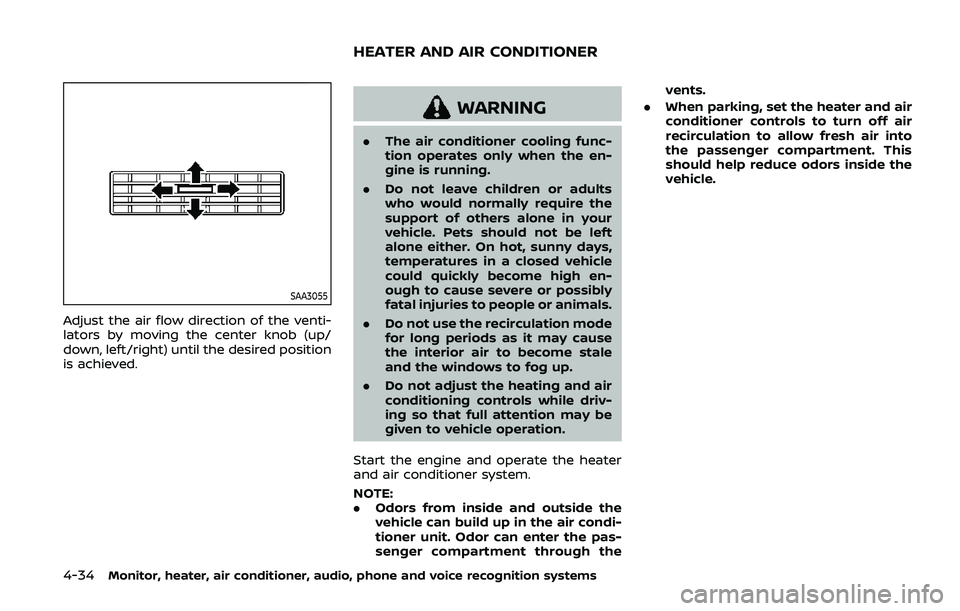
Adjust the air flow direction of the venti-
lators by moving the center knob (up/
down, left/right) until the desired position
is achieved.
WARNING
.The air conditioner cooling func-
tion operates only when the en-
gine is running.
. Do not leave children or adults
who would normally require the
support of others alone in your
vehicle. Pets should not be left
alone either. On hot, sunny days,
temperatures in a closed vehicle
could quickly become high en-
ough to cause severe or possibly
fatal injuries to people or animals.
. Do not use the recirculation mode
for long periods as it may cause
the interior air to become stale
and the windows to fog up.
. Do not adjust the heating and air
conditioning controls while driv-
ing so that full attention may be
given to vehicle operation.
Start the engine and operate the heater
and air conditioner system.
NOTE:
. Odors from inside and outside the
vehicle can build up in the air condi-
tioner unit. Odor can enter the pas-
senger compartment through the vents.
. When parking, set the heater and air
conditioner controls to turn off air
recirculation to allow fresh air into
the passenger compartment. This
should help reduce odors inside the
vehicle.
HEATER AND AIR CONDITIONER
Page 251 of 536
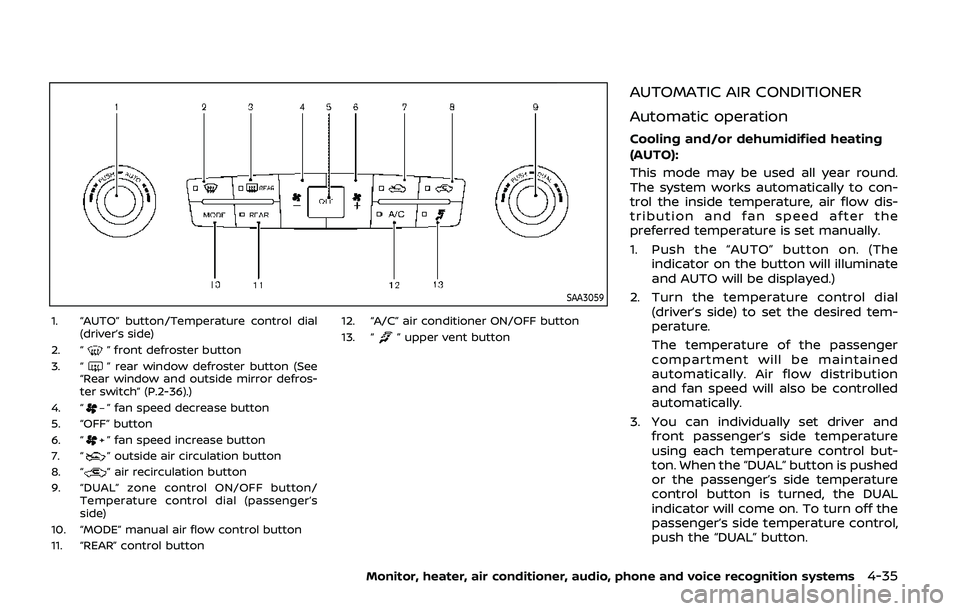
SAA3059
1. “AUTO” button/Temperature control dial(driver’s side)
2. “
” front defroster button
3. “” rear window defroster button (See
“Rear window and outside mirror defros-
ter switch” (P.2-36).)
4. “
” fan speed decrease button
5. “OFF” button
6. “
” fan speed increase button
7. “” outside air circulation button
8. “” air recirculation button
9. “DUAL” zone control ON/OFF button/ Temperature control dial (passenger’s
side)
10. “MODE” manual air flow control button
11. “REAR” control button 12. “A/C” air conditioner ON/OFF button
13. “
” upper vent button
AUTOMATIC AIR CONDITIONER
Automatic operation
Cooling and/or dehumidified heating
(AUTO):
This mode may be used all year round.
The system works automatically to con-
trol the inside temperature, air flow dis-
tribution and fan speed after the
preferred temperature is set manually.
1. Push the “AUTO” button on. (The
indicator on the button will illuminate
and AUTO will be displayed.)
2. Turn the temperature control dial (driver’s side) to set the desired tem-
perature.
The temperature of the passenger
compartment will be maintained
automatically. Air flow distribution
and fan speed will also be controlled
automatically.
3. You can individually set driver and front passenger’s side temperature
using each temperature control but-
ton. When the “DUAL” button is pushed
or the passenger’s side temperature
control button is turned, the DUAL
indicator will come on. To turn off the
passenger’s side temperature control,
push the “DUAL” button.
Monitor, heater, air conditioner, audio, phone and voice recognition systems4-35
Page 252 of 536
4-36Monitor, heater, air conditioner, audio, phone and voice recognition systems
4. To turn off the heater and air condi-tioner system, push the “OFF” button.
A visible mist may be seen coming from
the ventilators in hot, humid conditions as
the air is cooled rapidly. This does not
indicate a malfunction.
Dehumidified defrosting or defogging:
1. Push the “
” front defroster button.
(The indicator light on the button will
illuminate.)
2. Turn the temperature control dial to set the desired temperature.
. To quickly remove ice from the out-
side of the windows, push the fan
speed increase button “
” and set it
to the maximum position.
. As soon as possible after the wind-
shield is clean, push the “AUTO” button
to return to the auto mode.
. When the “
” front defroster button
is pushed, the air conditioner will
automatically be turned on at outside
temperatures above 23°F (−5°C) to
defog the windshield, and the air
recirculate mode will automatically
be turned off.
Outside air is drawn into the passen-
ger compartment to improve the
defogging performance.
Manual operation
Fan speed control:
Push the fan speed increase “
”or
decrease “” buttons to manually con-
trol the fan speed.
Push the “AUTO” button to return to
automatic control of the fan speed.
Temperature control:
Turn the temperature control dial to set
the desired temperature.
Air flow control:
Pushing the “MODE” manual air flow
control button selects the air outlet to:
: Air flows from center and side ventila-
tors.
: Air flows from center and side ventila-tors and foot outlets.
: Air flows mainly from foot outlets.
: Air flows from defroster and foot outlets.
Air intake control:
. Push the “
” air recirculation button
to recirculate interior air inside the
vehicle. The “
” indicator light on the
button will come on. The air recircula-
tion mode cannot be activated when
the air conditioner is in the front
defrosting mode “
”. .
Push the “
” outside air circulation
button to draw outside air into the
passenger compartment. The “
”
indicator light on the button will come
on.
. To control the air intake automatically,
push and hold either the “
” air
recirculation button or the “” out-
side air circulation button (whichever
indicator light is illuminated). The
indicator lights (both air recirculation
and outside air circulation buttons)
will flash twice, and then the air intake
will switch to automatic control.
Turning the system off
Push the OFF button.
Upper vent system
When the upper vent “” button is
pushed, the air flow against the driver’s
or passenger’s upper body becomes gen-
tle. The indicator light on the button will
illuminate.
In this mode, air from the upper ventilator
flows in order to control the cabin tem-
perature without blowing air directly on
the occupants.
Push the upper vent “
” button when
you want the air conditioner to work
quickly.
To turn the system off, push the upper