2019 NISSAN ARMADA fuel
[x] Cancel search: fuelPage 228 of 536
4-12Monitor, heater, air conditioner, audio, phone and voice recognition systems
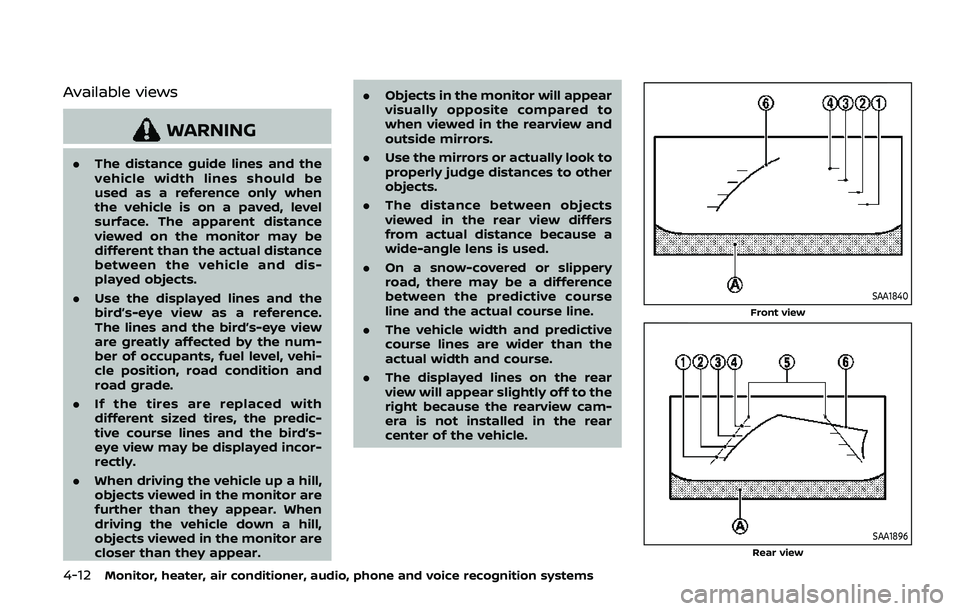
Available views
WARNING
.The distance guide lines and the
vehicle width lines should be
used as a reference only when
the vehicle is on a paved, level
surface. The apparent distance
viewed on the monitor may be
different than the actual distance
between the vehicle and dis-
played objects.
. Use the displayed lines and the
bird’s-eye view as a reference.
The lines and the bird’s-eye view
are greatly affected by the num-
ber of occupants, fuel level, vehi-
cle position, road condition and
road grade.
. If the tires are replaced with
different sized tires, the predic-
tive course lines and the bird’s-
eye view may be displayed incor-
rectly.
. When driving the vehicle up a hill,
objects viewed in the monitor are
further than they appear. When
driving the vehicle down a hill,
objects viewed in the monitor are
closer than they appear. .
Objects in the monitor will appear
visually opposite compared to
when viewed in the rearview and
outside mirrors.
. Use the mirrors or actually look to
properly judge distances to other
objects.
. The distance between objects
viewed in the rear view differs
from actual distance because a
wide-angle lens is used.
. On a snow-covered or slippery
road, there may be a difference
between the predictive course
line and the actual course line.
. The vehicle width and predictive
course lines are wider than the
actual width and course.
. The displayed lines on the rear
view will appear slightly off to the
right because the rearview cam-
era is not installed in the rear
center of the vehicle.
SAA1840
Front view
SAA1896Rear view
Page 262 of 536

Intelligent Blind Spot Intervention (I-BSI) (if
so equipped) ........................................................................\
.......... 5-43I-BSI system operation ................................................... 5-45
Turning the I-BSI system ON/OFF ......................... 5-47
How to enable/disable the I-BSI system ......... 5-48
I-BSI system limitations ................................................. 5-48
I-BSI driving situations .................................................... 5-50
System temporarily unavailable ............................. 5-55
System malfunction .......................................................... 5-56
System maintenance ....................................................... 5-56
Intelligent Back-up Intervention (I-BI) (if
so equipped) ........................................................................\
.......... 5-57
I-BI system operation ...................................................... 5-59
How to enable/disable the I-BI system ............ 5-63
I-BI system precautions ................................................. 5-64
System temporarily unavailable ............................. 5-65
System malfunction .......................................................... 5-66
System maintenance ....................................................... 5-66
Intelligent Cruise Control (ICC) ....................................... 5-67 How to select the cruise control mode ............ 5-69
Vehicle-to-vehicle distance control mode ...... 5-69
Conventional (fixed speed) cruise
control mode ........................................................................\
.. 5-85
Intelligent Distance Control (I-DC) (if
so equipped) ........................................................................\
.......... 5-89 I-DC system operation .................................................. 5-91
Turning the I-DC system ON/OFF ......................... 5-94
How to enable/disable the I-DC system .......... 5-95
I-DC system display and indicators ..................... 5-95 I-DC system limitations ............................................... 5-96
System temporarily unavailable ........................... 5-99
System malfunction ................................................... 5-101
System maintenance ................................................ 5-101
Automatic Emergency Braking (AEB) ................... 5-102 AEB system operation .............................................. 5-104
Turning the AEB system ON/OFF ................... 5-106
AEB system limitations ............................................ 5-107
System temporarily unavailable ....................... 5-108
System malfunction ................................................... 5-109
System maintenance ................................................ 5-110
Intelligent Forward Collision
Warning (I-FCW) ...................................................................... 5-111 I-FCW system operation ......................................... 5-113
Turning the I-FCW system ON/OFF ............... 5-114
I-FCW system limitations ........................................ 5-116
System temporarily unavailable ....................... 5-118
System malfunction ................................................... 5-118
System maintenance ................................................ 5-119
Break-in schedule ................................................................. 5-120
Fuel efficient driving tips ................................................ 5-120
Increasing fuel economy ................................................ 5-121
NISSAN all-mode 4WD® (if so equipped) ............ 5-121 NISSAN all-mode 4WD® system ........................ 5-122
4WD shift switch ........................................................... 5-126
4WD shift indicator ..................................................... 5-127
4WD warning light ....................................................... 5-127
Hill Start Assist system ..................................................... 5-129
Parking/parking on hills .................................................. 5-130
Page 265 of 536

dry grass, waste paper or rags.
They may ignite and cause a fire.
CAUTION
.Do not use leaded gasoline. De-
posits from leaded gasoline ser-
iously reduce the three-way
catalyst’s ability to help reduce
exhaust pollutants.
. Keep your engine tuned up. Mal-
functions in the ignition, fuel in-
jection, or electrical systems can
cause overrich fuel flow into the
three-way catalyst, causing it to
overheat. Do not keep driving if
the engine misfires, or if notice-
able loss of performance or other
unusual operating conditions are
detected. Have the vehicle in-
spected. It is recommended you
visit a NISSAN dealer for this
service.
. Avoid driving with an extremely
low fuel level. Running out of fuel
could cause the engine to misfire,
damaging the three-way catalyst.
. Do not race the engine while
warming it up. .
Do not push or tow your vehicle
to start the engine.
TIRE PRESSURE MONITORING SYS-
TEM (TPMS)
Each tire, including the spare (if provided),
should be checked monthly when cold
and inflated to the inflation pressure
recommended by the vehicle manufac-
turer on the vehicle placard or tire infla-
tion pressure label. (If your vehicle has
tires of a different size than the size
indicated on the vehicle placard or tire
inflation pressure label, you should deter-
mine the proper tire inflation pressure for
those tires.)
As an added safety feature, your vehicle
has been equipped with a Tire Pressure
Monitoring System (TPMS) that illumi-
nates a low tire pressure telltale when
one or more of your tires is significantly
under-inflated. Accordingly, when the low
tire pressure telltale illuminates, you
should stop and check your tires as soon
as possible, and inflate them to the
proper pressure. Driving on a significantly
under-inflated tire causes the tire to
overheat and can lead to tire failure.
Under-inflation also reduces fuel effi-
ciency and tire tread life, and may affect
the vehicle’s handling and stopping abil-
ity. Please note that the TPMS is not a
substitute for proper tire maintenance,
and it is the driver’s responsibility to
maintain correct tire pressure, even if
under-inflation has not reached the level
to trigger illumination of the TPMS low
tire pressure telltale.
Your vehicle has also been equipped with
a TPMS malfunction indicator to indicate
when the system is not operating prop-
erly. The TPMS malfunction indicator is
combined with the low tire pressure tell-
tale. When the system detects a malfunc-
tion, the telltale will flash for
approximately one minute and then re-
main continuously illuminated. This se-
quence will continue upon subsequent
vehicle start-ups as long as the malfunc-
tion exists. When the malfunction indica-
tor is illuminated, the system may not be
able to detect or signal low tire pressure
as intended. TPMS malfunctions may
occur for a variety of reasons, including
the installation of replacement or alter-
nate tires or wheels on the vehicle that
prevent the TPMS from functioning prop-
erly. Always check the TPMS malfunction
telltale after replacing one or more tires
or wheels on your vehicle to ensure that
the replacement or alternate tires and
wheels allow the TPMS to continue to
function properly.
Starting and driving5-5
Page 276 of 536
5-16Starting and driving
.Make sure the area around the vehicle
is clear.
. Check fluid levels such as engine oil,
coolant, brake fluid and window
washer fluid as frequently as possible,
or at least whenever you refuel.
. Check that all windows and lights are
clean.
. Visually inspect tires for their appear-
ance and condition. Also check tires
for proper inflation.
. Lock all doors.
. Position seat and adjust head re-
straints/headrests.
. Adjust inside and outside mirrors.
. Fasten seat belts and ask all passen-
gers to do likewise.
. Check the operation of warning lights
when the ignition switch is pushed to
the ON position. (See “Warning lights,
indicator lights and audible remin-
ders” (P.2-10).) 1. Apply the parking brake.
2. Move the shift lever to the P (Park) or N
(Neutral) position. (P is recommended.)
The starter is designed not to operate
unless the shift lever is in either of the
above positions.
3. Push the ignition switch to the ON position. Firmly depress the brake
pedal and push the ignition switch to
start the engine.
To start the engine immediately, push
and release the ignition switch while
depressing the brake pedal with the
ignition switch in any position.
.If the engine is very hard to start inextremely cold weather or when
restarting, depress the accelerator
pedal a little (approximately 1/3 to
the floor) and while holding, crank
the engine. Release the accelerator
pedal when the engine starts.
.If the engine is very hard to startbecause it is flooded, depress the
accelerator pedal all the way to the
floor and hold it. Push the ignition
switch to the ON position to start
cranking the engine. After 5 or 6
seconds, stop cranking by pushing
the ignition switch to OFF. After
cranking the engine, release the
accelerator pedal. Crank the engine
with your foot off the accelerator pedal
by depressing the brake
pedal and pushing the push-button
ignition switch to start the engine.
If the engine starts, but fails to run,
repeat the above procedure.
CAUTION
Do not operate the starter for more
than 15 seconds at a time. If the
engine does not start, push the
ignition switch to OFF and wait 10
seconds before cranking again,
otherwise the starter could be da-
maged.
4. Warm-up
Allow the engine to idle for at least 30
seconds after starting. Do not race the
engine while warming it up. Drive at
moderate speed for a short distance
first, especially in cold weather. In cold
weather, keep the engine running for
a minimum of 2 - 3 minutes before
shutting it off. Starting and stopping
the engine over a short period of time
may make the vehicle more difficult to
start.
When racing the engine up to 4,000
rpm or more under the no load
condition, the engine will enter the
BEFORE STARTING THE ENGINE STARTING THE ENGINE
Page 277 of 536
fuel cut mode.
5. To stop the engine, shift the shift lever to the P (Park) position and push the
ignition switch to the OFF position.
In preparation for the next engine start,
the engine may have a slightly delayed
shutoff after placing the ignition switch in
the OFF position, depending on the driv-
ing conditions.
NOTE:
Care should be taken to avoid situations
that can lead to potential battery dis-
charge and potential no-start condi-
tions such as:
1. Installation or extended use of elec-
tronic accessories that consume
battery power when the engine is
not running (Phone chargers, GPS,
DVD players, etc.)
2. Vehicle is not driven regularly and/
or only driven short distances.
In these cases, the battery may need to
be charged to maintain battery health.
REMOTE ENGINE START (if so
equipped)
Vehicles started with the remote engine
start function require the ignition switch
to be placed in the ON position before the
shift lever can be moved from the P (Park)
position. To place the ignition switch in the ON position, perform the following
steps:
1. Make sure that the Intelligent Key is
on you.
2. Firmly depress the brake pedal.
3. Push the ignition switch once to the ON position.
For additional information about the
remote engine start function, see “Re-
mote engine start” (P.3-19).
ENGINE PROTECTION MODE
The engine has an engine protection
mode to reduce the chance of damage
if the coolant temperature becomes too
high (for example, when climbing steep
grades in high temperature with heavy
loads, such as when towing a trailer).
When the engine temperature reaches a
certain level:
. The engine coolant temperature
gauge will move toward the H posi-
tion.
. Engine power may be reduced.
. The air conditioning cooling function
may be automatically turned OFF for a
short time (the blower will continue to
operate).
Engine power and, under some condi-
tions, vehicle speed will decrease. Vehicle
speed can be controlled with the accel-
erator pedal, but the vehicle may not
accelerate at the desired speed. The
transmission will downshift or upshift as
it reaches prescribed shift points. You can
also shift manually.
As driving conditions change and engine
coolant temperature is reduced, vehicle
speed can be increased using the accel-
erator pedal, and air conditioning cooling
function will automatically be turned
back ON.
Starting and driving5-17
DRIVING THE VEHICLE
Page 281 of 536
Shift ranges up or down one by one as
follows:
M1?
/M2 ?
/M3 ?
/M4 ?
/M5?
/M6 ?
/M7
M7 (7th):
Use this position for all normal forward
driving at highway speeds.
M6 (6th) andM5 (5th):
Use these positions when driving up long
slopes, or for engine braking when driving
down long slopes.
M4 (4th),M3 (3rd) andM2 (2nd):
Use these positions for hill climbing or
engine braking on downhill grades.
M1 (1st):
Use this position when climbing steep
hills slowly or driving slowly through deep
snow, or for maximum engine braking on
steep downhill grades.
. Remember not to drive at high speeds
for extended periods of time in lower
than 7th gear. This reduces fuel econ-
omy.
. Moving the shift lever rapidly to the
same side twice will shift the ranges in
succession.
. In the manual shift mode, the trans-
mission may not shift to the se-
lected gear or may automatically shift to the other gear. This helps
maintain driving performance and
reduces the chance of vehicle da-
mage or loss of control.
. When the transmission does not
shift to the selected gear, the Auto-
matic Transmission (AT) position in-
dicator light (in the vehicle
information display) will blink and
the buzzer will sound.
. In the manual shift mode, the trans-
mission automatically shifts down
to 1st gear before the vehicle comes
to a stop. When accelerating again, it
is necessary to shift up to the
desired range.Accelerator downshift — In D (Drive)
position —
For passing or hill climbing, fully depress
the accelerator pedal to the floor. This
shifts the transmission down into the
lower gear, depending on the vehicle
speed.
Fail-safe
When the fail-safe operation occurs, note
that the transmission will be locked in any
of the forward gears according to the
condition.
If the vehicle is driven under extreme
conditions, such as excessive wheel spinning and subsequent hard braking,
the fail-safe system may be activated.
This will occur even if all electrical
circuits are functioning properly. In this
case, push the switch to the OFF posi-
tion and wait for 3 seconds. Then push
the ignition switch back to the ON
position. The vehicle should return to
its normal operating condition. If it does
not return to its normal operating con-
dition, have the transmission checked
and repaired, if necessary. It is recom-
mended you visit a NISSAN dealer for
this service.
Starting and driving5-21
Page 380 of 536
5-120Starting and driving
CAUTION
During the first 1,200 miles (2,000
km), follow these recommendations
to obtain maximum engine perfor-
mance and ensure the future relia-
bility and economy of your new
vehicle.
Failure to follow these recommenda-
tions may result in shortened engine
life and reduced engine perfor-
mance.
. Avoid driving for long periods at con-
stant speed, either fast or slow. Do not
run the engine over 4,000 rpm.
. Do not accelerate at full throttle in any
gear.
. Avoid quick starts.
. Avoid hard braking as much as possi-
ble.
. Do not tow a trailer for the first 500
miles (805 km). Follow these easy-to-use Fuel Efficient
Driving Tips to help you achieve the most
fuel economy from your vehicle.
1. Use smooth accelerator and brake
pedal application.
.Avoid rapid starts and stops..Use smooth, gentle accelerator andbrake application whenever possi-
ble.
.Maintain constant speed whilecommuting and coast whenever
possible.
2. Maintain constant speed.
.Look ahead to try and anticipate and minimize stops.
.Synchronizing your speed with traf-fic lights allows you to reduce your
number of stops.
.Maintaining a steady speed canminimize red light stops and im-
prove fuel efficiency.
3. Use air conditioning (A/C) at higher vehicle speeds.
.Below 40 MPH (64 km/h), it is moreefficient to open windows to cool
the vehicle due to reduced engine
load.
.Above 40 MPH (64 km/h), it is more
efficient to use A/C to cool the
vehicle due to increased aerody-
namic drag.
.Recirculating the cool air in thecabin when the A/C is on reduces
cooling load.
4. Drive at economical speeds and dis- tances.
.Observing the speed limit and notexceeding 60 MPH (97 km/h)
(where legally allowed) can improve
fuel efficiency due to reduced aero-
dynamic drag.
.Maintaining a safe following dis-tance behind other vehicles re-
duces unnecessary braking.
.Safely monitoring traffic to antici- pate changes in speed permits
reduced braking and smooth accel-
eration changes.
.Select a gear range suitable to roadconditions.
5. Use cruise control.
.Using cruise control during highway driving helps maintain a steady
speed.
.Cruise control is particularly effec-tive in providing fuel savings when
driving on flat terrains.
6. Plan for the shortest route.
.Utilize a map or navigation system to determine the best route to save
time.
BREAK-IN SCHEDULE FUEL EFFICIENT DRIVING TIPS
Page 381 of 536
7. Avoid idling..Shutting off your engine when safefor stops exceeding 30-60 seconds
saves fuel and reduces emissions.
8. Buy an automated pass for toll roads.
.Automated passes permit drivers to use special lanes to maintain cruis-
ing speed through the toll and
avoid stopping and starting.
9. Winter warm up.
.Limit idling time to minimize impact to fuel economy.
.Vehicles typically need no morethan 30 seconds of idling at start-
up to effectively circulate the en-
gine oil before driving.
.Your vehicle will reach its ideal
operating temperature more
quickly while driving versus idling.
10. Keeping your vehicle cool.
.Park your vehicle in a covered parking area or in the shade when-
ever possible.
.When entering a hot vehicle, open- ing the windows will help to reduce
the inside temperature faster, re-
sulting in reduced demand on your
A/C system. .
Keep your engine tuned up.
. Follow the recommended scheduled
maintenance.
. Keep the tires inflated to the correct
pressure. Low tire pressure increases
tire wear and lowers fuel economy.
. Keep the wheels in correct alignment.
Improper alignment increases tire
wear and lowers fuel economy.
. Use the recommended viscosity en-
gine oil. (See “Engine oil and oil filter
recommendation” (P.10-5).)
WARNING
. Do not attempt to raise two
wheels off the ground and shift
the transmission to any drive or
reverse position with the engine
running. Doing so may result in
drivetrain damage or unexpected
vehicle movement which could
result in serious vehicle damage
or personal injury.
. Do not attempt to test a 4WD
equipped vehicle on a 2-wheel
dynamometer or similar equip-
ment even if the other two
wheels are raised off the ground.
Make sure you inform test facility
personnel that your vehicle is
equipped with 4WD before it is
placed on a dynamometer. Using
the wrong test equipment may
result in drivetrain damage or
unexpected vehicle movement
which could result in serious ve-
hicle damage or personal injury.
Starting and driving5-121
INCREASING FUEL ECONOMYNISSAN ALL-MODE 4WD® (if so equipped)