2019 NISSAN ARMADA display
[x] Cancel search: displayPage 170 of 536

2-76Instruments and controls
stop and reverse features as re-
quired by federal safety stan-
dards. (These standards became
effective for opener models man-
ufactured after April 1, 1982). A
garage door opener which cannot
detect an object in the path of a
closing garage door and then
automatically stop and reverse,
does not meet current federal
safety standards. Using a garage
door opener without these fea-
tures increases the risk of serious
injury or death.
. During the programming proce-
dure your garage door or security
gate will open and close (if the
transmitter is within range). Make
sure that people or objects are
clear of the garage door, gate,
etc. that you are programming.
. Your vehicle’s engine should be
turned off while programming
the HomeLink® Universal Trans-
ceiver. Do not breathe exhaust
gases; they contain colorless
and odorless carbon monoxide.
Carbon monoxide is dangerous. It
can cause unconsciousness or
death.PROGRAMMING HomeLink®
The following steps show generic instruc-
tions how to program a HomeLink®
button. If you have any questions or are
having difficulty programming your
HomeLink® buttons, refer to the
HomeLink® web site at: www.homelink.
com/nissan or call 1-800-355-3515.
NOTE:
It is also recommended that a new
battery be placed in the hand-held
transmitter of the device being pro-
grammed to HomeLink® for quicker
programming and accurate transmis-
sion of the radio-frequency.
JVI1689X
HomeLink® buttons (1-3)Indicator light (appears above each
HomeLink® button)
Status display (where the current condi-
tion of the HomeLink® is displayed)
Page 171 of 536
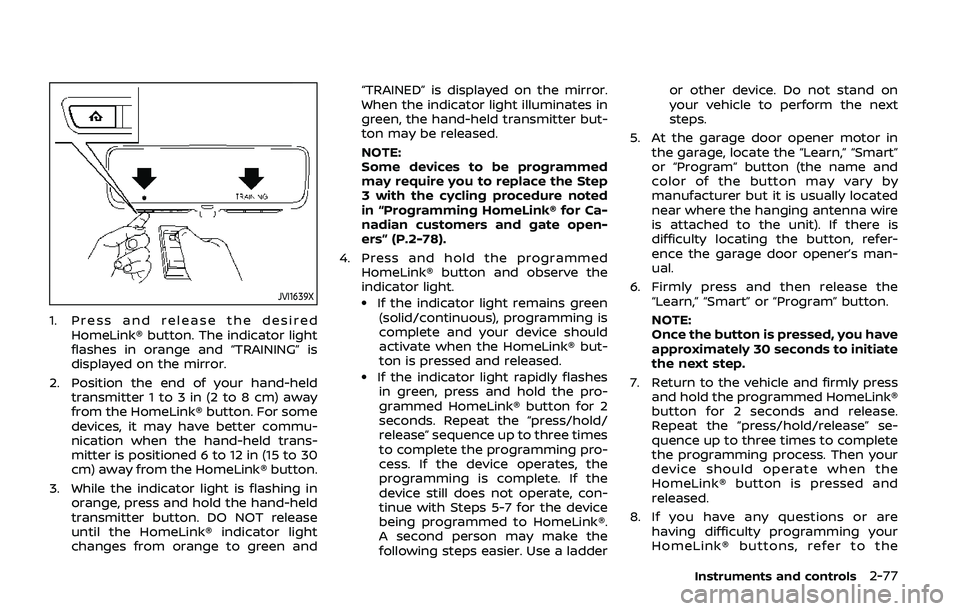
JVI1639X
1. Press and release the desiredHomeLink® button. The indicator light
flashes in orange and “TRAINING” is
displayed on the mirror.
2. Position the end of your hand-held transmitter 1 to 3 in (2 to 8 cm) away
from the HomeLink® button. For some
devices, it may have better commu-
nication when the hand-held trans-
mitter is positioned 6 to 12 in (15 to 30
cm) away from the HomeLink® button.
3. While the indicator light is flashing in orange, press and hold the hand-held
transmitter button. DO NOT release
until the HomeLink® indicator light
changes from orange to green and “TRAINED” is displayed on the mirror.
When the indicator light illuminates in
green, the hand-held transmitter but-
ton may be released.
NOTE:
Some devices to be programmed
may require you to replace the Step
3 with the cycling procedure noted
in “Programming HomeLink® for Ca-
nadian customers and gate open-
ers” (P.2-78).
4. Press and hold the programmed HomeLink® button and observe the
indicator light.
.If the indicator light remains green(solid/continuous), programming is
complete and your device should
activate when the HomeLink® but-
ton is pressed and released.
.If the indicator light rapidly flashesin green, press and hold the pro-
grammed HomeLink® button for 2
seconds. Repeat the “press/hold/
release” sequence up to three times
to complete the programming pro-
cess. If the device operates, the
programming is complete. If the
device still does not operate, con-
tinue with Steps 5-7 for the device
being programmed to HomeLink®.
A second person may make the
following steps easier. Use a ladder or other device. Do not stand on
your vehicle to perform the next
steps.
5. At the garage door opener motor in the garage, locate the “Learn,” “Smart”
or “Program” button (the name and
color of the button may vary by
manufacturer but it is usually located
near where the hanging antenna wire
is attached to the unit). If there is
difficulty locating the button, refer-
ence the garage door opener’s man-
ual.
6. Firmly press and then release the “Learn,” “Smart” or “Program” button.
NOTE:
Once the button is pressed, you have
approximately 30 seconds to initiate
the next step.
7. Return to the vehicle and firmly press and hold the programmed HomeLink®
button for 2 seconds and release.
Repeat the “press/hold/release” se-
quence up to three times to complete
the programming process. Then your
device should operate when the
HomeLink® button is pressed and
released.
8. If you have any questions or are having difficulty programming your
HomeLink® buttons, refer to the
Instruments and controls2-77
Page 172 of 536

2-78Instruments and controls
HomeLink® web site at: www.
homelink.com/nissan or call 1-800-
355-3515.
PROGRAMMING HomeLink® FOR
CANADIAN CUSTOMERS AND GATE
OPENERS
Canadian radio-frequency laws require
transmitter signals to “time-out” (or quit)
after several seconds of transmission –
which may not be long enough for
HomeLink® to pick up the signal during
programming. Similar to this Canadian
law, some U.S. gate operators are de-
signed to “time-out” in the same manner.
If you live in Canada or you are having
difficulties programming a gate operator
or garage door opener by using the
“Programming HomeLink®” procedures,
replace “Programming HomeLink®” Step
3 with the following:
NOTE:
When programming a garage door
opener, etc., unplug the device during
the “cycling” process to prevent possi-
ble damage to the device components.
Step 3: While the HomeLink® indicator
light is flashing in orange, press and
release (“cycling”) the hand-held transmit-
ter button every 2 seconds. Continue to
press and release the hand-held trans-
mitter button until the HomeLink® indi-cator light changes from orange to green.
When the indicator light illuminates in
green, hand-held transmitter button may
be released.
Proceed with “Programming HomeLink®”
step 4 to complete.
Remember to plug the device back in
when programming is completed.
OPERATING THE HomeLink® UNI-
VERSAL TRANSCEIVER
The HomeLink® Universal Transceiver,
after it is programmed, can be used to
activate the programmed device. To op-
erate, firmly press the appropriate pro-
grammed HomeLink® button. The
indicator light will illuminate in green with
three parenthesis
on the mirror
while the signal is being transmitted.
PROGRAMMING TROUBLESHOOT-
ING
If the HomeLink® does not quickly learn
the hand-held transmitter information:
. replace the hand-held transmitter
batteries with new batteries.
. position the hand-held transmitter
with its battery area facing away from
the HomeLink® button.
. press and hold the HomeLink® button
and hand-held transmitter button in
each step without interruption. .
position the hand-held transmitter 1
to 3 in (2 to 8 cm) away from the
HomeLink® button. Hold the transmit-
ter in that position for up to 15
seconds. If HomeLink® is not pro-
grammed within that time, try holding
the transmitter in another position -
for example, 6 to 12 in (15 to 30 cm)
away, keeping the HomeLink® button
in view at all times.
If you have any questions or are having
difficulty programming your HomeLink®
buttons, refer to the HomeLink® web site
at: www.homelink.com/nissan or 1-800-
355-3515.
CLEARING THE PROGRAMMED IN-
FORMATION
The following procedure clears the pro-
grammed information from three but-
tons. Individual buttons cannot be
cleared. However, individual buttons can
be reprogrammed, see “Reprogramming
a single HomeLink® button” (P.2-79).
To clear all programming
1. Press and hold the two outer HomeLink® buttons until the indicator
light begins to flash in green and
“CLEARED” is displayed on the mirror,
in approximately 10 seconds. Do not
hold for longer than 20 seconds.
Page 173 of 536
2. Release both buttons.
HomeLink® is now in the programming
mode and can be programmed at any
time beginning with “Programming
HomeLink®” - Step 1.
REPROGRAMMING A SINGLE
HomeLink® BUTTON
To reprogram a HomeLink® button, com-
plete the following.
1. Press and hold the desired HomeLink®button. DO NOT release the button.
2. The indicator light will illuminate in green, and after 20 seconds it will
begin to flash in orange and “TRAIN-
ING” is displayed on the mirror.
3. Release the HomeLink® button and proceed with “Programming
HomeLink®” — Step 3.
For questions or comments, contact
HomeLink® at: www.homelink.com/
nissan or 1-800-355-3515.
The HomeLink® button has now been
reprogrammed. The new device can be
activated by pressing the HomeLink®
button that was just programmed. This
procedure will not affect any other pro-
grammed HomeLink® buttons.
If a new device is not programmed to the
HomeLink® button, it will revert to the
previously stored programming.
USING THE GARAGE DOOR TWO-
WAY COMMUNICATION
HomeLink® has the function of commu-
nicating with garage door opener sys-
tems. If your garage door openers are
compatible with HomeLink®, the
HomeLink® can:
. receive and display “closing” or “open-
ing” status from your garage door
opener.
. recall and display the garage door
being “closed” or “opened”.
HomeLink® can receive the status from a
garage door opener at a range up to 820
ft (250 m), but it varies depending on the
environment. You may need to reduce
vehicle speed to successfully receive the
garage door opener communication.
Programming two-way communi-
cation
After programming a new HomeLink®
button, proceed with “Programming
HomeLink®” Step 6 to enable two-way
communication. If the garage door status
indicator appears on the left side on the
mirror when pressing the programmed
HomeLink® button, the two-way commu-
nication programming is complete.
JVI1640X
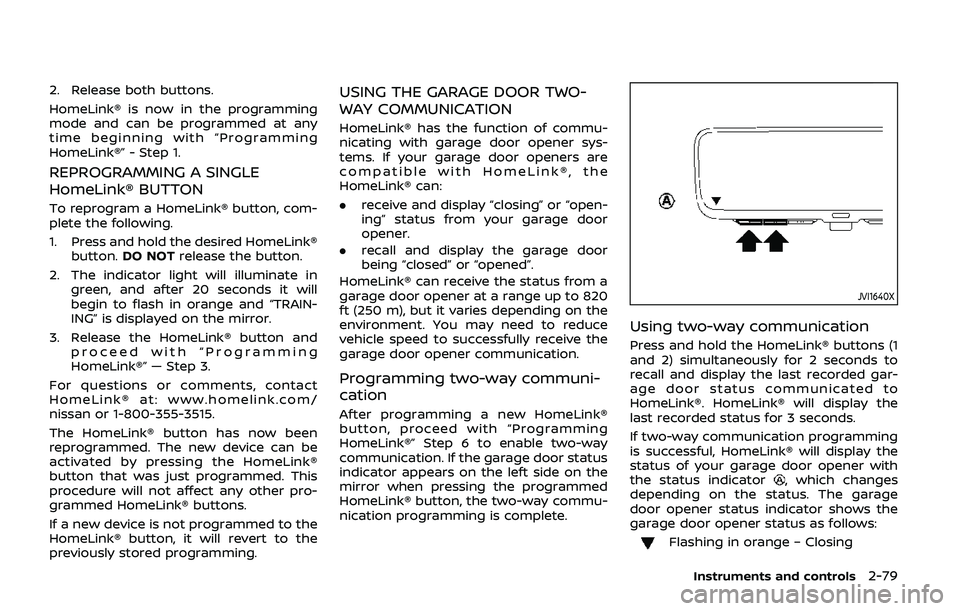
Using two-way communication
Press and hold the HomeLink® buttons (1
and 2) simultaneously for 2 seconds to
recall and display the last recorded gar-
age door status communicated to
HomeLink®. HomeLink® will display the
last recorded status for 3 seconds.
If two-way communication programming
is successful, HomeLink® will display the
status of your garage door opener with
the status indicator
, which changes
depending on the status. The garage
door opener status indicator shows the
garage door opener status as follows:
Flashing in orange – Closing
Instruments and controls2-79
Page 186 of 536
3-12Pre-driving checks and adjustments
CAUTION
The lockout protection may not
function under the following condi-
tions:
.When the Intelligent Key is placed
on top of the instrument panel.
. When the Intelligent Key is placed
inside the glove box or a storage
bin.
. When the Intelligent Key is placed
inside the door pockets.
. When the Intelligent Key is placed
inside or near metallic materials.
Unlocking doors and fuel-filler door
1. Push the door handle request switch
(driver’s or front passenger’s)or the
liftgate request switchonce while
carrying the Intelligent Key with you.
When you approach the vehicle with
the Intelligent Key, the puddle light
and the passenger cabin illumination
will illuminate and stay on for a short
period of time (if so equipped). (See
“Welcome light” (P.2-68).)
2. The hazard indicator flashes once and outside chime sounds once. The cor-
responding door will unlock. The fuel-filler door will also unlock
when the driver’s door handle request
switch is pushed.
3. Push the door handle request switch again within 60 seconds.
4. The hazard indicator flashes once and outside chime sounds once again. All
the doors will unlock.
The liftgate can be unlocked and opened
by pushing the liftgate opener switch. See
“Liftgate” (P.3-22).
All doors will be locked automatically
unless one of the following operations is
performed within 1 minute after pushing
the request switch while the doors are
locked. If during this 1-minute time period,
the request switch is pushed, all doors will
be locked automatically after another 1
minute.
. Opening any door
. Pushing the ignition switch
Power liftgate open (if so equipped)
1. Carry the Intelligent Key.
2. Push the power liftgate opener switch
.
3. The liftgate will unlock and automati- cally open.
4. The hazard indicator flashes 4 times and the outside chime sounds.
BATTERY SAVER SYSTEM
When all the following conditions are met
for a period of time, the battery saver
system will cut off the power supply to
prevent battery discharge.
.The ignition switch is in the ACC
position, and
. All doors are closed, and
. The shift lever is in the P (Park)
position.
WARNING SIGNALS
To help prevent the vehicle from moving
unexpectedly by erroneous operation of
the Intelligent Key listed on the following
chart or to help prevent the vehicle from
being stolen, chime or beep sounds inside
and outside the vehicle and a warning
displays in the vehicle information display.
When a chime or beep sounds or the
warning displays, be sure to check the
vehicle and Intelligent Key.
See “Troubleshooting guide” (P.3-13) and
“Vehicle information display” (P.2-20).
Page 187 of 536
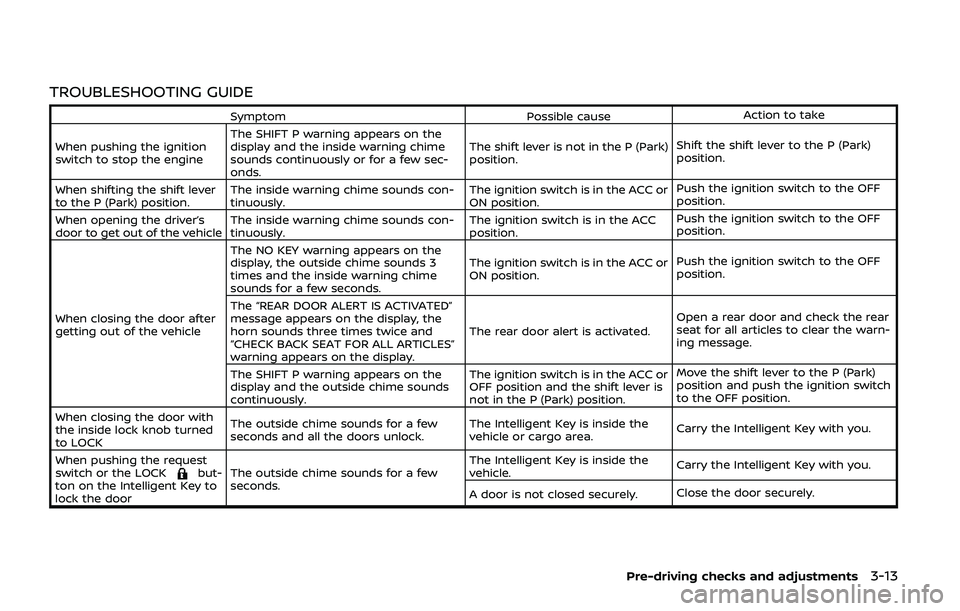
TROUBLESHOOTING GUIDE
SymptomPossible causeAction to take
When pushing the ignition
switch to stop the engine The SHIFT P warning appears on the
display and the inside warning chime
sounds continuously or for a few sec-
onds. The shift lever is not in the P (Park)
position.
Shift the shift lever to the P (Park)
position.
When shifting the shift lever
to the P (Park) position. The inside warning chime sounds con-
tinuously. The ignition switch is in the ACC or
ON position.Push the ignition switch to the OFF
position.
When opening the driver’s
door to get out of the vehicle The inside warning chime sounds con-
tinuously. The ignition switch is in the ACC
position.Push the ignition switch to the OFF
position.
When closing the door after
getting out of the vehicle The NO KEY warning appears on the
display, the outside chime sounds 3
times and the inside warning chime
sounds for a few seconds.
The ignition switch is in the ACC or
ON position.
Push the ignition switch to the OFF
position.
The “REAR DOOR ALERT IS ACTIVATED”
message appears on the display, the
horn sounds three times twice and
“CHECK BACK SEAT FOR ALL ARTICLES”
warning appears on the display. The rear door alert is activated.
Open a rear door and check the rear
seat for all articles to clear the warn-
ing message.
The SHIFT P warning appears on the
display and the outside chime sounds
continuously. The ignition switch is in the ACC or
OFF position and the shift lever is
not in the P (Park) position.Move the shift lever to the P (Park)
position and push the ignition switch
to the OFF position.
When closing the door with
the inside lock knob turned
to LOCK The outside chime sounds for a few
seconds and all the doors unlock.
The Intelligent Key is inside the
vehicle or cargo area.
Carry the Intelligent Key with you.
When pushing the request
switch or the LOCK
but-
ton on the Intelligent Key to
lock the door The outside chime sounds for a few
seconds. The Intelligent Key is inside the
vehicle.
Carry the Intelligent Key with you.
A door is not closed securely. Close the door securely.
Pre-driving checks and adjustments3-13
Page 188 of 536
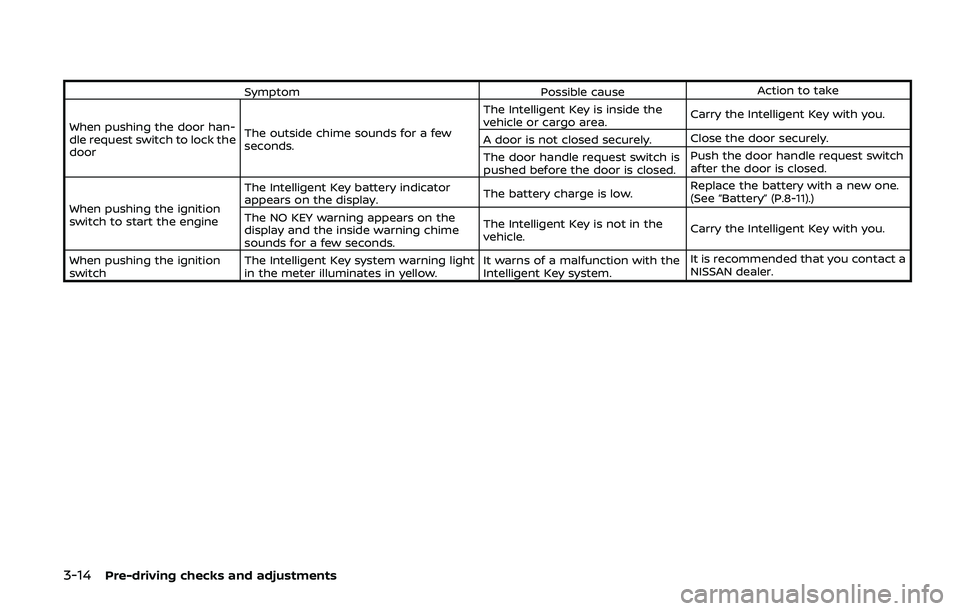
3-14Pre-driving checks and adjustments
SymptomPossible causeAction to take
When pushing the door han-
dle request switch to lock the
door The outside chime sounds for a few
seconds. The Intelligent Key is inside the
vehicle or cargo area.
Carry the Intelligent Key with you.
A door is not closed securely. Close the door securely.
The door handle request switch is
pushed before the door is closed. Push the door handle request switch
after the door is closed.
When pushing the ignition
switch to start the engine The Intelligent Key battery indicator
appears on the display.
The battery charge is low.Replace the battery with a new one.
(See “Battery” (P.8-11).)
The NO KEY warning appears on the
display and the inside warning chime
sounds for a few seconds. The Intelligent Key is not in the
vehicle.
Carry the Intelligent Key with you.
When pushing the ignition
switch The Intelligent Key system warning light
in the meter illuminates in yellow. It warns of a malfunction with the
Intelligent Key system.It is recommended that you contact a
NISSAN dealer.
Page 195 of 536
.The remote engine startbutton is
not pushed and held within 5 seconds
of pushing the “LOCK”
button.
. The brake pedal is depressed.
. The doors are not closed and locked.
. The liftgate is open.
. The Intelligent Key system warning
light remains on in the vehicle infor-
mation display.
. An Intelligent Key is left inside the
vehicle.
. The theft alarm sounds due to illegal
entry into the vehicle.
. Two remote engine starts, or a single
remote engine start with an exten-
sion, have already been used.
. The shift lever is not in the P (Park)
position.
The remote engine start may display a
warning or indicator in the vehicle infor-
mation display. For an explanation of the
warning or indicator, see “Operational
indicators” (P.2-23).
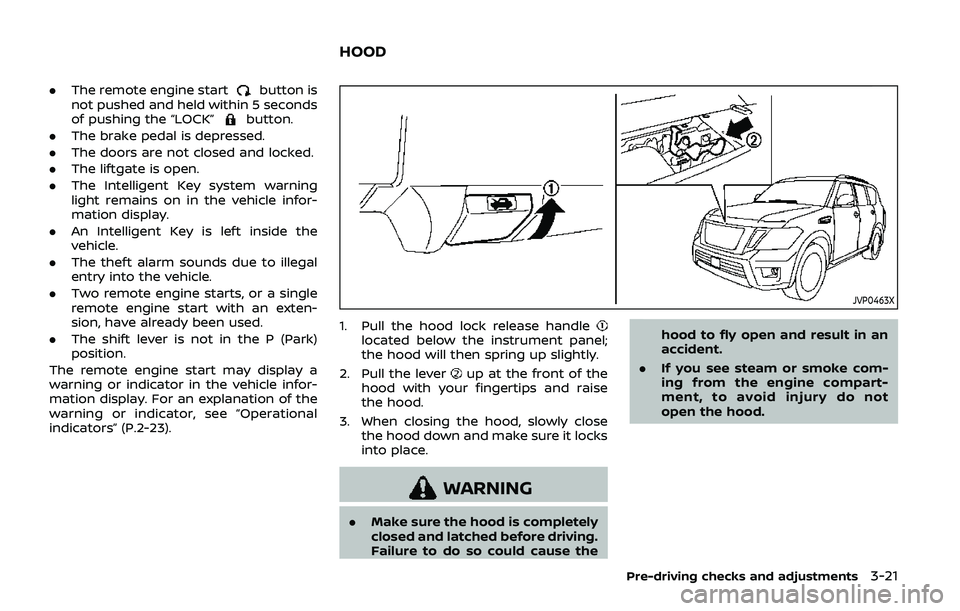
JVP0463X
1. Pull the hood lock release handlelocated below the instrument panel;
the hood will then spring up slightly.
2. Pull the lever
up at the front of the
hood with your fingertips and raise
the hood.
3. When closing the hood, slowly close the hood down and make sure it locks
into place.
WARNING
.Make sure the hood is completely
closed and latched before driving.
Failure to do so could cause the hood to fly open and result in an
accident.
. If you see steam or smoke com-
ing from the engine compart-
ment, to avoid injury do not
open the hood.
Pre-driving checks and adjustments3-21
HOOD