2019 NISSAN ARMADA 4WD
[x] Cancel search: 4WDPage 388 of 536
5-128Starting and driving
will either remain illuminated or blink.
If the 4WD warning light comes on, the
4WD shift indicator turns off.
High-temperature transfer case oil makes
the 4WD warning light blink rapidly (about
twice per second). If the warning light
blinks rapidly during operation, stop the
vehicle in a safe place immediately. Then
if the light turns off after a while, you can
continue driving.
A large difference between the diameters
of front and rear wheels will make the
4WD warning light blink slowly (about
once per two seconds). Change the 4WD
shift switch to AUTO and do not drive fast.
CAUTION
.If the 4WD warning light comes
on or blinks slowly during opera-
tion or rapidly after stopping the
vehicle for a while, have your
vehicle checked as soon as pos-
sible. It is recommended you visit
a NISSAN dealer for this service.
. Shifting between 4HI and 4LO is
not recommended when the 4WD
warning light turns on.
. When the 4WD warning light
comes on, the 2WD mode may be engaged even if the 4WD shift
switch is in AUTO or 4H. Be
especially careful when driving. If
corresponding parts are malfunc-
tioning, the 4WD mode will not be
engaged even if the 4WD shift
switch is shifted.
. Do not drive the vehicle in the 4HI
or 4LO position on dry hard sur-
face roads. Driving on dry, hard
surfaces in 4HI or 4LO may cause
unnecessary noise, tire wear and
increased fuel consumption.
If the 4WD warning light turns on
when driving on dry hard surface
roads:
— in the AUTO or 4HI position,
shift the 4WD shift switch to
AUTO.
— in the 4LO position, stop the vehicle and shift the transmis-
sion shift lever to the N (Neu-
tral) position and shift the
4WD shift switch to AUTO.
. If the 4WD warning light is still on
after the above operation, have
your vehicle checked as soon as
possible. It is recommended you
visit a NISSAN dealer for this
service. .
The transfer case may be da-
maged if you continue driving
with the warning light blinking.
Page 398 of 536

5-138Starting and driving
The Vehicle Dynamic Control (VDC) sys-
tem uses various sensors to monitor
driver inputs and vehicle motion. Under
certain driving conditions, the VDC sys-
tem helps to perform the following func-
tions.
.Controls brake pressure to reduce
wheel slip on one slipping drive wheel
so power is transferred to a non
slipping drive wheel on the same axle.
. Controls brake pressure and engine
output to reduce drive wheel slip
based on vehicle speed (traction con-
trol function).
. Controls brake pressure at individual
wheels and engine output to help the
driver maintain control of the vehicle
in the following conditions:
— understeer (vehicle tends to not
follow the steered path despite
increased steering input)
— oversteer (vehicle tends to spin due to certain road or driving condi-
tions).
The VDC system can help the driver to
maintain control of the vehicle, but it
cannot prevent loss of vehicle control in
all driving situations.
When the VDC system operates, the VDC
warning light
in the instrument panel
flashes so note the following: .
The road may be slippery or the
system may determine some action
is required to help keep the vehicle on
the steered path.
. You may feel a pulsation in the brake
pedal and hear a noise or vibration
from under the hood. This is normal
and indicates that the VDC system is
working properly.
. Adjust your speed and driving to the
road conditions.
If a malfunction occurs in the system, the
VDC warning light
illuminates in the
instrument panel. The VDC system auto-
matically turns off.
The VDC OFF switch is used to turn off the
VDC system. The VDC off indicator
illuminates to indicate the VDC system is
off. When the VDC switch is used to turn
off the system, the VDC system still
operates to prevent one drive wheel from
slipping by transferring power to a non
slipping drive wheel. The VDC warning
light
flashes if this occurs. All other
VDC functions are off, and the VDC
warning light
will not flash. The VDC
system is automatically reset to on when
the ignition switch is placed in the OFF
position then back to the ON position.
When the 4L position is selected with the
4WD shift switch, the VDC system is
disabled and the VDC off indicator light illuminates (for 4WD models).
See “Vehicle Dynamic Control (VDC) warn-
ing light” (P.2-17) and “Vehicle Dynamic
Control (VDC) off indicator light” (P.2-20).
The computer has a built-in diagnostic
feature that tests the system each time
you start the engine and move the vehicle
forward or in reverse at a slow speed.
When the self-test occurs, you may hear a
“clunk” noise and/or feel a pulsation in the
brake pedal. This is normal and is not an
indication of a malfunction.
WARNING
.
The VDC system is designed to
help improve driving stability but
does not prevent accidents due
to abrupt steering operation at
high speeds or by careless or
dangerous driving techniques.
Reduce vehicle speed and be
especially careful when driving
and cornering on slippery sur-
faces and always drive carefully.
. Do not modify the vehicle’s sus-
pension. If suspension parts such
as shock absorbers, struts,
springs, stabilizer bars, bushings
and wheels are not NISSAN re-
commended for your vehicle or
VEHICLE DYNAMIC CONTROL (VDC) SYSTEM
Page 403 of 536
6 In case of emergency
Hazard warning flasher switch ......................................... 6-2
Roadside assistance program ........................................... 6-2
Emergency engine shut off .................................................. 6-3
Flat tire ........................................................................\
.......................... 6-3Tire Pressure Monitoring System (TPMS) .......... 6-3
Changing a flat tire .............................................................. 6-4
Jump starting ........................................................................\
....... 6-12
Push starting ........................................................................\
......... 6-14 If your vehicle overheats .................................................... 6-14
Towing your vehicle ............................................................... 6-16
Towing recommended by NISSAN ..................... 6-17
Vehicle recovery (freeing a stuck vehicle) ...... 6-19
Four-Wheel Drive (4WD) manual shifting
(4WD models) ........................................................................\
....... 6-20
When 4WD warning light illuminates ............... 6-20
Operating procedure ..................................................... 6-21
Page 420 of 536
6-18In case of emergency
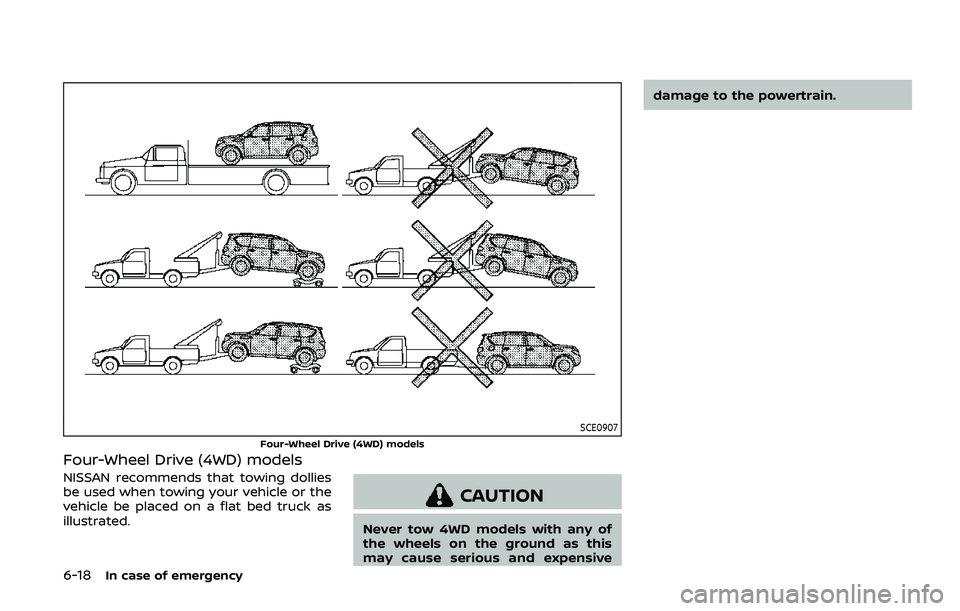
SCE0907
Four-Wheel Drive (4WD) models
Four-Wheel Drive (4WD) models
NISSAN recommends that towing dollies
be used when towing your vehicle or the
vehicle be placed on a flat bed truck as
illustrated.
CAUTION
Never tow 4WD models with any of
the wheels on the ground as this
may cause serious and expensivedamage to the powertrain.
Page 422 of 536
6-20In case of emergency
4. Slowly rock the vehicle forward andbackward.
.Shift back and forth between R(Reverse) and D (Drive).
.Apply the accelerator as little as possible to maintain the rocking
motion.
.Release the accelerator pedal be-
fore shifting between R and D.
.Do not spin the tires above 35 MPH(55 km/h).
5. If the vehicle cannot be freed after a few tries, contact a professional tow-
ing service to remove the vehicle. This section describes the procedure for
manually shifting the vehicle into the 4WD
mode (4L position) in case of an emer-
gency.
WHEN 4WD WARNING LIGHT ILLU-
MINATES
If the 4WD warning light illuminates while
driving, there may be a malfunction in the
4WD system. Stop the vehicle and have
the vehicle checked as soon as possible. It
is recommended you contact a NISSAN
dealer for this service. (See “NISSAN all-
mode 4WD®” (P.5-121).)
When the vehicle is stuck on an uneven
road (desert, mud, etc.) and the 4WD
warning light is illuminated, be sure to
place the 4WD shift switch in the 4L
position. If only the rear wheels are
spinning, this means that the transfer
has not switched to the 4L position
electrically.
If this situation occurs, contact a dealer or
road assistance service for help. If an
immediate service is not available, per-
form the following procedure to switch to
the 4L position manually and free the
vehicle.
CAUTION
Only perform this procedure in an
emergency.
If the vehicle is driven for a long
period of time over a long distance
with a component detached, foreign
material such as water, sand, etc.
may enter from the opening and this
may cause a malfunction in the
drivetrain system. After freeing a
vehicle that has become stuck, it is
recommended you contact a NISSAN
dealer for inspection and repair.
WARNING
.
Ensure your safety before per-
forming the operations. The ve-
hicle may move unexpectedly.
. Place the ignition switch in the
OFF position, apply the parking
brake and let the vehicle cool
down.
. Do not perform the following
procedure immediately after
driving the vehicle. Parts such as
exhaust components, the trans-
FOUR-WHEEL DRIVE (4WD)
MANUAL SHIFTING (4WD models)
Page 423 of 536
mission, etc. are very hot and
may cause a burn injury.
. Make sure that the parts that will
be operated as well as related
parts cool down before perform-
ing the operation.
. Burrs or projecting portions of
metal components may cause
unexpected injury to your fingers
or arms. Pay special attention in
regard to your safety while re-
moving and installing these
parts. Wear work gloves and pro-
tective arm covers.
CAUTION
While removing and installing the
parts, prevent the removed parts
from getting dirty with water, dirt or
sand. Protect the parts using a cover
such as a clean cloth, etc.
OPERATING PROCEDURE
Place the ignition switch in the OFF
position and apply the parking brake. Let
the vehicle cool down before performing
the following procedure.
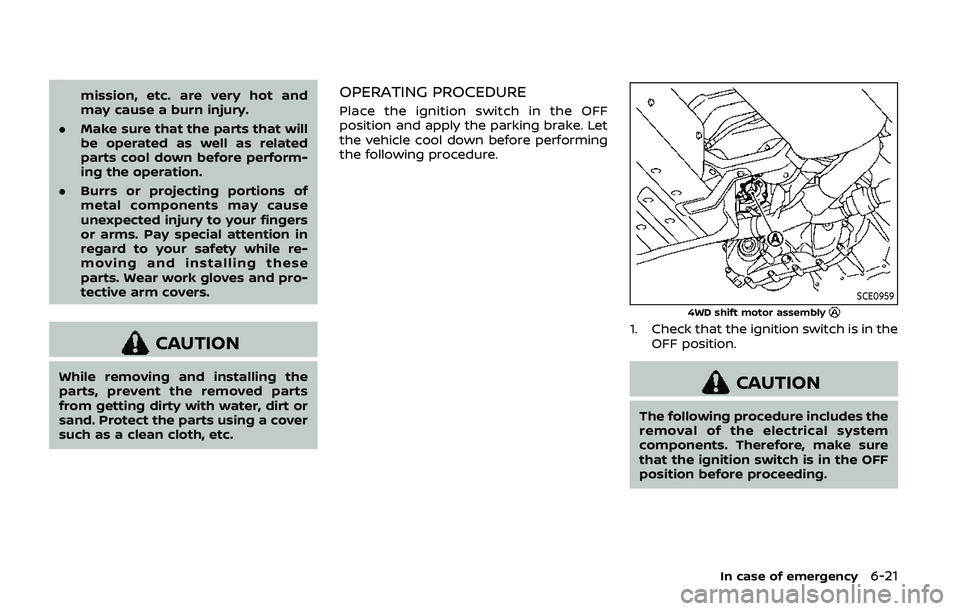
SCE0959
4WD shift motor assembly
1. Check that the ignition switch is in the
OFF position.
CAUTION
The following procedure includes the
removal of the electrical system
components. Therefore, make sure
that the ignition switch is in the OFF
position before proceeding.
In case of emergency6-21
Page 424 of 536
6-22In case of emergency
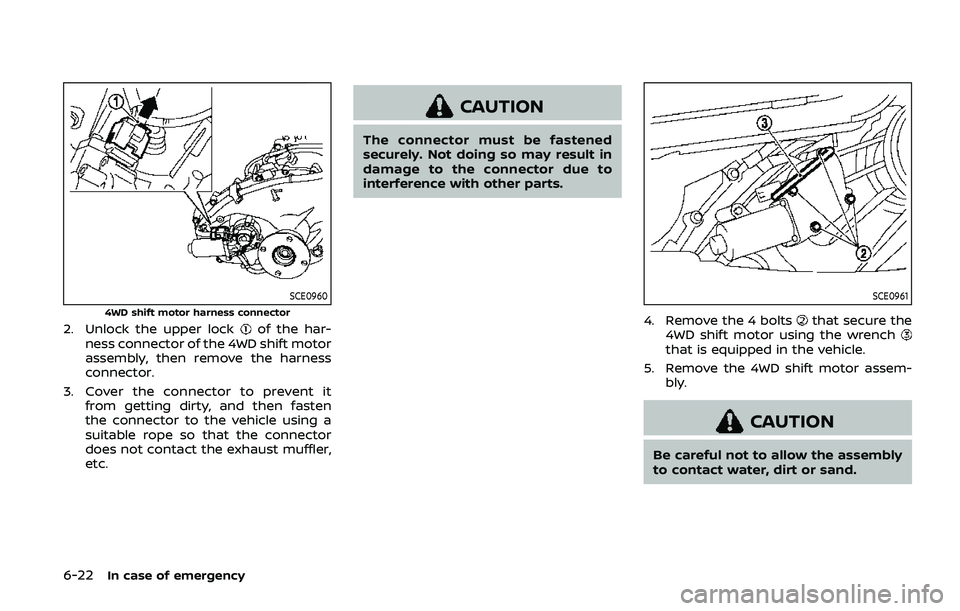
SCE0960
4WD shift motor harness connector
2. Unlock the upper lockof the har-
ness connector of the 4WD shift motor
assembly, then remove the harness
connector.
3. Cover the connector to prevent it from getting dirty, and then fasten
the connector to the vehicle using a
suitable rope so that the connector
does not contact the exhaust muffler,
etc.
CAUTION
The connector must be fastened
securely. Not doing so may result in
damage to the connector due to
interference with other parts.
SCE0961
4. Remove the 4 boltsthat secure the
4WD shift motor using the wrench
that is equipped in the vehicle.
5. Remove the 4WD shift motor assem- bly.
CAUTION
Be careful not to allow the assembly
to contact water, dirt or sand.
Page 425 of 536
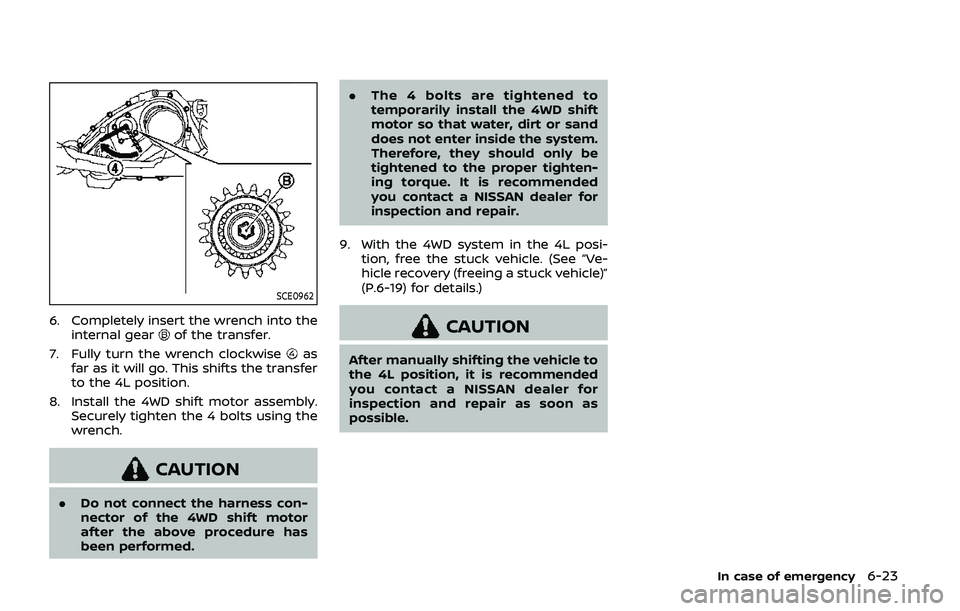
SCE0962
6. Completely insert the wrench into theinternal gearof the transfer.
7. Fully turn the wrench clockwise
as
far as it will go. This shifts the transfer
to the 4L position.
8. Install the 4WD shift motor assembly. Securely tighten the 4 bolts using the
wrench.
CAUTION
.Do not connect the harness con-
nector of the 4WD shift motor
after the above procedure has
been performed. .
The 4 bolts are tightened to
temporarily install the 4WD shift
motor so that water, dirt or sand
does not enter inside the system.
Therefore, they should only be
tightened to the proper tighten-
ing torque. It is recommended
you contact a NISSAN dealer for
inspection and repair.
9. With the 4WD system in the 4L posi- tion, free the stuck vehicle. (See “Ve-
hicle recovery (freeing a stuck vehicle)”
(P.6-19) for details.)
CAUTION
After manually shifting the vehicle to
the 4L position, it is recommended
you contact a NISSAN dealer for
inspection and repair as soon as
possible.
In case of emergency6-23