2019 NISSAN ARMADA warning
[x] Cancel search: warningPage 201 of 536
SPA2752
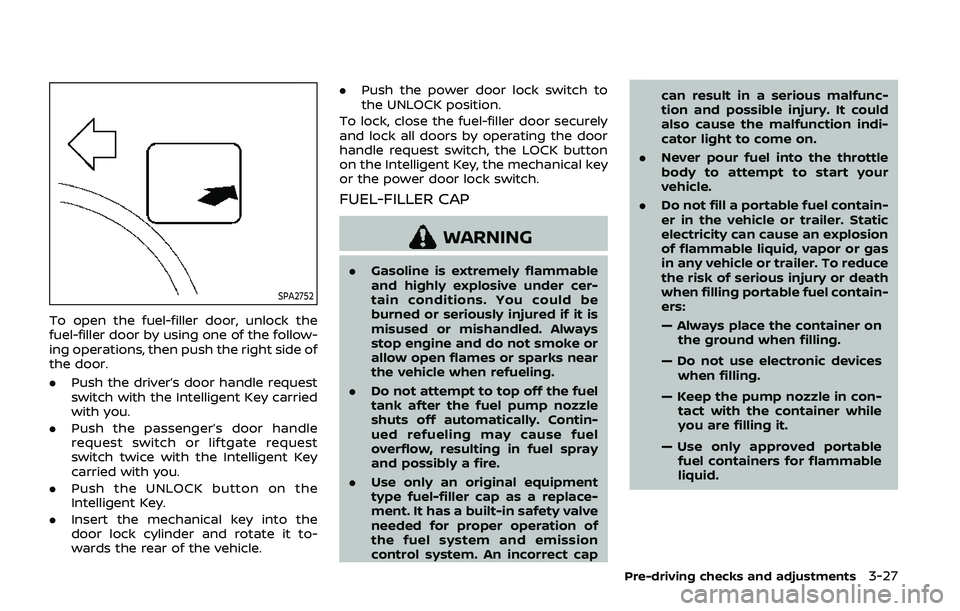
To open the fuel-filler door, unlock the
fuel-filler door by using one of the follow-
ing operations, then push the right side of
the door.
.Push the driver’s door handle request
switch with the Intelligent Key carried
with you.
. Push the passenger’s door handle
request switch or liftgate request
switch twice with the Intelligent Key
carried with you.
. Push the UNLOCK button on the
Intelligent Key.
. Insert the mechanical key into the
door lock cylinder and rotate it to-
wards the rear of the vehicle. .
Push the power door lock switch to
the UNLOCK position.
To lock, close the fuel-filler door securely
and lock all doors by operating the door
handle request switch, the LOCK button
on the Intelligent Key, the mechanical key
or the power door lock switch.
FUEL-FILLER CAP
WARNING
. Gasoline is extremely flammable
and highly explosive under cer-
tain conditions. You could be
burned or seriously injured if it is
misused or mishandled. Always
stop engine and do not smoke or
allow open flames or sparks near
the vehicle when refueling.
. Do not attempt to top off the fuel
tank after the fuel pump nozzle
shuts off automatically. Contin-
ued refueling may cause fuel
overflow, resulting in fuel spray
and possibly a fire.
. Use only an original equipment
type fuel-filler cap as a replace-
ment. It has a built-in safety valve
needed for proper operation of
the fuel system and emission
control system. An incorrect cap can result in a serious malfunc-
tion and possible injury. It could
also cause the malfunction indi-
cator light to come on.
. Never pour fuel into the throttle
body to attempt to start your
vehicle.
. Do not fill a portable fuel contain-
er in the vehicle or trailer. Static
electricity can cause an explosion
of flammable liquid, vapor or gas
in any vehicle or trailer. To reduce
the risk of serious injury or death
when filling portable fuel contain-
ers:
— Always place the container on
the ground when filling.
— Do not use electronic devices when filling.
— Keep the pump nozzle in con- tact with the container while
you are filling it.
— Use only approved portable fuel containers for flammable
liquid.
Pre-driving checks and adjustments3-27
Page 202 of 536
3-28Pre-driving checks and adjustments
CAUTION
.If fuel is spilled on the vehicle
body, flush it away with water to
avoid paint damage.
. Insert the cap straight into the
fuel-filler tube, then tighten until
the fuel-filler cap clicks. Failure to
tighten the fuel-filler cap properly
may cause the
malfunction
indicator light (MIL) to illuminate.
If the
light illuminates be-
cause the fuel-filler cap is loose
or missing, tighten or install the
cap and continue to drive the
vehicle. The
light should turn
off after a few driving trips. If the
light does not turn off after a
few driving trips, have the vehicle
inspected. It is recommended you
visit a NISSAN dealer for this
service.
. The LOOSE FUEL CAP warning will
appear if the fuel-filler cap is not
properly tightened. It may take a
few driving trips for the message
to be displayed. Failure to tighten
the fuel-filler cap properly after
the LOOSE FUEL CAP warning
appears may cause the
Mal-
function Indicator Light (MIL) to illuminate.
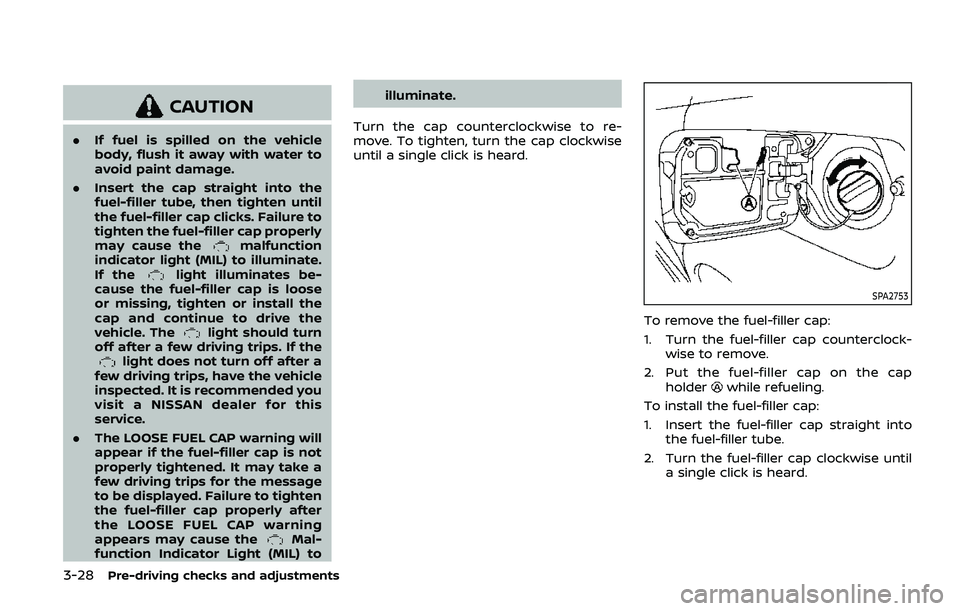
Turn the cap counterclockwise to re-
move. To tighten, turn the cap clockwise
until a single click is heard.
SPA2753
To remove the fuel-filler cap:
1. Turn the fuel-filler cap counterclock- wise to remove.
2. Put the fuel-filler cap on the cap holder
while refueling.
To install the fuel-filler cap:
1. Insert the fuel-filler cap straight into the fuel-filler tube.
2. Turn the fuel-filler cap clockwise until a single click is heard.
Page 203 of 536
SPA2815
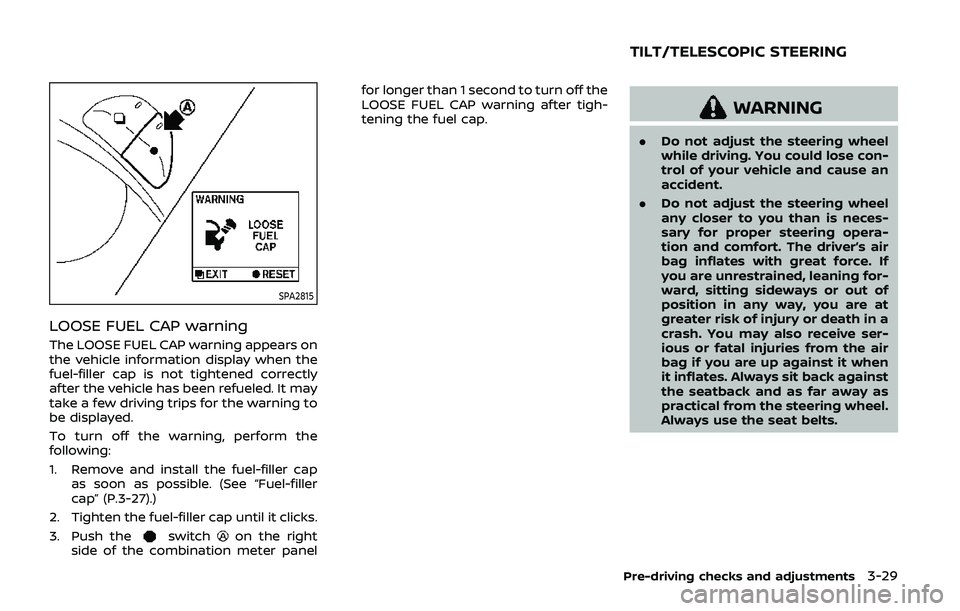
LOOSE FUEL CAP warning
The LOOSE FUEL CAP warning appears on
the vehicle information display when the
fuel-filler cap is not tightened correctly
after the vehicle has been refueled. It may
take a few driving trips for the warning to
be displayed.
To turn off the warning, perform the
following:
1. Remove and install the fuel-filler capas soon as possible. (See “Fuel-filler
cap” (P.3-27).)
2. Tighten the fuel-filler cap until it clicks.
3. Push the
switchon the right
side of the combination meter panel for longer than 1 second to turn off the
LOOSE FUEL CAP warning after tigh-
tening the fuel cap.
WARNING
.
Do not adjust the steering wheel
while driving. You could lose con-
trol of your vehicle and cause an
accident.
. Do not adjust the steering wheel
any closer to you than is neces-
sary for proper steering opera-
tion and comfort. The driver’s air
bag inflates with great force. If
you are unrestrained, leaning for-
ward, sitting sideways or out of
position in any way, you are at
greater risk of injury or death in a
crash. You may also receive ser-
ious or fatal injuries from the air
bag if you are up against it when
it inflates. Always sit back against
the seatback and as far away as
practical from the steering wheel.
Always use the seat belts.
Pre-driving checks and adjustments3-29
TILT/TELESCOPIC STEERING
Page 205 of 536
SPA2447
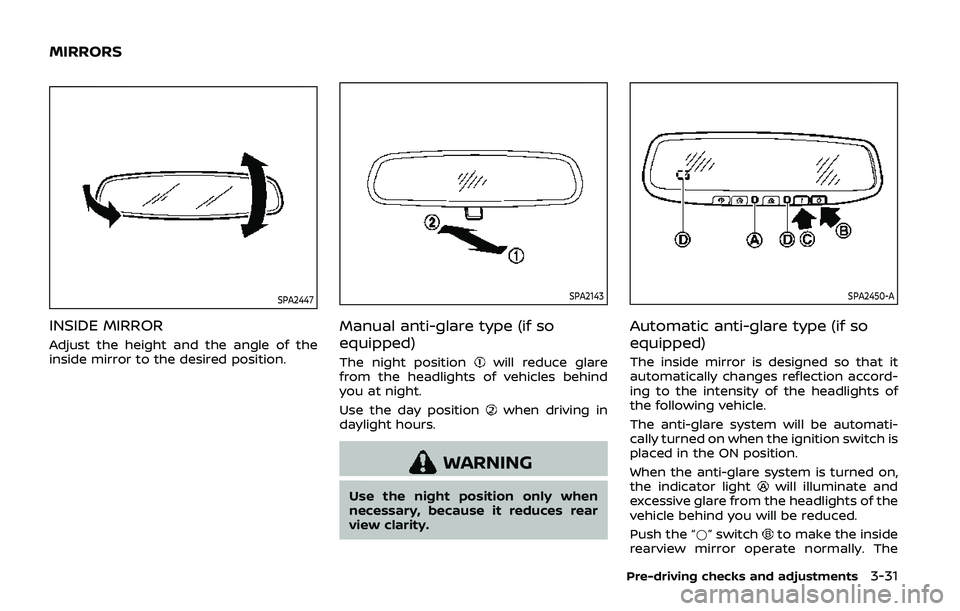
INSIDE MIRROR
Adjust the height and the angle of the
inside mirror to the desired position.
SPA2143
Manual anti-glare type (if so
equipped)
The night positionwill reduce glare
from the headlights of vehicles behind
you at night.
Use the day position
when driving in
daylight hours.
WARNING
Use the night position only when
necessary, because it reduces rear
view clarity.
SPA2450-A
Automatic anti-glare type (if so
equipped)
The inside mirror is designed so that it
automatically changes reflection accord-
ing to the intensity of the headlights of
the following vehicle.
The anti-glare system will be automati-
cally turned on when the ignition switch is
placed in the ON position.
When the anti-glare system is turned on,
the indicator light
will illuminate and
excessive glare from the headlights of the
vehicle behind you will be reduced.
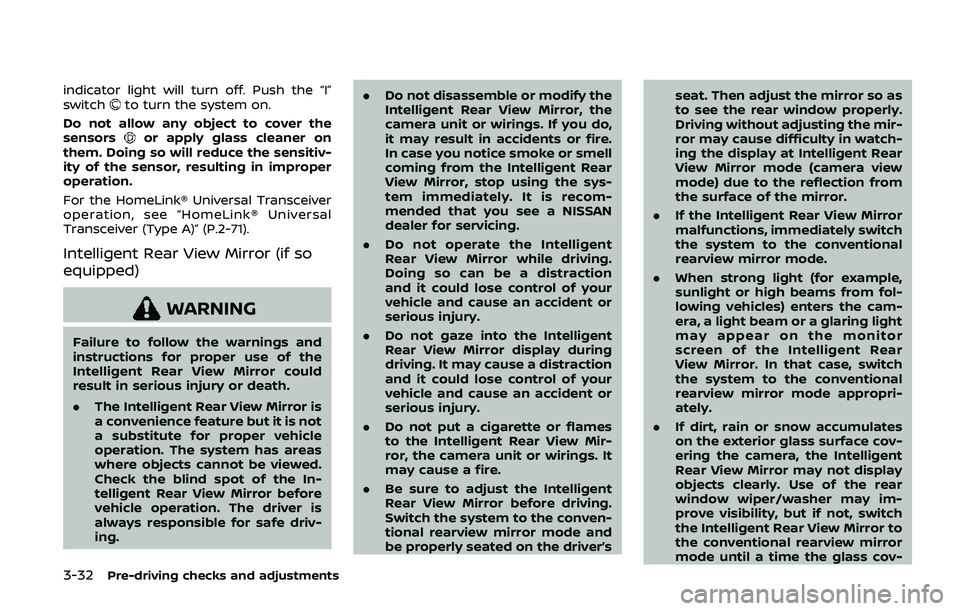
Push the “*” switch
to make the inside
rearview mirror operate normally. The
Pre-driving checks and adjustments3-31
MIRRORS
Page 206 of 536
3-32Pre-driving checks and adjustments
indicator light will turn off. Push the “I”
switchto turn the system on.
Do not allow any object to cover the
sensors
or apply glass cleaner on
them. Doing so will reduce the sensitiv-
ity of the sensor, resulting in improper
operation.
For the HomeLink® Universal Transceiver
operation, see “HomeLink® Universal
Transceiver (Type A)” (P.2-71).
Intelligent Rear View Mirror (if so
equipped)
WARNING
Failure to follow the warnings and
instructions for proper use of the
Intelligent Rear View Mirror could
result in serious injury or death.
. The Intelligent Rear View Mirror is
a convenience feature but it is not
a substitute for proper vehicle
operation. The system has areas
where objects cannot be viewed.
Check the blind spot of the In-
telligent Rear View Mirror before
vehicle operation. The driver is
always responsible for safe driv-
ing. .
Do not disassemble or modify the
Intelligent Rear View Mirror, the
camera unit or wirings. If you do,
it may result in accidents or fire.
In case you notice smoke or smell
coming from the Intelligent Rear
View Mirror, stop using the sys-
tem immediately. It is recom-
mended that you see a NISSAN
dealer for servicing.
. Do not operate the Intelligent
Rear View Mirror while driving.
Doing so can be a distraction
and it could lose control of your
vehicle and cause an accident or
serious injury.
. Do not gaze into the Intelligent
Rear View Mirror display during
driving. It may cause a distraction
and it could lose control of your
vehicle and cause an accident or
serious injury.
. Do not put a cigarette or flames
to the Intelligent Rear View Mir-
ror, the camera unit or wirings. It
may cause a fire.
. Be sure to adjust the Intelligent
Rear View Mirror before driving.
Switch the system to the conven-
tional rearview mirror mode and
be properly seated on the driver’s seat. Then adjust the mirror so as
to see the rear window properly.
Driving without adjusting the mir-
ror may cause difficulty in watch-
ing the display at Intelligent Rear
View Mirror mode (camera view
mode) due to the reflection from
the surface of the mirror.
. If the Intelligent Rear View Mirror
malfunctions, immediately switch
the system to the conventional
rearview mirror mode.
. When strong light (for example,
sunlight or high beams from fol-
lowing vehicles) enters the cam-
era, a light beam or a glaring light
may appear on the monitor
screen of the Intelligent Rear
View Mirror. In that case, switch
the system to the conventional
rearview mirror mode appropri-
ately.
. If dirt, rain or snow accumulates
on the exterior glass surface cov-
ering the camera, the Intelligent
Rear View Mirror may not display
objects clearly. Use of the rear
window wiper/washer may im-
prove visibility, but if not, switch
the Intelligent Rear View Mirror to
the conventional rearview mirror
mode until a time the glass cov-
Page 212 of 536
3-38Pre-driving checks and adjustments
.The color of an object in the distance
or in the dark may be difficult to be
recognized. This is not a malfunc-
tion.
System maintenance (Intelligent Rear
View Mirror):
. Always keep the mirror and camera
area of the rear window clean.
. Clean the mirror and the camera lens
with a dry soft cloth.
. When clean the camera area of the
rear window, using a soft cloth dam-
pend with water and a few neutral
detergent. And after, the dry it up with
dry soft cloth.
. If the image on the Intelligent Rear
View Mirror display screen is still un-
clear even after cleaning the camera
area of the rear window, an oil film
may be adhering to the rear window
glass. Clean the rear window glass
with an oil film remover.
. Never use alcohol, benzine, thinner, or
any similar material to clean the
mirror or camera lens. It will cause a
discoloration, deterioration or a sys-
tem malfunction.
. Do not attach a sticker (including
transparent material) on the camera
area of the rear window.OUTSIDE MIRRORS
WARNING
.Objects viewed in the outside
mirror on the passenger side are
closer than they appear. Be care-
ful when moving to the right.
Using only this mirror could cause
an accident. Use the inside mirror
or glance over your shoulder to
properly judge distances to other
objects.
. Do not adjust the mirrors while
driving. You could lose control of
your vehicle and cause an acci-
dent.
SPA2739
Adjusting outside mirrors
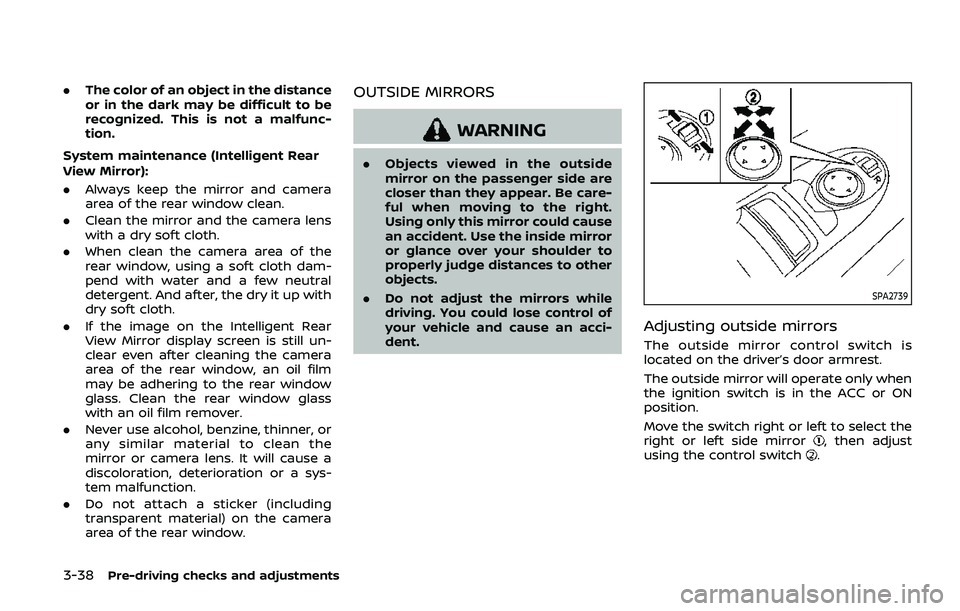
The outside mirror control switch is
located on the driver’s door armrest.
The outside mirror will operate only when
the ignition switch is in the ACC or ON
position.
Move the switch right or left to select the
right or left side mirror
, then adjust
using the control switch.
Page 218 of 536
4-2Monitor, heater, air conditioner, audio, phone and voice recognition systems
For models with NissanConnect® with
Navigation (if so equipped) and Services
(if so equipped), refer to the NissanCon-
nect® Owner’s Manual regarding the fol-
lowing information.
.Audio system
. Bluetooth® Hands-Free Phone
. NissanConnect® Services
. SiriusXM Traffic
TM
.SiriusXM® Travel Link
. SiriusXM® Satellite Radio
. Navigation system
. Voice Recognition System
. Information and settings viewable on
NissanConnect®
WARNING
.Do not disassemble or modify
this system. If you do, it may
result in accidents, fire, or electric
shock.
. Do not use this system if you
notice any abnormality, such as
a frozen screen or lack of sound.
Continued use of the system may
result in accident, fire or electric
shock.
. In case you notice any foreign
object in the system hardware,
spill liquid on it, or notice smoke
or smell coming from it, stop
using the system immediately. It
is recommended you visit a
NISSAN dealer for servicing.
Ignoring such conditions may
lead to accidents, fire, or electric
shock.
. Park the vehicle in a safe location
and apply the parking brake to
view the images on the front
center display screen.
CAUTION
Do not use the system when the
engine is not running for extended
periods of time to prevent battery
discharge.
Do not attempt to operate the system in
extreme temperature conditions [below
−4°F (−20°C) and above 158°F (70°C)].
Operating this system under these con-
ditions may result in system malfunc-
tions.
NISSANCONNECT® OWNER’S MANUALSAFETY NOTE
Page 219 of 536
JVH1688X
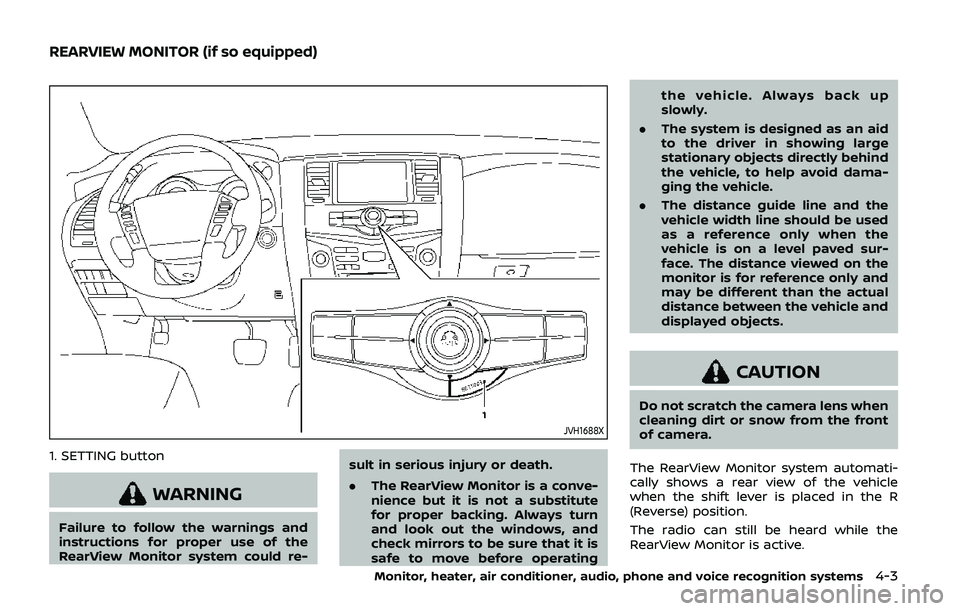
1. SETTING button
WARNING
Failure to follow the warnings and
instructions for proper use of the
RearView Monitor system could re-sult in serious injury or death.
.
The RearView Monitor is a conve-
nience but it is not a substitute
for proper backing. Always turn
and look out the windows, and
check mirrors to be sure that it is
safe to move before operating the vehicle. Always back up
slowly.
. The system is designed as an aid
to the driver in showing large
stationary objects directly behind
the vehicle, to help avoid dama-
ging the vehicle.
. The distance guide line and the
vehicle width line should be used
as a reference only when the
vehicle is on a level paved sur-
face. The distance viewed on the
monitor is for reference only and
may be different than the actual
distance between the vehicle and
displayed objects.
CAUTION
Do not scratch the camera lens when
cleaning dirt or snow from the front
of camera.
The RearView Monitor system automati-
cally shows a rear view of the vehicle
when the shift lever is placed in the R
(Reverse) position.
The radio can still be heard while the
RearView Monitor is active.
Monitor, heater, air conditioner, audio, phone and voice recognition systems4-3
REARVIEW MONITOR (if so equipped)